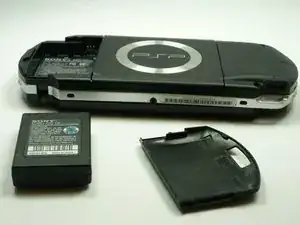
Introduzione

Questa guida ti aiuterà a sostituire lo schermo LCD se è stato rotto o danneggiato.

  1. QacnKmgPd5vO4EVM
    • Capovolgi la PSP in modo tale da avere il retro davanti a te.

  2. KfhYCVXbuwocyXOJ
    KfhYCVXbuwocyXOJ
    ET6LQanHrAYARDNK
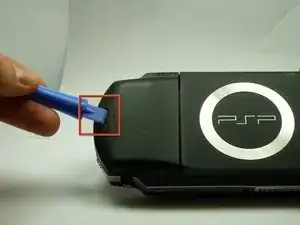
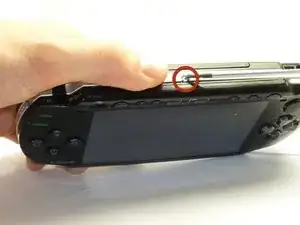
    • Cerca il bottone del coperchio della batteria a sinistra sul retro della PSP.

    • Premi il bottone e rimuovi il coperchio.

    You are dumbbb... BRO YOUR DUMB BC U DIDNT HAVE TO USE A TOOL TO OPEN THE DOOR. USE YOUR FINGER""

    Paulo Moments -

    The battery door can be damaged dont use a tool

    Paulo Moments -

    That also happend to me it got destroyed by screwdriver

    Paulo Moments -

  3. ISXv3lrW12xLWbnR
    ISXv3lrW12xLWbnR
    2m4TOHnIVUoYXWUA
    • Usando un dito, rimuovi la batteria tenendo la console come mostrato nell'immagine.

    The use of the opening tool is completely unnecessary. There is a finger actuated opening latch button that says “PUSH” on it. Simply press down with your thumb then slide your thumb down and away, dragining the battery door with it. It will then come off. Assuming the system still has its original plastics, they may have become brittle enough that the opening tool could damage the release button or the plastic cover.

    Franklin Allen -

  4. ckGKHpFUTpAy5N3R
    ckGKHpFUTpAy5N3R
    vJp1HKCLNP1L5iB6
    • Rimuovi le quattro viti indicate con un cacciavite a croce di dimensioni #00.

    • Dovrai staccare lo sticker di garanzia per accedere alla vite nell'angolo inferiore sinistro.

    Much luck to you if you have a tiny, metal screwdriver like I did, the screws might be stuck in there and may require some force.

    Squib -

    you need to peel back the warranty sticker in order to access both the lower left and lower left screws

    Frederick zzstu Geib -

    This is a bit misleading, you should only remove the two black screws in the battery compartment. The silver ones can stay.

    Damian Cartwright -

    The two left hand screws won’t come out of mine

    XULF -

    iFixit screwdriver bits aren't thin enough to reach the two screws on the right near the memory stick slot.

    Fliggle_Slaps -

    Can't edit previous comment so here's a new one:

    Standard or older iFixit screwdriver bits aren't thin enough to reach the two screws on the right near the memory stick slot. You'll need precision bits that have longer tips to reach these deep screws.

    Fliggle_Slaps -

  5. aGllC1mxt3FxwjJx
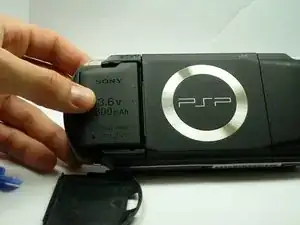
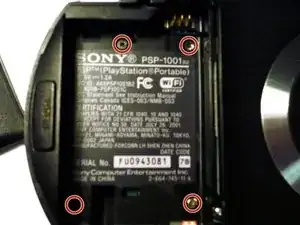
    • Rimuovi la vite dalla parte inferiore della PSP. Tienila separata dalle altre viti.

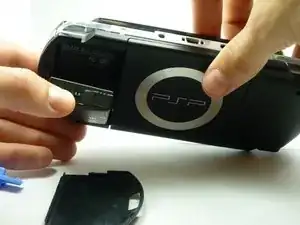
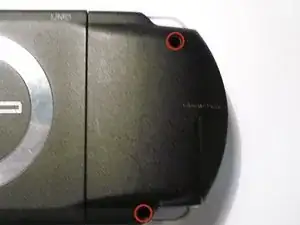
    • Rimuovi le viti sul lato destro posteriore all'interno dei fori.

  6. Ii3a5ygvVCa2DQTW
    Ii3a5ygvVCa2DQTW
    QOKFQYHjjpjkCpkW
    • Separa delicatamente la scocca esterna in plastica dal resto del sistema, come mostrato.

  7. mRetS1vLqaIMHxsm
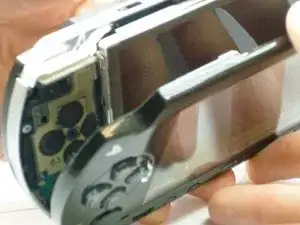
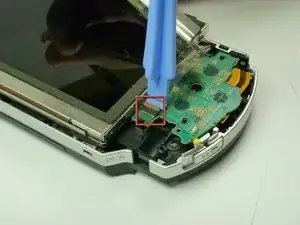
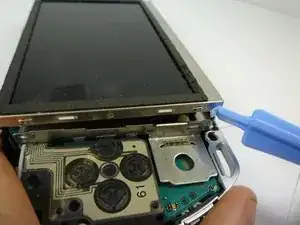
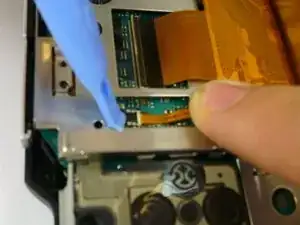
    • La scheda dei pulsanti, alla base dello schermo LCD, è trattenuta da due clip.

    • Solleva queste clip sopra i tacchi usando uno strumento di apertura PSP. Questo rilascerà le clip.

    • La scheda dei pulsanti è ancora collegata alla PSP da un cavo a nastro!

  8. XAPlWSPYTBnk4kHW
    XAPlWSPYTBnk4kHW
    y2ZMPu6hFaIMHeEZ
    CM3B1OCMvLaoaYgU
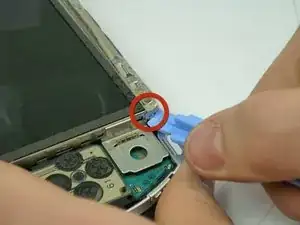
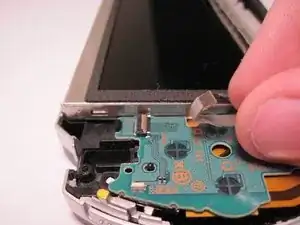
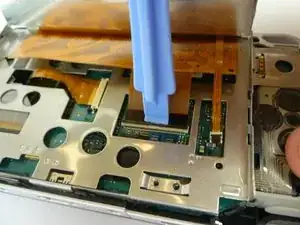
    • Il cavo a nastro della scheda dei pulsanti è trattenuto da un fermaglio. Solleva il fermaglio in alto, lontano dal cavo a nastro.

    • Tira via il cavo dal fermaglio.

  9. D2bNuCiDSWWwWXII
    D2bNuCiDSWWwWXII
    PWVvGylIhKJX1y1B
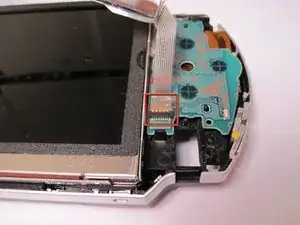
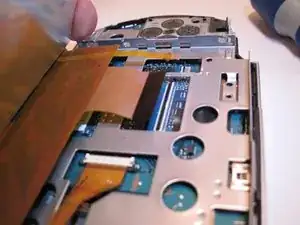
    • Lo schermo LCD è trattenuto dal telaio LCD con clip simili. Introduci uno strumento sottile tra la clip e lo schermo e sollevali delicatamente mentre inizi a sollevare lo schermo.

  10. YPeEx2CAOyTrMhpe
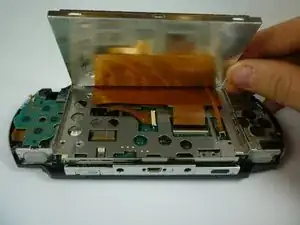
    • Lo schermo LCD è ancora collegato con cavi a nastro. Solleva delicatamente lo schermo LCD per evitare di romperli.

  11. MfU6sZYZNswQWfrR
    MfU6sZYZNswQWfrR
    haRHpeyReVrZbE3Y
    OVxu3pWnw5aI5CSv
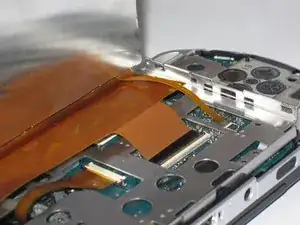
    • Il sottile cavo a nastro si apre dal lato opposto rispetto all'ingresso del cavo a nastro. Apri il fermaglio verso il cavo a nastro. Il fermaglio si solleverà e rilascerà il cavo a nastro. Posiziona il tuo strumento dietro la parte nera, quindi solleva la parte nera di plastica.

    • Il cavo a nastro largo si apre dallo stesso lato in cui il cavo a nastro è attaccato e si apre lontano dal cavo.

    • Entrambi questi fermagli sono i pezzi neri.

    • Tira delicatamente i cavi a nastro lontano dai fermagli. Ora lo schermo LCD può essere rimosso.

    • Quando rimonti, fai attenzione a come spingi i fermagli. Quello più piccolo è molto facile da rompere.

Henry Lee

Membro da: 14/01/10

794 Reputazione

8 commenti

I broke one of the laches....helppp!!!!

janet -

This is not easy...I tore up the outer casing trying to do this. I better see money in the mail for this

Justin Autrey -

My Sony PSP has just stop coming on

lil bao -

People!! If you weren't gifted in screws and bolts, then bring your console to a repair shop. Seriously blaming this for your Dick Fingers?

janisfranckevics -

dick fingers!!

jonathon allen -

It needs to be mentioned that the power switch is very fragile. When reassembling the front cover you need to first make sure that the small black switch on the circuit board sits in the yellow part of the switch, otherwise when you apply pressure to click the cover back in place the black switch will break off.

Isak -

Great tutorial, thanks to this I manage to fix the R button, it turns out the ribbon cable of the right section of buttons was dirty and a little bit off of place, and taking out the screen was necessary to get to that connector.

Jhosttyn Medina -

Totally helpful thank u so much, a little bit of patience and common sense job was done an I was play my psp portable the instant I put the battery cover back on it! U guys ROCK TNX AGIAN!!

Barclay Wilson -