Introduzione
Aggiorna o sostituisci l'insieme unità o SuperDrive (richiede un disco sottile). Vedi di determinare con sicurezza il tuo modello di MacBook quando installi nuovi componenti perché i modelli più vecchi hanno una connessione PATA/IDE invece che SATA.
-
-
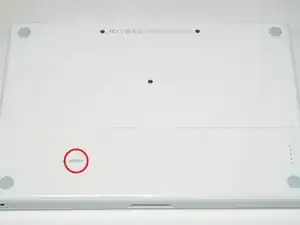
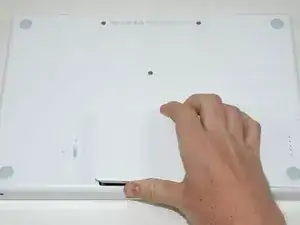
Usa una monetina o uno spudger per ruotare la vite di blocco della batteria di 90 gradi in senso orario.
-
-
-
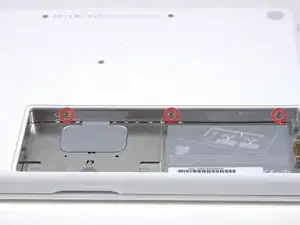
Svitare le tre viti con testa a croce equidistanti lungo la parete posteriore dello scomparto della batteria.
-
-
-
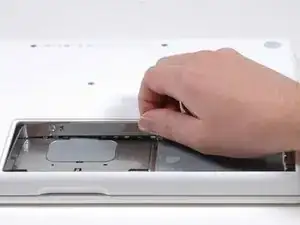
Ruotare il coperchio della memoria a forma di L affinché liberi l'apertura dello scomparto della batteria e rimuoverlo dal computer.
-
-
-
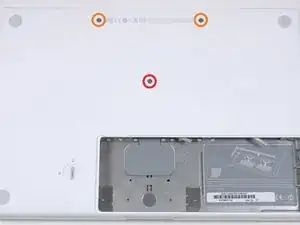
Rimuovere le 3 viti seguenti:
-
Una vite con testa a croce n. 00 da 11 mm nella parte centrale del case. (Testa: 5 mm di diametro x 0,75 mm di spessore)
-
Due viti con testa a croce n. 00 da 14,5 mm (testa: 5 mm di diametro x 0,75 mm di spessore)
-
-
-
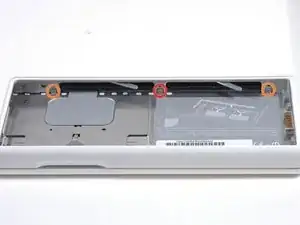
Rimuovi le 3 viti seguenti dalla parete posteriore dello scomparto della batteria:
-
Una vite con testa a croce Phillips #0 da 3 mm (testa: 2,75 mm di diametro).
-
Due viti con testa a croce Phillips #0 da 4 mm su entrambi i lati. (Testa: 2,75 mm di diametro)
-
-
-
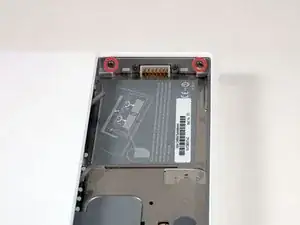
Rimuovere le due viti con testa a croce da entrambi i lati della parete destra dello scomparto della batteria (non quelle più vicine al connettore della batteria).
-
Due viti con testa a croce n. 000 da 6,25 mm. (Testa: 4 mm di diametro x 0,5 mm di spessore)
-
-
-
Rimuovere le quattro viti con testa a croce indicate dalla parete anteriore dello scomparto della batteria. Operando da sinistra, rimuovere la seconda, la quarta, la settima e la nona vite.
-
Quattro viti con testa a croce n. 000 da 3,25 mm. (Testa: 4 mm di diametro x 4 mm di spessore)
-
-
-
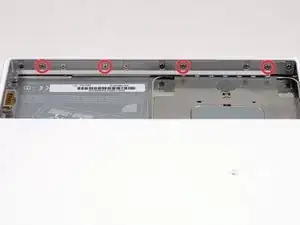
Rimuovere le 4 viti seguenti dalla parte posteriore del computer:
-
La vite più lunga va nella parte interna, mentre quelle più corte nella parte esterna.
-
Due viti con testa a croce n. 00 da 11 mm con gambo (2,2 mm di diametro x 2 mm di lunghezza) (Testa: 3,2 mm di diametro x 0,5 mm di spessore)
-
Due viti con testa a croce n. 00 da 7,25 mm con gambo (2mm di diametro x 3,75 mm di lunghezza) (Testa: 3,2 mm di diametro x 0,5 mm di spessore)
-
-
-
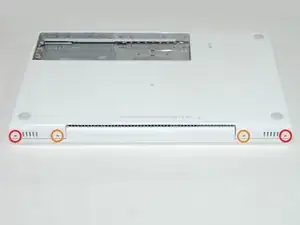
Rimuovere le due viti con testa a croce dal lato con unità ottica del computer.
-
Due viti con testa a croce n. 00 da 5,2 mm con gambo (2,3mm di diametro x 3,5 mm di lunghezza) (Testa: 3,2 mm di diametro x 0,5 mm di spessore)
-
-
-
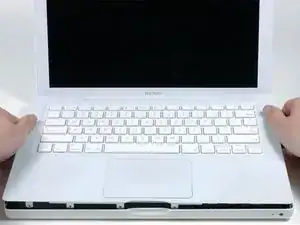
A partire dalle vicinanze del display e lavorando attorno alla parte anteriore del computer, aprire il case superiore. Per eseguire l'operazione, può essere utile adoperare un plettro per chitarra medio o di tipo A.
-
-
-
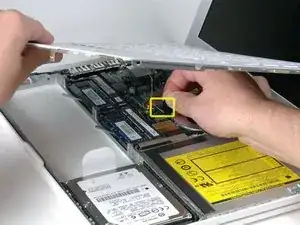
Tenendo il case superiore sollevato, estrarre la linguetta nera del cavo argentato dal relativo connettore.
-
Con il case superiore rimosso, puoi sfruttare la possibilità di rimuovere polvere, peli, ecc. La cosa migliore è usare una bomboletta di aria compressa; se usi un pennello assicurati che sia realizzato in un materiale (di solito pelo animale) che non genera elettricità statica, potenzialmente distruttiva per l'elettronica.
-
-
-
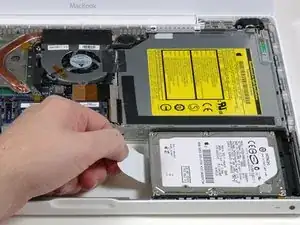
Prendere la linguetta in plastica bianca collegata al disco rigido e tirarla verso sinistra, rimuovendo il disco dal computer.
-
-
-
Rimuovere le due viti con testa a croce dal bordo anteriore dell'unità ottica.
-
Due viti con testa a croce n. 000 da 3,25 mm, (testa: 4 mm di diametro x 0,3 mm di spessore)
-
-
-
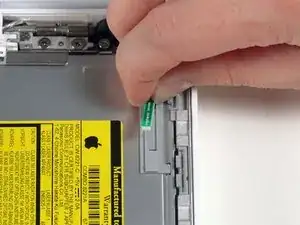
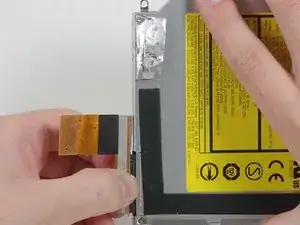
Scollegare il cavo piatto arancione dell'unità ottica dalla scheda logica. È possibile scollegare il cavo anche estraendolo mediante un inseritore.
-
-
-
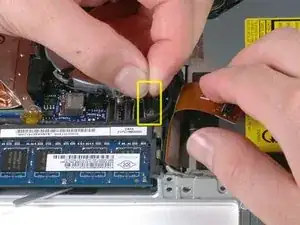
Scollegare il cavo dati del display appena esposto. Se non sono presenti linguette da tirare nella parte superiore del connettore, potrebbe essere utile adoperare un inseritore per scollegare il connettore.
-
-
-
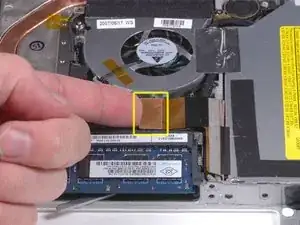
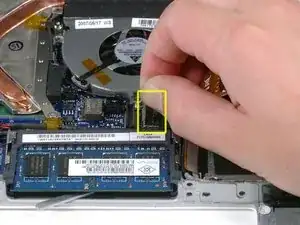
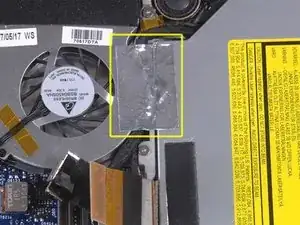
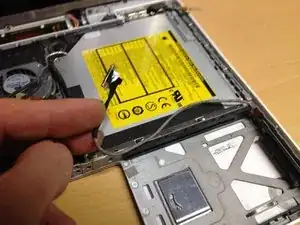
Stacca il nastro alluminato tra la ventola e il disco ottico. Solleva il nastro dal lato della ventola, lasciandolo attaccato al disco ottico.
-
In fase di rimontaggio, assicurati di allineare i cavi sotto il nastro prima di riattaccarlo.
-
-
-
Estrarre il cavo dati del display da lungo il bordo dell'unità ottica per rendere accessibile una vite con testa a croce argentata.
-
-
-
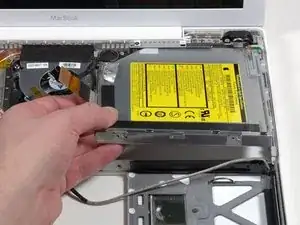
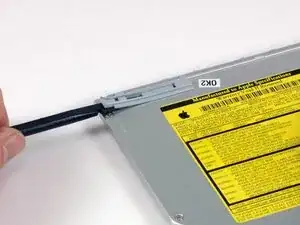
Sollevare il bordo anteriore dell'unità ottica e farla scorrere verso l'alto e fuori dal computer.
-
-
-
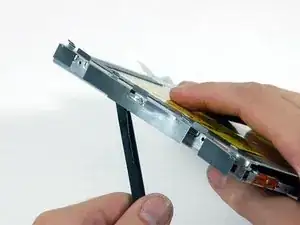
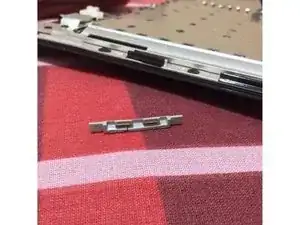
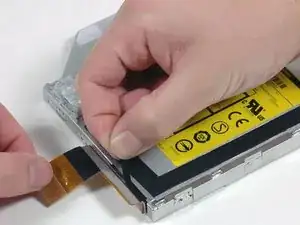
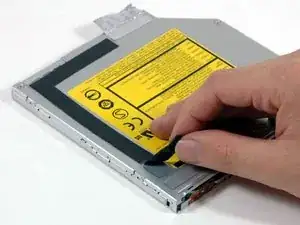
Usa uno spudger per staccare delicatamente la staffa in metallo argentato dal lato sinistro del disco ottico. Stai attento non piegare la staffa, perché è molto sottile e si piega facilmente. Se la staffa non viene via facilmente, puoi riscaldare l'adesivo per agevolare l'operazione di distacco.
-
-
-
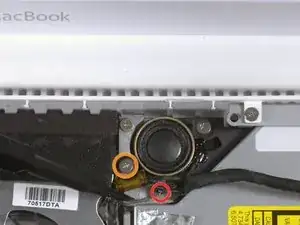
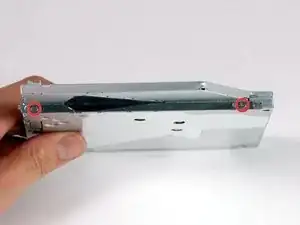
Rimuovi le due viti a croce Phillips che fissano la staffa di montaggio al lato destro dell'unità ottica.
-
-
-
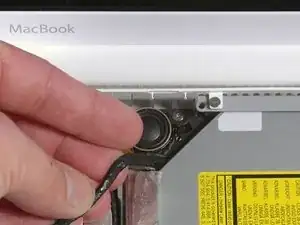
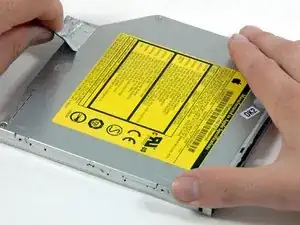
Usa uno spudger per staccare il fissaggio dell'antenna Bluetooth dalla parte superiore del disco ottico.
-


Per riassemblare il dispositivo, segui queste istruzioni in ordine inverso.

11 commenti
Thank you guys for a thorough job explaining this process of changing the optical drive. I replaced 3 totally on mine and 2 friends computers ......... Now it's totally easy and I'm thinking of taking up a little side business or fixing macs with your help!! I wish your parts were a little less expensive though.
Zahan -
That was extremely helpful!....Thank you so much...
Oddsox -
I appreciate all your help. The change of my my optical drive costs around 200 dollars in my country, Mexico. But with your aid I didn't pay anything, because of my optical drive had a piece of peaper inside. I'm very glad withyou, thanks a lot. I saved much money, You want a beer?
luis -
I used this guide plus the Thermal Paste guide to resolve my MacBook RRS (Random Restart Syndrome) issue. My MacBook would randomly restart after the fan kicked into high speed. When I removed the heatsink I discovered an an irregular patch completely free of thermal compound of about 15-20% of the area on one of the processors. I removed and re-applied the thermal paste. I ran a memory test utility overnight that previously caused a restart after a couple of hours, and the probelm seems to be solved. TIme will tell.
ServiceDocs -
This guide was seriously helpful, so thanks for putting this together. I found a thick ribbon of dust/muck whatever between the fan outlet and the exhaust port that was almost as dense as felt. My fan must have been fighting like crazy trying to pass air through that blockage, which explains the high temps and excessive fan noise. Wish I'd done this sooner...
Thanks again!
skraggle -
Just R&R'ed the fan in my black MacBook Core 2 Duo tonight. Took me 30 minutes tops and I was taking my time. These instructions are SPOT ON! Great job ifixit.com! Two thumbs up!
Follow the instructions exactly as you see and have a piece of paper taped to the table next to you that you can outline all the screws you took out so you know where they go back in. I expected this to be a LOT harder, but it was one of the simplest repairs I've ever done to ANY computer!
mikeutter -
Piece of cake--or should I say gum. If you don't have a magnetized screwdriver, load up a stick of gum and chomp on it until it's needed then use a bit to retain screw on the driver. And if you should tear the black tape, or if the silver tape won't stick any more, just bubblegum it together. The instructions were clear and correct, which made for a very simple repair.
Mike Woodruff -
My battery does not pop out when after step 1. Any idea why, and how do fix it?
Calvin -
Will not drop out even if you turn it upside down?
skraggle -
Somehow, now my isight camera doesn't work and the light is always on. Cannot figure out what I did wrong.
josefsalyer -
Somehow the plastic disc with the slot for a coin got dislodged from the case, and I can't seem to get it open now. Any tips/links on how to open this without the aid of the plastic disc?
Peter Wood -
i broke my disc off as well. I used two toothpicks to rotate the thing. hi tech.
howard bederman -
Outstanding guide - thank you!
owen bullock -
My computer will not charge when plugged in. It will stay on as ling as the plug is in the wall however if the power source gets disconnected it will shut down immediately. I removed the battery and put it back in that did not help. It worked and charged fine 2 days ago. I have a backpack with a laptop storage area. I went to hang the backpack up and it fell and ever since the battery is not functioning. Is there some fix I can try or is my only solution to replace it? I would have thought that dropping it would affect more than the battery?
Beth Tomasek -
Better leave the back pack where it cannot fall. Hindsight is so much better than foresight . I learned the hard way too!
Loy Lum -
Many of the tiny screws in this project were quite sticky. I found some blue Loctite residue that must have been when the Apple repair shop worked on the laptop years ago. I have found that it is important to hold the correct driver firmly down in the screw and then just tweak the driver in short bursts to loosen it before unscrewing it with a smooth turn.
Patrick Langvardt -
Be really careful while doing this to not use too much force while doing this step, because the plastic disc can break off and it can be a cosmetic issue along with functionality issue. This happened to me first hand so please take my word for it…
[deleted] -
Probably worth mentioning at this stage that the caddy you propose to use should not have lugs on the front corners, like those used in unibody 1278 and onwards.
harwood -
Hehe, still my mac os running! After, already bit more than 10 years of use!
I put new heat paste now for the second time. Maybe this helped for staying young so long.
Thanx for all the repair guides!!!
Fabien -