Introduzione

  1. tEDvxLoAOkWLcUW4
    tEDvxLoAOkWLcUW4
    aGWH62rPoJV2CHgr
    vkr1D1tXGORV4pJc
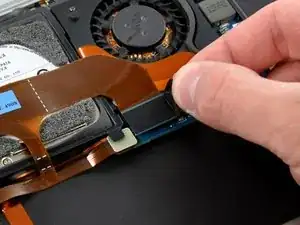
    • Scollega il cavo a nastro del gruppo delle prese dalla scheda madre tirando verso l'alto la sua aletta nera.

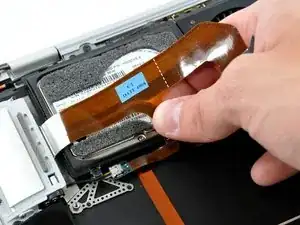
    • Separa il cavo a nastro dell'uscita audio dall'adesivo che lo fissa sulla copertura superiore.

    • Usa uno spudger per fare leva sul connettore del cavo a nastro dell'uscita audio per sollevarlo dal supporto del disco rigido.

    I skipped the step (6c) of prying the audio out ribbon cable connector board off the hard drive bracket (& disconnecting it), since it doesn't come off real easily, and I didn't want to damage it. It only requires a little more care when removing the HD from it's bracket if you skip step 6c.

    amiller770 -

  2. FaQxPdBMW4FvKZ6g
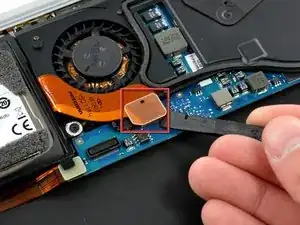
    • Scollega il cavo dell'uscita audio dalla sua presa sul cavo a nastro del gruppo delle prese.

    This is not necessary and looks pretty risky too.

    eugene_o -

    Agreed, I encountered no issues when I skipped this on a Rev.B model.

    Kyle Milnes -

  3. fdYFJHZCNFBNPoke
    • Usa uno spudger per sollevare il connettore del cavo del disco rigido dalla scheda madre.

    Reversing step 8 is where I ran into trouble. The replacement fan I had was slightly thicker than the original and caused the ZIF cable to work its way out of the tenuous connection it had to the SSD, resulting in a "?" missing boot drive error upon startup. Took me three tries to get it right! The difficulty is to get the drive connector to the logic board to reach and seat without pulling the other end out of the drive.

    aaronmiller -

  4. dHilYruXLwxGNxhQ
    dHilYruXLwxGNxhQ
    YYNJZaEUb6jTMknW
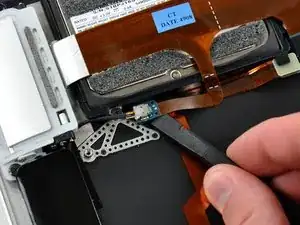
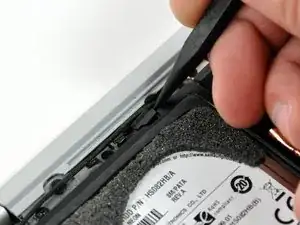
    • Usa la punta affilata di uno spudger per spostare il cavo del microfono dal suo supporto sul disco rigido.

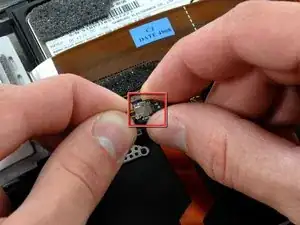
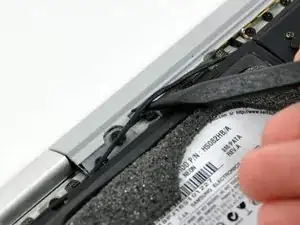
    • Separa la copertura della vite dall'adesivo che la fissa sul supporto del disco rigido.

  5. omakqsHgAhJZlcWd
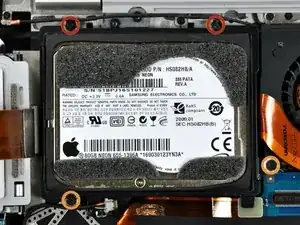
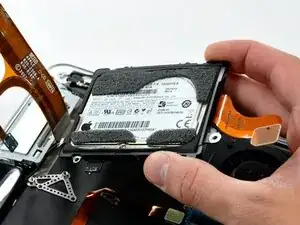
    • Svita le quattro viti a croce Phillips che fissano il gruppo del disco rigido alla copertura superiore:

    • Due viti da 4,7 mm.

    • Due viti da 3,9 mm.

    Longer screws on top.

    Adam Nelson -

    Two 3.9 mm Phillips screws.

    Two 4.7 mm Phillips screws.

    Alvaro Hermida -

    There is a cable glued to the diskframe that must be loosened with a spudger before you can remove the frame.

    oysteinalsaker -

  6. AZunO3LXTkBgQlXF
    • Solleva e rimuovi il gruppo del disco rigido dalla copertura superiore.

    Ever since Steve Jobs died, Apple hasn't been what it used to be.

    George A. -

Conclusione

Per rimontare il dispositivo, segui le istruzioni in ordine inverso.

Walter Galan

693762 Reputazione

0 commenti