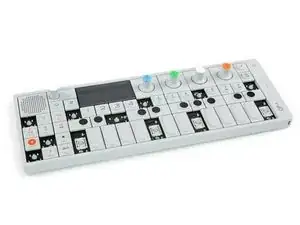
Introduzione

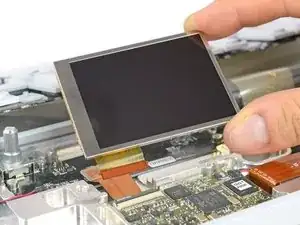
Il display non si limita a riportare informazioni utili, ma è anche piacevole guardare le piccole animazioni che accompagnano i suoni. Se il display dovesse guastarsi, questa guida mostra come sostituirlo.

  1. vxoTLiJxFDPOji5X
    vxoTLiJxFDPOji5X
    ajlj12AYLBNXKv6o
    MSgrKiNeLFhWdEpd
    • Per raggiungere le viti disposte sotto la tastiera, devi prima togliere alcuni tasti. Puoi usare uno strumento di apertura o un plettro. La prima immagine mostra come il dispositivo dovrebbe presentarsi dopo aver rimosso le chiavi necessarie (12 in tutto).

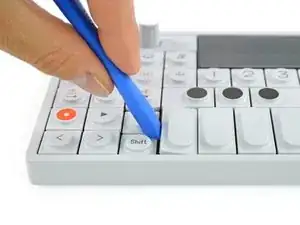
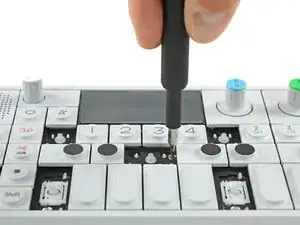
    • Per i quattro tasti più lunghi della tastiera, si deve intervenire a partire dal lato sinistro.

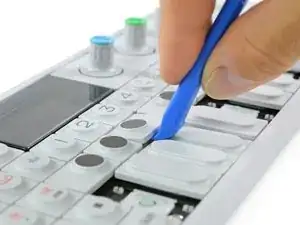
    • Per staccare gli otto tasti più piccolibisogna iniziare dal basso.

  2. NKEIk4cFqiaAPIDr
    NKEIk4cFqiaAPIDr
    faMO21YfJAINC3yK
    • Il meccanismo a pantografo degli otto tasti piccoli impedisce l'accesso alla vite sottostante.

    • Usando di nuovo uno strumento di apertura un plettro, si possono estrarre facilmente questi elementi.

    • In fase di riassemblaggio, accertati di sistemarli nel senso corretto, con la faccia superiore in alto.

  3. SLEyuvdxWjnDuCUg
    SLEyuvdxWjnDuCUg
    RCYV1CYSlXFdOVKE
    MpduwLQ5mTtWh4lM
    • Svita queste 12 viti con un cacciavite a croce Phillips #00.

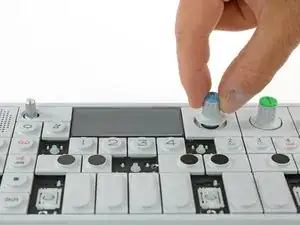
    • Quindi basta tirar fuori le otto manopole ruotanti e la manopola del volume.

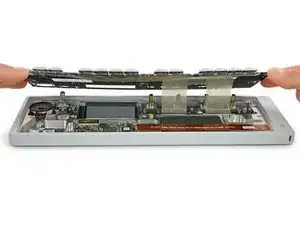
    • Ora è possibile sollevare lievemente la tastiera e disporla più indietro.

    Your missing the ribbon decoupling step, unless you skipped it because it’s such a tight squeeze to get back in.

    William “Zoe” FitzGerald -

    The concept of removing the square panels that the knobs sit on was skipped.

    Station 2Station -

  4. qJg5uZO2UgNXEdkK
    qJg5uZO2UgNXEdkK
    UWtXrjdNVgKYTF2I
    bsTStZcjsFVSPaQa
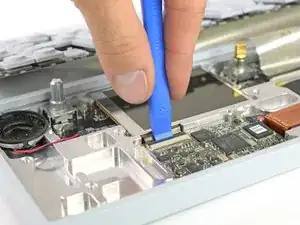
    • Apri il connettore del cavo del display usando uno strumento di apertura in plastica per far scattare verso l'alto il blocco.

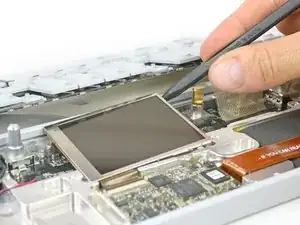
    • Il display è tenuto in posizione da un adesivo poco tenace. Uno spudger può essere di aiuto per staccarlo.

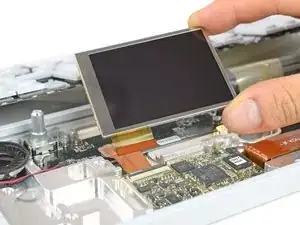
    • Ora puoi scollegare il cavo e tirare fuori l'intero display.

    • Dopo il rimontaggio, puoi eseguire i tre test di funzionalità (0, 1 e 2) dello start screen speciale dell'OP1. Puoi accedere a questa modalità tenendo premuto il pulsante "COM" mentre accendi il dispositivo.

Conclusione

Per rimontare il tuo dispositivo, seguì queste istruzioni in ordine inverso.

Tobias Isakeit

Membro da: 31/03/14

116544 Reputazione

13 commenti

It is really helping.

do you know where to get the screen?

thank you.

chefshin -

I see that the part # is AMS260CM61 ver 2 by Samsung. However, I have not been able to source it online.

Mike -

Hey guys,

Can someone from IFIXIT please let us know where we can buy the screen please.

my screen is cracked and i desperately need to replace it.

Thanks!

Jack -

Hi Jack, unfortunately we do not know where to get a replacement screen for the OP-1. You might want to get in contact with the guys from Teenage Engineering directly. Sorry

Tobias Isakeit -

Jack, look for “part number 74-x000045”, there are few of them out there. Cheers.

Peter O -

What about the new rev 2.0 op-1

Can you source those screens ?

Newer push in connection.

Or anyone got the specs or compatible part number ?

Yes, also messaged t.e

Gadget -

It appears there are three versions of the screen as of 2021-03-10; I cannot currently confirm if ver. 2 or ver. 3 are accurate, but will update in about a month when I receive a ver. 2 if they are not accurate:

ver. 1 : 74-x000045, can be currently found on eBay ; this version is the one is shown in the example

ver. 2 : AMDM001, will need to purchase from LCD-focused or bulk electronics sites such as enlcd; this one has a connector piece on the ribbon to snap onto the circuit board, and is smaller than 74-x000045; it is NOT interchangeable with ver. 1

ver. 3 : AMEJ006D, even worse scarcity than ver. 2, only found one listing on eBay, none from LCD-focused or bulk electronics sites; looks similar to ver. 2; it is also NOT interchangeable with ver. 1. However, it looks similar to ver. 2, so it MIGHT be interchangeable with ver. 2 — I haven’t been able to test.

Anonymous -

Update: the AMDM001 arrived from lcdperfect, and I can confirm it works correctly with version 2 of the OP-1 (the version with the smaller screen and higher circuit board that the screen connects to).

Anonymous -

This is some valuable information here. Thanks for sharing

Tobias Isakeit -

I just did this and it worked! Thank you for this tutorial.

The original problem for me was a progressive glitching. The screen was kind of readable for a few months but eventually went completely dark aside from a random pixel or two.

I ordered my replacement screen from from this seller on AliExpress. The first screen didn't work but thankfully they had free returns and all that was lost was a few months of slow shipping time. ;)

Of note: Your replacement screen might be flipped upside down. Don't worry. Restart your OP-1 while holding down the COM button and it will prompt you to flip the screen by hitting Shift-4.

One thing I noticed that might help people squeeze some new life out of an old screen: When I was replacing the screen I decided to carefully peel the sticker connector off the back of the old screen. I reconnected it one last time and... it started working again. Albeit with some slight ghosting. If your screen seems otherwise dead, maybe give that a try as a last resort.

Elling Lien -

How to order display please i need to fix it

pon mani -

Hello, I dont see where to buy the display? It is available for buying?

TOMI LEBRERO -

Hello, It´s possible buying a screen of OP 1? Thanks

TOMI LEBRERO -