Introduzione

I dorsali su un controller wireless Xbox One 1697 possono diventare poco responsivi nel tempo a causa dell'usura. Se i dorsali del tuo controller perdono la responsività o si rompono, segui questa guida per sostituirli.

  1. vC1HAulr6S1W3TAY
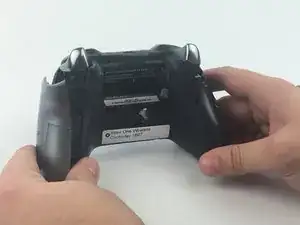
    • Rimuovi la copertura del vano batterie.

    • Rimuovi le due batterie AA.

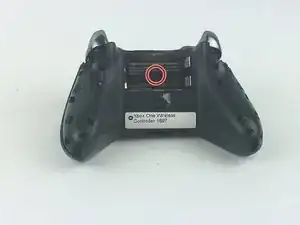
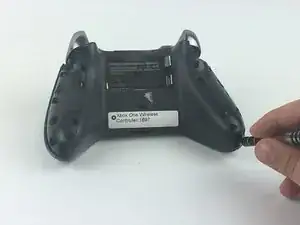
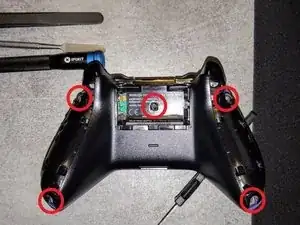
    • Rimuovi attentamente l'etichetta o forala per accedere alla vite.

    Note: Screw removal is in Step 3

    jkgarrett17 -

  2. CTyTRM3AVECmFEQn
    CTyTRM3AVECmFEQn
    lHWLG62JPqGEmInL
    nQawGyBwfXs1t1bv
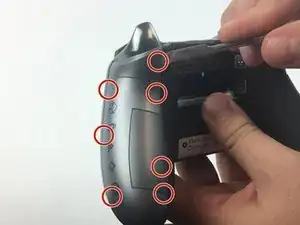
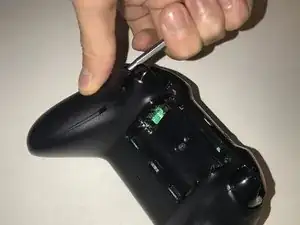
    • Rimuovi le coperture dei manici facendo leva con uno spudger attorno alla loro fessura.

    • Fai leva sulle coperture dei manici muovendo lo spudger avanti e indietro. Devi farlo lungo tutta la fessura di ogni manico per rimuoverli.

    • Ci sono sette ganci che devono essere aperti per rimuovere ogni copertura dei manici.

    Absolutely use the spudger to do this. DO NOT just lift up a bit at the bottom and then try to forcefully pull off this panel (as is shown and suggested on *multiple* YouTube videos). You WILL snap the clips. Maybe not all of them and *maybe* none of them, but as the instructions here detail, what you want to do is UNCLIP the clips where they are located, using the PLASTIC spudger. NOT a screwdriver. I watched three separate videos on YouTube where the person said “just stick a screwdriver in there and once you’re able to lift up enough to fit your finger inside, do so, and then just carefully pull the panel off.” That’s not how it works.

    Andrew Sauk -

  3. hKS3w1sepkXoyq2O
    hKS3w1sepkXoyq2O
    2TGpXcUlgetAgZ6b
    ZU4EASHE2puEJBbc
    • Rimuovere le coperture dei manici permette di rimuovere la copertura anteriore.

    • Usa un cacciavite Torx TR8 per svitare le cinque viti Torx TR9.

    you must also remove the T8 screw hidden under the label in the battery compartment to free the faceplate.

    Dennis Kim -

    Precised by Dennis Kim, but to remove the screws you need a TORX TR8 screwdriver (I guess it’s a Torx size 8)

    James Burton -

  4. TTYlEyoKIMFjqcVr
    TTYlEyoKIMFjqcVr
    XlucDgkdaGKNRCfW
    CqKIbhMBCNeV1Dtc
    • Ora che i dorsali sono ben visibili, assicurati di pulire la polvere e la sporcizia che puoi trovare lì attorno.

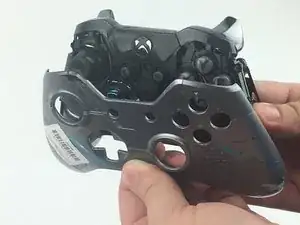
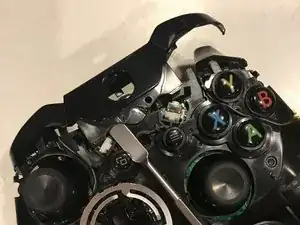
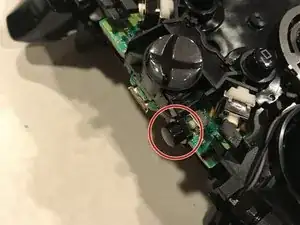
    • I dorsali sono collegai da una copertura in plastica centrale attorno al tasto home della Xbox. Rimuovi questo pezzo in plastica sollevandolo da sopra le due sporgenze, premendo il tasto home e spingendo la copertura verso la parte superiore del controller.

    • Stai attento al tasto di sincronizzazione appoggiato sotto la copertura in plastica. Assicurati di riposizionarlo prima di rimontare il gruppo dei dorsali/copertura in plastica.

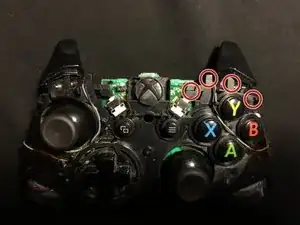
    • Rimuovi il gruppo dei dorsali tirandoli via dalla copertura in plastica.

    you forgot to include directions for removing the central cover.

    Dennis Kim -

    And when you do, the connect button pops out, and now I have no clue how to put it back -_-

    Roel Binnendijk -

    The replacement part I bought fit OK but was too snug, with the result that the bumpers wouldn’t spring back so they wouldn’t click and unclick the tiny control switches they connect to.

    After a bit of examination I determined that if I cut out the middle arch section that joins the bumpers, but leaving enough plastic to go under the central plastic cover so that they would be held in place securely, that it was possible to reassemble the controller so the bumpers click and unclick freely.

    Perry Bonewell -

    I had the same issue, But i just shaved the little lugs that connect the button to the switch with a scalpel and used the original plastic black cover. Works a treat and i’ve no fear the button will fall out.. :)

    steve winter -

  5. 5DnoZdbtTOTDbXcZ
    5DnoZdbtTOTDbXcZ
    jnFCICyWB4ByLlmR
    yQfxM236hqQMmkMV
    • Il controller è pronto per montare il nuovo gruppo dei dorsali.

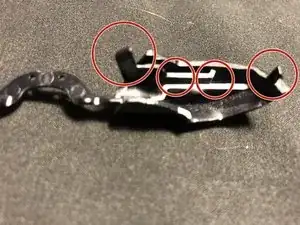
    • Allinea i nuovi dorsali sopra il controller tenendo premuti i grilletti e allineando le quattro sporgenze su entrambi i lati.

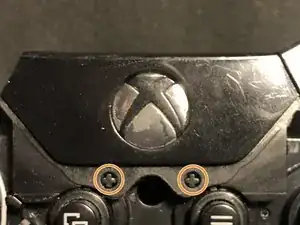
    • Posiziona la nuova copertura del tasto home sopra la porta micro USB, spingi il tasto home in posizione e tira la copertura oltre le due sporgenze come mostrato.

Conclusione

Il tuo dispositivo è ora pronto all'uso.

Ryan Burroughs

Membro da: 25/09/17

1168 Reputazione

12 commenti

the bumpers take some finesse to remove, so be patient

Vincent -

You should add a security hex screwdriver to your tools list, along with the gauge that is required.

Travis Weston -

There is a fifth screw in the battery compartment that holds the faceplate on. Take an exacto knife and cut out sticker where the hole is.

Scott Williams -

Could you elaborate on the “remove the bumpers” part (last step) please, thank you.

r.d.huijsmans -

Great guide. Helped me easily fix a sticky bumper and save 60$

Bryon Crockett -

Thank you soooo much. Had a broken bumper for over a year and finally fixed it thanks to this great guide.

twisted-starlight -

It would be nice if the reserve was shown as well.

Ryan A -

How do you put them back on. The right button assembly seems to be different than the left for me

GildenScale -

I need to fix this bumpers on this same controller, does anyone know which is the type of bumpers that I need for this controller before I buy one set? I’ve found there are 2 types, one with a curve connection, and another with a flat straight connection bewteen bumpers.Thnx

Gzamo Z -

Instructions were fool-proof. Although, I didn’t have a new bumper to install, I was able to take my controller apart to verify it was broken. I will say, it took some cussing to get the handles off, lol. Those sucka’s wouldn’t budge for a little bit, haha.

Jenny -

Bad design or planned obsolescence on Microsoft's part, but thanks for the guide. I had a problem that others had on the replacement bumper where it had the switch depressed all the time, their solution was to file down the plastic (just barely) that presses the switch and it worked for me as well.

Tony -

Excellent guide! Just revived a controller that had been chilling unused for 2 years. The replacement bumper I purchased off of Ebay had a little hitch. They would not move or click at all when placed. I just had to break off the little plastic nub that holds the end of the bumper to the controller (I found that little trick on accident by breaking one of them, lol). Now the controller functions fine, the bumpers can just be pulled up at the outside ends. Not a problem, as their purpose is to be clicked. Thanks!

Nathan Kennedy -