Introduzione

Segui questa guida per sostituire una fotocamera posteriore difettosa.

  1. 3mEZDqNpHP1NAoQS
    3mEZDqNpHP1NAoQS
    xTO64DCaMsQFpJBm
    HC3JrUgL6QVjhELX
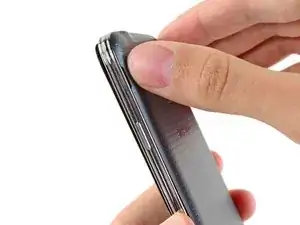
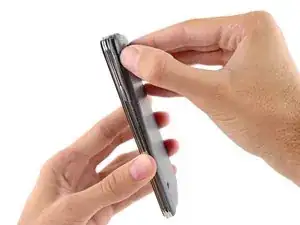
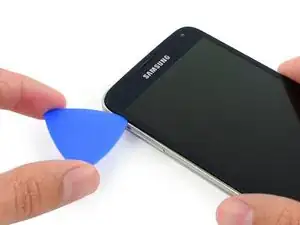
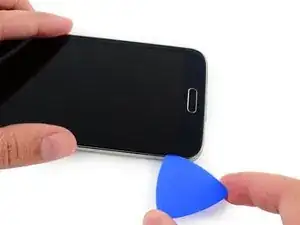
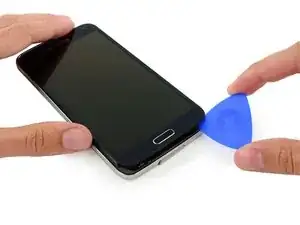
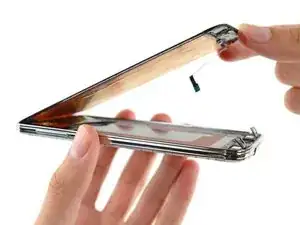
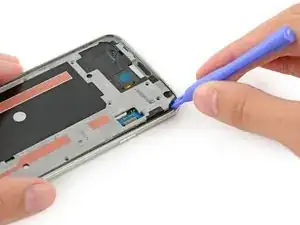
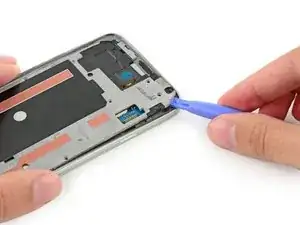
    • Inserisci un'unghia o uno strumento di apertura in plastica nell'intaglio a sinistra della fotocamera posteriore.

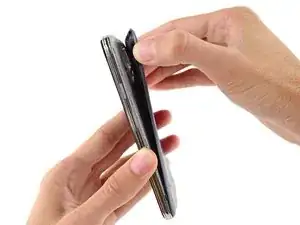
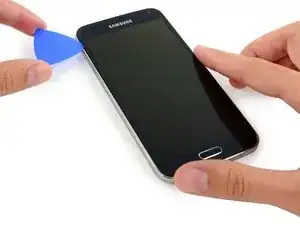
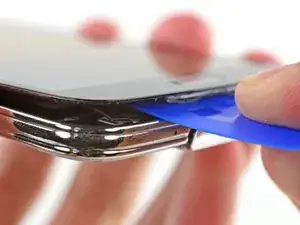
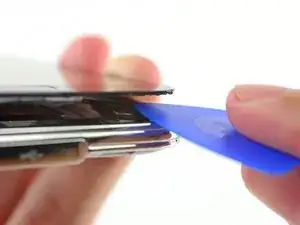
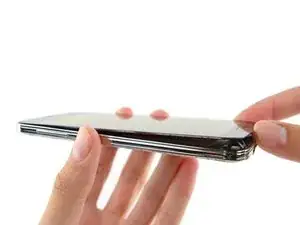
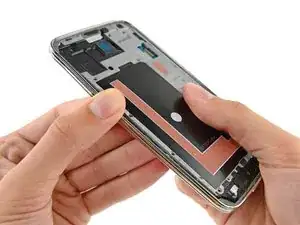
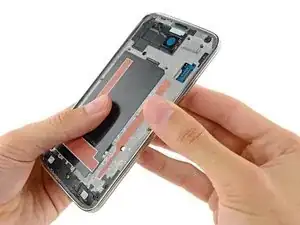
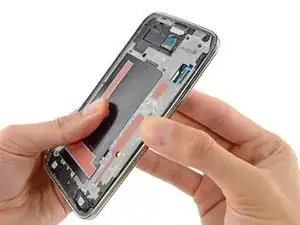
    • Solleva e ruota delicatamente, allontanando il bordo superiore, il case posteriore flessibile dal retro del telefono.

  2. fbRApTyubdGpQqcI
    fbRApTyubdGpQqcI
    YQWaDPslkNAgJIpd
    dk6dXbpPRGWWgFDv
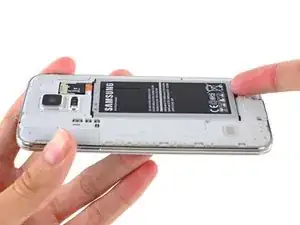
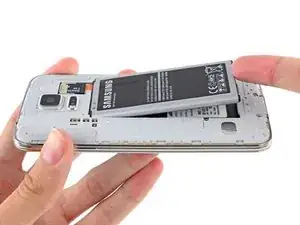
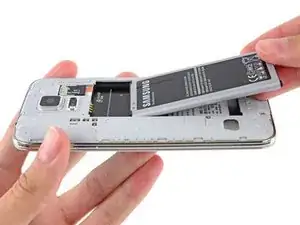
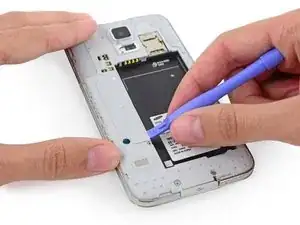
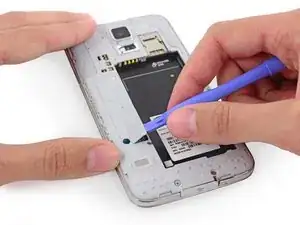
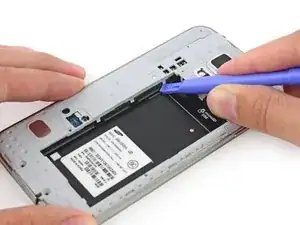
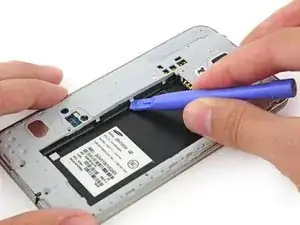
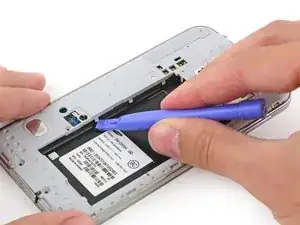
    • Inserisci un'unghia o uno strumento di apertura in plastica nell'intaglio nell'angolo inferiore destro della batteria e solleva la cella verso l'alto.

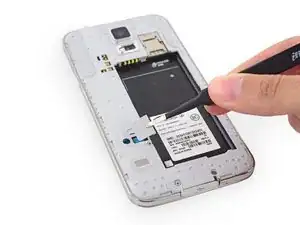
    • Rimuovi la batteria dal telefono.

    The battery will need to be charged after it is placed in the phone. No one told me that and I bought a battery and thought it was bad. Keep the phone off and insert the charger. You will need to charge it for several hours before you can use the phone.

    Diane Schumacher -

  3. AAawVymjqARQpSCD
    AAawVymjqARQpSCD
    BHdA4xn3H5rChNAu
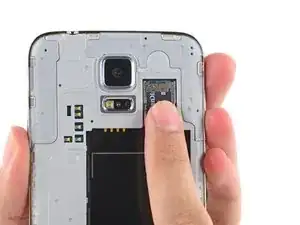
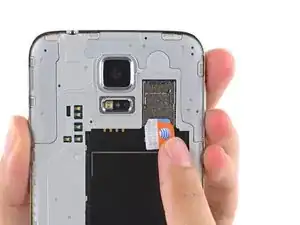
    • Con la punta di un dito premi sulla scheda microSD e falla scorrere verso il basso per tirarla fuori dal suo alloggiamento.

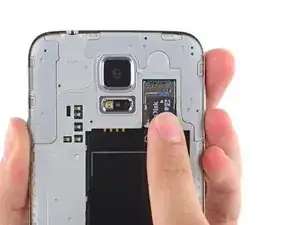
    • Rimuovi la scheda microSD dal telefono.

    I found removing the SIM/SD card with my fingertip a little difficult – not enough friction. So I used a 'rubber' (in US English it's called a pencil eraser or just simply, an eraser.

    Simple, cheap (zero) and effective! :)

    Cheers.

    John

    johnsg0053 -

  4. QxalaCOh3lW5ekjC
    • Ripeti la procedura precedente per rimuovere la scheda SIM.

    Actually this isn’t as easy as it appears in the photo and instructions, since the SIM card does not have a notch that you can use to pull it out. In my experience I’ve found that the best way to remove the SIM card is by pressing down somewhat hard on the SIM card, and then push-pulling it outward.

    OmniWeb Technical Education -

  5. UfxjrONAiEwe3Pqm
    UfxjrONAiEwe3Pqm
    xY6eY5eHtlBGb5TK
    WRYQRcZPGAvYby1N
    • Usa uno strumento di apertura in plastica per sollevare il pannello che copre il connettore del telaio centrale in plastica.

    • Rimuovi il pannello con un paio di pinzette.

    • L'adesivo rimasto dovrebbe bastare per riattaccare il pannello al telaio. In caso contrario usa un piccolo pezzo di nastro biadesivo.

    In my experience I have always removed this Home button protector panel with ONLY a plastic opening tool, and I have never found adhesive beneath it.

    OmniWeb Technical Education -

  6. xkYwZGCOIJZZMnl4
    xkYwZGCOIJZZMnl4
    4RQMpvTjPEcZoDJ6
    • Usa la punta di uno spudger per sollevare verso l'alto il connettore del cavo del pulsante home dal suo zoccolo.

  7. IwfbXeWE6jKGCZ2w
    IwfbXeWE6jKGCZ2w
    fjtqM3CfiSvI3Df1
    • Nei passi seguenti userai un iOpener per scaldare l'adesivo che fissa il gruppo display al resto del telefono. Così la rimozione dello schermo sarà più sicura e più facile. Per usare bene l'iOpener, segui le nostre istruzioni di riscaldamento per iOpener e fai attenzione a tutte le avvertenze.

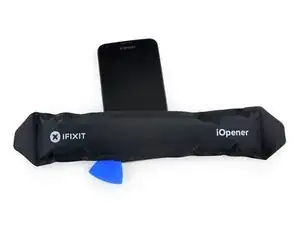
    • Applica un iOpener caldo sulla metà sinistra del telefono per un periodo massimo di 90 secondi.

    • Riscalda l'iOpener e applicalo sulla metà destra del telefono.

    good location for a timer, I am taking my phone apart

    andrew beals -

    ¿se puede hacer con la pistola de calor?

    Diego Alomoto -

    Si, puedes utilizar la pistola de calor también, pero ten cuidado ;-)

    Sandra Hiller -

    Otra opción es usar una “placa calefactora” que, según yo, es la opción mas “profesional” ya que con ella se puede limitar la temperatura, para que no se malogre la pantalla táctil (la “digitizador” detŕas del vídrio).

    OmniWeb Technical Education -

    Another option is to use a “hot plate” which, according to me, is the more “professional” option since with it you can limit the temperature, so that the touchscreen doesn’t get ruined (the “digitizer” behind the glass).

    OmniWeb Technical Education -

    A hairdryer on low not being used statically is also an easy option. Or if your a caveman or low tech, and all you have is a single baby sock and metal bb’s or little rocks, as long as they’re not silica rocks, put them in the baby sock, at the edge of your cave campfire to warm them and thats all you need. -retired aviation engineer

    crabbysam -

  8. BFv2rbQMoNfFXwOr
    BFv2rbQMoNfFXwOr
    TKlk4XrBGJhZ4VcK
    • Nei passi seguenti userai un plettro di apertura per separare l'adesivo che fissa il pannello frontale di vetro. Fai leva soltanto dov'è indicato. Se incontri una certa resistenza, smetti di far scorrere il plettro e riscalda di nuovo la parte.

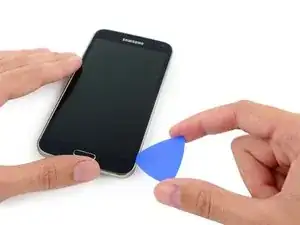
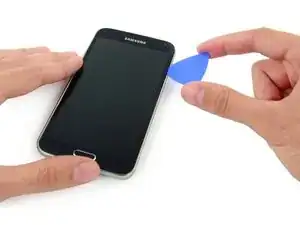
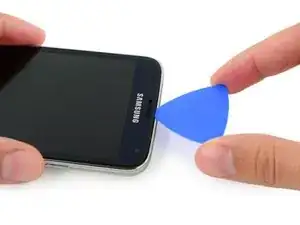
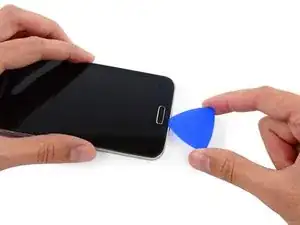
    • Inserisci la punta di un plettro di apertura sotto il lato inferiore destro del pannello di vetro.

    I hope this helps others:

    my screen was STRONGLY glued to the midframe, it was impossible to remove it without breaking it, be very careful with the copper adhesive in the midframe!!!

    I can't even understand how this guide doesn't mention it properly!

    Pedro -

    Yeah, the real trick with these types of screens is to measure (or just “have a feel for”) an adequate temperature with the heat pad (e.g. iOpener), or heat gun, or hot plate. First you have to heat up the screen just enough so that you can “break into” one side without breaking the bezel or the glass, and then verrrry carefully and verrrrry gradually insert plastic opening picks (or even playing cards) as you make progress around the exterior border of the phone. Whenever I do this, I always insert 5-6 objects (again, plastic picks or playing cards) before I fully remove the digitizer-glass assembly, which typically ends up as follows as I move around the exterior border: one pick at each of the four corners and one pick on each of the two sides. WARNING: DO NOT INSERT ANY OBJECT BENEATH THE GLASS MORE THAN A FEW MILLIMETRES FROM THE EXTERIOR BORDER.

    OmniWeb Technical Education -

    Thanks for the info guys! :-)

    Tony -

    Wow seriously 100% ur going to break the LCD if this is the first time opening the phone this is why android is built disposable it now costs 60$ to fix a stupid 10$ part this fix is definitely not worth it

    android=disposable

    apple=a better way of life

    I will never attempt to fix another android again

    taylor britton -

  9. dahXEbODMSOG4Io1
    dahXEbODMSOG4Io1
    MkE5VQe2F4eHWuvx
    IbKdWQDEMu4ejYVx
    • Fai scorrere il plettro lungo il lato destro dello schermo.

    This is not as easy as they make it seem in this guide. The real trick with these types of touchscreens is to properly measure (or just “have a feel for”) an adequate temperature with the heat pad (e.g. iOpener), or heat gun, or hot plate, that you use to heat the adhesive beneath the glass exterior of the digitizer-glass assembly. First you have to heat up the screen just enough so that you can “break into” one side without breaking the bezel or the glass, and then verrrry carefully and verrrrry gradually insert plastic opening picks (or even playing cards) as you make progress around the exterior border of the phone. Whenever I do this, I always insert 5-6 objects (again, plastic picks or playing cards) before I fully remove the digitizer-glass assembly, which typically ends up as follows as I move around the exterior border: one pick at each of the four corners and one pick on each of the two sides. WARNING: DO NOT INSERT ANY OBJECT BENEATH THE GLASS MORE THAN A FEW MILLIMETRES FROM THE EXTERIOR BORDER.

    OmniWeb Technical Education -

  10. YkOl2cATJhHDltJl
    YkOl2cATJhHDltJl
    h65ueL2OPRF55yQY
    LDQydYLpQV3Zxr6V
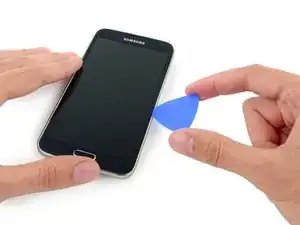
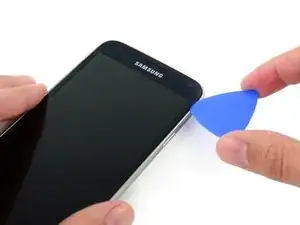
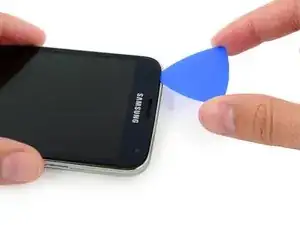
    • Fai scorrere delicatamente il plettro attorno all'angolo e fermati prima della griglia dell'altoparlante sopra il telefono.

    Be sure not to nick and tear the capacitive touch chip interface that meets the LCD screen here! I caught it and didn't even feel the resistance. :-(

    Play It Loud Computer Services -

  11. PmNGSMoFdWDsQpEl
    PmNGSMoFdWDsQpEl
    YyZApPZOopQj2Wem
    VIZtsGlSJO3lAcGC
    • L'adesivo che fissa la parte superiore del telefono è solo una stretta striscia sopra l'altoparlante voce. Fai scorrere il plettro lungo il bordo dell'altoparlante per evitare di danneggiare componenti interni.

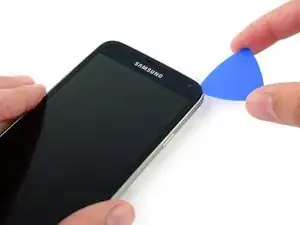
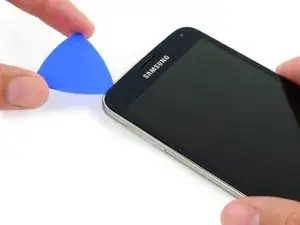
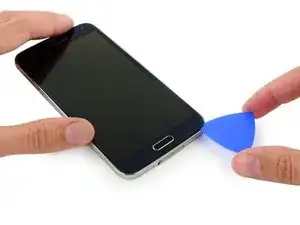
    • Fai scorrere il plettro lungo il bordo superiore del telefono, stando attento a non inserire il plettro troppo in profondità.

    I have been extra careful, and it did not prevent me to sever the flat cable in the upper left corner. The cable is very close and you should take extreme caution.

    Neocray -

    I accidentally sliced the flex cable and now my Digitizer refuses to work….LCD is still functional.

    Take heed lol. I found out the hard

    Blank -

  12. 1Psg3SUIsPFkAhEB
    1Psg3SUIsPFkAhEB
    XsBxQpHFWGFDmUGy
    3FUm43F2i2ZFNHHf
    • Fai delicatamente scorrere il plettro attorno all'angolo superiore sinistro.

    • Se l'adesivo oppone resistenza dopo essersi raffreddato, riapplica un iOpener caldo sopra la metà sinistra del telefono.

  13. KYZE4kTWWqT3jVO4
    KYZE4kTWWqT3jVO4
    cHZWvHbekCcNYdFG
    ekw5Y1Yj4oqAYT4J
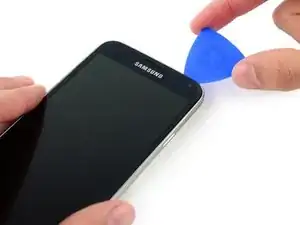
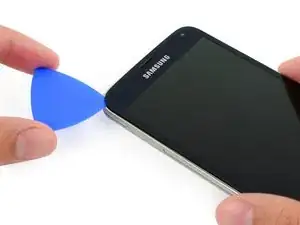
    • Fai scorrere il plettro lungo la metà sinistra del telefono e fermati all'angolo inferiore sinistro.

  14. DefZsUGNOQvu4VxB
    DefZsUGNOQvu4VxB
    YhWMpXhsOSYYlMiS
    • Fai scorrere il plettro attorno all'angolo inferiore sinistro del telefono, assicurandoti che rimanga saldamente in posizione in questo punto.

    • Nel passo seguente applicherai un iOpener sopra la parte del tasto home del telefono e devi evitare che il plettro possa scivolare fuori.

  15. PfLFpWYOEf5diLWN
    • Applica l'iOpener riscaldato sopra la parte inferiore del gruppo display.

    • In questa parte del telefono ci sono componenti fragili. Per proteggere il telefono devi essere sicuro che l'adesivo sia caldo e staccabile senza sforzo.

  16. soHBL5LFwXFQS2Bh
    soHBL5LFwXFQS2Bh
    QjGnHmA4ydBCUagU
    VS1sMZ1kdNpZngv6
    • La parte inferiore del telefono comprende i cavi piatti del tasto menu e del tasto home. Se inserisci il plettro troppo in profondità nel telefono, potresti tagliare questi cavi.

    • Fai scorrere solo la punta del plettro lungo il bordo inferiore dello schermo per finire di separare l'adesivo rimasto.

    How do I avoid damage? I tried this and now have to get a new screen, LED, and digitizer since the grey part under the glass snapped and cracked in many areas. I had to discard it and order a replacement to fix the phone.

    cbressijr -

  17. 2hgrZGU1RGKE1gSq
    2hgrZGU1RGKE1gSq
    uUNLHxbcL4EeE3lh
    • Fai leva con il plettro per separare il vetro dal telefono.

    • Se il pannello frontale non si separa facilmente, può essere necessario tagliare ulteriormente l'adesivo.

    Be aware that there is adhesive on the inner parts of the screen. Plan on replacing this screen and digitizer as well.

    AB Computer Services -

  18. Bj5QCRDSiXibxcEN
    Bj5QCRDSiXibxcEN
    SNiiKJiYfYPn5FgP
    • Se il pannello frontale non si stacca facilmente, può essere necessario separare l'adesivo presente sul cavo del tasto menu.

    • Questi cavi sono sottili e si danneggiano facilmente, quindi stai attento a staccarli solo dal gruppo display senza strapparli.

    • Inserisci uno strumento di apertura sotto i simboli del tasto menu del display e premi i cavi del tasto verso il basso per staccarli del pannello frontale.

    Accidentally cut one of the side buttons. It wouldn't come out, the screen was badly cracked.

    Nickoakz -

    My digitizer was glued to the chasis, the glass came up separately and the digitizer broke when I tried to pry it up.

    ken -

    That’s actually probably because you might not have heated the sides of the screen (where the adhesive is located) enough before prying up on the exterior border of the glass part. It’s very difficult to know the tolerance limits of such devices if you’ve never seen them apart before, and as such one can easily get confused between where the glass ends and the digitizer begins. On my first smartphone repair I broke a digitizer, so I know how it feels.

    OmniWeb Technical Education -

  19. N1GIqDhGGJ5dqynn
    N1GIqDhGGJ5dqynn
    idHQEUC2FOiIMmW2
    • Solleva leggermente, ma non rimuoverla, la parte del pulsante home del gruppo display.

    • Non rimuovere completamente il pannello frontale perché è ancora collegato da un connettore.

    • Se vuoi riutilizzare il cavo flessibile del tasto home, stai attento a non strapparlo dal pulsante stesso a causa dell'adesivo. Il tasto home funzionerebbe ugualmente, non così il lettore impronte digitali.

    The display assembly I purchased from ifixit.com included a new home button with a new flex cable. If you have the same, I'd recommend removing the home button in this step.

    pdub01 -

    Same here. My home-button flex cable extended under the main board rear cover plate, and would have required removing screws to extract. So I left the original home button installed, and removed the one that came with the new assembly.

    The ‘reverse order’ step are misleading. It is not trivial to reconnect the main screen flex cable to the main assembly — lots of trial and error to get it snugly plugged into the receiving connector. That part is glossed over. (Dissassembly is trivial. Reassembly is hard.)

    After putting the screen and connectors on, I learned that there’s some plastic edging on the BACK. I had to remove the screen since it effectively wraps the home-button key. The new screen cracked. Great.

    Peter Nicoll -

    Sansumg S5 is the stupiest design (for repair) ever.

    I have fixed s2,s3,s4, note, note 2 and note 3

    All of them, you can get into the logic board from the back without touching the screen assembly.

    With the S5, just a simple problem could cost you buying a new lcd assembly.

    You must remove the lcd in order to remove the screws for the logic board cover.

    I purchased a cracked lcd S5, so I can replace it and sell it. My mistake was I did not did a research on the tear down (thinking it should the same as previous S model.

    To make story short, lucky for me, I did a dry test of the entire phone, before glueing on the new lcd assembly.

    Because the front camera lens was damaged, cost $5.

    If I glued the lcd, it would be 50/50 chance that I would crack the new screen.

    So any repair that you need to do on the S5, you will have to consider the risk of breaking the LCD.

    I hope Samsung change the design on the S6. Which I doubt it. Because the higher cost of repair means people won't fix them = more new sells

    idevice Recycle -

    How can I find out if I messed my phone up . the person who glued the screen on didn't glue it on right , so I tried to take off the screen and I got it off but now that I try to put it back on the screen is black .

    cholitaesh21 -

    I know this reply is a bit late, over 2 years late, but I just wanted to add to idevice Recycle that the way "they" designed this phone is exactly as you described, to make it wayyyy more difficult to fix even the most simplest thing on this phone. Inverting the motherboard, designed exactly the opposite way of the S4 (as you described), from their standpoint of view, as you'd have to admit, was a brilliant idea on "they're" part.

    I've torn apart and fixed many cell/smart phones in my days thus far, but mostly iphones by far. A friend passed

    me one of these phones this past week. I've never messed with one before so you already know, even though I

    have much knowledge about them, this site was the first I visited about this phone. Needless to say, go figure.

    They did a really great job though making this phone one of the most difficult phones to do any type of repair

    on. Adhesive sucks. But eh, all is well with a bit of time and patience. Had to replace rear camera and middle

    bezel frame. Time to off it....

    you_mad.lil_fella -

    This guide may have been written for a different revision but the SM-G900F that I just repaired had glue sticking the entire of the rear of the screen to the chassis making it very difficult to remove. Had to use a spudger and push it down the inside of the phone separating the copper film from the chassis to free it up. Would be easy to damage the home button cable but I was ok.

    Adam -

    I had the same thing happen just now. I was working on a G900A. A real PITA!

    mcr4u2 -

    Is there a need to put adhesive after removing the screen?? If so, do you have an adhesive recommended...

    garrykufa2000 -

    Should be. i recommend using 3m strip double sided adhesive

    leiki42 -

    I had the same issue as idevice recycle. The model S5 that I was working on had a huge amount of glue on the back of the lcd which I wasn't aware of - this caused me to crack the glass which then literally broke the lcd in half (costing me £120 for a new screen!!!)

    I've repaired all manner of Samsung products over the years and I've never had any issues with any model apart from this one. My advice to anyone doing this repair is once you have managed to unstick the screen from the frame, before attempting to remove it, apply a bit of heat (but not too much, you don't want to damage anything) to the back of the phone where the battery normally sits. This is where all the glue on the back of the lcd is located which sticks the lcd to the frame of the phone - I wish I knew of this before trying to remove the screen!

    Clems -

    The guide needs to mention that the LCD is firmly glued.. Mine was bust anyway, but Step 19 is not fit for purpose.

    Dave -

    So this really blows. I needed to swap the logic board from a phone with a cracked screen to one with a good screen. Yeah that’s not happening. I now have two cracked screens… Thanks Samsung! The difficulty on this should be way higher. As others have said, the screen is glued on the underside over a large portion where the copper foil is. It’s not coming up easily or in one piece.

    Jeremy Buseman -

    If you want to make the reassembly easier, be careful to not separate the Home button assembly, from the glass. Instead, just carefully pry away the soft button adhesive connectors.

    OmniWeb Technical Education -

  20. qhyARYwgfY5QPOTE
    qhyARYwgfY5QPOTE
    MS1XRNkYHaNbaO3C
    HtpMkJeNBEvjPVpM
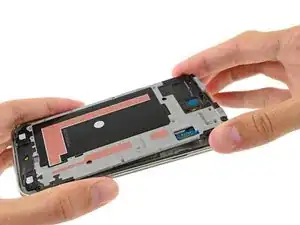
    • Usa l'estremità a punta di uno spudger per sollevare dal suo zoccolo sulla scheda madre il connettore del cavo del gruppo del pannello anteriore.

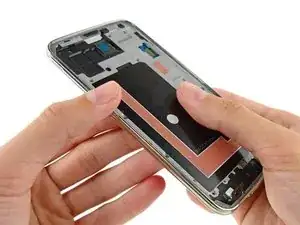
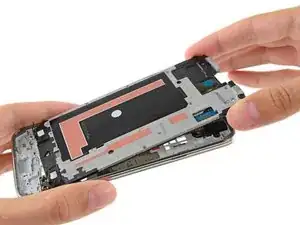
    • Ora si può rimuovere dal telefono in tutta sicurezza il gruppo del pannello anteriore.

    • Se il tuo schermo sostitutivo non ha un pulsante home, segui la nostra guida al gruppo pulsante home per trasferire il tuo vecchio tasto nel nuovo schermo o per installarne uno di nuovo.

    Absolutely wonderful! Worked like a charm. This is the easiest replacement I have seen so far on an Android. :)

    Paul Frutiger -

    This was all a breeze until I removed the screen and the LCD and digitizer crumpled on me now I have to replace the whole thing not just the charge port which was the initial issue… Great guide though and thanks it helped. Minus the panic attacked when all the parts started to crack and break as I removed the glass and now digitizer or LCD stayed safe for replacement.

    cbressijr -

    Be VERY careful of the flex ribbon on the LCD …it'll break with the slightest twitch…one of mine ripped totally in half

    Blank -

    please i need number lcd samsunggalaxy s 5 it is g 900 a or what?

    fady awad -

    The difficulty of changing the S5's display is enormous. Not only is it glued around the edges, it's also glued strongly to the midframe. If you ignore this, damage is inevitable. The digitizer flex cable is also very easy to kill. Glue sucks. When assembling the display, the edge bonding is not enough; you need special double-sided adhesive tape that is stuck to the midframe so that the display does not fall out again so quickly. Before doing this, you have to thoroughly remove the old adhesive on the edge. I have successfully performed this procedure once but would never do it again.

    Karl Napf -

  21. DLQUBMAVlE5QCmJT
    • Rimuovi le dieci viti Phillips #000 da 3,4 mm dal lato display del telaio centrale.

    It’s probably a good idea to remove (and subsequently screw back in) these screws in a sort of “star fashion” (e.g. alternating from top-to-bottom, left-to-right) in order to equally distribute the tension.

    OmniWeb Technical Education -

  22. YfT26JYqScUXJyHG
    • Capovolgi il telefono e rimuovi le viti seguenti dal lato batteria del telaio centrale:

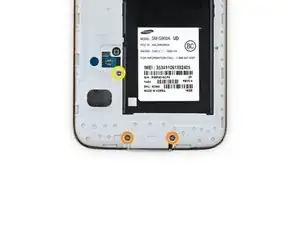
    • Due viti Phillips #000 da 4,4 mm vicino alla presa USB sul lato batteria del telaio centrale

    • Una vite Phillips #000 da 4,4 mm

  23. P2EMIXYQkM5nKMLZ
    P2EMIXYQkM5nKMLZ
    EsRbVOklL1yX5Wvb
    aHPiOoP6vjkWxVFE
    • Fai delicatamente scorrere uno strumento di apertura di plastica lungo il bordo sinistro interno del telaio centrale per sganciare le tre clip di plastica bianca.

    There are also two more white clips just along the edges of the battery connection terminals (to the right of the 3 shown in the pictures). Using a spudger to pry these loose too will make separating them later much easier.

    Peter Morris -

    Yes, I second that! You definitely need to loosen those two other clips or you may have problems separating this interior frame from the midframe.

    OmniWeb Technical Education -

  24. oau5VuqXgsb6UDIT
    oau5VuqXgsb6UDIT
    BFKXEZTSZnUZfZ3X
    • Il telaio intermedio è composto di due metà che rinchiudono la scheda madre.

    • Solleva delicatamente i bordi lunghi della cornice cromata allontanandoli dal telefono per separare le due metà del telaio centrale.

    • Può essere utile premere dall'interno dell'alloggiamento della batteria, ma stai attento a non piegare la metà interna del telaio centrale, dove è montata la scheda madre.

    maybe my phone was stuck a little, but i had to work it pretty hard to get this step. Just take your time.

    andrew beals -

    Personally I wouldn’t recommend separating the midframe-motherboard assembly like this. What I recommend is the following: 1. Insert the flat end of a spudger between the main speaker grille and the main camera assembly (technically, between the gray and black plastic pieces. 2. Pry up on the black plastic piece (using the gray plastic piece as a fulcrum) in such a way that allows you to lift that end of the interior midframe-motherboard assembly from the inner midframe (see step 27). THEN 3. Once you have created enough space, insert a triangular pick tool, and THEN use a plastic opening tool to pry any remaining corners out of the silver bezel (see step 26). WARNING: BE VERRRRY CAREFUL WHERE YOU INSERT TOOLS or apply pressure because there are many sensitive components along that top part (where the cameras and infrared sensors are located).

    OmniWeb Technical Education -

  25. tBRwTBSTmFpdVyXy
    tBRwTBSTmFpdVyXy
    LkHrsLEEMEtKwVKw
    • Continua dalla parte destra della cornice cromata, allontanandola dalla parte interna del telaio centrale, per separare le due metà.

    Personally I wouldn’t recommend separating the midframe-motherboard assembly like this. What I recommend is the following: 1. Insert the flat end of a spudger between the main speaker grille and the main camera assembly (technically, between the gray and black plastic pieces. 2. Pry up on the black plastic piece (using the gray plastic piece as a fulcrum) in such a way that allows you to lift that end of the interior midframe-motherboard assembly from the inner midframe (see step 27). THEN 3. Once you have created enough space, insert a triangular pick tool, and THEN use a plastic opening tool to pry any remaining corners out of the silver bezel (see step 26). WARNING: BE VERRRRY CAREFUL WHERE YOU INSERT TOOLS or apply pressure because there are many sensitive components along that top part (where the cameras and infrared sensors are located).

    OmniWeb Technical Education -

  26. xEeTrYOZh1MgDZd2
    xEeTrYOZh1MgDZd2
    3avGRewLcqsqBw1U
    • Usa uno strumento di apertura di plastica per staccare eventuali angoli ancora aderenti della cornice cromata.

  27. 15SyYwLCP6BqmnEf
    15SyYwLCP6BqmnEf
    JOwAdcljaiJ1rZXT
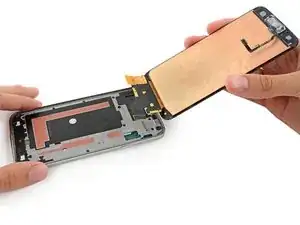
    • Rimuovi delicatamente il gruppo telaio centrale interno/scheda madre dal telaio centrale interno bianco.

    Did two of these phones, and a small white hard plastic cap fell out. Can anyone tell me where this goes on reassembly? See pic: http://library-static.snapfish.com/libra...

    Brian Guild -

    The white plastic cap which fell out is actually the piece that covers a small hole marked R2 near the original philips head screw you remove when first disconnecting the small display connector. The good news is that this cap can be put back on after fully reassembling the phone.

    Brian Guild -

  28. v6P3IL65vPaNOV2O
    • Svita l'unica vite Phillips #00 da 3,0 mm che fissa la scheda madre al telaio centrale.

  29. rlNULZdO31NOikg2
    rlNULZdO31NOikg2
    XpSpdmjnJuBRfiAL
    OZDGXq1SbVamTNy6
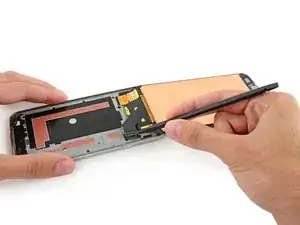
    • Spingi, ma non rimuoverla, la scheda madre per allontanarla dal telaio centrale e consentire l'accesso ai connettori sul retro.

    • Non provare a rimuovere completamente la scheda madre perché è sempre collegata al telaio centrale interno dal connettore Micro-USB della scheda figlia.

    • Appoggia la scheda madre su una superficie piana pulita e tieni con una mano il telaio centrale in modo di lasciar libera l'altra per lavorare sul gruppo scheda madre.

  30. ax2MfJfFmgOUhRFW
    ax2MfJfFmgOUhRFW
    vHqKh4ogPUhqFv4n
    tmYNMDKd2ohGGnEC
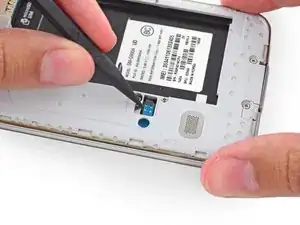
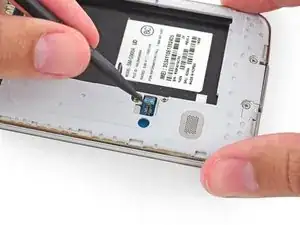
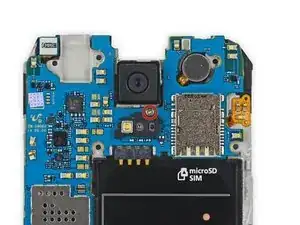
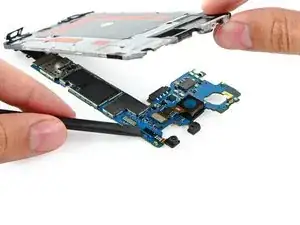
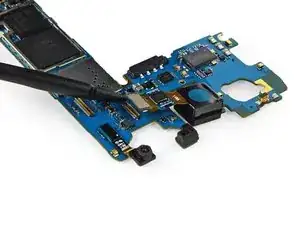
    • Usa l'estremità piatta di uno spudger per disconnettere il connettore della fotocamera posteriore verso l'alto dal suo zoccolo sulla scheda madre.

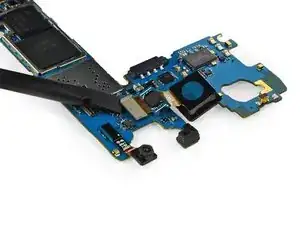
    • Rimuovi la fotocamera posteriore dalla scheda madre con un paio di pinzette.

    Does any one know what the connection type is that connects the camera to the mother board? I'm not sure what to search to find it.

    Mason Henke -

Conclusione

Per rimontare il tuo dispositivo, segui queste istruzioni in ordine inverso.

Sam Goldheart

Membro da: 19/10/12

465140 Reputazione

11 commenti

has any one replaced the camera and now you get the warning camera filled and the led light fails each time you click the app?

Aaron -

did you ever figure out how to fix that, i have the same problem

Stuart Orellana -

Outstanding guide!! My rear facing camera got smashed in a bike accident (key in the same pocket as phone - dumb...) and the impact didn't totally disable it, but it lost the ability to properly focus at any but really close distances. This guide made the replacement process completely straightforward and if not "easy" at least a whole lot less daunting. Especially helpful were all the warnings and advice about dealing with the little itty bitty cables at the touch and home buttons at the bottom of the screen.

One item that I might add to this guide - I found it helpful to use multiple opening picks to keep the already cut adhesive around the edges of the display from re-sticking itself as I continued to slowly heat and cut and heat and cut. It's very tenacious adhesive and it really likes to cling back to itself, cool and re-solidify before you get done cutting it all.

Most importantly, after doing this repair, my phone is back to 100% with a perfectly working camera and all functions normal. YAY!!!

Edward Williams -

... and, here's the actual repair - https://youtu.be/Q2oj6zpJmTQ compressed to just under two minutes

Edward Williams -

I got a phone from someone and the camera was broken, so I replaced it. After that it still doesn't worked, so I wiped the cache, made a factory reset, etc, still nothing. Does this happened to someone else here? What else can affect the proper function of the camera?

Csongor Bakos -

very nice help, how can I help translating to portuguese?

joao4simoes -

Glad to hear you want to contribute to the iFixit guides! We're working on public translations and will let you know when Portuguese translations are possible. Cheers!

Jasper Fleischhauer -

How do you affix the screen back on? Do you need to place new adhesive or just reuse the old one?

pyrexid -

My screen was STRONGLY glued to the midframe, it was impossible to remove it without breaking it, be very careful with the copper adhesive in the midframe!!! I can't even understand how this guide doesn't mention it properly!

Pedro -

Great guide. I replaced the damaged outer plastic chrome bezel, front and rear camera following the instructions carefully and all went perfectly well. Phone is like new now.

Gary Avery -

You really need to let people know about the amount of adhesive on the back of these screens. They are NOT easy to take off (it’s almost as if they have superglue on the back of them) and they can crack with the slightest of pressure. Clearly going from this guide, the adhesive from the back of the screen had already been removed, making this look like an easy process when it actually isn’t :(

Clems -