Introduzione

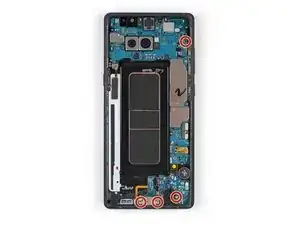
Usa questa guida per sostituire il gruppo display, comprensivo di telaio, del Samsung Galaxy Note8.

Prima di smontare il tuo telefono, scarica la batteria sotto il 25%. La batteria può prendere fuoco e/o esplodere se forata inavvertitamente, ma le possibilità che questo accada sono molto più basse se la cella è scarica.'''

Questa guida prevede la rimozione della cover di vetro posteriore; ti servirà dell'adesivo sostitutivo per riattaccare la cover stessa al telefono.

Aprire il Samsung Galaxy Note8 danneggerà le guarnizioni impermeabili del dispositivo. Se non sostituirai i sigilli adesivi, il tuo telefono funzionerà normalmente, ma non sarà più resistente all'acqua.

  1. NL6mFMekMgZyS5GW
    • Spegni il tuo telefono.

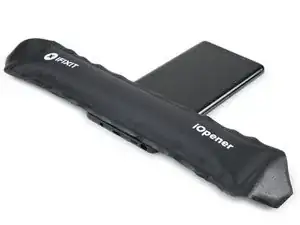
    • Prepara un iOpener per ammorbidire l'adesivo sul retro del Note8.

    • Applica l'iOpener sul retro del Note8, lungo il lato del pulsante di accensione.

    I used a heat gun to soften the glue - worked it around the edges, moving the heat gun quickly. As this is my first attempt, I’m still calibrating on this - but other guides mention getting the back cover hot enough so as it’s just too hot to touch. I also have a temp probe on my multi-meter, and I measured appx. 75 deg. C.

    One of the other guides showed using a electronics hot plate set to 105 deg C for 60 sec.

    Phil Brooks -

  2. SGkLVwYb6ppAAHgN
    SGkLVwYb6ppAAHgN
    4mhJcBy1fZ4akNqD
    MESslCDbHbGpJa4J
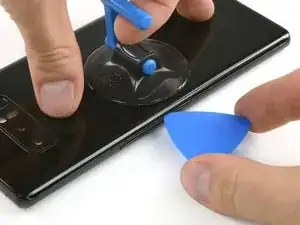
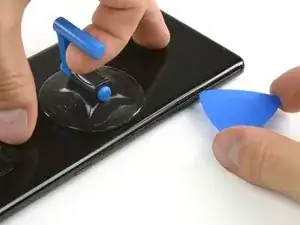
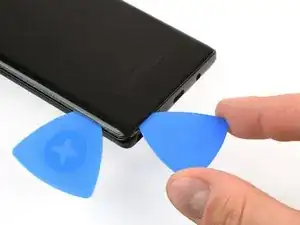
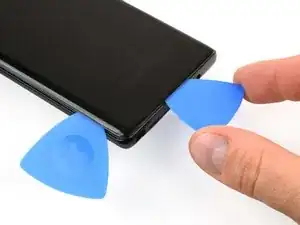
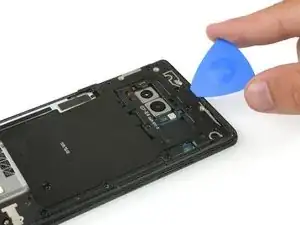
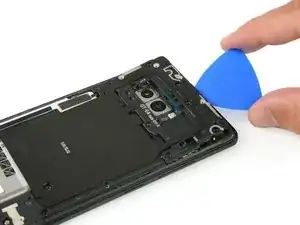
    • Usa una ventosa per sollevare il case posteriore e un plettro di apertura per inserirlo nella fessura che si è creata.

    • Siccome i bordi della cover posteriore sono leggermente incurvati, è meglio inserire il plettro da sotto e inclinandolo.

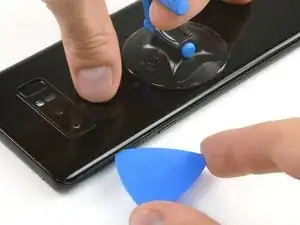
    • Partendo dal centro del lato, taglia l'adesivo mentre tiri sulla ventosa.

    • Stai attento a non far leva troppo forte con il plettro di apertura per evitare di rompere il case posteriore. È meglio tirare sulla ventosa e usare il plettro per tagliare l'adesivo.

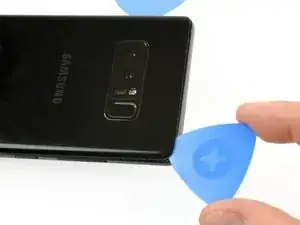
    • Fai scorrere il plettro verso l'angolo inferiore e lascialo qui per impedire che l'adesivo aderisca di nuovo alla cover.

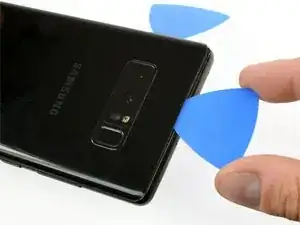
    • Prendi un'altro plettro e fallo scorrere verso l'angolo superiore.

    • Se diventa sempre più difficile spostare il plettro, dovrai forse riscaldare e applicare di nuovo l'iOpener sulla cover posteriore.

    I used an X-acto knife with the flat blade to get it started. I tried using the suction cup - but it’s difficult to get good leverage. Once I got the cover started - I used the metal pry tool (sharpened with a dremel file) and a business card to work it open.

    This is definitely the hardest part.

    Phil Brooks -

    Once off I see all the glue on the curved part of the chassis NOTON THE BACK. Apply heat to curved edges.

    Lyle Walsh -

  3. sSqDWoFHObK56xJp
    sSqDWoFHObK56xJp
    nxncMfYm2KUVYrl1
    diuWRRAFYKVkyLBY
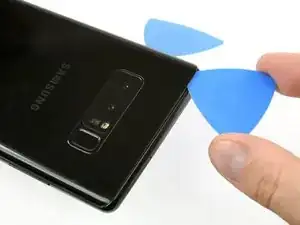
    • Prendi ancora un'altro plettro di apertura e fallo scorrere attorno all'angolo e lungo il bordo superiore.

    • Scalda di nuovo con un iOpener se necessario.

    • Lascia il plettro nell'angolo superiore destro per evitare che l'adesivo aderisca di nuovo.

  4. edGFZZXkGbZcYJvY
    edGFZZXkGbZcYJvY
    BQgRHIcKCAqUZM3w
    onhvVuYXi4gs2DqJ
    • Gira il dispositivo e inizia a tagliare l'adesivo nella parte inferiore con un altro plettro di apertura.

    • Lascia il plettro nell'angolo inferiore destro per evitare che l'adesivo aderisca di nuovo.

  5. ecHSbxpCmtaISrbQ
    ecHSbxpCmtaISrbQ
    XjG3DFTqN2VORed2
    lUAISUsw5llMA1N2
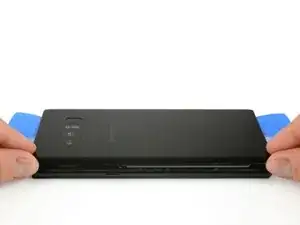
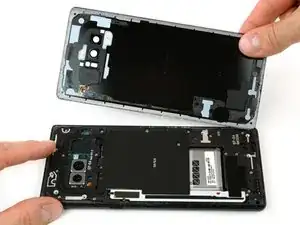
    • Quando hai finito di tagliare correttamente l'adesivo di tutti i tre bordi, puoi sollevare lentamente la cover posteriore.

    • Non forzare per aprire la cover. Usa di nuovo un iOpener per ammorbidire l'adesivo se il case posteriore non viene via o inizia a piegarsi.

    • Stai attento al connettore del sensore impronte digitali quando apri il case. Dovrai forse scollegarlo come descritto nel passo seguente.

    I broke the back camera cover for the NUT 8 and then I bought a commercial cover and installed it but the quality of the picture became very bad and my question is, do you know where to get the original cover at a reasonable price?

    Loord Mohammad -

  6. DDdOIeW2OV56XhYh
    • Stacca il sensore impronte digitali con delle pinzette.

    • Può essere che il connettore si sia già scollegato mentre aprivi la cover posteriore.

    don't skip disconnecting the sensor, even if isn't still glued to the case. it has to move away from the NFC/charging coil assembly in order to free the latter so it can be lifted away from the battery.

    a nonni mouse -

  7. cvElNvbILNsVRWGV
    • Togli il case posteriore.

    • Per preparare il rimontaggio, rimuovi ogni adesivo residuo dal telefono e pulisci le zone incollate con alcol isopropolico e un panno privo di pelucchi.

    How do you swap the fingerprint sensor

    Lukus Carr -

    You can use a tweezer to swap the fingerprint sensor, you might be careful when doing the step 6, additionally, a tweezer will be helpful when reassemble the fingerprint sensor. please note that your new back cover needs to have the fingerprint adhesive on. most of the product did not have. i have get a LUVSS brand from amazon which came with all OEM adhesive and full set tools, even a B6000 glue, best option to go for replacing the note 8 back glass

    ggmall -

  8. oYxXTk3numBwPCKL
    • Svita le dieci viti a croce Phillips #00.

  9. m4tPAKEExvAdTYeh
    m4tPAKEExvAdTYeh
    NAkZSOfuSsQSI5tB
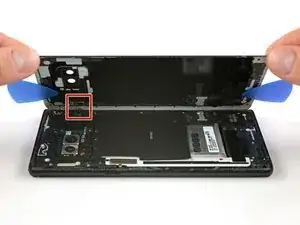
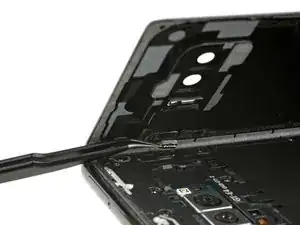
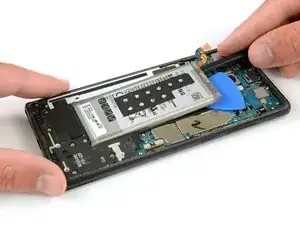
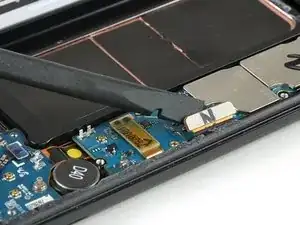
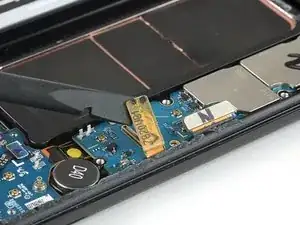
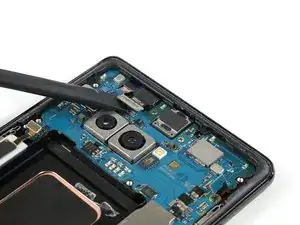
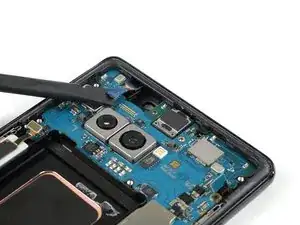
    • Inserisci un plettro di apertura nel bordo superiore, fra il gruppo antenna NFC e bobina di ricarica e il case.

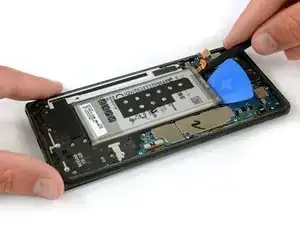
    • Fai leva sulla parte superiore per sollevare il gruppo dal case.

    Solve the problem of moisture during charging

    moaed aljnapy -

  10. NKVr2Lr1A2oxkNV3
    • Togli con cautela verso l'alto il gruppo antenna NFC e bobina di ricarica completo.

    • La parte inferiore sinistra del gruppo aderisce leggermente al telaio.

  11. PVIpNYP1kJOKKYFX
    • Usa l'estremità piatta di uno spudger per scollegare il connettore della batteria.

  12. XkTcXArPMNFDXJpf
    • Prepara un iOpener e applicalo sul display per almeno due minuti per ammorbidire l'adesivo sotto la batteria. Scalda ancora e applica di nuovo l'iOpener se necessario.

    • In alternativa, oppure se la batteria è gonfia, puoi applicare dell'alcol isopropilico sotto ciascun angolo la batteria e lasciare che penetri per diversi minuti per indebolire l'adesivo.

    Isopropyl alcohol worked great but flooded the main board and took all night to dry out

    Lyle Walsh -

  13. jVbAyEJXiTsIbO2b
    jVbAyEJXiTsIbO2b
    hSJiJkGRcjoSZAlA
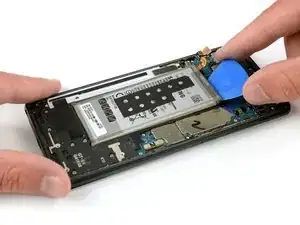
    • Usa l'estremità piatta di uno spudger per staccare la batteria partendo dall'angolo superiore destro.

    • Dovrei far leva contro il case direttamente al di sopra della scheda principale. Fallo con cautela per evitare di danneggiare i componenti vicini.

    • Può essere necessario dover scaldare e applicare ripetutamente l'iOpener per ammorbidire al massimo l'adesivo. La colla e tenace e possono essere necessari diversi tentativi per riuscire a infilare lo spudger sotto la batteria.

    • Usa lo spudger per staccare la batteria finché non riuscirai a inserire un plettro di apertura per evitare che l'adesivo possa incollarsi di nuovo.

    • Fai del tuo meglio per non deformare la batteria in questa fase. Le batterie al litio-ioni con involucro sottile e flessibile possono rilasciare sostanze chimiche pericolose, prendere fuoco e perfino esplodere se danneggiate. Non applicare una forza eccessiva e non forzare la batteria con attrezzi metallici.

    I really think this is much less risky if you just take out the motherboard. There is much less risk to heat the other components when you are loosening the battery adhesive and you can be more rough when getting the battery out. Especially (but not exclusively) if you are changing the screen anyway. Should be after step 29.

    Additionally, I went at the battery from the side with a credit card and prying out the battery evenly across the length of the battery. I was even able to make a ‘ridge-peek’ from the card and screen and heat it from above while pushing down on the card and prying at eh same time. I got it out without any battery deformation. I would get one of those flat credit card shaped tools if I did it again because the credit card deformed and I had to keep flipping it.

    tobinmckenna -

    Didn’t need to heat or use alcohol to get the battery out - just gently kept prying. I used the metal pry tool that came with the battery replacement tool kit. But very careful not to puncture the old battery.

    Phil Brooks -

  14. G6AKUTtuVUIyElrZ
    G6AKUTtuVUIyElrZ
    iJWYKMGGJJoInGXD
    ZSHHpEhL5gFmt4Un
    • Usa l'estremità piatta di di uno spudger per far leva sotto l'angolo superiore sinistro della batteria, nella zona dove è posizionato il cavo flex.

    • Fai scorrere lo spudger lungo il lato della batteria per rompere tutto l'adesivo rimasto.

    • Quando forzi il distacco della batteria, mantieniti nelle aree indicate in arancione. Evita l'area rossa centrale che corrisponde al retro del display.

  15. TDqkBeRePDKKGwjr
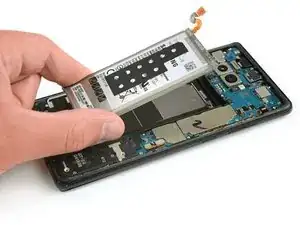
    • Solleva la batteria fuori dal case.

    • Non riutilizzare la batteria dopo che è stata rimossa, perché questo rappresenta un rischio per la sicurezza. Sostituiscila con una nuova cella.

    • Rimuovi dal telefono tutto l'adesivo rimasto e pulisci le aree che erano incollate con alcol isopropilico e un panno privo di pelucchi.

    • Segui questa guida per applicare l'adesivo della batteria.

    • Segui questa guida per applicare l'adesivo pretagliato.

    do you mean when replacing display the battery should also be replaced?

    John Kenneth -

    Hi John,

    Since you can replace the display without removing the battery, you do not need to replace the battery.

    Arthur Shi -

    Great guide!

    Quick note. If you are changing out the back cover or cant get touch ID reconnected Warm it up some on the back cover. It should pop right off with a spudger. Then reattach it inside the phone. Make sure the adhesive on back cover is sticky enough to hold it in place. Then set back cover on top!

    jake765111 -

  16. YJbY5iBiEsphWKZN
    YJbY5iBiEsphWKZN
    dLeDmMuklCDUvDFj
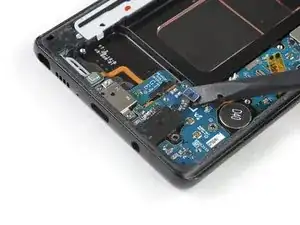
    • Inserisci uno strumento di estrazione schede SIM nel piccolo foro sul lato sinistro del bordo superiore del telefono

    • Premi per espellere il vassoio.

    • Rimuovi la scheda SIM dal telefono.

  17. hnbRJAGbDOqNd3cb
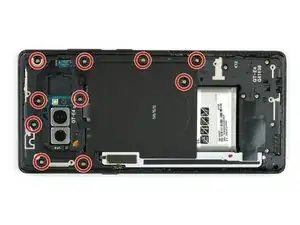
    • Rimuovi le sei viti a croce Phillips #00 presenti sul gruppo altoparlante nella parte inferiore del telefono.

  18. pjTaCPhxiJgTKBMT
    pjTaCPhxiJgTKBMT
    3KTOBSymhaigZIWs
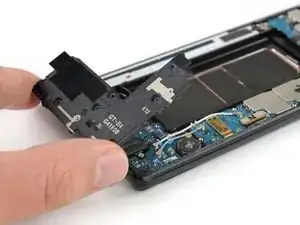
    • Usa l'estremità piatta di uno spudger per staccare il gruppo altoparlante.

    • Il distacco avverrà al di sopra della scheda madre e del cavo di antenna. Esegui l'operazione con cautela per evitare di danneggiare i componenti vicini.

    • Rimuovi il gruppo altoparlante.

  19. VyEPZjHuSIPDZ3v4
    VyEPZjHuSIPDZ3v4
    NsNd51gqfygmVnDP
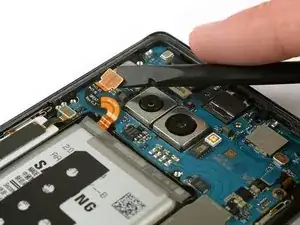
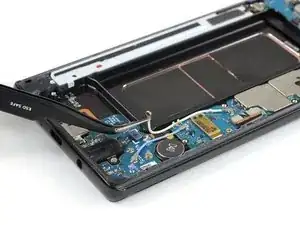
    • Rimuovi i due cavi coassiali che vanno dalla scheda figlia alla scheda madre.

    • Se vuoi sostituire il tuo gruppo display insieme al telaio, non è assolutamente necessario rimuovere i cavi coassiali. Tuttavia, ti suggeriamo di farlo lo stesso per evitare di danneggiare o mettere in tensione i cavi stessi.

    • Usa delle pinzette per scollegare, con cautela, entrambe le estremità del cavo coassiale bianco per rimuoverlo.

  20. VlEqPhANJqDJbImK
    VlEqPhANJqDJbImK
    IT2JEqKDQvsyG62H
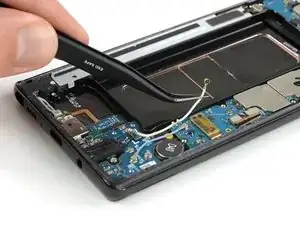
    • Scollega con delicatezza, usando delle pinzette, entrambi i terminali del cavo coassiale blu per rimuoverlo.

  21. ck2rX6WnEKnMIFH3
    ck2rX6WnEKnMIFH3
    XR2gQR2HqZcD3jSe
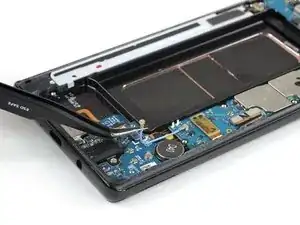
    • Usa l'estremità piatta di uno spudger per scollegare i due cavi, quello del display e quello del touchscreen.

  22. jgiNvkxXqBkp6l5C
    jgiNvkxXqBkp6l5C
    AQKnrQbAT4VqbXKM
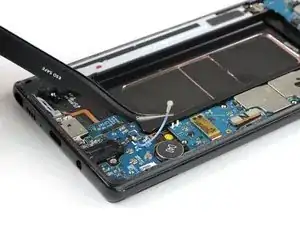
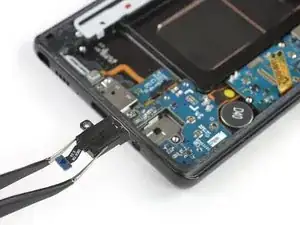
    • Usa l'estremità piatta di uno spudger per scollegare il cavo flessibile del pulsante di accensione.

    • Disconnetti il cavo del flash e del sensore di prossimità.

  23. FUcW1fSYMdZYEprY
    FUcW1fSYMdZYEprY
    1qnOmSsIrECaLkST
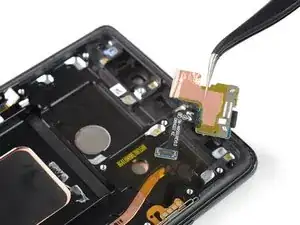
    • Usa l'estremità piatta di uno spudger per scollegare il connettore del flex della fotocamera anteriore.

    • Rimuovi con delicatezza la fotocamera anteriore utilizzando delle pinzette.

  24. tpARijNsD2NEYKEF
    tpARijNsD2NEYKEF
    Ph6kQPNxVFdXDhLG
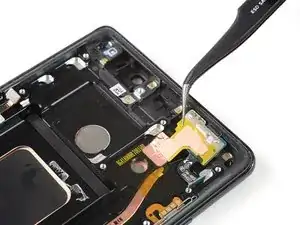
    • Usa l'estremità piatta di uno spudger per scollegare il connettore del cavo flessibile dello scanner dell'iride.

    • Rimuovi con delicatezza lo scanner dell'iride con delle pinzette.

  25. P5RvDaUMJfNYAlll
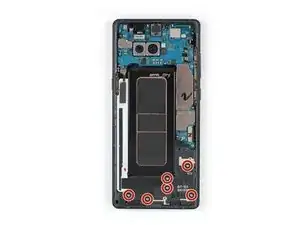
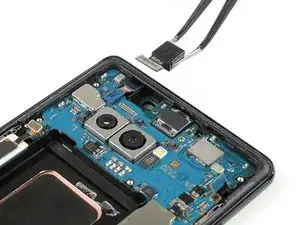
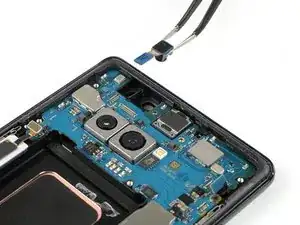
    • Rimuovi le quattro viti a croce Phillips #00 che fissano la scheda madre, il jack cuffie e la porta di ricarica.

  26. fIDE4ZPbZhDMsZhH
    fIDE4ZPbZhDMsZhH
    WUiCqXQtFwOExywd
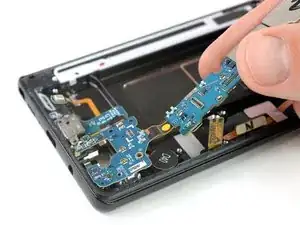
    • Usa l'estremità piatta di uno spudger per scollegare il connettore del cavo flessibile del jack cuffie.

    • Con delle pinzette, rimuovi, con delicatezza, il jack cuffie.

  27. B1Um1jdUVQP6d2Lf
    B1Um1jdUVQP6d2Lf
    LYjEOo2KcVs1fRYm
    • Prepara un iOpener e applicalo sulla parte inferiore del telefono per ammorbidire l'adesivo sul cavo flessibile del microfono.

    • Con delle pinzette, solleva delicatamente il microfono dal suo alloggiamento per liberarlo dal telaio centrale.

    • Non rimuovere il microfono. È ancora collegato alla scheda figlia.

  28. rIcZkVTIiunmaOQK
    rIcZkVTIiunmaOQK
    Qn56JTejpaGF36Jj
    • È possibile rimuovere la scheda madre lasciando al suo posto la scheda figlia. Tuttavia, il connettore del cavo flessibile della scheda figlia è disposto sul retro della scheda madre e non è facile trafficarci su mentre tieni in mano la scheda madre.

    • Nel caso tu preveda di rimuovere la scheda madre lasciando al suo posto la scheda figlia, presta particolare attenzione a non danneggiare alcun componente circostante mentre disconnetti il cavo flessibile.

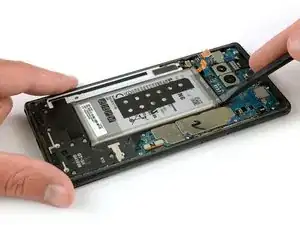
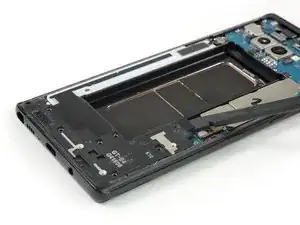
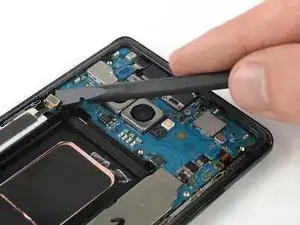
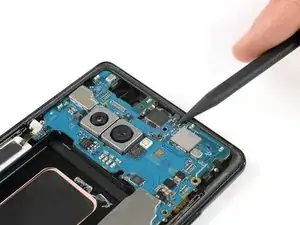
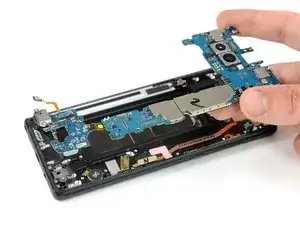
    • Usa l'estremità a punta di uno spudger per sollevare la scheda madre finché non riesci a prenderla bene con le dita.

    • La scheda madre è libera di muoversi sul telaio centrale, quindi ci sono diverse posizioni dove puoi infilare lo spudger per sollevarla. Fai attenzione a non danneggiare i componenti circostanti.

  29. PB2P1uaUIIPh3ID5
    PB2P1uaUIIPh3ID5
    ymmRaIbUWdjTYex6
    LNNMtppSFo5jLrIN
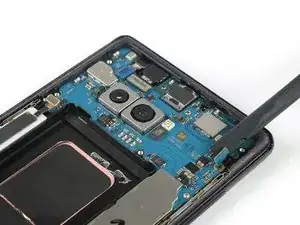
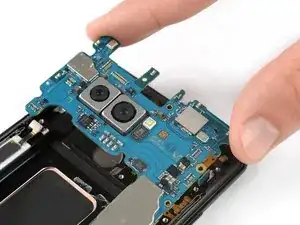
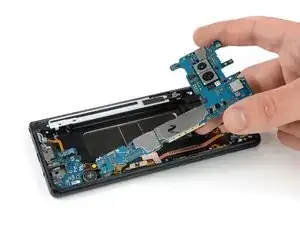
    • Solleva con delicatezza la scheda madre.

    • Per sollevare dal suo alloggiamento la scheda figlia, tira entrambi i componenti lentamente verso la parte superiore del telefono mentre li sollevi verso l'alto.

  30. jcMiUpoXgmrsZvfw
    • Prepara un iOpener e applicalo sull'intero telefono per ammorbidire l'adesivo in corrispondenza del motore di vibrazione sul lato inferiore e dell'altoparlante voce sulla parte superiore.

  31. YB2O4fTC43mhxouf
    YB2O4fTC43mhxouf
    uxoZZiIG2Nbme4XZ
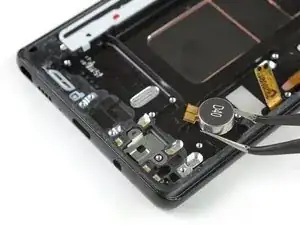
    • Rimuovi con delicatezza il motore di vibrazione con delle pinzette. Presta attenzione al suo cavo per evitare di romperlo accidentalmente.

    • Usando ancora le pinzette, rimuovi l'altoparlante voce.

    • Controlla se il tuo gruppo display sostitutivo ha già un altoparlante voce integrato. Se è così, non serve rimuovere l'altoparlante, ma potresti optare per tenerlo come parte di ricambio.

  32. 26mNiYmUTq5RMkA2
    26mNiYmUTq5RMkA2
    YipTPATEBZJPOsM1
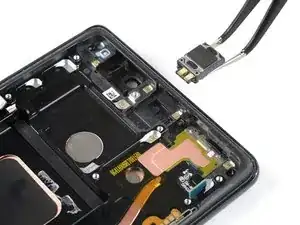
    • Usa delle pinzette per sollevare il cavo del flash e del sensore di prossimità e staccare delicatamente il nastro adesivo che lo tiene attaccato al telaio centrale.

    • Rimuovi il gruppo del flash e del sensore di prossimità.

  33. uHJ4foN4IXXcDKBe
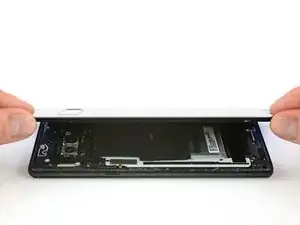
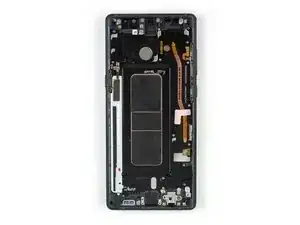
    • Per rimontare il tuo telefono, trasferisci tutti i componenti che hai rimosso al nuovo gruppo display dotato di telaio. Applica di nuovo l'adesivo dove è necessario.

Conclusione

Se possibile, accendi il tuo telefono e verifica la correttezza della riparazione prima di installare del nuovo adesivo e sigillare nuovamente il telefono.

Per rimontare il tuo dispositivo, segui queste istruzioni in ordine inverso. Applica del nuovo adesivo dove è necessario.

Dominik Schnabelrauch

Membro da: 23/11/16

200687 Reputazione

10 commenti

i would like to suggest a time of (52) Minutes and (36) Seconds plus thanks for the guide

Jesse Looney -

check, plus you’re welcome :)

Tobias Isakeit -

great guide!

Bryan Cruse -

Very excellent guide. Great pictures. Pictures must have been done in some sorta studio setting or edited for only what is needed for the illustration of every step. This was my first attempt at self repair on a cellphone, but I’m no slouch. I repair and refurbish all sorts of electromechanical devices and was once employed to do brain surgery on massive water cooled mainframe computers. Some of the same rules apply; have proven procedures, follow instructions, control your work space, and invest in the best tools. Since this was my first, I was not in a hurry. It took me all of 6 hours, but I was meticulous, repeated many steps to increase my confidence, and had all the time needed to do what I needed to do. Grateful for no longer being a slave to phone repair/insurance scams!! DIY forever!

Rex Burrus -

Thanks for the great guide. Unfortunately, ifixit does not stock Note 8 parts in Australia. When I went to purchase the display assembly with frame from a parts supplier, they refused to sell me the part as they said that a number of customers have experienced the LCD not working on the new assembly after repairing their phone. The wholesaler would not honour the warranty as all screens are tested before dispatch, therefore, the LCD must have been damaged in the repair process. I could understand if the repair included installing a new screen into an existing frame but because all parts are being transferred into the new assembly and the parts available for sale all come with adhesive, is there any step where it is likely that the LCD could be damaged even if extremely careful?

Ian Bishop -

Hello Ifixit team, regardind note 8, I have the Corean model SM-N950N, can you tell if it has the same display assembly as SM-N950F?

What I mean is does all the connectors of a 950F display fit perfectly to a 950N board and frame and everything, reason is the 950N board I have is a 256gb storage and I don’t want to switch to 950F board with only 64gb storage, thanks in advance, Adrian

Adrian -

You may want to check the compatibility list of the spare part here: Galaxy Note8 Screen

Unfortunately, the Korean model (905n) is not listed separately but the part seems to fit every other model. So my guess is that the Korean version won’t be any different and the part will fit. Google searching for a spare motherboard might shed some light on different dimensions if they are some due to the difference in storage.

Tobias Isakeit -

Thanks for the amazing guide! Really clear and worked well for my phone.

Here are a few notable things from my attempt:

- It would be very nice to know that a new battery might be required in the “necessary parts” in the very beginning. I only found out this on step 15 and I was already at removing the battery. At the end, i used my original one and don’t think there’s really an issue.

- Step 31 was by far the hardest - if you’re considering / attempting to perform the fix, pay extra attention to removing the vibration motor and earpiece speaker. They aren’t really easy to pull off with the tweezers as the pictures suggest, even after heating up the other side.

I ended up breaking the earpiece speaker in half and exposed the copper coil there..which i almost tore from some pulling. Luckily, it still works, but the quality is a little bit worse than it was.

Overall, though…very happy that this comprehensive guide exists! My phone looks brand new right now…save for the very slightly misplaced back panel.

Thanks!

Kidney Fluffmonster -

Salve,il mio display ha già il frame però non ci sono i pulsanti in alluminio Come faccio a rimuovere i pulsanti cortesemente Grazie

Martina Lochis -

@isakrittl of course I have checked the compatibility on the site before I asked, but still not confirmed, it’s not so easy and convenient to “try” and buy the part in hope it works, thats the reason I asked here where you guys dissasemble a lot of devices and my note 8 among them, this is the reason I asked thinking you guys know about all its variants, even technicians from repair shops I went to have different oppinions some say it’s a single display for all note 8 variants some say it’s different for 950N at least, so I want to know for sure before I order, thanks

Adrian -