Introduzione

Segui questa guida per sostituire il gruppo display incluso il telaio del tuo Huawei P9.

Prima di smontare il tuo telefono, scarica la batteria sotto il 25%. La batteria può prendere fuoco e/o esplodere se forata inavvertitamente, ma le possibilità che questo succeda sono molto più basse se è stata scaricata in precedenza.

  1. 4PyHbYrcjSvJWL1j
    4PyHbYrcjSvJWL1j
    DNEduDWvuNoZPq1J
    c6BOqyVgVAnvZQVi
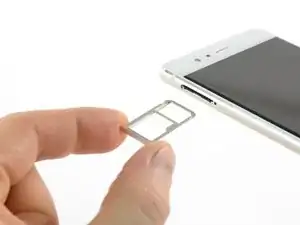
    • Per prima cosa, spegni il telefono e rimuovi il vassoio della scheda SIM.

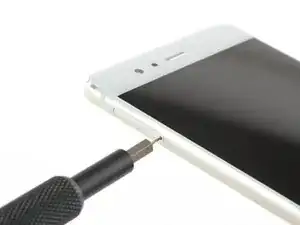
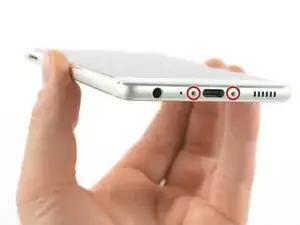
    • Svita le due viti Pentalobe P2 posizionate sul fondo vicino alla porta USB-C.

    • Se lo schermo è rotto, puoi usare del nastro adesivo per proteggere gli occhi dalle schegge di vetro e per avere una presa migliore quando apri il telefono.

    your supply kit -IFIXIT does not have a screw driver bit small enough to unscrew the two Pentalobe P2 screws for my Huawei Mate P9 pro

    phone. Where can I get help from ?

    Vincent Leung -

    Hi Vincent!

    Our Pentalobe P2 bits work perfectly in the Huawei P9. If you already have a driver handle that has a 4mm socket, you can use one of these bits in it and that should work fine. Otherwise, if you prefer the P2 screwdriver itself, you can find that tool here.

    I hope this helps!

    Kadan Sharpe -

  2. BRleOapCGqBVnTQC
    BRleOapCGqBVnTQC
    FwiZGa4HkhlOKIT3
    • Evita di sollevare lo schermo al posto dell'intero gruppo del telefono, in quanto così facendo potresti danneggiare lo schermo.

    • Usa un iSclack o una ventosa per separare il gruppo del telefono dal pannello posteriore.

    • Nel caso non riesca a sollevare il gruppo del telefono dal pannello posteriore, puoi inserire la punta di uno spudger nella presa jack e spingere il gruppo del telefono verso l'alto finché non crei una fessura tra il gruppo e il pannello posteriore. Quindi usa lo spudger per sollevare il gruppo del telefono dal pannello posteriore.

    • Aspetta a rimuovere completamente il pannello posteriore. C'è ancora un cavo di collegamento! Va dal sensore di impronte digitali al gruppo display.

    If you cant get suction because of cracks in the screen, use wide tape to create smooth surface.

    Kent Alexander Johansen -

    If your screen is smashed, and nothing else will work (iSclack etc), you can get a thin blade between the casing and the screen assembly and the bottom. The screen assembly can then be pried out. I fought with mine before discovering this. Be careful of the broken glass.

    Rob Collins -

    I struggled to remove screen with suction cups due to damage to the back case. I used a jim to pry from bottom by usb c port, worked well.

    Philip Lloyd -

    Be very carrefull as it can open in one fell swoop !

    Jean-Marc Boisseau -

    On my model, I had 2 Little torx screws beside the USB port. If so, the screen won’t come out with them on.

    Lola Gillet -

    Interesting, sure those were 6-starred (Torx) and not 5-starred (Pentalobe) like mentioned in step 1?

    Tobias Isakeit -

    Are there any tips to help loosen the screen after taking the screws out? I brought in an extra person to help with the suction cup whilst I tried to pry the screen away with it still only moving at most 1mm (maybe less) and not enough to get any pry tools in. Ending up using quite a lot of force - far more than I think I should be to no success. As it stands I’m just ending up doing minor damage to the base of the screen/case.

    A Birch -

    Hey A Birch,

    just for the case, I mention — it’s important to pull out the SIM card tray, otherwise, it will block the opening procedure and you’ll damage your phone. In case the frame is damaged or bent you’ll need more force to open the phone. In general, the opening procedure should be fairly easy.

    Dominik Schnabelrauch -

    On this step, I found it hard as the screen and the motherboard are attatched, but instead just the screen is coming up, any tips for getting under and lifting up the motherboard + battery. (Trying to do a battery replacement). The screen with that wire on Step 15 for some reference :)

    Nathan T -

    Received my kit yesterday and now trying to remove the screen from the case with the suction tool. Having extreme difficulty and cannot even get a pick in to prise it off. Still trying…

    Alan Farrow -

    Found it easy to remove screen from case using the sucker while holding the edge of the case down using the blue spudger that came with the kit. Came off in seconds…

    Alan Farrow -

    If you have difficulty removing the display from the case, make sure to not just remove the screen. Apparently, if the case has received a knock or the motherboard is sticking to the case, it can be very, very difficult to move the motherboard as well as the screen.

    However, the whole screen and motherboard assembly needs to come out. If only the screen moves, chances are the ribbon cable that attaches it to the motherboard may get pulled out of its socket or may even get damaged. I suggest to not use excessive force on the display and be very careful when attempting to pry it open. You need to get a purchase on the whole screen/motherboard unit, not just the screen.

    Using a lever through the USB C port and the hole for the headphone jack may help to get the motherboard assembly moving. Be careful, though to not damage theses parts.

    I think the guide should be amended to point out the possibility of moving the screen only and its associated dangers.

    Thomas Kuehne -

    I found the screen/motherboard very difficult to move. I used the sucker (down near the USB/screw end) and the broad end of the spudger in the USB port (I was careful (I hope!) to not insert the spudger too far so I was just pressing against the case). It needed a lot of force and can away sunddenly but has left the fingerprint cable intact.

    I have looked at other comments and I had removed the 2 screws next to the USB port and the sim tray, it was just plain sticky.

    David Crane -

    I couldn’t remove the screen cause I was afraid to break it!! Also using two suction caps it was impossible to lift. I tried with a thin blade but nothing to do. Is there any “trick” to release it? Why is it so strengthly stuck? Please somebody give some suggests…

    Gabriele Greggio -

    Try to make sure to remove the SIM card tray and the screws at the bottom end of the phone before you try to lift the display, both block the display whilst removing the back cover. For the case that you’re using two suction cups instead of an iSclack, try to place them as close to the bottom edge as possible. For the case that the suction cups fall off easily, you can put a little water on them before pressing them on the phone. As you mentioned you can try using a blade/opening pick/jimmy as a lever during the removal procedure or you can use a tool like a spudger and insert it into the USB port to press the assembly out of the rear cover but take care to avoid damage to the port. The plastic clamps can sit really tight sometimes. In case the frame is damaged or bent you’ll need more force to open the phone.

    Dominik Schnabelrauch -

    PS I spent my money to buy battery and tool kit but if I can’t open it I wasted money believing in this “guide” that show all as a kind of easy DIY… actually it’s easier to make a damage bigger than repair!

    Gabriele Greggio -

    Heating the aluminium back of the phone with a hairdryer to about 60C helps. Aluminium expands more than twice as much as the glass which anyway remains cool away from the hairdryer. Then the suction pliers and the spudger through the 3.5mm audio jack hole finally did the trick. I was about to give up!

    J B Graham -

    I strongly agree with JB Graham : the fix should suggest to heat the phone if you encounter difficulty to open the case. I had to heat it a while until I could make the two parts move with the suction cups.

    pichel -

    I just replaced the battery of the Huawei p9. I had to open the phone using a thick, blunt needle using the headphone jack. After creating a gap, I carefully fulled the phone apart by my fingernails, with no problem whatsoever. No risk of damage doing it this way. Of course, you need to be carefull not to damage the contact pins inside the jack, but at least there is no risk of damaging the screen this way.

    I don’t understand why the suction cups are the preferred method to open the case. They just popped of by applying a scaring amount of force…

    Next time I will immediately use the headphone jack.

    M Brt -

  3. X1MPLayTq1F5uLiC
    X1MPLayTq1F5uLiC
    OZ2clDIO3g3DEtiL
    • Scollega il sensore delle impronte digitali utilizzando uno spudger.

  4. RsCaUdATkD2Tvxkx
    RsCaUdATkD2Tvxkx
    hlCmBSqrFLJdjGPM
    PRHAuXb4wO2NlcMF
    • Scollega il cavo dell'antenna.

    • Rimuovi lo sticker posizionato sulla testa della vite.

    By carefully removing the cable from the antenna, the solder broke and the connector remained attached to the cable.

    It was therefore not possible for me to reattach the cable during reassembly.

    Nevertheless, I don't notice any malfunction after turning the phone back on: the WiFi and the 4g signal are good and I don't see any difference neither in terms of performance nor quality.

    Maxence Laurent -

  5. WHeMocCRaaG5PfMb
    WHeMocCRaaG5PfMb
    oYfWKH5uTEri1VEo
    YsZttPuQbDPNpgSK
    • Svita le due viti a croce Phillips #00 che tengono in posizione la piastra metallica.

    • La piastra, che copre il connettore della batteria, ha due piccoli ganci su ciascun lato. Usa delle pinzette per liberarli e sgancia la piastra spostandola delicatamente verso l'alto.

    Removing the plate can be a bit difficult. It was stuck behind the other plate. It bended a bit while removing it, but it doesn't harm if it does.

    Steven -

    I actually couldn’t get this plate out: as mentioned by Steven there is a slight lip (shown on the photo - the tweezers are pointing to it) and this is under another plate above. That was just a minor complication, the real problem is that I couldn’t release the end of the plate nearest the edge, In the end I had to gently bend the plate up.

    David Crane -

  6. ggPJOixVHqWUaKg2
    ggPJOixVHqWUaKg2
    BHudHxmaWOgbouDk
    • Ora puoi scollegare il connettore della batteria e ripiegarlo da un lato.

    • Il modello EVA-L09 ha un'antenna NFC attaccata alla batteria.

    • Se stai rimuovendo la batteria solo per accedere al display, puoi lasciare l'antenna NFC sulla batteria.

    • Segna la sua posizione sulla batteria con un pennarello. Staccala con cura e fai attenzione a non strappare o piegare l'antenna.

    • Per il riassemblaggio, posiziona l'antenna NFC dove avevi segnato col pennarello, in modo tale che i contatti si allineino con i loro rispettivi alloggiamenti.

    Just changed (05/2020) the battery on an EVA-L09 model and could not see an NFC antenna. There were no other cables leading to the battery unless it was integrated within the power ribbon somehow. Will have to wait and see after the first charge has finished to see if I still have NFC. No biggy as I never used it. Could really use a picture or some way to show where it should/could be. Thanks.

    Jimbo -

    It should look somewhat similar to the P9 lite NFC antenna seen in this guide: Sostituzione batteria Huawei P9 Lite

    Tobias Isakeit -

  7. H4WaFVuRkVYHtZJY
    H4WaFVuRkVYHtZJY
    uhV5QR4jYffg4ovy
    • Libera l'estremità delle strisce di estrazione adesive per poter avere una buona presa su di esse.

  8. FVSRWiDElIImuZBD
    FVSRWiDElIImuZBD
    NY3Av3VWT26IbYDc
    vvAIVuwD4nINbrSs
    • La batteria è tenuta in posizione da tre pezzi di adesivo, una linguetta di estrazione rimovibile in centro e dal lato del vassoio della scheda SIM. Un terzo pezzo di adesivo sul lato del pulsante è privo di una linguetta di estrazione

    • Tira le strisce adesive con un movimento lento e costante per liberare la batteria.

    • Se queste strisce adesive si rompono, puoi usare un iOpener per riscaldarle e ammorbidirle un po' in modo da poter tirar fuori la batteria facendo leva con uno spudger.

    • Ci sono due cavi che passano direttamente sotto la batteria. Stai attento non danneggiarli se fai leva con lo spudger! Nell'ultima immagine si vede il loro posizionamento.

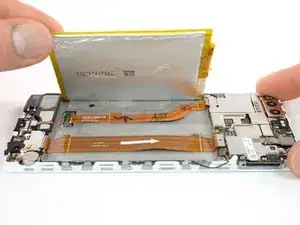
    • Solleva lentamente la batteria verso il lato del pulsante per liberarla dal pezzo di adesivo nascosto che è rimasto.

    • Quando rimonti il telefono, sostituisci il vecchio adesivo con delle strisce adesive estendibili, del nastro biadesivo o delle strisce adesive pretagliate.

    Hi, does the LCD Screen and Digitizer Assembly with frame come with new adhesive tabs or battery stickers? I read that if there are no stickers the battery could move and cause damage. Please let me know, i would like to be sure before i place my order.

    Javier -

    Hi Javier! The P9 display kit does have battery adhesive. It’s visible as two orange strips, which are the adhesive release liners. We’ll be sure to specify it better in the component list. Thanks for asking!

    Sam Goldheart -

    Merci mille fois à l’auteur de ce tuto qui est vraiment super

    Jean-luc 11/12/2018

    jean-luc maitay -

    Removing the battery was a bit hard. The tape broke, so it was not easy to remove the battery. I didn't use the Iopener to heat it. I finally succeeded to remove it.

    I do noticed that the battery was very flexible. Wondering if this means she's very old or is it normal after charging a lot of times, or is or maybe because it got humid (my phone is sometimes damped when I have it my shirt when cycling). Compared to the new battery it's a huge difference.

    Steven -

    Those batteries are allways soft. So, don‘t worry.

    Mathias -

    It will be easyer, if you remove first the mainborad and then the battery. That’s my experience after the repair of this phone.

    Albert Dreistein -

    Hi, what does it mean

    use the iopener for heating the stickers

    ?

    Does it mean that for this operation it is used a hot air gun? I watched the ifixit page of iopener, but I didn't see such a gun

    Pinuzza -

    Hi Pinuzza,

    you can find our iOpener here. It is a tool to gently loose adhesive with heat. A heat gun is a more radical way and should be used carefully. You can easily damage components by overheating them. Here is a guide how to use our iOpener.

    Dominik Schnabelrauch -

    @Dominik: First af all thank you very much for the reply and for the extremely detailed guide. I've seen many tutorials, and I put this as the best one, because it considers very important aspects, e.g. to be careful about the electronic components below the battery, the fact that there are 3 stickers, and so on. That said, I have some doubt about iOpener (the same item I had seen and referred to previously): I cannot distinguish 1) the item below the picks and on the left side of the screwdriver, 2) the item on the right side of the picks, 3) the item below the suction cup. Above all, I have an enormous doubt and curiosity about the fact that this tool allows an easy extraction of the battery even heating the stickers, i.e., what tool in the packet should it be the candidate for this purpose, and how?

    Pinuzza -

    (How can it heat?)

    Pinuzza -

    Perhaps can I heat biadhesive stickers using a plastic rod? Perhaps like primitives did, quickly rubbing blades of straw? If I don't understand exactly, I can't buy anything

    Pinuzza -

    @Dominik, I've just seen the iOpener guide you linked. However, I'm not able to understand: Have I to put all the items of the tool in a microwave? Why heat a screwdriver or the suction cup? I can't see how this could heat the adhesives: they are below, protected by battery.. how heat may reach them?

    Pinuzza -

    @Pinuzza you only need to place the iOpener in the microwave, not every tool that is needed for the repair. Heat up the iOpener as explained and it will save the heat. Place it on the areas where the adhesive sits underneath the battery/display/etc. Leave the iOpener in its place for at least two minutes so that the heat can reach the adhesive. This will work through the battery, display and/or a circuit board. This way you’ll loosen the adhesive, what makes the removal significantly easier.

    Dominik Schnabelrauch -

    @Dominik, okay now it’s more clear, but I can't understand exactly what is the iOpener in the image you linked (I think iOpener be the name of the entire tool). I see a black fabric case (with iOpener label) which seems to contain all the repair items.. is this the heater? Or the two transparent underneath rectangle?

    Pinuzza -

    Hi Pinuzza,

    the black fabric case you see in the picture is the iOpener. There’s a liquid in the fabric sleeve that saves heat. This is why you place the iOpener in the microwave to save heat there and then on your device to soften adhesive afterwards. All other parts in the picture are tools for repairing, prying and to cut adhesive. From left to right: screwdriver, 6 opening picks (flat tool to cut adhesive e.g. during a screen removal), blue flat battery blocker (is used if you can’t disconnect the battery in an easy way e.g. in an iPad you can slide it between the connectors), suction cup to pull up displays or rear covers, plastic card (bigger tool to cut adhesive in hard to reach areas e.g under bigger battery packs), the blue opening tool (to cut adhesive and prying tool), tweezers, spudger (all-purpose prying tool to cut adhesive and/or disconnect cables). In this guide you can see that you only place the iOpener in the microwave. All other tools are packed separately and not in the black fabric.

    Dominik Schnabelrauch -

    @Dominik, thank you very much for the detailed reply! Now it's all clear!

    (And compliments for the very well supplied and assorted store…and tutorials :)

    Pinuzza -

    Would be useful to see recommended points to place the spudger to lever out the battery. I used the corners at the top (i.e. at the edge where the plate I couldn’t remove!) and slowly forced out the battery (which did bend quite a bit).

    David Crane -

    These phones are now about 3 or 4 years old and the adhesive has had time to bake pretty hard. Of course the tabs break off as described. Without the iOpener I used a hair dryer on low fan, hi heat intermittently for about 5 minutes and used three spudgers under the battery using the guide picture of the ribbon cables under the battery to choose the safe places for the spudgers. You have to shift them as you ease it out as the small ribbon cable weaves to the centre. Like others have said, the battery bent and distorted to an alarming amount and I was glad I had discharged it to almost flat following the guide.

    J B Graham -

    Replacing a dead battery in 2020. Sticky tabs snapped of course. I lifted the battery up ever so slightly with a long flat spudger/spade so I could get the fine tweezers in there a grab as much as I could. Seems to be the top half inch/1.5cm that’s baked and brittle. The rest came out with no fuss.

    I have the EVA-L09 model but could not find an NFC antenna so… kinda hoping for the best once I’m done charging. Could there be a photo added of one if at all possible?

    Jimbo -

    Si vous n’avez pas de iOpener, vous pouvez utiliser une poche de gel chaud/froid pour les contusions (ex Actipoche)

    If you don't have an iOpener, you can use a hot/cold gel pouch for bruises (ex Actipoche)

    Karine JALLEY -

    Merci a ce tutto qui est vraiment tres bien mis a part que pour ouvrir le tellephone la ventouse ne suffit pas il faut utiliser un spatule (spudger) en faisant appui par la prise usb c et pour decoller la batterie il faut prendre une pince car elle est vraiment collé fort sinon vraiement tres bien ce tutto!!

    boos -

  9. msVxr4sikD5Yr4Ry
    • Rimuovi dalla scheda madre le altre cinque viti a croce Phillips #00.

  10. 2iK2rIaPoxNZBVFs
    2iK2rIaPoxNZBVFs
    PoyC2vRyghsEkQB4
    LnFf5lTkNuR4ATcs
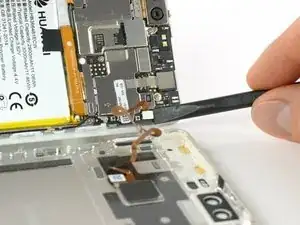
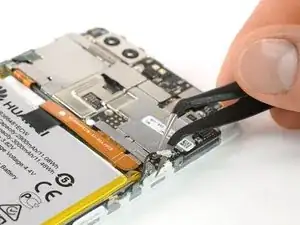
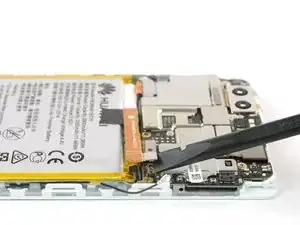
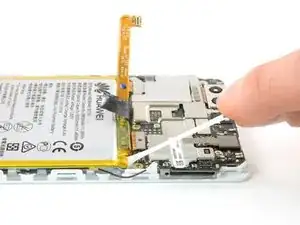
    • Stacca il cavo flessibile della scheda madre e anche il cavo di accensione e dei pulsanti del volume.

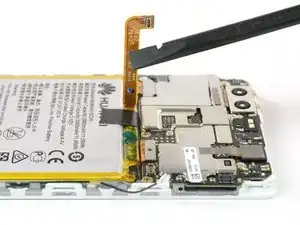
    • Scollega il cavo flessibile dello schermo LCD.

  11. hREMycr2PYDPfIHt
    hREMycr2PYDPfIHt
    5jbYtP4JlMmAcEOw
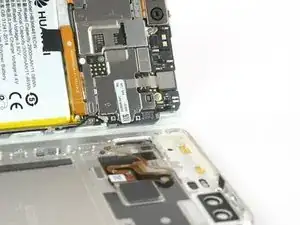
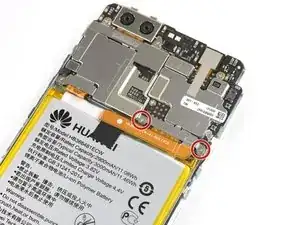
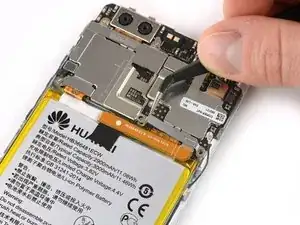
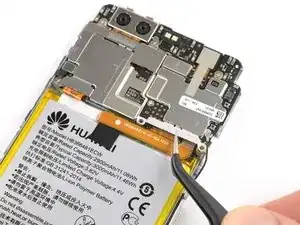
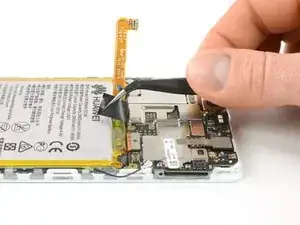
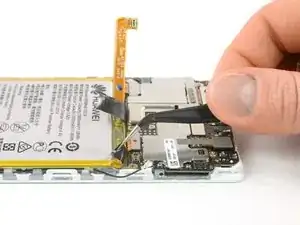
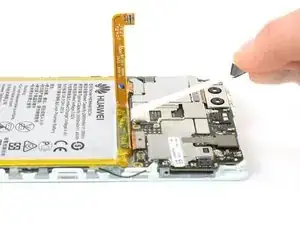
    • Rimuovi il gruppo della scheda madre.

    • Rimuovi l'altoparlante voce (fai attenzione, sotto c'è dell'adesivo).

    Hi, can you tell me what is this pink foam-like round things? I am about to buy your LCD Screen and Digitizer Assembly with frame, but i am unsure if it comes with this pink foam circles or if i have to buy that separately. Also if it is something important to have in the replacement. Please let me know so i can be sure what to expect before i place my order.

    Javier -

  12. dVsZKuoKfyeHmrL1
    dVsZKuoKfyeHmrL1
    EqEuME6QqRMho2cg
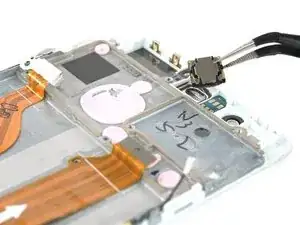
    • Rimuovi il gruppo sensore di prossimità dalla sua staffa.

    • Se il nuovo gruppo display non comprende la guarnizione di gomma del gruppo sensore di prossimità, bisogna trasferirla dal gruppo originale.

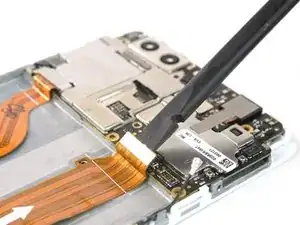
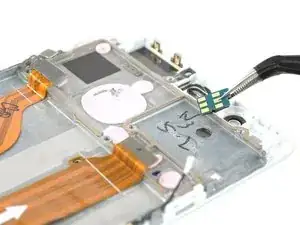
    • Stacca con cautela il cavo flessibile della scheda madre.

  13. hJO2pIlwaigTJ5YA
    hJO2pIlwaigTJ5YA
    xFSLEgNUWrLVWubG
    IS4sxQKfbJSKkXAp
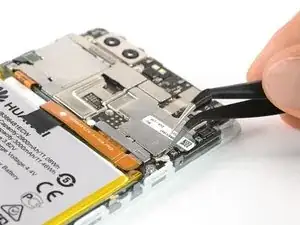
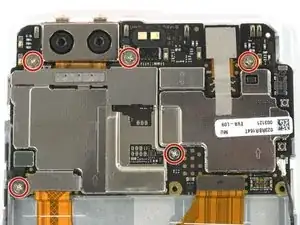
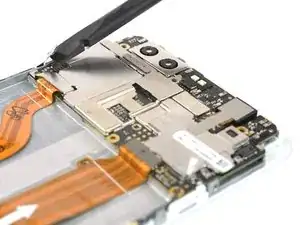
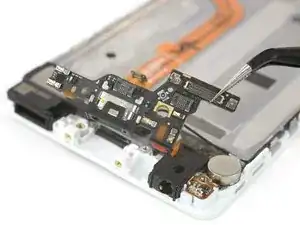
    • Svita le tre viti Phillips #00 dalla scheda figlia.

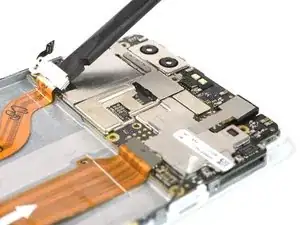
    • Rimuovi con cautela la staffa metallica. Il connettore del jack cuffie potrebbe attaccarsi ad essa.

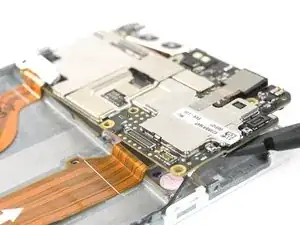
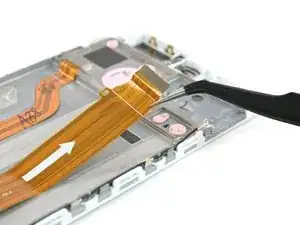
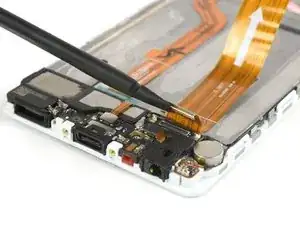
    • Scollega il connettore del cavo flessibile della scheda madre e piega il cavo da una parte.

    Achtung: Es könnte sein, dass das Kabel der Kopfhörerbuchse mit der Metallhalterung veklebt ist. Das war bei mir der Fall, somit ist das Kabel der Kophörerbuchse beim entfernen der Metallhalterung abgerissen.

    Albert Dreistein -

    Danke für den Hinweis. Wir haben den Text nun aktualisiert, um das zu berücksichtigen. Schade um deine Kopfhörerbuchse jedoch.

    Tobias Isakeit -

    War nicht so schlimm, da die Kopfhörerbuchse nicht mehr richtig das Klinkenkabel hielt.

    Albert Dreistein -

  14. BADZNEEWqPVVb46O
    BADZNEEWqPVVb46O
    Rqg4xpHDOlUiDZYG
    • Disconnetti il cavo flessibile del jack cuffie.

    • Scollega il cavo dell'antenna.

  15. MVrfRwIAdcRC4JGy
    MVrfRwIAdcRC4JGy
    YygXtM6nGYbY5TaD
    cXuStYsw1eOGf5Vk
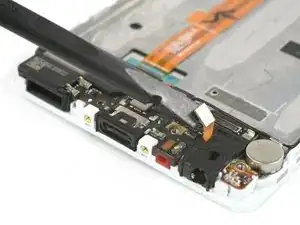
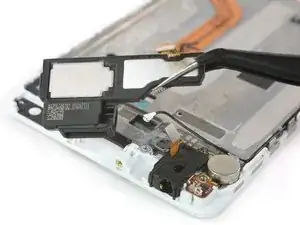
    • Stacca il connettore dell'altoparlante.

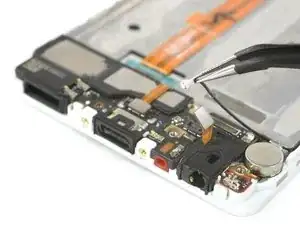
    • Rimuovi la scheda figlia.

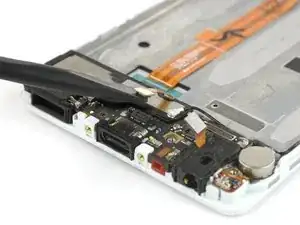
    • Stacca l'altoparlante dall'adesivo che lo fissa sul gruppo display.

  16. KTTMrPHkZfYoM56G
    KTTMrPHkZfYoM56G
    WfGB4nKpc3Rs5Qkb
    RBigEb6m6JvCgjNQ
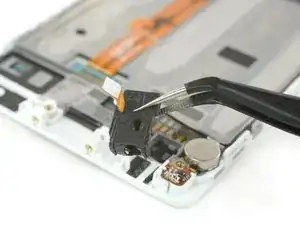
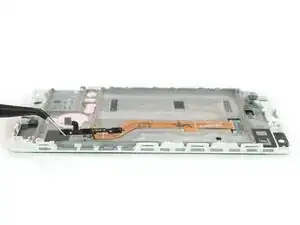
    • Rimuovi il jack cuffie dal suo alloggiamento.

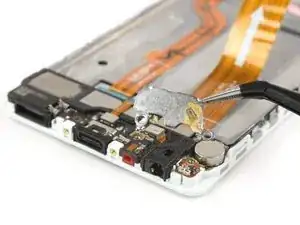
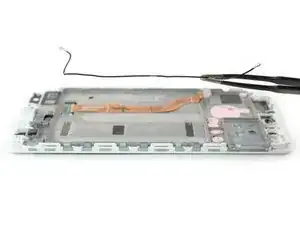
    • Stacca il motore di vibrazione dal suo vano nel gruppo display.

    • Rimuovi con cautela il fragile cavo di contatto dall'adesivo che lo ancora al telaio.

  17. UVInYXKuVrHZNamU
    UVInYXKuVrHZNamU
    5SWwgTiPYVswiK1Y
    xiinPcSgtdwVAybE
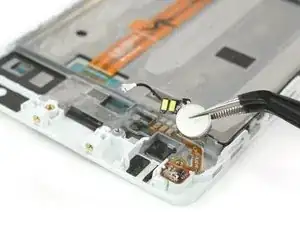
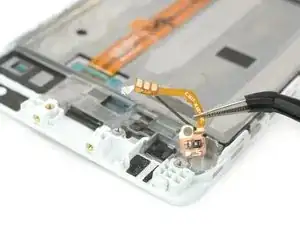
    • Rimuovi il cavo dell'antenna e il cavo di accensione e dei pulsanti del volume su ciascun lato.

    • Verifica attentamente la nuova parte e paragonala alla parte originale. Ci sono dei piccoli componenti che dovrai forse trasferire.

    • Sul retro della scheda madre ci sono dei pad termici (delle masse rosa gommose) per la dissipazione del calore. Se questi pad termici si rompono, sono rinsecchiti o aderiscono al vecchio gruppo display, puoi applicare dei nuovi pad termici al nuovo gruppo display o alla scheda madre.

Conclusione

Per rimontare il tuo dispositivo, segui queste istruzioni in ordine inverso.

Dominik Schnabelrauch

Membro da: 23/11/16

200687 Reputazione

Un commento

thank you ifixit

safi alsafi -