Introduzione

Guida prerequisita interna.

  1. fwWlhUYgGWky6vxI
    fwWlhUYgGWky6vxI
    Rl3MACXXMuFqdYoa
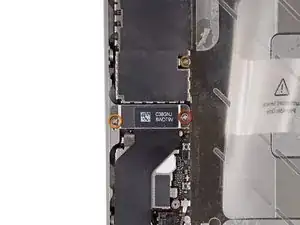
    • Svita le viti seguenti che fissano la staffa del cavo del connettore dock alla scheda madre:

    • Una vite a croce Phillips da 1,5 mm

    • Una vite a croce Phillips da 1,2 mm

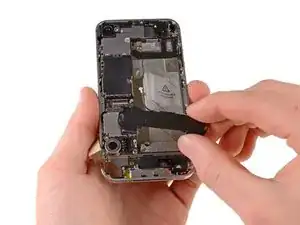
    • Rimuovi la staffa del cavo del connettore dock.

    the ifixit #000 screwdriver is too big for the 1.5 mm Phillips screw &

    1.2 mm Phillips screw!!!!!!

    mothusi motswasele -

  2. 2Y1ID4UpNcTgJFr6
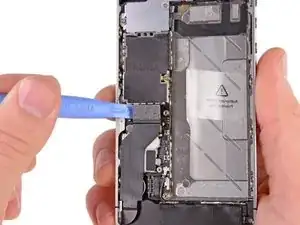
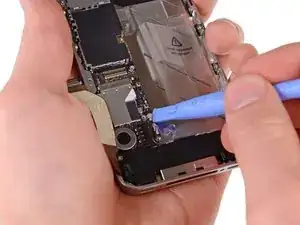
    • Usa il bordo di uno strumento di apertura di plastica per sollevare il cavo del dock dalla sua presa sulla scheda logica.

  3. UAr4S5XuO2jmMeWC
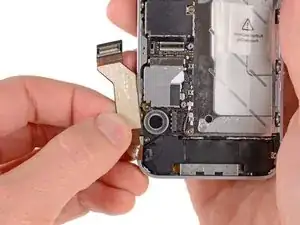
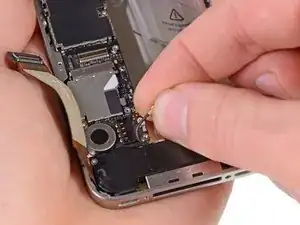
    • Stacca il cavo del connettore dock dall'adesivo che lo fissa alla scheda logica e al lato dell'involucro dell'altoparlante.

    When reassembling, peel adhesive strips off dock connector cable, but do not stick them down. First plug the cable into it's socket, then stick down the cable. It will make locating the plug in the socket easier.

    rob -

    The metal piece with white and black areas stuck to the adhesive and pulled off the board for me. There are some chips under it. It popped back on the board and didn't seem to be a problem.

    DMcG -

  4. LAhtS2JFIZsJy3pV
    LAhtS2JFIZsJy3pV
    2EAiESipHBII4cSG
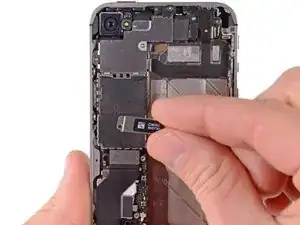
    • Usa il bordo di uno strumento di apertura di plastica per sollevare il cavo dell'antenna cellulare dalla sua presa sulla scheda logica.

    • Togli il cavo dell'antenna cellulare da sotto le clip metalliche fissate alla scheda madre.

    Note, the pictures do not show the routing of the cable under the metal finger next to where the battery was. Make sure the cable is replaced under the finger when reassembling.

    rob -

    The trickiest part for me was reconnecting the antenna cable to the socket. Do it carefully!

    A tip is to mold the cable and connector so that it stays correctly aligned with the socket, and all you have to worry about is pressing the connector against the socket.

    Felipe Pozzer -

    Bump on the comment re: no picture here shows the proper cable route. The text mentions being careful to route it under the metal finger, but no way to know where that it is from these pictures. The re-route is: around the left side of the screw socket and then the right side of the silver thing (finger) which is to the right of the battery connector.

    gregsrow -

    In this picture (actually in all of them) the cellular antenna cable is not routed properly (red line). Be sure when reassembling your iPhone 4s to route the cable around the metal finger (yellow line).

    <img src="http://i53.photobucket.com/albums/g80/dr... target_blank">

    drlewis506 -

  5. CaiGy4ZyfZigraUU
    • Svita le due viti a croce Phillips da 2,4 mm che fissano il gruppo involucro altoparlante alla cover posteriore.

  6. TBYmohbThrbJf1PN
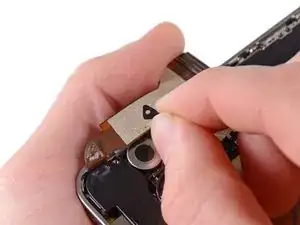
    • Rimuovi il piccolo distanziale nero sotto la vite a croce Phillips, vicino al motore di vibrazione.

  7. dr5npToRAq1rqe2A
    dr5npToRAq1rqe2A
    RMtovBPOXxJt5RcU
    IaP46dHMVPQxZsW6
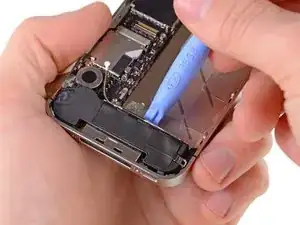
    • Solleva il gruppo involucro dell'altoparlante dalla cover con uno strumento di apertura di plastica, stando attento a non danneggiare le clip EMI dell'antenna Wi-Fi attaccata.

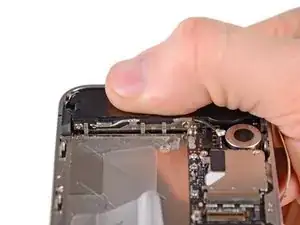
    • Rimuovi il gruppo involucro dell'altoparlante.

    • Prima di smontare le viti del gruppo involucro dell'altoparlante, accertati che le lamelle della messa a terra del Wi-Fi restino sotto il bordino del case metallico dell'iPhone, come si vede nella terza immagine.

    • Prima del rimontaggio, pulisci bene tutti i punti di contatto metallo-metallo tra le lamelle di messa a terra dell'antenna Wi-Fi e il case delliPhone con uno sgrassante come windex o alcol isopropilico. I grassi delle dita possono potenzialmente causare problemi di interferenza.

    The spring contacts on the speaker bottom make re-installing a bit tricky, since they make the speaker pop up until the screws are back in. If this happens, one or more of the fingers that are supposed to be under the case will pop out. What I found worked was to put the speaker in, getting the metal fingers under the case as directed, and then hold the speaker down with while putting the two screws in, along with that triangle piece.

    gregsrow -

    I was holding the plastic triangle spacer in a pair of tweezers, and it shot out like a watermelon seed ya squeeze between your fingers!

    It shot (I think) into a high-clutter area of the room and I can't find it. I made a replacement spacer out of plastic and I'll hope it works. Where am I going to buy a stupid little replacement spacer? I think I'm outta luck..

    Mike McIntosh -

    Im reassembling the phone and as I was going to place the speaker back on, two rubber pieces popped out. Based on the images here I cant seem to determine where they go. Please help.

    Isabella -

Conclusione

Per rimontare il tuo dispositivo, segui queste istruzioni in ordine inverso.

Walter Galan

693762 Reputazione

0 commenti