Introduzione

Questa guida ti mostrerà come smontare il gruppo del lettore CD del GameCube per accedere il lettore CD ed il laser. Queste parti sono responsabili per la lettura delle informazioni sui dischi di gioco, permettendo di giocarli sulla console.

Se il lettore CD è difettoso (ad esempio non fa girare i CD) o la lente del laser è danneggiata, non riuscirà a leggere correttamente i dischi di gioco. Questo può richiedere la sostituzione della componente del dispositivo. In quanto il GameCube è una console abbastanza datata, E-bay sarà un buon posto da dove iniziare a cercare i ricambi.

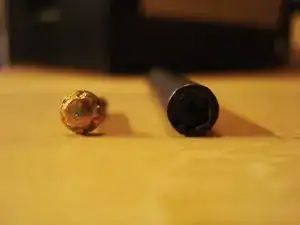
Prima di provare a smontarlo, dovrai avere un cacciavite Gamebit da 4,5 mm. Questo è uno strumento speciale utilizzato per aprire alcune console di Nintendo e può essere acquistato da Amazon.

  1. EXmngHuO2usXoFLn
    EXmngHuO2usXoFLn
    FHM21aEFmJipvNvw
    VjCSVObtR6vLAFRb
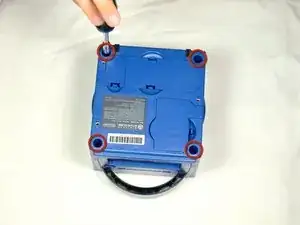
    • Ruota il GameCube in modo che la faccia inferiore sia rivolta verso l'alto.

    • Utilizza il cacciavite Gamebit da 4,5 mm per rimuovere tutte e quattro le viti.

  2. TTgX5EeSWjKCqHWb
    TTgX5EeSWjKCqHWb
    PAReZYqLsElCE35E
    LDfiiuYtwUYO6tjf
    • Con la faccia inferiore del GameCube rivolta verso l'alto e le viti rimosse, tira attentamente la copertura esterna della console via dalla copertura superiore.

    • Sposta il GameCube in modo che l'interno sia rivolto verso l'alto.

    This can also be done whilst being in the normal upright position after all 4 of the 4.5mm Gamebit screws have been removed. Pull the top of the shell directly upwards and it should slide off easily.

    Less chance of snagging any wires or parts.

    Christopher Cox -

  3. kXNmWMsVur4bGmBC
    • Premi delicatamente sui clip posizionati su entrambi i lati del pannello posteriore.

    • Rimuovi con attenzione il pannello posteriore dal GameCube.

    A second picture clearly showing which direction to pull the back panel away from the unit would be nice.

    rubixtriangle -

  4. SoDefm6gSe5cMhiM
    • Sgancia attentamente le porte dei controller sulla parte anteriore della console.

    • Un cavo a nastro (evidenziato in arancione) è ancora collegato alla console. Non scollegare questo cavo.

    • Le porte dei controller sono le porte dove colleghi i controller nella console e sono di forma semi circolare.

    well... what happens if accidentally i disconnected it?

    negroporexcelencia -

    presumably nothing major. The CMOS battery is attached to the controller ports, so the most i'd expect is that the gamecube loses it's date/time setting. As long as you reset that before jumping into animal crossing or something, you should be fine. I'm currently doing a teardown of my gamecube, and if something does prove to have gone wrong, i'll report back.

    sigoshi -

    okay, i finished putting it back together. gamecube works fine and surprisingly still remembers what year it is. boots into smash bros and shows memory card contents fine.

    sigoshi -

  5. TR4hFCNmFQAQbPvG
    TR4hFCNmFQAQbPvG
    fUWjsHkvqvdWIXac
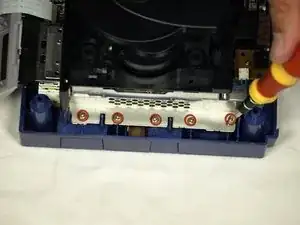
    • Usa un cacciavite a croce Phillips per svitare le 2 viti che si trovano sul retro delle prese dei controller.

    • Separa attentamente la copertura esterna grigia delle porte dei controller e della scheda logica.

    That step is not needed for the laser replacement.

    Vincent Léon -

    Love ur labeling and legends. Good on ya

    Josh Johnston -

    Not a necessary step

    Jilvenhong Dickinson -

  6. YlxsbRCapOkJiWyE
    YlxsbRCapOkJiWyE
    EumsDHVxO6AANqp2
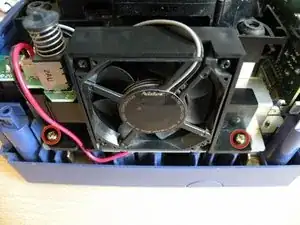
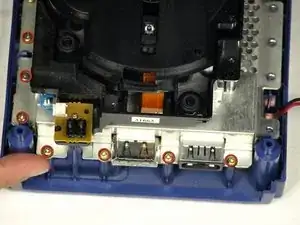
    • La parte sinistra della console contiene la ventola e il suo alloggio.

    • Svita attentamente le due viti che fissano la ventola al suo alloggio.

    • Non scollegare i cavi rosso e nero della ventola dalla console. Indicato in arancione

    Why can't the fan wire be detached?

    Josh Hobbs -

    It can, but you might not want to

    Jilvenhong Dickinson -

  7. QXkEOAxCZlSgbIqL
    QXkEOAxCZlSgbIqL
    iYB3kWBN1CPInbGu
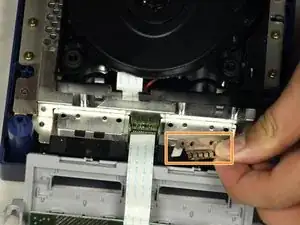
    • Svita le quattro viti a croce Phillips #1 che bloccano le molle della terra.

    • Rimuovi attentamente le molle della terra dalla console come mostrato nella seconda immagine.

  8. ylaqEoUPMkoTQheh
    ylaqEoUPMkoTQheh
    Okn1rg5bLKNDXflJ
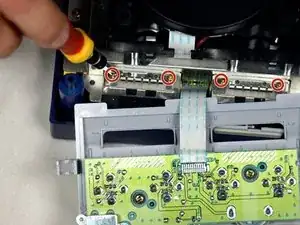
    • Il lettore CD è fissato ad una placca in metallo.

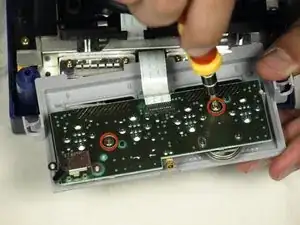
    • Usando un cacciavite a croce Phillips #2, svita le dodici viti attorno al bordo esterno del lettore CD.

    Are these 12 screws the exact same kind like the 2 that were on the fan?

    blaise ventura -

    Yes! As far as I can tell anyway. Makes sense, too since opposite the fan you have five of the same holes as well.

    Ben Zelinsky -

  9. UpsnMRoslMBZjQiY
    UpsnMRoslMBZjQiY
    pScQZBrImQdBnWPO
    lnNsoMXKum6GHJDo
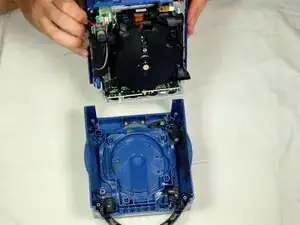
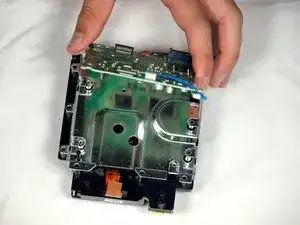
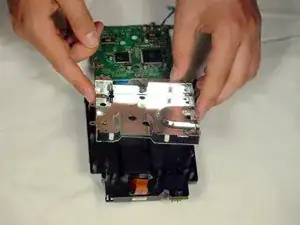
    • Separa attentamente il gruppo del lettore CD dal resto del GameCube.

    • Il gruppo del lettore CD è fissato alla scheda madre sottostante da una presa: potresti dover fare una certa forza per rimuovere attentamente il gruppo.

    • La placca in metallo e il lettore CD resteranno attaccati.

  10. CXHSHSSbi1bIDgI6
    CXHSHSSbi1bIDgI6
    DqGjEPexRPJk5bXe
    6uNaBjWZ3yJ3QVLS
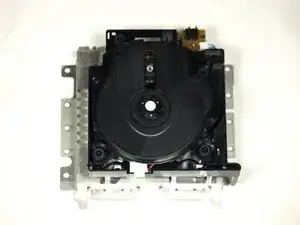
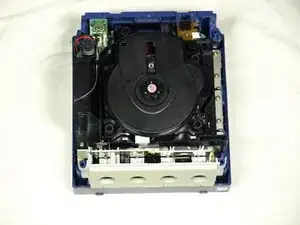
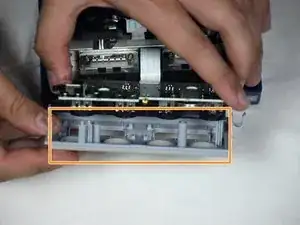
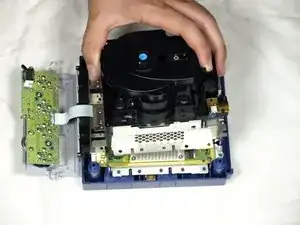
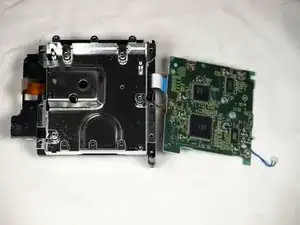
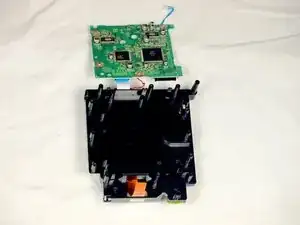
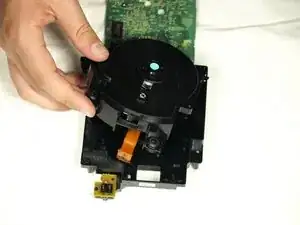
    • A questo punto, il gruppo del lettore CD dovrebbe essere separato dal tuo GameCube (immagine 1).

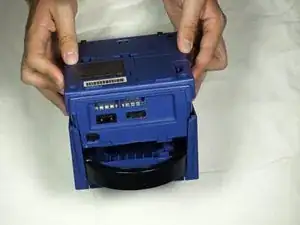
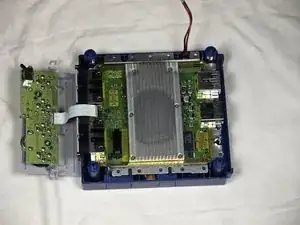
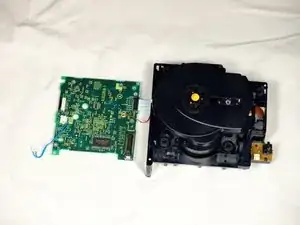
    • Gira il gruppo del lettore CD a faccia in giù.

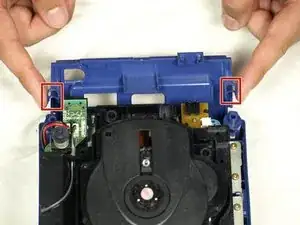
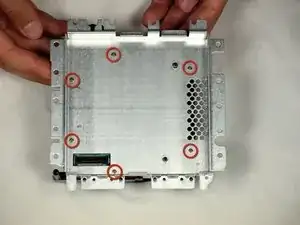
    • Rimuovi le sei viti con un cacciavite a croce di dimensioni #1.

    • Solleva delicatamente e rimuovi la piastra metallica.

    • Fai attenzione a non danneggiare il cavo a nastro marrone.

    If you are just doing the lens power adjustment, from this step skip straight to step 17. Steps 11-16 are unnecessary unless you are replacing the lens completely.

    Joseph Greenwell -

  11. KRpQrqBxTnKleXKb
    KRpQrqBxTnKleXKb
    cHX5iWuF3eEMEHFf
    pQWyj1JjJJJ2o1gI
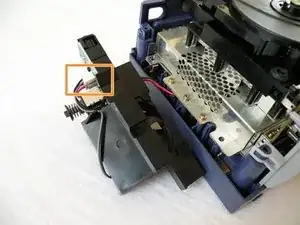
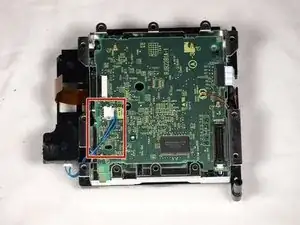
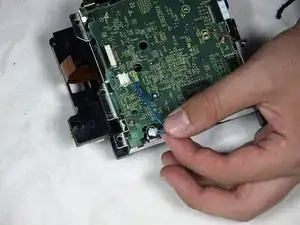
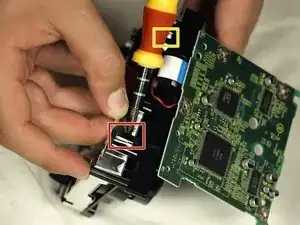
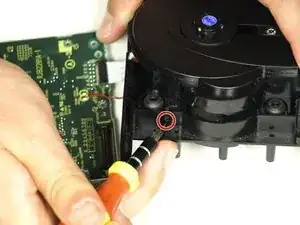
    • Scollega il cavo blu tirandolo delicatamente.

    • Non tirare né il filo stesso né il connettore collegato alla scheda.

    • Scollega il cavo marrone. Per farlo tira delicatamente via l'aletta nera dalla plastica bianca. Così allenterai la tensione sul cavo marrone, potendolo sfilare dall'aletta.

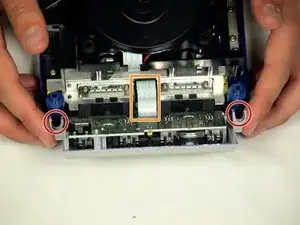
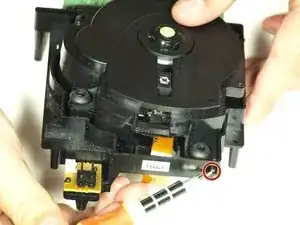
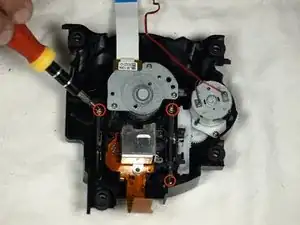
    • Rimuovi le quattro viti Phillips #1 che collegano la scheda circuito all'insieme dell'unità ottica.

    • La quarta vite si trova dietro il cacciavite nella terza immagine.

    A helpful addition/change to this step would be to include a photo of where/how to remove the brown ribbon cable (maybe also include this terminology in the text, instead of just “cable”). Furthermore, the yellow box to indicate the blue cable highlights everything except the part that you need to remove, which is a little confusing.

    Thanks!

    Ben

    Ben Zelinsky -

    I cannot get the 4 little screws to go back into the board once removed. There is nothing for them to bite into - how do I get this board put back together?

    David Blanton -

  12. UH61taPMTJJhkdoT
    UH61taPMTJJhkdoT
    NhB2ANWLSEbZJX6T
    iFbamVJcqKoYCnAR
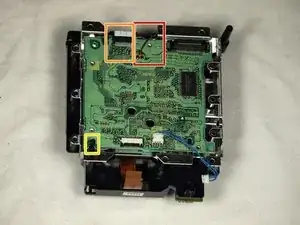
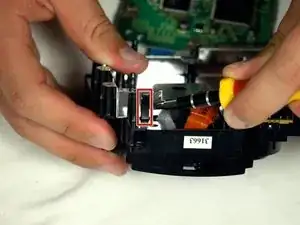
    • Rilascia la piccola clip che tiene giù la scheda.

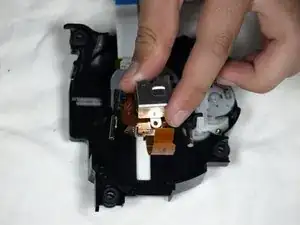
    • Rimuovi delicatamente la scheda logica (il grande quadrato verde) come mostrato nelle tre immagini.

    • NON SEPARARE il cavo rosso o il cavo a nastro bianco che collegano la scheda logica alla copertura in metallo.

    • Cavo rosso

    • Cavo a nastro bianco

    What would happen if I accidentally separated the white ribbon cable... because I watched a video of some guy going through this same process. Separated all the cables and his worked. My cube stopped reading disks recently. Laser is calibrated properly. Begins to spin then stops

    Ps

    Is there anyway I can save my cube

    kyleharms10 -

    I'm just guessing here, but I think they mean there's no need to separate those cables to complete the repair—just be careful not to pull or stress them. Like you said, nothing bad will happen if you choose to disconnect a couple cables. As for what's wrong with your cube, you might want to try asking your question over in the Answers forum.

    Jeff Suovanen -

    There is a small tab to the left of the red wire that you need to pull out to release the circuit board.

    patriotsfansince87 -

    Why do we need further disassembly that this ? The potentiometer is already accessible at this point. Why do we need to tear down the lens from it’s slot in step 16 ?

    Startide Harlock -

    Good question! I’m wondering the same thing.

    Ben Zelinsky -

    You don’t. You can stop here if you’re doing the laser potentiometer calibration.

    jweeman -

    The plastic post closest to the white ribbon cable can be annoying to deal with to remove the circuit board. Removing the white ribbon cable carefully with blunt tweezers can be necessary to remove the circuit board.

    William -

  13. VMgOObLqqFbFItJ2
    VMgOObLqqFbFItJ2
    gytnMdmHMAUQyW64
    3CPCc1lbSJixCbJO
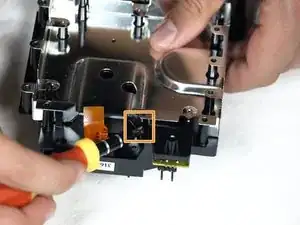
    • Usa un cacciavite a testa piatta per rilasciare attentamente i quattro ganci in plastica che tengono insieme il gruppo del lettore CD.

    • Usa con attenzione un cacciavite come leva per svitare e rilasciare l'ultima clip.

    Since this step uses a flathead screwdriver, it might be useful to include that in the list of required tools at the top.

    Ben Zelinsky -

    Unnecessary step

    dog -

  14. Cae21Xmet6apeyUx
    Cae21Xmet6apeyUx
    iIe2HnM4pWMPMWAF
    wFTtOLxqOGFYZ4O4
    • Solleva delicatamente la copertura in metallo dal gruppo del lettore CD.

    • Stai attento a non staccare il cavo rosso o il cavo a nastro bianco, ancora attaccati alle due metà del gruppo del lettore CD.

    • Quindi gira a faccia in giù le due metà del gruppo del lettore CD.

    Unnecessary step

    dog -

  15. ptmTApb3PNLWjZiy
    ptmTApb3PNLWjZiy
    VAPlGWlHWUEkJDaY
    WkgVfYGPCfhhX1Hg
    • Usa un cacciavite a testa piatta per rilasciare i due ganci sulla metà posteriore del gruppo del lettore CD.

    • L'ultimo gancio non deve essere rilasciato: La metà superiore del gruppo del lettore CD si sfilerà da quella inferiore.

    • Rimuovi la metà superiore del gruppo del lettore CD dalla base.

    • Stai attento a non staccare il cavo rosso o il cavo a nastro bianco che sono ancora attaccati.

    Unnecessary step

    dog -

  16. Cl3CeisvclggbxYP
    Cl3CeisvclggbxYP
    bjWFXHMXUFOPfnHd
    • Dopo aver staccato la metà superiore del gruppo del lettore CD, girala a faccia in giù.

    • Usando un cacciavite a croce Phillips #1, svita attentamente le ultime tre viti vicino alle barre del gruppo della lente.

    • Estrai le ultime tre viti e rimuovi l'insieme della lente.

    what kind of screws are these on the laser lens i lost one and need to buy new ones cause i cant find the 3rd

    Ugly potato -

    This step isn't necessary for adjustment of the lens

    dog -

    we're replacing the laser tho

    just some mango -

Conclusione

Per rimontare il tuo dispositivo, segui le istruzioni in ordine inverso.

mwbisson

Membro da: 05/11/09

1038 Reputazione

5 commenti

What type of optical drive could I use to replace the one in said GameCube once I've broken it down?

Bob Marotta -

Did you ever find out, Bob?

Lee Martin -

I found OEM parts (removed from other Game Cubes) available on Ebay. Just ordered the part for about $16.

erin clark -

Good walkthrough. My 8 year old completed this repair with minimal help from me. Thanks!

erin clark -

As a tech writer I just wanted to say our step by step instructions are spot on. Great Job

Jim Canfield -