Introduzione

Prerequisito per rimuovere la scheda logica.

  1. HNodnvFDOXqhlMXA
    HNodnvFDOXqhlMXA
    BHA24EFAL6YMxDX5
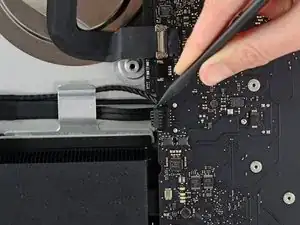
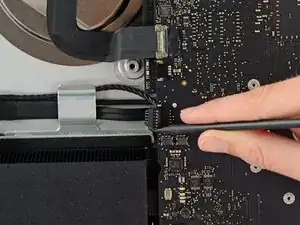
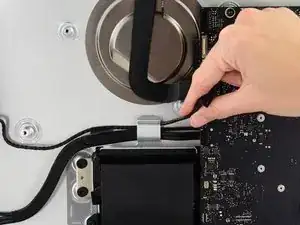
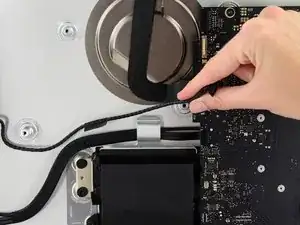
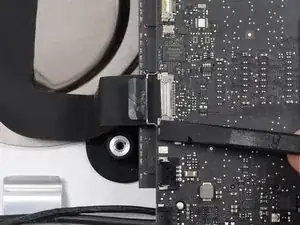
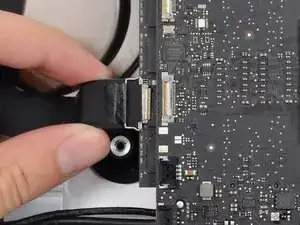
    • Spingi su ciascun lato del connettore del cavo dell'altoparlante sinistro con la punta di uno spudger e accompagnalo delicatamente fuori dalla sua presa.

    A step is entirely missing here – removing the right speaker cable connection from the logic board and also removing the right speaker casing (all the pictures below show it already having been removed). You actually don't need to entirely remove the right speaker to get the logic board out but you will need to remove its screws and lift it slightly. And you will need to remove its plug from the motherboard but that's not hard and it looks identical to the left speaker plug/socket.

    biscuit -

    This does need adding to the guide if anyone from ifixit sees this!

    Alan Digby -

  2. I4FHPJSY2RdIAKpM
    I4FHPJSY2RdIAKpM
    IQI3FAcDkqTiluDN
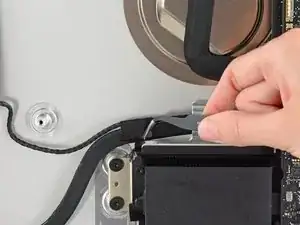
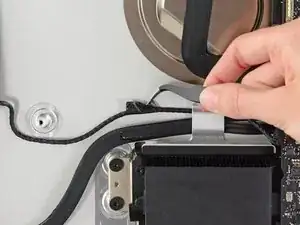
    • Se necessario, usa delle pinzette per rimuovere gentilmente il nastro adesivo che fissa il cavo dell'altoparlante sinistro al cavo dati/alimentazione SATA.

    • Il nastro adesivo dev'essere rimosso se stai rimuovendo l'altoparlante sinistro.

    Actually i didn't get why should i unstick the tape which gum up left speaker cable to the SATA data/power cable. It's gonna be hard to bond the tape again cause it looses the clue ability. I can definetely claim that there is no need to touch the tape.

    dv1977 -

    I too can say that there was no reason to remove the tape.

    [deleted] -

    Agreed. I completed the repair without removing the tape.

    phil -

  3. xq3p5oA32AQSGXOU
    xq3p5oA32AQSGXOU
    cAsGVAibIgvPwglG
    kWMRbvqbuWHtgfoo
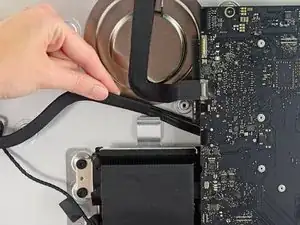
    • Sposta il cavo dell'altoparlante sinistro tirandolo fuori dal gancio di fissaggio sul retro del telaio posteriore.

    • Allo stesso modo, solleva il cavo SATA dati/alimentazione dal gancio di fissaggio.

  4. QOf3XLqDJv4DX6qS
    QOf3XLqDJv4DX6qS
    iIaZuRoBXMJZf2yr
    nUSEuwt2ELiWHnFN
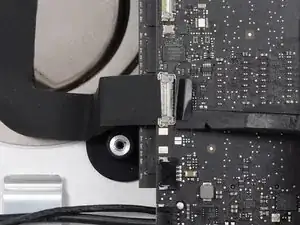
    • Usa la parte piatta di uno spudger per capovolgere la staffa di fissaggio di metallo sul connettore del cavo della fotocamera iSight.

    • Rimuovi il cavo della fotocamera iSight dalla sua presa sulla scheda logica.

    • Non usare troppa forza. È un connettore delicato che si danneggia facilmente.

  5. klKX1IlEy4VhPbuC
    klKX1IlEy4VhPbuC
    CMiYZkC6TLCaqOvG
    TmpLRCDUoI4eAwdU
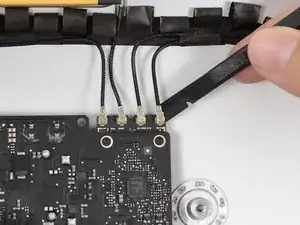
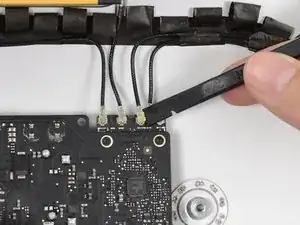
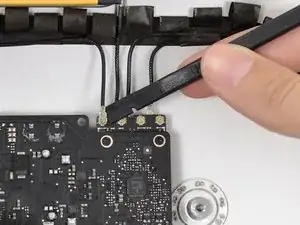
    • Usa la parte piatta di uno spudger per scollegare tutti i connettori delle quattro antenne dalla scheda Airport/Bluetooth.

    • Prendi nota della posizione di ciascun connettore quando ricolleghi i cavi.

    Be careful and tender here, otherwise you risk that the connectors brake

    Andreas -

    Agreed, super easy to bend these and break them.

    jctracey -

    i found it helpful to use the flat end of the spudger under the cable near the connector and gently wiggle the spudger until the cable was disconnected.

    Tim Telcik -

    Agreed, I broke one connector. The airport seems to work anyway. But what to do to fix it? Change the airport card or try to weld it again?

    Paolo Galante -

    I mark each cable tip with a different colored sharpie and then take a Pic. This gives me the order and the angle of orientation in order to reconnect these pesky connectors.

    Macrepair SF -

    OK, so when did you remove the RIGHT speaker? Suddenly it is not in the photos. I s there anything besides it's plug to remove?

    Carl Schultz -

  6. pkNvFYKvIasFOKqU
    pkNvFYKvIasFOKqU
    P4sSeqDOsEvGEQok
    ZVGYLswMDOwsAKFP
    • Usa la parte piatta di uno spudger per sollevare il connettore del cavo del jack cuffie dalla sua presa sulla scheda logica.

    • Spingi il cavo un po' a destra per spostarlo per poi rimuovere la scheda logica.

    The photo in Step 51 shows the right speaker missing, however there is no step prior for removing the right speaker.

    Hence, refer to this other guide to remove the right speaker *before* Step 51.

    Sostituzione altoparlante destro iMac Intel 21.5" EMC 2638

    Tim Telcik -

    Its there! Step 28 & 29 is the removal, the left one doesn’t need to be removed.

    Dan -

  7. wfvHpJ2HrgULGWTR
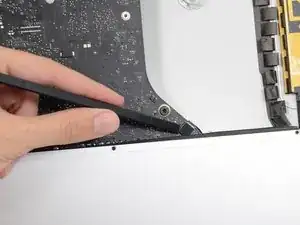
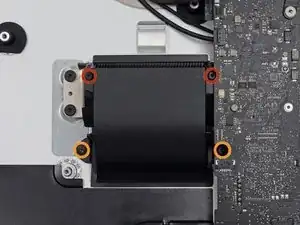
    • Rimuovi le seguenti viti che fissano il condotto di scarico al telaio posteriore:

    • Due viti T8 da 6,3 mm

    • Due viti T8 da 4,7 mm

    I have the Manta 64 bit kit and the driver that comes with that kit is too short/fat to reach that right 4.7mm T8 screw. I cant fit it past the logic board. i’ll have to find a T8 with a longer shaft or a skinny extension bit

    Nick -

    edit: nvm I didn’t see the smaller TR8 bit but I’m good now!

    Nick -

    A T9 bit fits and grips the screws tight enough to make it easier to work with the deep 4.7mm screw.

    johann beda -

  8. gHYsgMXUPsvMEPPv
    • Rimuovi le quattro viti T10 da 7,2 mm che fissano la scheda logica al telaio posteriore.

    So a major problem for me here — my iMac (purchased 2018 ) has a solid circular fastener where the lower left T10 screw should be. So I think I’m dead in the water as far as getting the logic board off to put the new RAM in. I can’t see how people can insert the ram from behind without seeing it or being able to get two fingers to the tabs. I’m so frustrated with the design of this computer.

    jctracey -

    That’s a new one on us! We’d love to see a photo. Any chance it’s a tamper-proof sticker hiding the head? You may also be able to turn it with a set of pliers if you can get a decent grip, just be careful not to bump any board components!

    Sam Goldheart -

    It’s a tamper proof sticker. I started to peel it up, but it was just easier to press the screwdriver bit in.

    as an update, these are now T8 screws

    cwaldrip -

  9. mphplmAwyTb25ocY
    mphplmAwyTb25ocY
    VF3gGx2gnSgMxHxb
    cVpJbUOHS1rdp63o
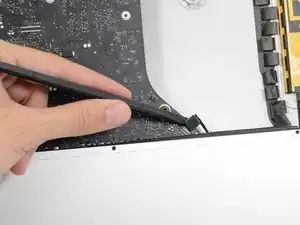
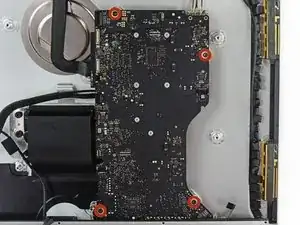
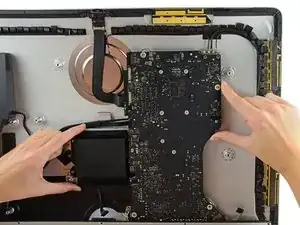
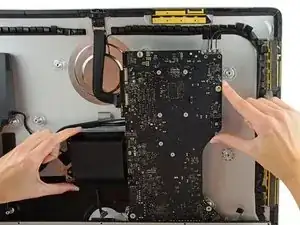
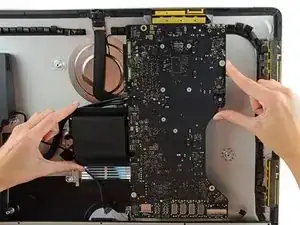
    • Inclina la parte superiore della scheda logica, allontanandola dal telaio posteriore.

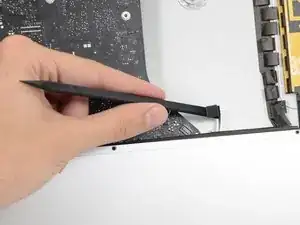
    • Solleva la scheda logica e rimuovila dall'iMac.

    • Fai attenzione che la scheda non si impigli sui perni delle viti.

    • Le schede I/O sulla parte inferiore della scheda logica saranno la parte più difficile. Ti raccomandiamo di tirare delicatamente per evitare di danneggiarle.

    If you have a helper (or if you're very coordinated and careful), you can very likely lift up the logic board far enough to replace both RAM modules without pulling the logic board all the way out. Just be careful what you touch, of course.

    phil -

    This is the trickiest part of the whole operation. It took me a solid half hour to get the logic board out. I’m sure it would be easier a second time, because there’s not many delicate components around the USB/Internet sockets, so you can be a little more assertive with it than I felt comfortable doing.

    David Thompson -

    i found the logic board kept snagging on the USB connectors poking through the exterior case. Wiggle the logic gently to extract..

    Tim Telcik -

    There are two connections underneath, where the HDD cables plug in. This should be pointed out; they pulled loose when I removed the logic board and I didn’t notice until I had most of it put back together.

    lkollar -

    Take out the two screws that hold down the right speaker, and push it up a little, before removing the logic board. It makes things a lot easier.

    Also: there’s a cable on the right side of the logic board that isn’t called out. Nor are the two HDD cables that plug into the underside of the logic board.

    lkollar -

    Photo shows right speaker removed, but this is not in the steps. I loosened it and disconnected its cable. Otherwise, the logic board wasn’t going to come out safely.

    ken -

  10. aXrO3HIsZLM6VVUu
    aXrO3HIsZLM6VVUu
    E2qQhWqcQr5jIGXO
    • Quando installi la scheda logica, presta attenzione ad allineare le porte I/O correttamente. La scheda logica può rimanere storta anche quando è fissata con tutte le viti.

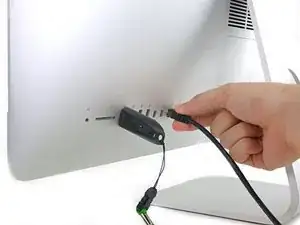
    • Usa una chiavetta USB o un cavo ethernet per accertarti che la scheda logica sia posizionata correttamente mentre la avviti.

Conclusione

Per rimontare il dispositivo, segui queste istruzioni in ordine inverso.

Sam Goldheart

Membro da: 19/10/12

465140 Reputazione

0 commenti