Introduzione

Prerequisito per rimuovere la scheda madre.

  1. ABFQ1yWISq4jrhaR
    ABFQ1yWISq4jrhaR
    LXxAYFsXXuUcyCRY
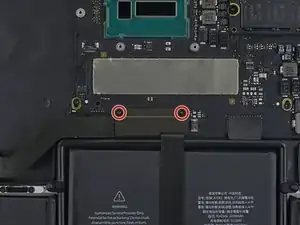
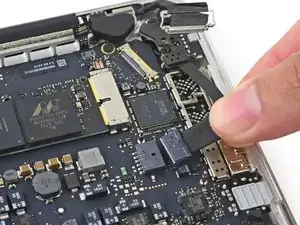
    • Svita le due viti Torx T5 da 2,1 mm che fissano la copertura del cavo della scheda I/O alla scheda madre.

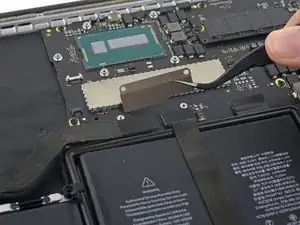
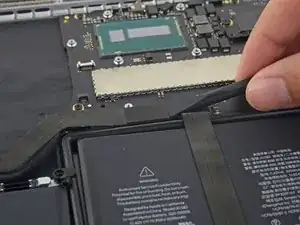
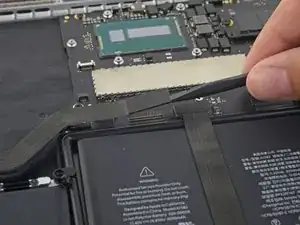
    • Rimuovi la copertura del cavo della scheda I/O.

  2. SkY3xXSaxDYURa6s
    SkY3xXSaxDYURa6s
    yGefv5CEUndfydC2
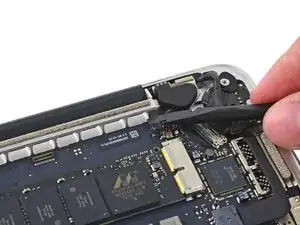
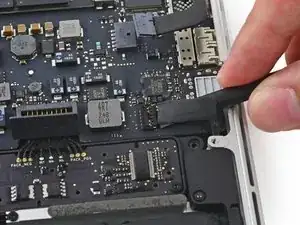
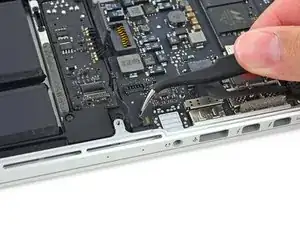
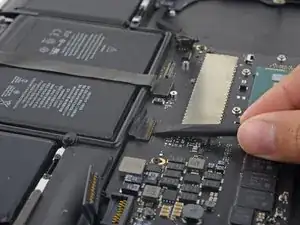
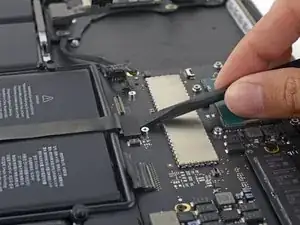
    • Usa la parte piatta di uno spudger per sollevare il connettore della scheda I/O dalla sua presa sulla scheda madre.

    • Stai attento a fare leva solo sul connettore della scheda I/O e non sulla presa o rischi di danneggiare la scheda madre.

  3. oGEMhZLIK5WNXDhN
    oGEMhZLIK5WNXDhN
    MCuqWkbPcZja4hs2
    • Solleva il cavo della scheda I/O dalla scheda madre e piegalo in modo che non dia fastidio.

    • Per evitare di danneggiare il cavo, piegalo dove è già piegato, all'estremità del cavo dalla parte della scheda I/O.

  4. DLAVERplRRgdAZsA
    DLAVERplRRgdAZsA
    5GxblI3unIyoHfZO
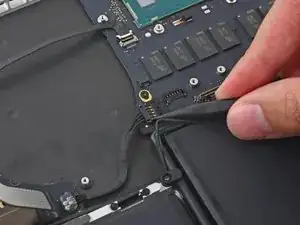
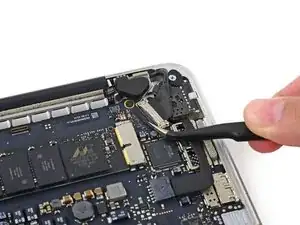
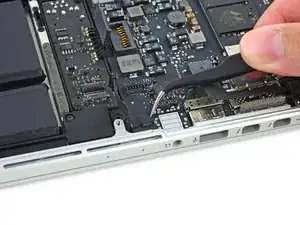
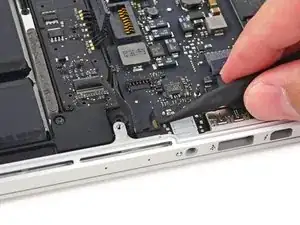
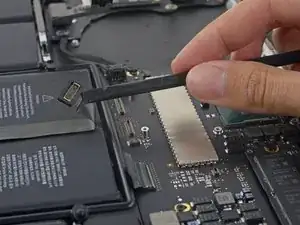
    • Usa la punta di uno spudger per sollevare il connettore dello speaker destro dalla sua presa sulla scheda madre.

  5. ZLy5bVJMmnmMBA1a
    ZLy5bVJMmnmMBA1a
    pPIGxhBXGEwSQeOK
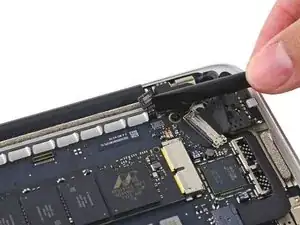
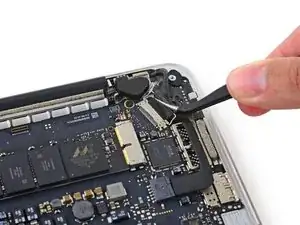
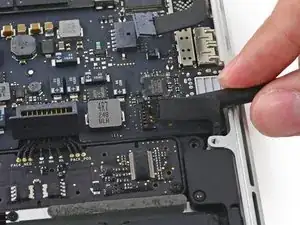
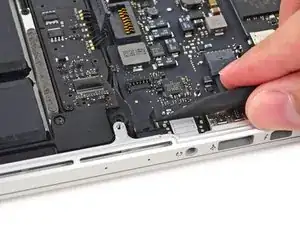
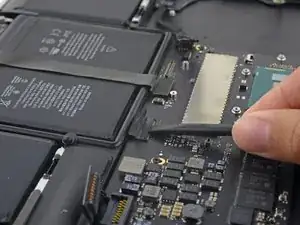
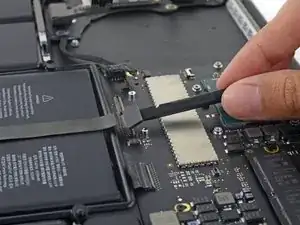
    • Usa la punta di uno spudger per spingere entrambi i lati del connettore della scheda I/O per sfilarlo man mano dalla sua presa sulla scheda madre.

  6. qdoImI2Rmpwv5ncn
    qdoImI2Rmpwv5ncn
    EBacf5TjDUNj6vZP
    rkvWdkm6i3s1QaCc
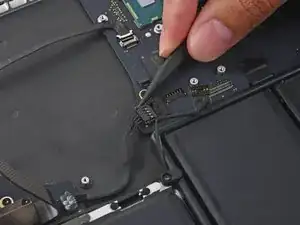
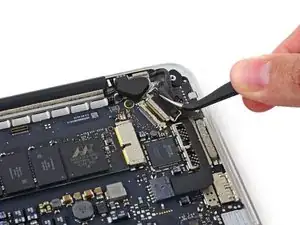
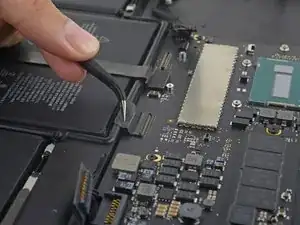
    • Usa la parte piatta di uno spudger per scollegare il cavo della retroilluminazione della tastiera dalla scheda madre e piegalo da una parte in modo che non interferisca con la scheda.

  7. XeiWdaL1f2FP132i
    XeiWdaL1f2FP132i
    jQT2pvbYI1tsTQJg
    o3byaKcGA1GtsiRp
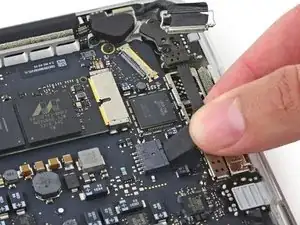
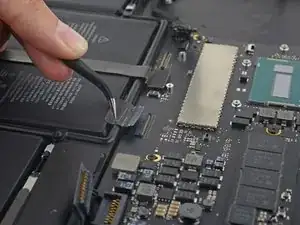
    • Prendi l'aletta di plastica nera del connettore del cavo dello schermo e tirala per sbloccare il cavo e sfilalo dalla sua presa parallelamente alla scheda madre.

    In my 2015 retina MacBook Pro 13”: I saw as shown the piece of black plastic tape. One peels this off as shown, using the same tweezers shown, or something else. The tweezers shown work well to lift the stainless steel clip, again as shown. But I add here that the points of the ribbon cable to grab and pull horizontally back are not optimal, as shown. You do not have to grab the ribbon. There are two points where the wire clip attaches to the connector that work well as places to grab with the tweezers shown. Hope this is clear

    Thomas Sturgill -

  8. NHisJdNetFkCKeCk
    NHisJdNetFkCKeCk
    pxvgGOuFktkYGZQH
    • Sfila attentamente il connettore dell'ingresso DC dell'alimentazione dalla sua presa tirandolo parallelamente alla scheda madre.

  9. gEmGsmZpKdLvw5Vu
    gEmGsmZpKdLvw5Vu
    RiCbA3F2sU12irKq
    cFfpTKhvmsOEMiiP
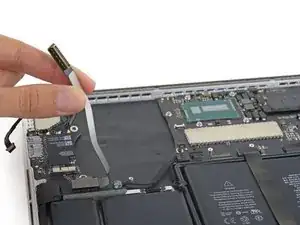
    • Infila la parte piatta di uno spudger sotto il cavo dell'altoparlante sinistro vicino al suo connettore e fai leva per sollevarlo, quindi piega il cavo da una parte in modo che non interferisca.

    I wasn’t careful enough or something, the socket came straight off, ouch. I don’t even see how it was connected originally. Not soldered or anything, will try to solder myself but it looks very thin. Be careful!

    Ray Dai -

  10. NFaffPxDVL6qRpj1
    NFaffPxDVL6qRpj1
    Jpm4GZRUnG6wvpER
    • Se presente, rimuovi il nastro sopra il connettore ZIF del cavo del microfono.

  11. RnGP5ACO4KHYg2oY
    RnGP5ACO4KHYg2oY
    qKeyNJaFOnRIv2BO
    qwgGhebiJSSRSmSj
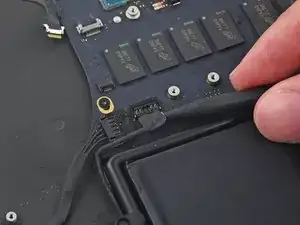
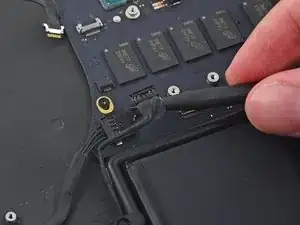
    • Usa la punta di uno spudger per ruotare verso l'alto l'aletta di bloccaggio sul connettore ZIF del cavo del microfono.

    • Sfila il cavo del microfono dalla sua presa sulla scheda madre.

    This tiny connector was difficult for me, and I hope I have not damaged it. Same design as some connectors already removed. A tiny, plastic front latch is lifted up, causing release. You grab the ribbon cable and pull it back horizontally, and to my surprise, this is end is just one tiny flat metal end, no multiple wire connectors that mate on the male end of the ribbon cable.

    Thomas Sturgill -

  12. 4IIPAEXtJP3i2UoB
    4IIPAEXtJP3i2UoB
    rHrjJZ532AdvYHyL
    xgAPI3TFRgCnQbTl
    • Se presente, rimuovi il nastro sopra il connettore del cavo della tastiera.

    • Usa la punta di uno spudger per ribaltare l'aletta di bloccaggio sul connettore ZIF.

    Also very difficult, because there is so little room to wriggle the ribbon cable, horizontally and backward. The photos do not offer a solution. The points I used are white (at least not black) points on the both, outer edges, and I was able to push there with the tip of the spudger.

    Thomas Sturgill -

  13. hF6VSPUSRrrE2DED
    hF6VSPUSRrrE2DED
    oC1yURZJ5qtOsZAc
    • Sfila il cavo della tastiera dal suo connettore ZIF sulla scheda madre.

  14. 24EJpuj2N4PhOAkj
    24EJpuj2N4PhOAkj
    SOd1kigaKCdQOwor
    fu4diPETjfZdbOlM
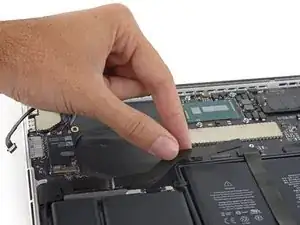
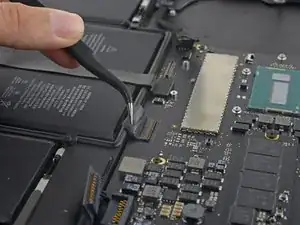
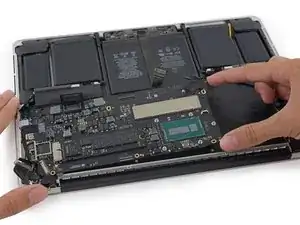
    • Usa la parte piatta di uno spudger per sollevare il connettore del trackpad dalla sua presa sulla scheda madre.

    • Piega il cavo sulla batteria ber liberare il passaggio alla scheda madre.

  15. fZHlMagfitKmnHmV
    • Svita le cinque viti Torx T5 da 3,5 mm che fissano la scheda madre alla scocca superiore.

    Il y en a une plus longue que les autres.

    Easy Repair -

  16. HLVhleSEEOJBY2xn
    HLVhleSEEOJBY2xn
    gFbCXM5lIgdaEWws
    6Af4XmKWPFl6cVEs
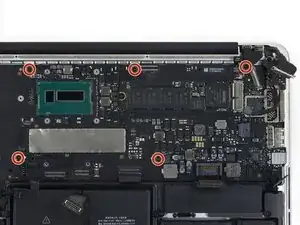
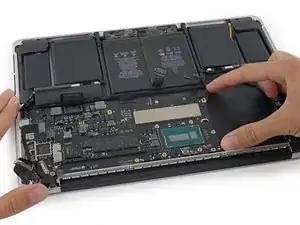
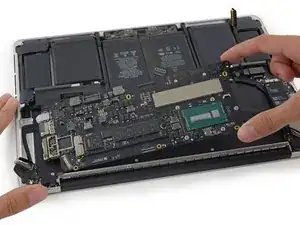
    • Solleva leggermente il bordo della scheda madre dal lato del processore e tiralo verso l'alloggio della ventola per sfilare le porte dalla scocca superiore.

    • Rimuovi la scheda madre.

    It won't come off; help!

    Zelma Garza -

    It seems to be stuck on the thunderbolt ports for me won’t come out

    Brendan O'Rourk -

    i found that it was difficult to get the processor back inside correctly during reassembly. it might take a few tries, as there are small “bracket” type pieces on the underside of the i/o ports that may bend out of shape. use caution, be exceedingly gentle and patient, but don’t give up!

    Colleen V -

Conclusione

Per rimontare il dispositivo, segui le istruzioni in ordine inverso.

Sam Goldheart

Membro da: 19/10/12

465149 Reputazione

0 commenti