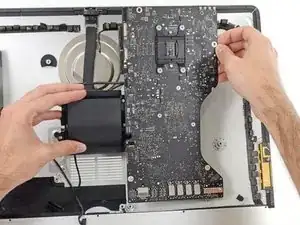
Introduzione

Solo prerequisito.

  1. bpUJduIptxtCQTrJ
    bpUJduIptxtCQTrJ
    NY3U2MjTCPHSNjfv
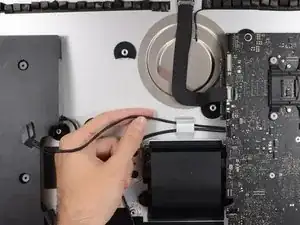
    • Premi entrambi i lati del connettore del cavo dello speaker sinistro con la punta di uno spudger e guidalo delicatamente fuori dalla sua presa.

    As noted in the right speaker cable section, the two corners of the connector are latches that need to be pushed toward the center of the connector to release. This is easily done with the pointed end of the spudger. Once the two corner latches are released, the connector comes apart easily.

    Fred Heineman -

  2. nIBOyJbEX5Sl4Or2
    nIBOyJbEX5Sl4Or2
    pAPeO3l2vihSiYDM
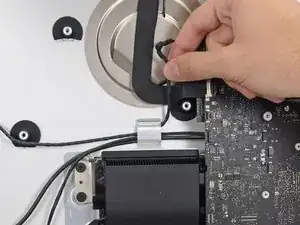
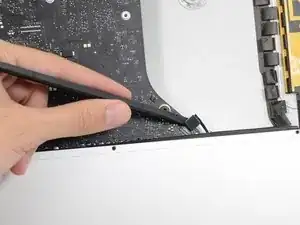
    • Sfila il cavo dello speaker sinistro tirandolo verso l'alto, fuori dal gancio di bloccaggio sul retro della copertura posteriore.

  3. aPduYkOrm1ijEuIm
    aPduYkOrm1ijEuIm
    J3l5W2gyvQbjlT4W
    nPMIkqvYZHIUCEXb
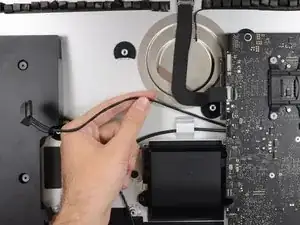
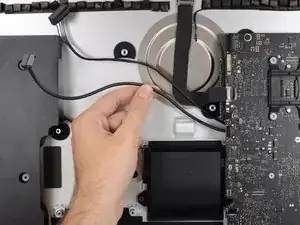
    • In modo simile al passo precedente, sfila i cavi dati e alimentazione SATA dal gancio di bloccaggio.

  4. Oi1uPFeAgU4d4B1V
    Oi1uPFeAgU4d4B1V
    UQYT31FILKH2XlFo
    deVi3sgpTG6ko3ev
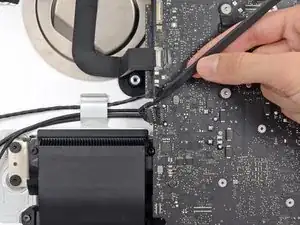
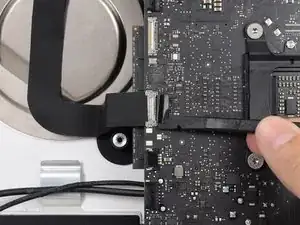
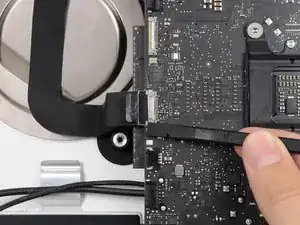
    • Usa la parte piatta di uno spudger per ruotare verso l'alto la staffa di bloccaggio in metallo sul connettore del cavo della fotocamera iSight.

    • Sfila il cavo della fotocamera iSight dalla sua presa sulla scheda madre.

    • Questo è un connettore delicato che può venire danneggiato facilmente.

    As seen in the photo this clip clearly has a pull tab. Forget the spudger and just open the clip with the pull tab.

    airshack -

  5. ChWlT2nybGpoDtrw
    ChWlT2nybGpoDtrw
    2LQdOvIdwuPacACY
    52lBdh3y1pIxgFri
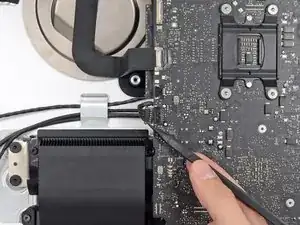
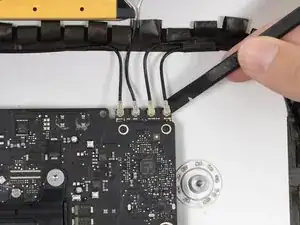
    • Usa la parte piatta di uno spudger per scollegare tutti i quattro connettori dell'antenna dalla scheda AirPort/Bluetooth.

    • Segna la posizione originale di ogni connettore per quando li dovrai ricollegare.

    I broke off one of the antenna connectors when I took off the antenna wires, but the new 802.11ac card is working:) I seems the way to take off the wires is lifting it up from the wire side. In hindsight I just wasn´t careful enough.

    Runar Vaernes -

    how do I check a working logic board

    Navneet Garg -

    I labeled mine with label printer labels prior to disconnection.

    airshack -

    I labeled mine with label printer labels prior to disconnection. The label/tabs made reinstalling easier as I held onto the label/tabs while pressing down on the connectors. Much easier than holding onto the physical wires.

    airshack -

    If you have a pair of angled tweezers, they work well for grabbing under the connector so that you aren’t pulling on the wire. The head of the T10 screwdriver works well for pressing them back on.

    Mitchell Scheffler -

    iMac 2017 EMC 3069 this has the antenna brackets with two T5

    Glenn Koslowsky -

  6. PVF2eFHOcWUlH6ov
    PVF2eFHOcWUlH6ov
    qbxXCqIthxynZ525
    tjH4h6FyAyucQGqX
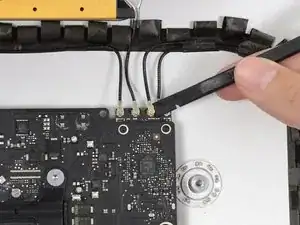
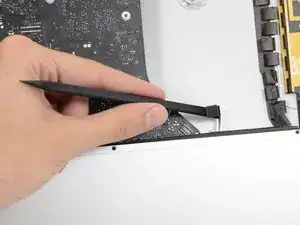
    • Usa la parte piatta di uno spudger per scollegare il connettore del cavo della presa jack dalla sua presa sulla scheda madre.

    • Spingi leggermente il cavo verso destra.

    Unlike the rest of the connectors on the logic board, this one lifts up away from the board rather than to the side. That “Push the cable slightly to the right.” notation is after the connector is free.

    Fred Heineman -

  7. QJIoRvsnlHELAikU
    • Svita le seguenti viti che fissano il condotto di scarico alla copertura posteriore:

    • Due viti Torx T8 da 6,3 mm

    • Due viti Torx T8 da 4,7 mm

    Weirdly, these screws didn’t work with my T8 driver. Not with T6 or T10.

    Every other screw (to this point) has been fine. Hmm.

    Jake Lodwick -

    ??? The T8 worked fine for me. Not sure what the difference would be.

    Fred Heineman -

    Fare molta attenzione alla vite in fondo a destra, è facile (soprattutto se la punta del proprio cacciavite non è magnetizzata) che la vite si perda sotto alla Logic board. Se la punta del cacciavite non è magnetizzata consiglio o di utilizzare un magnete esterno o di utilizzare delle pinze mentre si svita la vite in modo da non incorrere in questo problema.

    Carlo Molta -

  8. vTFjxoQJVL1LjsGU
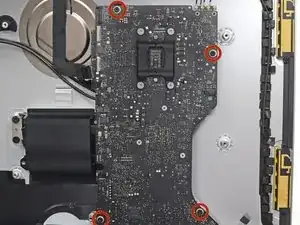
    • Svita le quattro viti Torx T10 da 7,2 mm che fissano la scheda madre alla copertura posteriore.

    When reinstalling the logic board, install four screws loose. Insert thumb drives into the back in all slots to ensure alignment. Once aligned, then tighten screws.

    Gary Kelch -

    On some models there is a tiny microphone cable connector, just above the lower left logic board screw. Remove by carefully pulling straight down. There is also a piece of insulating plastic w/adhesive on top of the screw which can be pulled off prior to removal. Save and reuse with the same screw on installation.

    Ed Beachwood -

  9. CbhcbTbVVbCDOdVR
    CbhcbTbVVbCDOdVR
    3ZWTvdymBERwUaSS
    kWgY5CCYya3SJRcj
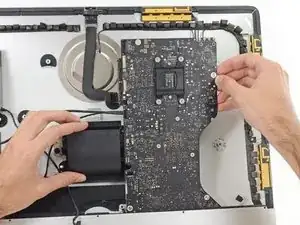
    • Allontana la parte superiore della scheda madre dalla copertura posteriore.

    • Solleva la scheda madre e rimuovila dall'iMac.

    • Stai attento a non far impigliare la scheda in nessun supporto delle viti della copertura posteriore.

    • Le schede I/O in fondo alla scheda madre saranno la parte più problematica. Ti consigliamo di tirare delicatamente per evitare danni.

    • Durante il rimontaggio della scheda madre, stai attento alla posizione dei connettori I/O. Dopo aver infilato la scheda nella copertura, inserisci una chiavetta USB o un cavo Thunderbolt in uno dei connettori per allinearla correttamente.

    When inserting the logic board back, pay attention of the position of the I/O connectors. When it is back in place, put a USB / Thunderbolt cable into the connectors to ensure the perfect alignment.

    Peter -

    This is fantastic advice. I used a combination of USB and display port plugs to ensure proper alignment and help keep the logic board steady while i screwed it back in. Thank you!!

    kazoodac -

    Great technique. I plugged a cable into every port before tightening logic board screws.

    airshack -

    ive gotten this far and i still have one question, i’m replacing my HDD With A SSD should i also remove the original Blade drive ? and run exclusively off the ssd, ? i wasn’t 100 on whether or not i was getting the fusion set up so i’m not in possession of a upgraded blade, so i though this was a good question id hadn’t seen asked.

    Eliasar -

Conclusione

Per rimontare il tuo dispositivo, segui le istruzioni in ordine inverso.

Sam Goldheart

Membro da: 19/10/12

465140 Reputazione

0 commenti