Introduzione

Questa guida ti condurrà attraverso il il processo della sostituzione di un gruppo schermo LCD e digitizer difettoso in un Motorola Moto G4 Plus.

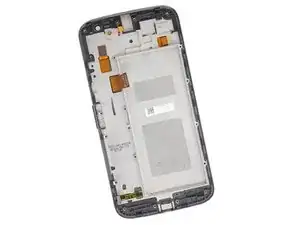
Questa guida riguarda la sostituzione di un gruppo schermo completo, che comprende il telaio del display. La tua parte di ricambio dovrebbe essere simile a questa. Se hai acquistato il nudo display, dovrai eseguire dei passi di smontaggio supplementari, che non sono coperti da questa guida.

Per la tua sicurezza, scarica la batteria da sostituire sotto il 25% prima di smontare il telefono. In questo modo si riduce il rischio di un pericoloso incendio se la batteria viene danneggiata accidentalmente nel corso della riparazione.

  1. lxT1UwKFgURyGcaK
    lxT1UwKFgURyGcaK
    1jye2DaRjg6xaoVK
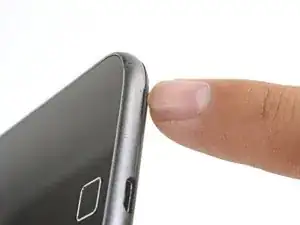
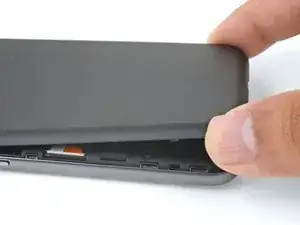
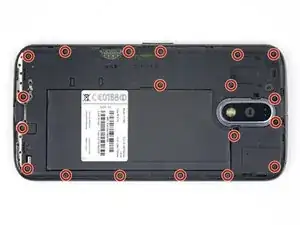
    • Inserisci un'unghia o uno spudger nella cavità sul bordo inferiore del telefono, vicino alla porta di ricarica.

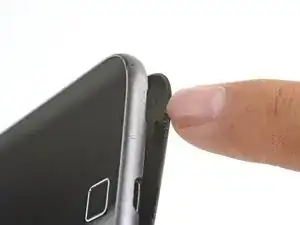
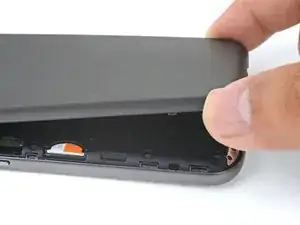
    • Solleva la cover posteriore dal corpo del telefono.

  2. bYe3O62W1Wt2gtmv
    bYe3O62W1Wt2gtmv
    ZRw4LGhEDAptG1C1
    GYFrkRTtyKQlEd4B
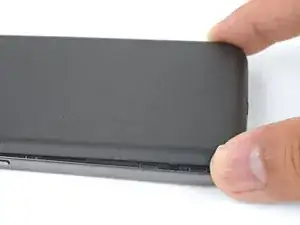
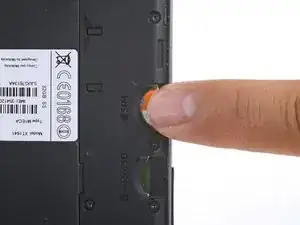
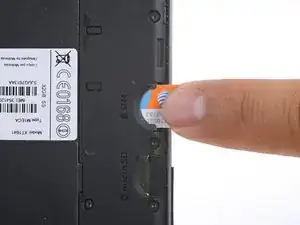
    • Continua ad alzare delicatamente la cover posteriore finché tutte le clip di plastica si saranno sganciate.

    • Rimuovi la cover posteriore.

    • Per rimontare la cover, allineala sopra la scocca e premi con delicatezza tutto attorno ai bordi finché senti che le clip scattano in posizione di blocco.

  3. MaIl6GDNwMyW3grX
    MaIl6GDNwMyW3grX
    GW6DOBihck1UBAjI
    • Fai scorrere fuori la scheda SIM per rimuoverla.

    Tenho un Motorola g4 plus 64 G

    El celular se volvía loco abriendo y cerrando aplicaciones

    Ahora no reconoce la tarjeta SIM

    Internet y Wasapp funciona

    Alguien sabe donde lo reparan soy de Argentina Buenos Aires CABA

    Florencia Garrido -

  4. Y2bjMadRQCjPq6bx
    • Rimuovi le 19 viti T3 da 3,1 mm che fissano il telaio centrale.

    A pair of binocular magnifiers is helpful here. Also, a magnetic pickup will help pull the tiny screws out of their counterbores.

    John Fossey -

    Well I'm stuck. 3 screw heads are stripped on mine, not lucky as they are two on USB port end and screw in-between two SIM slots. Phone bought new and this is 1st time screws have been touched, could see they were already stripped before getting screwdriver near them. Any tips on removing stripped screws?

    Mark Wintle -

    Hi Mark,

    I’m sorry to hear that! You can try some techniques from the stripped screw guide.

    Arthur Shi -

    I found that a T4 driver was the correct size for the screws.

    craig rhombs -

  5. GWhTNtKHDQJSDPMj
    GWhTNtKHDQJSDPMj
    NHQGAZWDKlNcbEPB
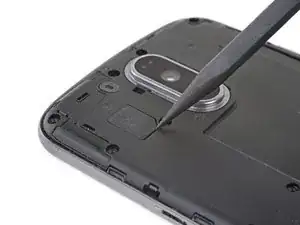
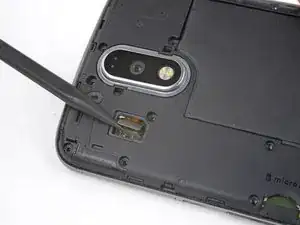
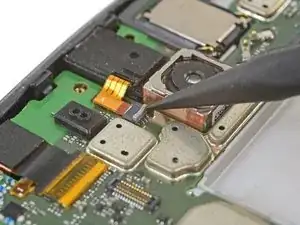
    • Usa la punta di uno spudger per sollevare la cover di gomma sopra il connettore del flash della fotocamera.

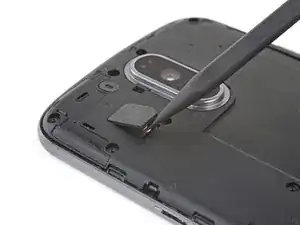
    • Rimuovi la cover di gomma.

  6. OJ5Fd4d5Z2XoxdSJ
    OJ5Fd4d5Z2XoxdSJ
    jgbdAx6g5ACgeNYZ
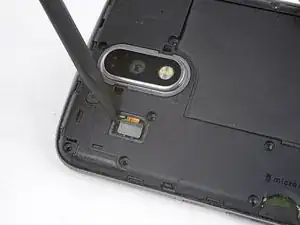
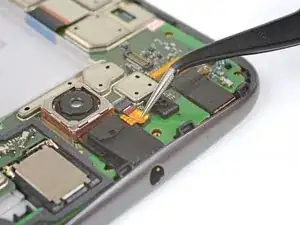
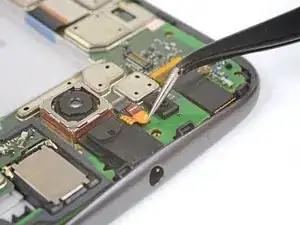
    • Usa la punta di uno spudger per sollevare e quindi disconnettere il connettore del flash della fotocamera.

  7. W32KIcqo5YIFpbJE
    W32KIcqo5YIFpbJE
    BvV2RE33Xg4YIrS2
    XyJnRSGqnQMNF6GM
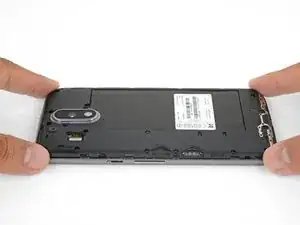
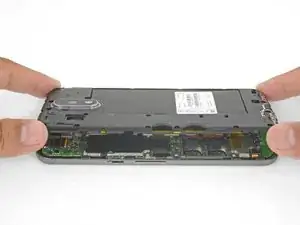
    • Prendendolo dai bordi, smuovi il telaio centrale e sollevalo dalla scocca.

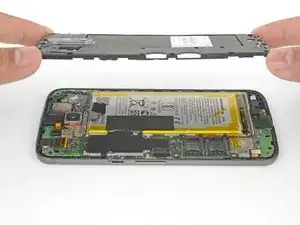
    • Rimuovi il telaio centrale.

  8. cKHNL1FamCU5dnJR
    cKHNL1FamCU5dnJR
    gtZvU3O3HOCkIVVa
    • Stai molto attento a non perforare la batteria con attrezzi affilati. Una batteria al litio-ioni danneggiata può prendere fuoco e/o esplodere.

    • Stacca il nastro adesivo che fissa i cavi della batteria e rimuovilo.

    • Stacca e rimuovi il nastro adesivo nero a cavallo tra la batteria e il telefono.

    • Benché nessuno di questi pezzi di nastro sia necessario per l'operatività del telefono, mettili da parte, se sono ancora in buone condizioni, per usarli nel processo di reinstallazione.

  9. Bfp1NnsXcvWBibdD
    Bfp1NnsXcvWBibdD
    4dnSoBQCeltW12NK
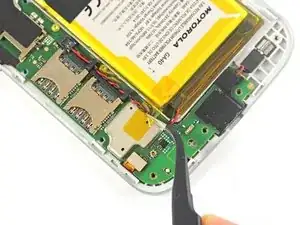
    • Infila la punta di uno spudger sotto i cavi rossi e neri della batteria e fai leva delicatamente verso l'alto.

    • Non tirare direttamente la spina, perché danneggeresti lo zoccolo sulla scheda. Fai molta attenzione a dove far leva, evitando di farlo sulla presa stessa.

    • In fase di rimontaggio, allinea il connettore sul suo zoccolo e premilo verticalmente per ricollegarlo.

  10. nt22DOKrSYEXRwXJ
    nt22DOKrSYEXRwXJ
    jKLniTeXpWZsqVEH
    • Usa delle pinzette o le dita per sfilare i cavi della batteria dalle staffe di plastica.

  11. ZKWAJrj2tjMODGja
    ZKWAJrj2tjMODGja
    jGKF3XeKMqHHDGOB
    y1OsQoSImBTLGvGG
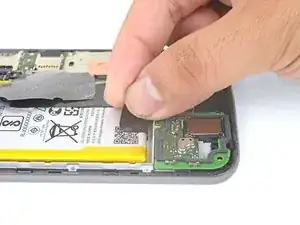
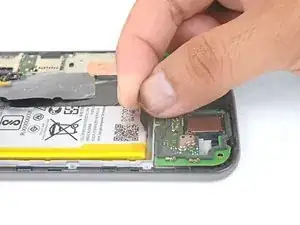
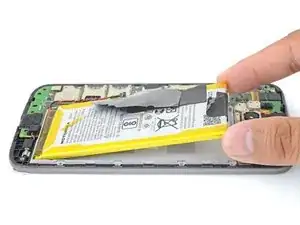
    • Stacca dalla batteria l'estremità della linguetta di estrazione, afferrala e tirala lentamente ma costantemente per separare la batteria dalla scocca.

    • Per ammorbidire l'adesivo si possono usare poche gocce di alcol isopropilico ad alta concentrazione (90% o superiore) lungo ciascuno dei lati.

    • Se la linguetta di estrazione si rompe, usa uno spudger per far leva delicatamente attorno ai bordi della batteria finché non si stacca.

    • Non deformare o perforare la batteria: se la danneggi, può incendiarsi e/o esplodere.

    • Non rimontare mai una batteria danneggiata o deformata: sostituiscila.

    Does anybody know, what the black tape covering the metal cans an the battey is made of? It seems to have a heat insulating effect.

    David Kilias -

    No, but the tape completely separated from itself when I removed it. Glue separated from the backing. I figure the glue in the frame is holding it well enough.

    Alan Kristensen -

    I found prying the battery out was the trickiest part of this job. Take your time and pry with the plastic tool, working from the end away from the wires, but try not to deform the battery in the process. It does finally come out.

    John Fossey -

    Hi, I cannot remove the Battery, it has too strong glue. Any Ideas?

    Regards

    Moritz Strack -

    You can try to drip some high concentration isopropyl alcohol along the battery edge to help loosen the adhesive.

    Arthur Shi -

  12. ehBg24hidmq3SD3u
    • Rimuovi la batteria.

    • Per installare la batteria, orientala in modo che i cavi escano verso la parte posteriore del telefono e il connettore della batteria sia sul lato della scheda madre.

    • Elimina qualsiasi residuo di colla rimasto che potrebbe impedire alla batteria di posizionarsi perfettamente a filo della scocca. Usa alcune strisce del foglio adesivo incluso nel kit batteria oppure del nastro biadesivo per fissare la batteria alla scocca.

  13. 4GcOndOJUGbmi1Rq
    4GcOndOJUGbmi1Rq
    n5mEJWpKdTYjedTB
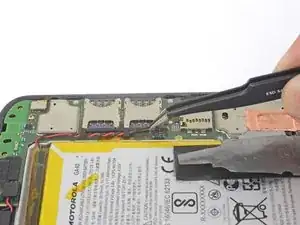
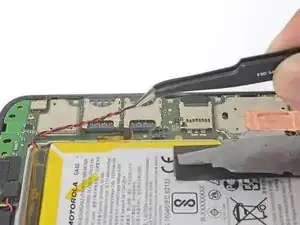
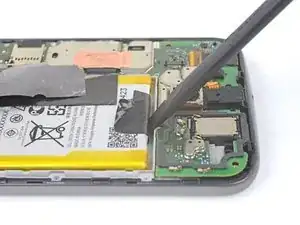
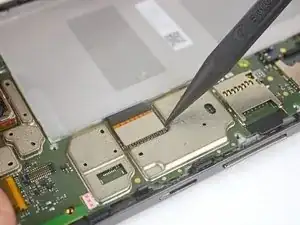
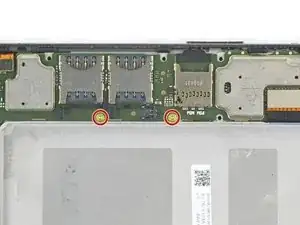
    • Stacca il nastro adesivo giallo che copre la vite Torx T3 vicino allo slot per la scheda SIM.

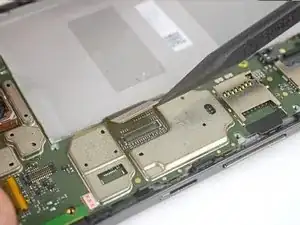
    • Stacca il nastro di rame che copre il connettore del display.

    • Questo nastro di rame serve a proteggere il connettore del display. Cerca di mantenerlo integro per il successivo rimontaggio.

    When putting this metal tape back down. place it on the center of the connector first. Use the Spudger and GENTLY rub on the metal tape from the center out, to get the creases out of it that will appear when you take it off. By doing this, you can get it VERY flat and eliminate any creases that formed.

    Alan Kristensen -

  14. HgBaSWBTDJsTrGQM
    HgBaSWBTDJsTrGQM
    DKlopskwTg6UlNme
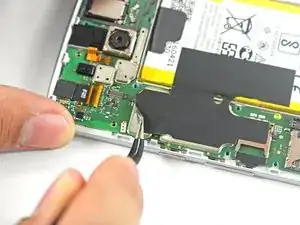
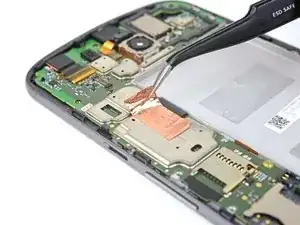
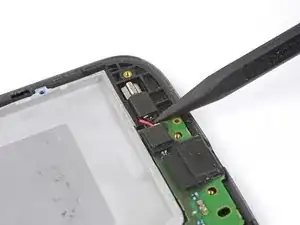
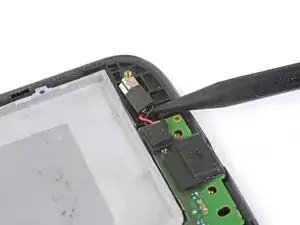
    • Infila la punta di uno spudger sotto i cavi del motore di vibrazione.

    • Fai leva delicatamente per liberare il motore di vibrazione dal suo alloggiamento.

    • In fase di rimontaggio, allinea il motore di vibrazione con l'alloggiamento e premi verso il basso.

  15. ecBBdLQ3RmX64edW
    ecBBdLQ3RmX64edW
    TMjEQdBTLVDypQVS
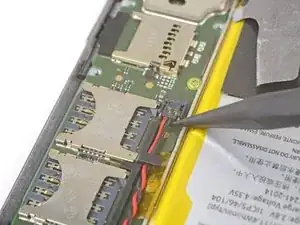
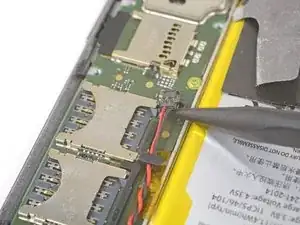
    • Usa uno spudger per sollevare e disconnettere dalla scheda madre il connettore del cavo del pulsante home.

  16. 26Or64mfUGYUACi4
    26Or64mfUGYUACi4
    2YWtLG4W2H1SwCVO
    • Usa uno spudger per alzare e scollegare dalla scheda madre il connettore dello schermo.

    As you try to re-attach this clip, it helped me to look at it from the side (top of phone ) and look under the clip to help align the connector. It was easy to see when it did not line up and correct it so it clicked in cleanly. Same thing applies in Step 15

    Alan Kristensen -

  17. pIlcJNyRmVsGDoDQ
    pIlcJNyRmVsGDoDQ
    YnBXPrkiLWkEPWer
    jA5NsaU26CaLh5jU
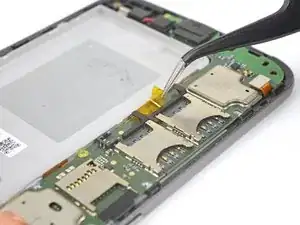
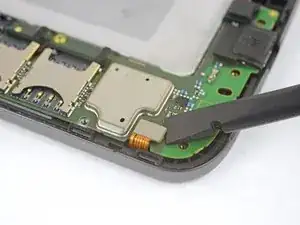
    • Usa delle pinzette per rimuovere il nastro adesivo giallo che protegge il connettore del jack cuffie.

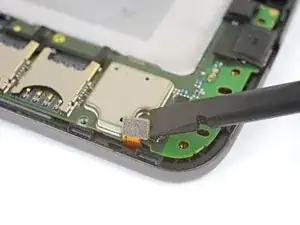
    • Usa con cautela la punta di uno spudger per sbloccare l'aletta grigia di sicurezza del connettore ZIF del jack cuffie.

  18. 4GmGDVj6WcFMhvOy
    4GmGDVj6WcFMhvOy
    VmZSW2qQYrfs2aTP
    • Usa delle pinzette o la punta di uno spudger per sfilare il cavo a nastro dal connettore ZIF.

    • In fase di rimontaggio, allinea e inserisci nuovamente il cavo nel connettore ZIF finché la linea bianca sul cavo resta appena visibile. Richiudi l'aletta di blocco del connettore ZIF.

  19. dLlB3AZAGMNBWANf
    • Rimuovi le due viti Torx T3 da 2,4 mm vicino allo slot della scheda SIM.

    General hint in putting screws back in without stripping them. 1) put the screw back in the hold. 2) gently turn it counter-clockwise like you are loosening it again. (Do not press down on the screw, let the weight of the screwdriver be the only pressure) When you feel/hear a little click, stop. That is the screw thread falling into the correct groove. 3) Turn it clockwise to tighten the screw.. you should feel NO resistance until the screw is fully seated. If you do, repeat step 2 again until you hear/feel the drop of the screw. This works when putting in any screw, not just the ones on this phone. Repeat this same process for each screw in this step and step 4 above.

    Alan Kristensen -

  20. RAKMm1LfSyZiJVoY
    RAKMm1LfSyZiJVoY
    cwRmNKHxWQlfLRx2
    LA24yMvNrGvQilo5
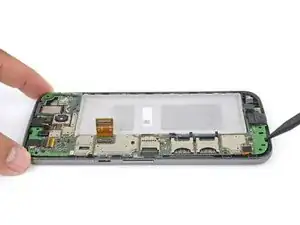
    • Inserisci la punta di uno spudger nell'incavo della parte inferiore della scheda madre.

    • Fai leva con attenzione per liberare la scheda madre dalla scocca e dalle clip sui bordi.

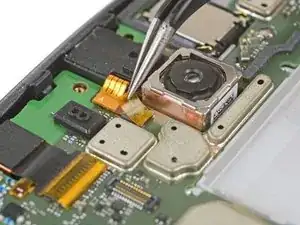
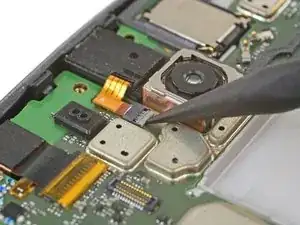
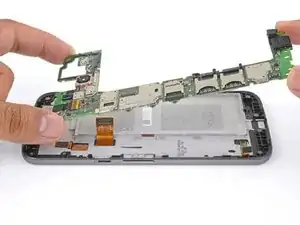
    • Usa uno spudger per spostare i cavi flessibili che potrebbero dare fastidio; accertati che tutti i moduli attaccati alla scheda madre (come la fotocamera anteriore) non siano in alcun modo ancorati alla scocca.

    • Se avverti della resistenza, fermati. Accertati che non si alcun componente che tiene collegata la scheda madre alla scocca.

    • Solleva dalla scocca la scheda madre e rimuovila.

    When reassembling, make sure the protective film over front camera opening is removed before putting that camera back in or you will be taking it apart again to remove it.

    Alan Kristensen -

  21. PW5QIsFxpcUlriLH
    PW5QIsFxpcUlriLH
    IuZJxj1UsF4Hhc2M
    RtArRI6BKUyZcAiJ
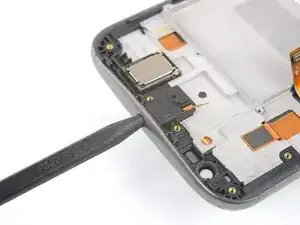
    • Per togliere il jack cuffie e trasferirlo sul nuovo telaio, inserisci la punta di uno spudger nella porta cuffie e spingila verso il basso per far saltare fuori il jack dal telaio.

    • Rimuovi il jack cuffie.

    • Per installare il jack cuffie nel nuovo telaio, allinealo nella sua posizione e premi verso il basso.

    Unless I got a defective or incomplete replacement part (LCD screen and digitizer assembly), you must also remove the little headphone jack wire that you disconnected in step 18 and transfer it into the new assembly. It is stuck on the assembly quite well.. I used some alcohol (just like you used on the battery) to loosen the glue. It pulls straight towards the earpiece you will remove in step 22.

    Alan Kristensen -

    Wie beim Kommentar von 2018, fehlte auch bei mir das Verbindungsstück im neuen Rahmenteil, kein großes Ding, aber dies fehlt hier in der Beschreibung

    Johannes Wirth -

  22. pMmxSpcUTM6FwDEQ
    pMmxSpcUTM6FwDEQ
    3XS2jXZ35HLZ2RBh
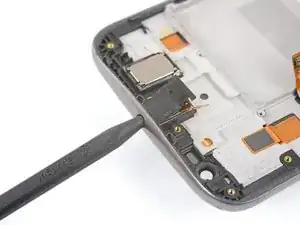
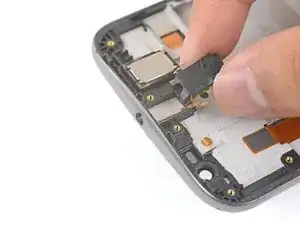
    • Per rimuovere l'altoparlante voce e trasferirlo sul nuovo telaio, inserisci la punta di uno spudger nella parte inferiore dell'altoparlante.

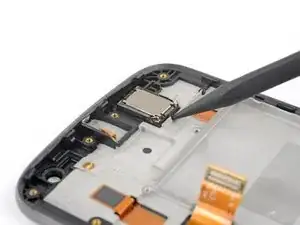
    • Fai leva per sollevare l'altoparlante voce e separarlo dal telaio.

    • Per installare l'altoparlante voce sul nuovo telaio, controlla l'adesivo presente e se necessario sostituiscilo. Allinea l'altoparlante in modo che due contatti a molla siano orientati come mostrato nell'immagine.

    Den Lautsprecher musste ich in meinem Fall nicht ausbauen, da ich einen neuen schon auf dem Ersatzrahmen montiert bekommen hatte

    Johannes Wirth -

  23. 25KKgUyreSRsKen1
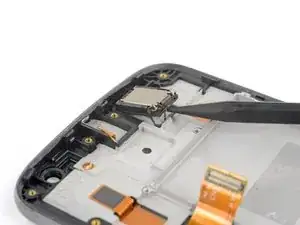
    • Rimane solo il gruppo schermo LCD e digitizer con il suo telaio.

    • Verifica con attenzione che le parti di ricambio combacino perfettamente e controlla di aver rimosso dalla vecchia scocca tutte le parti che andranno poi trasferite su quella nuova.

    Vom alten Rahmen mussten noch die Buttons für Einschalten und Lautstärke rausgelöst und in den neuen Rahmen eingeklickt werden

    Johannes Wirth -

Conclusione

Per rimontare il dispositivo, segui queste istruzioni in ordine inverso.

Porta i tuoi rifiuti elettronici a un riciclatore certificato R2 o e-Stewards.

La riparazione non è andata secondo i piani? Vai sulla nostra comunità Risposte Motorola Moto G4 Plus per trovare aiuto nella risoluzione dei problemi.

Arthur Shi

Membro da: 03/01/18

248233 Reputazione

Un commento

Why are the display/ LCD screen of any smartphone damaged?

Subrata Choudhury -