Introduzione
Aggiorna il tuo hard disk per aver maggior spazio di archiviazione!
Questa guida ti illustra anche i passi per aggiornare l’hard disk del tuo iMac con un SSD. Descrive come installare il sensore di temperatura dell’SSD per far funzionare le ventole dell’iMac alla velocita’ corretta.
Prima di iniziare qualsiasi lavoro sul tuo iMac: stacca la spina del computer e tieni premuto per dieci secondi il pulsante di accensione per scaricare i condensatori dell’alimentatore.
Stai molto attento a non toccare i fili dei condensatori o ogni altra parte saldata esposta nella parte posteriore dell’alimentatore.
-
-
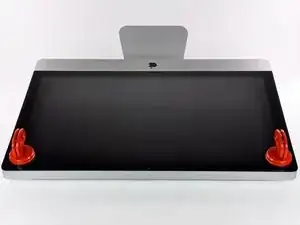
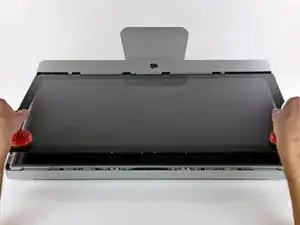
Fai aderire una ventosa accanto a ciascuno dei due angoli superiori del pannello di vetro.
-
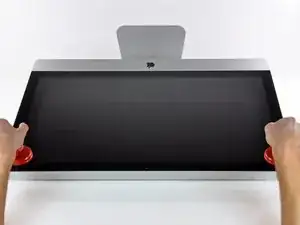
Tenendo delicatamente la ventosa contro il vetro, solleva la maniglia orientabile finché non è parallela all'altra maniglia (come indicato nella terza immagine).
-
-
-
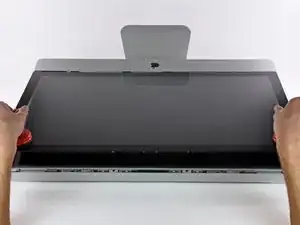
Solleva delicatamente il pannello di vetro in perpendicolare rispetto alla superficie dello schermo LCD affinché sia possibile sgombrare i piedini di montaggio in acciaio inseriti lungo il lato sottostante al bordo superiore del pannello di vetro.
-
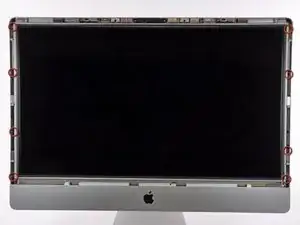
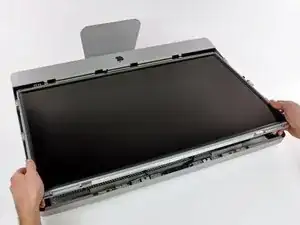
Estrai il panello di vetro dal bordo inferiore dell'iMac e riponilo da parte con attenzione.
-
-
-
Posa con cura l'iMac su una superficie piana con il supporto in basso.
-
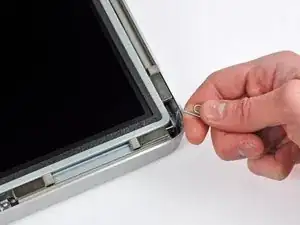
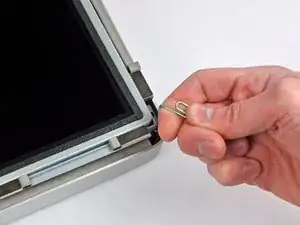
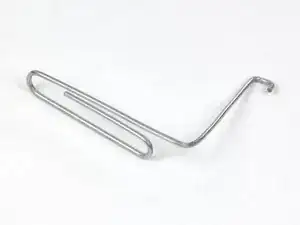
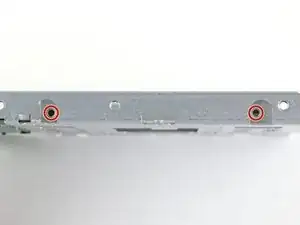
Usa un piccolo attrezzo a uncino per sollevare un lato del bordo superiore del display agganciando la cornice esterna in acciaio del display stesso.
-
-
-
Usa un paio di pinzette per tirare la piattina della sincronizzazione verticale fuori dalla sua sede sulla scheda di controllo del LED vicino all'angolo superiore sinistro del tuo iMac.
-
-
-
Ruota il display sollevandolo dal case esterno quanto basta a disconnettere il cavo della retroilluminazione LED dalla scheda di controllo LED.
-
-
-
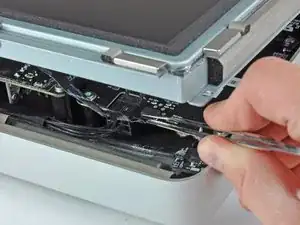
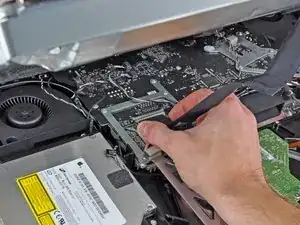
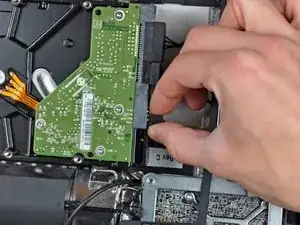
Premi insieme i due braccetti laterali della spina del cavo di connessione dati per sbloccarla dalla sua sede sulla scheda logica.
-
Sfila la spina del cavo di connessione dati dalla sua presa sulla scheda logica.
-
-
-
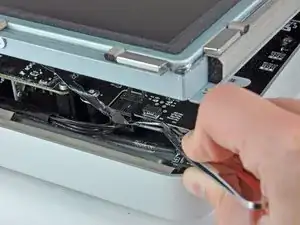
Solleva il display quanto basta per scollegare il cavo del sensore termico dell'LCD dalla sua presa sulla scheda logica.
-
-
-
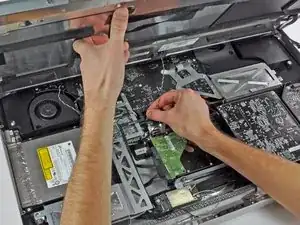
Sfila delicatamente il display verso il lato superiore del tuo iMac e sollevalo dal case esterno.
-
-
-
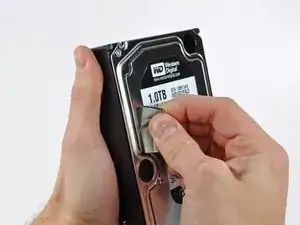
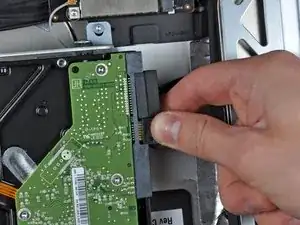
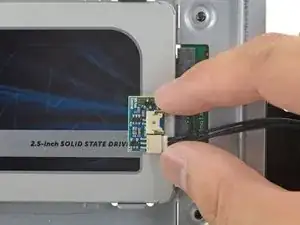
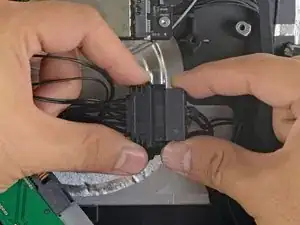
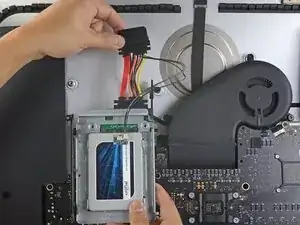
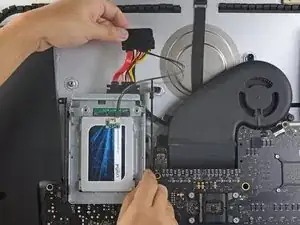
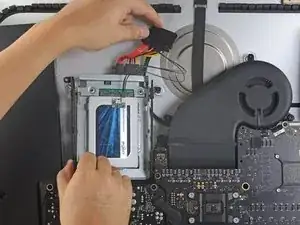
Scollega il sensore termico, il cavo di alimentazione SATA e il cavo dati SATA sfilando i connettori dalle prese sull'hard drive.
-
-
-
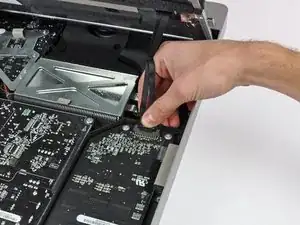
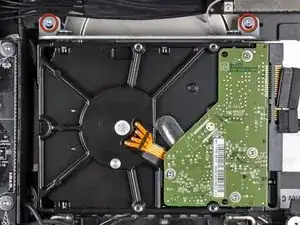
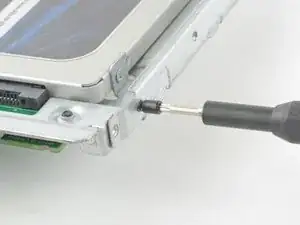
Svita le due viti Torx T10 che fissano il supporto superiore dell'hard disk al contenitore esterno.
-
-
-
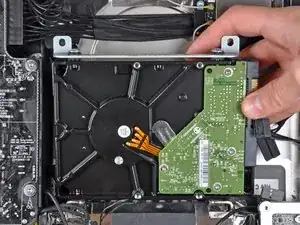
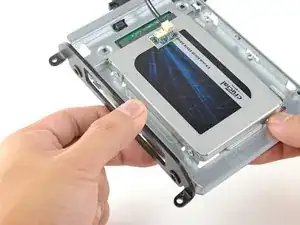
Rimuovi l'hard disk dal contenitore esterno ruotandolo delicatamente.
-
Solleva l'hard disk sfilando i suoi due pernini di posizionamento inferiori e rimuovilo dal contenitore esterno.
-
-
-
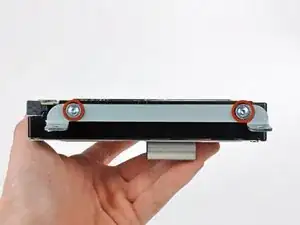
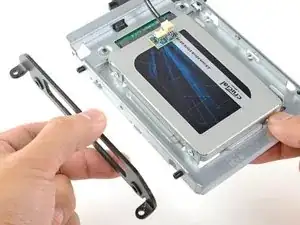
Svita le due viti Torx T8 che fissano il supporto superiore all'hard disk.
-
Rimuovi il supporto superiore dall'hard disk.
-
-
-
Rimuovi con cautela il pezzo di poliuretano espanso incollato sulla faccia superiore del disco rigido.
-
-
-
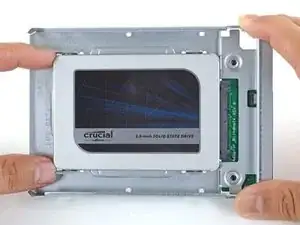
Allinea il connettore dell'SSD con i rispettivi zoccoli dell'involucro metallico.
-
Premi il disco contro gli zoccoli dell'alloggiamento finché l'SSD non si blocca in posizione corretta.
-
-
-
Usa un cacciavite a croce Phillips per installare le quattro viti cromate (due su ciascun lato) lungo i bordi dell'SSD per fissarlo all'involucro.
-
-
-
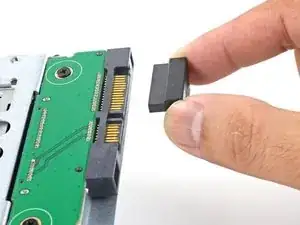
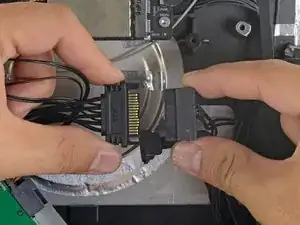
Collega il cavo di alimentazione SATA con predisposizione sensore incluso nella porta dell'alloggiamento.
-
-
-
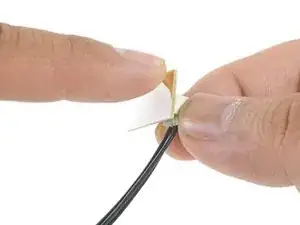
Stacca la protezione bianca dal retro della piccola scheda del sensore di temperatura per esporre l'adesivo presente su questo componente.
-
Fai aderire la scheda del sensore di temperatura su una superficie metallica esposta dell'SSD, vicino al connettore SATA.
-
Ripiega i cavi del sensore di temperatura che ingombrano in modo che non siano di intralcio in fase di montaggio dell'alloggiamento.
-
-
-
Usa un cacciavite T8 per trasferire le spinette di allineamento dal vecchio HD ai lati dell'involucro.
-
-
-
Connetti il cavo di alimentazione SATA dell'iMac all'altra estremità del nuovo cavo SATA predisposto per il sensore.
-
-
-
Fai scorrere l'involucro dell'SSD nello spazio occupato in precedenza dall'hard drive.
-
Fai passare i cavi SATA in modo che non interferiscano con alcun altro componente.
-
-
-
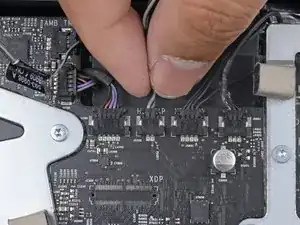
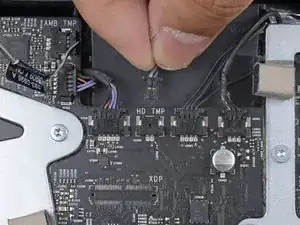
Trova il connettore sulla scheda madre etichettato HD TMP o HDD TEMP.
-
Se il precedente cavo della temperatura è ancora connesso alla scheda, scollegalo e rimuovilo. Non ti servirà più.
-
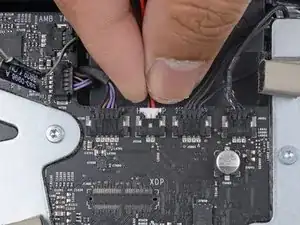
Connetti il doppio cavo rosso-nero del sensore di temperatura alla presa sulla scheda madre etichettata HD TMP o HDD TEMP.
-
Ripiega la parte di cavo in eccesso in modo che non interferisca con altri componenti.
-


Per riassemblare il tuo dispositivo, segui queste istruzioni in ordine inverso.

87 commenti
While putting the system back together, I recommend untaping and removing the vertical sync cable from the back of the led screen. Plug it back into the LED Driver board and then into the back of the screen. Reapply the tape and continue reassembling as normal. It is far easier to plug it back into the screen than into the driver board through such a small gap.
Evan -
Wow! That's a great tip... I looked at doing this and thought it would be a hassle but if you said it is easier than doing it taped than it must be easier. I'm going to do this time. Thaanx
My hd failed and i used this guide to replace it with the same model. The problem i'm stuck with now is installing os x again. The installation starts and goes on for a while, while the hard drive makes a weird clicking noise. Then randomly the installation fails and asks to try again. I've done this ten times now.
I'm not here to rant though, i've some useful tips as well.
Instead of buying suction cups, i used a vacuum cleaner inserted into the back of a plastic container to create more pressure per inch. Also used duct tape on edges of the container to create more friction and not damage the glass. Although later i noticed you could wedge the sharp edge of a knife between the glass and the case and widen the gap with a fingernail, then pull the glass out completely.
A note when you're buying screw drivers... The ones with the interchangeable bits won't reach the screws on the lcd, so be prepared to fiddle with strips of paper and screws falling into the sides!
nav -
Were you able to finally install the osx ?
Kul -
I'm supposing my SSD will go before my HDD, but either way this doesn't look like the inside of my 27" iMac. Help?
You can easily lift the glass panel off the magnets with only your fingernails (or something thin like a credit card or a guitar pick). No need to buy suction cups you will only use once.
Nick Caron -
Yes, you don't need the specific suction cups to remove the display cover - it's held on by magnets, and if you start at the center by the iSight you can work out to the edges and remove it. I had an iPhone screen suction cup around and it helped with balancing the screen when you pull it out fully, but by no ways is it required.
jtowner -
Great guide and pretty straight forward the only thing that took me ages and I didn't manage to undo were the power btn cable (step 28) and the thermal sensor (step 25) Seemed like they were glued on! Very difficult to remove and obviously conscious so I didn't break anything!
Eddie -
Thanks!!! Worked excellently.
I used a plunger (clean first ;-) to get the screen off, and http://exirion.net/ssdfanctrl/ for fan control.
Then, i did not take out the whole display and left it in the hinges on the bottom side and held it up with two small cardboard boxes. Easy enough to disconnect the hdd then.
I replaced with an ssd, put that into a ssd enclosure. Had to drill an extra hole in it to fasten the pins that hold it in place.
Used Carbon Copy Cloner to make an image from the old hdd, with the sad connected via usb. Checked it of it booted via System Preferences > Startup Disk. It worked so the took the imac apart and replaced the disk. Booted, everything was working as always, only faster!
Frank303 -
I'm replacing my optical drive too. what exactly needs to be plugged into the SSD? I don't have the kit - as I am not sure one is required if I buy something like this: http://www.amazon.com/gp/product/B0056OB...
Can you please advise? Can I do it with this piece, or do I need to get the entire bracket kit?
Allen Borza -
My display data cable forks, with a smaller section going up near the camera board. Where it forks, it is attached to the aluminum plate that attaches around the cpu board. I haven't seen any images that look similar, and I'm stumped at how to remove this second section of the cable. 2010 i7 build to order
Awolf -
Agree with the other comments here. Despite buying suction cups, not sure they were necessary as the screen removed very easily. A sat nav suction cup would do the job fine.
Stuart Bloomfield -
I can confirm that it is possible to remove the front glass using fingernails rather than suction cups. It isn’t easy, but if you try you should be able to pry off the glass.
I did this twice: once at the beginning of the procedure and once again at the end, when I realized that a big pice of lint was trapped under the glass.
gordonhamachi -
Don’t use suction cups. totally unnecessary. screen pops off with fingernails.
Kieran Hobbs -
The reason for caution about suction cups tends to be making sure you don’t apply uneven pressure on the edges of the glass and crack it in the process of removal. I do agree however that some pretty small suction cups would do fine. These suction cups can be had at your local princess auto (Harbor freight) for a few bucks and are useful elsewhere as well. if you use your fingernails or other items just try and do it evenly :)
Abirinder Brar -
good duct tape or gaffer tape wrapped around your hands makes an excellent glass removal 'tool'. Even clear packing tape works a charm.
Stu Blair -
A great first step that minimizes that first gust of dust migration when the glass is lifted is to clean the glass, sides *and the back* before lifting the glass, and then lift SLOWLY. Most of that dust is already trapped inside and pulled up as the screen lifts, but with care you can keep it there (or gently vacuum out with a micro vac…).
John -
before starting any of this…there is a device that you can use that comes with the IFixit kit to format and either clone or restore your hard drive to the new drive…it will save you a lot of headaches..it is a SSD enclosure that you can plug into your existing computer …
Tomr -
Thanks for the instructions. Before doing this the first time, suggest to everyone, read through at least twice. This is the easiest step, as you’ll soon see. As for removing the glass, USE suction cups, either the ones the sell here, or others. DON’T skimp. Also wear gloves when handling the glass. Don’t take chances.
ECJohansen -
Duct tape works too!
Dani -