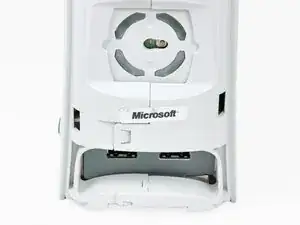
Introduzione

Questa guida mostra solo come rimuovere il lettore DVD.

La Xbox 360 è progettata in modo che il lettore DVD funzioni solo con la specifica console sul quale è stato installato in fabbrica. Sostituire un lettore DVD difettoso con uno nuovo non funzionerà, poiché quello nuovo ha una chiave digitale diversa, che quindi la console non riconoscerà.

  1. yMUJPMnCJJuiSO6X
    yMUJPMnCJJuiSO6X
    14IrWYZVEVr1aEfS
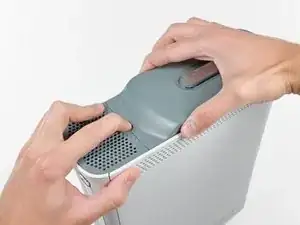
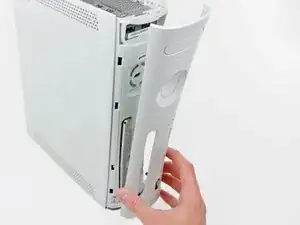
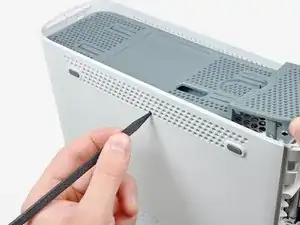
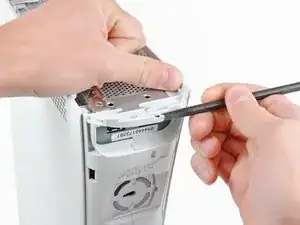
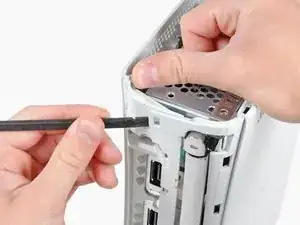
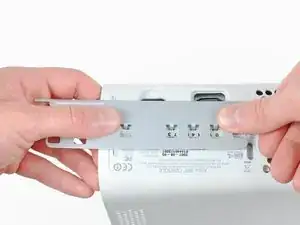
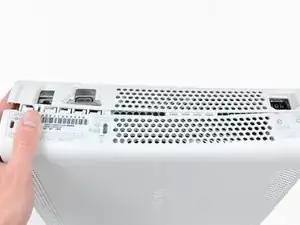
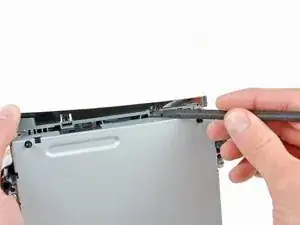
    • Mentre premi il pulsante di sbloccaggio sul gruppo del disco rigido, solleva il bordo anteriore.

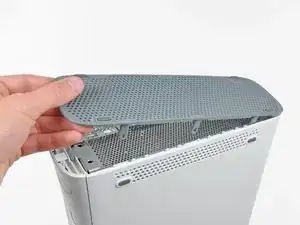
    • Rimuovi il gruppo dell'hard drive dalla presa d'aria superiore.

    WARNING: Just replacing the drive will not make it work correctly. Microsoft has married the drives to the motherboard. Hence, in order to get full operation out of the drive you'll have to perform more steps not listed here. Search in the FAQ on this specific topic for more details. Otherwise, before buying a new drive, try cleaning the inside of the old one and/or replace the belt involved in opening and closing the drive door.

    - Good Luck

    Eric -

    Thanks..helped!

    joseph zulu -

    bress the button and lift with the same hand! i thought mine was stuck because of this pic!!!

    Maths with Luigi -

  2. J6CIpEaLOoYAQHxb
    • Metti in verticale la console con il lato inferiore rivolto verso l'alto.

    • Durante questa procedura puoi usare la punta dello strumento di apertura per la Xbox 360 al posto di uno spudger.

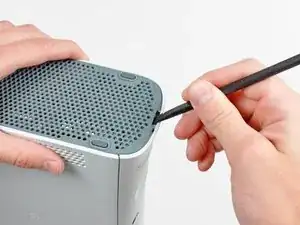
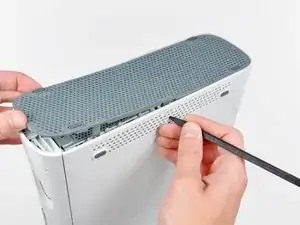
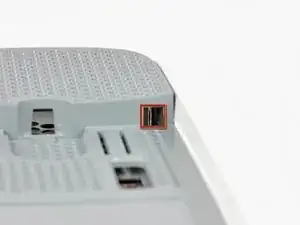
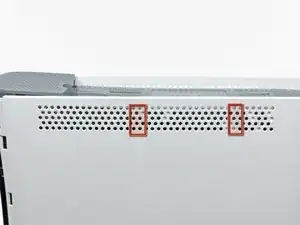
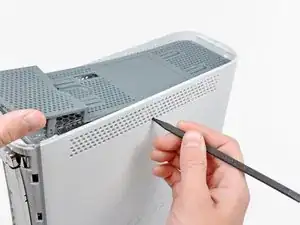
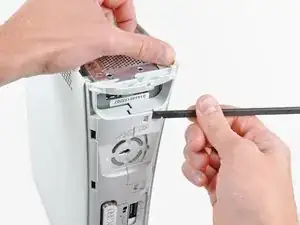
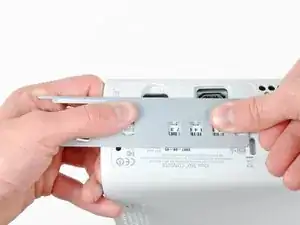
    • Inserisci la parte piatta di uno spudger o il bordo dello strumento di apertura per la Xbox 360 nella piccola apertura sul bordo anteriore della presa d'aria inferiore.

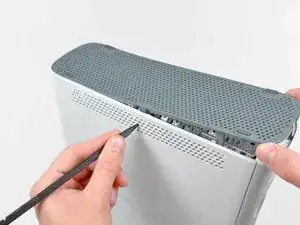
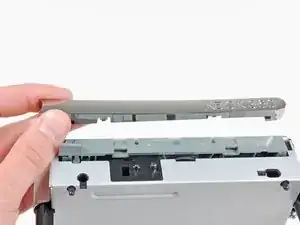
    • Solleva il bordo anteriore della presa d'aria inferiore dalla mascherina.

    You can avoid this step by pulling the front cover off. Just make sure you don't break the springs for the USB bay area.

    Repair Doctor -

    Hello, thank you ifix for this guide, I followed this guide, I got stuck at some point but I resolved it. Also I want to share this resource: Step by Step guide to fix Xbox 360 errors it helped me go through all the things associated with Xbox 360 and the troubleshooting of errors. Hope this can also help you all.

    Christopher Sage -

  3. ELe3ImNHnfjH5CMS
    ELe3ImNHnfjH5CMS
    XlYWdcnwtOrB1W3S
    NJBPRBLSExTr3Den
    • Nei prossimi passaggi dovrai usare la punta di uno spudger o dello strumento di l'apertura per la Xbox 360 per rilasciare i gancetti lungo i bordi destro e sinistro della presa d'aria inferiore. Le loro posizioni sono evidenziate in rosso.

    • Dovrai inserire la punta nei fori sui lati in plastica della sconsole.

  4. MacUdYZ1EwkBWQmW
    MacUdYZ1EwkBWQmW
    kL3iWK2V1YIMoyBX
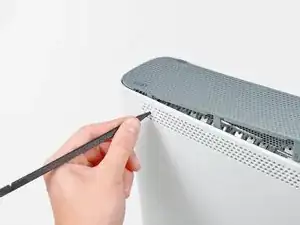
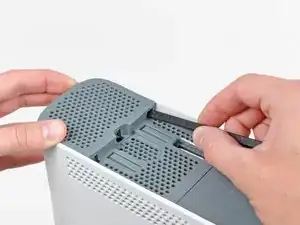
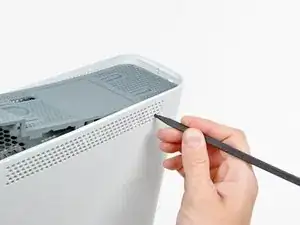
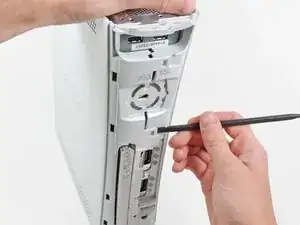
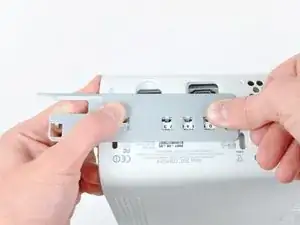
    • Per per sganciare le clip, inizia da quelle più vicini al bordo frontale della presa d'aria inferiore.

    • Mentre tiri leggermente verso l'alto il bordo anteriore della presa d'aria inferiore, spingi i ganci più vicini alla parte anteriore della ventola stessa verso l'interno della console con la punta di uno spudger.

  5. vPypAIcA45sMw4Y4
    vPypAIcA45sMw4Y4
    o6vXGPFRiS5OhrXC
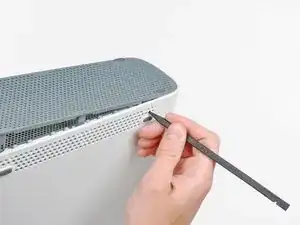
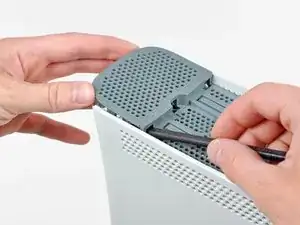
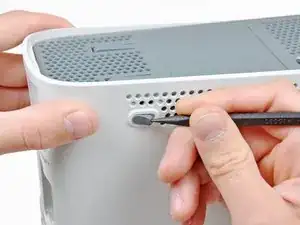
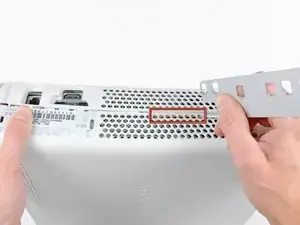
    • Ripeti la stessa procedura per rilasciare le due clip centrali della presa d'aria inferiore.

  6. HS2EJegmA2DGOAE1
    HS2EJegmA2DGOAE1
    3VgWioIEgIExHeDa
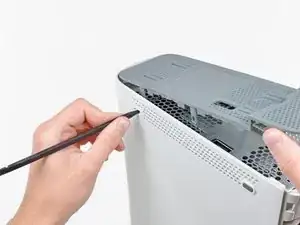
    • Usa la punta di uno spudger per rilasciare i ganci della presa d'aria inferiore più vicini al retro della Xbox.

  7. IIcCSDqQGMSuBFJW
    • Rimuovi la presa d'aria inferiore della Xbox 360.

  8. K34QYfxVrrftatym
    K34QYfxVrrftatym
    ytuwV2efqMfxRndW
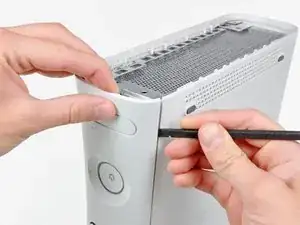
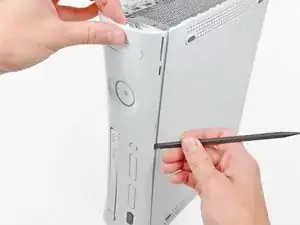
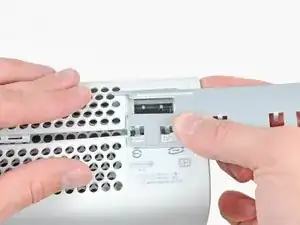
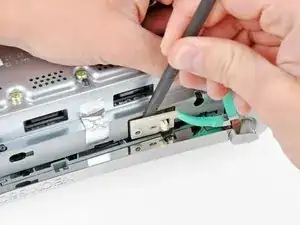
    • Infila la parte piatta dello spudger tra la mascherina e la scocca esterna vicino al tasto di accensione.

    • Fai scorrere lo spudger lungo il bordo della mascherina per rilasciare i ganci che la tengono ferma.

    • Puoi usare anche il bordo dello strumento di apertura per la Xbox 360 per questo passaggio, ma potrebbe graffiare la scocca in plastica.

    • In alternativa puoi usare le mani per tirare via, prestando attenzione, la mascherina dalla Xbox 360.

    The faceplate just pulls off, using a tool is completely unneccessary. https://beta.support.xbox.com/help/xbox-...

    Erik Tomlinson -

  9. xM4CxhxJnIT4eHCA
    • Ripeti la stessa procedura per rilasciare l'altro lato della mascherina.

  10. uqjqI2HkmxeYCGNH
    • Rimuovi la mascherina dal lato anteriore della console.

  11. HMMFtOmkPd6YTvo4
    HMMFtOmkPd6YTvo4
    CM3dOusgANm2syl1
    • Metti la console in verticale con il bordo superiore rivolto verso l'alto.

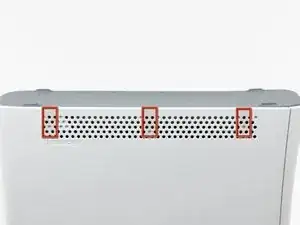
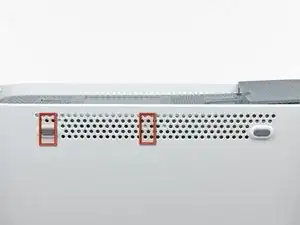
    • La presa d'aria superiore è fissata alla console con delle clip. Le prime due sono posizionate sotto la presa d'aria vicino alla mascherina, come mostrato in figura.

  12. hLQONPwYWw5wwuku
    hLQONPwYWw5wwuku
    vG3S2NKpGQNSJi2m
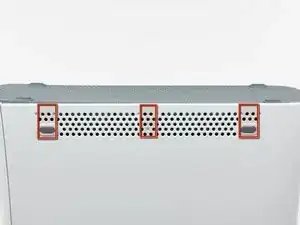
    • Infila la parte piatta di uno spudger nelle piccole aperture menzionate nel passo precedente per sganciare le clip.

    • Puoi anche usare la punta dello strumento di apertura per la Xbox 360 per questo passaggio.

    I found it easier to open these clips using the pointy end of the spudger rather than the flat end. Just slide it in against the side of the case and the clip will pop off.

    dave -

  13. Jcd3cuuefWPTrKGO
    Jcd3cuuefWPTrKGO
    ESFwEvEAkCyE1Y51
    GHihpIrQVQUlSBCN
    • Nei prossimi passaggi dovrai usare la punta di uno spudger o dello strumento di l'apertura per la Xbox 360 per rilasciare i ganci lungo i bordi destro e sinistro della presa d'aria superiore. Le loro posizioni sono evidenziate in rosso.

  14. cLODuehWcnPCYpHx
    cLODuehWcnPCYpHx
    ZNDntxLmkPnmgeDd
    • Per rilasciare i ganci della presa d'aria superiore, inizia da quelli centrali.

    • Mentre tiri leggermente verso l'alto il bordo anteriore della presa d'aria superiore, spingi le clip centrali verso l'interno della console con la punta di uno spudger.

  15. 3NS6J5nJKAOQxDdZ
    • Usa la punta di uno spudger per rilasciare il gancio della presa d'aria superiore più vicino al retro della cover superiore della Xbox.

  16. satartHPCh3cCoKK
    satartHPCh3cCoKK
    pfYZbHEZFGAGpkAw
    • L'ultima clip è nascosta dietro al piedino in gomma più vicino al retro della console.

    • Usa la punta di uno spudger per rilasciare il gancetto della presa d'aria superiore più vicino al retro della Xbox.

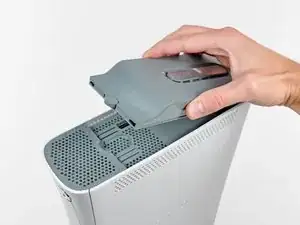
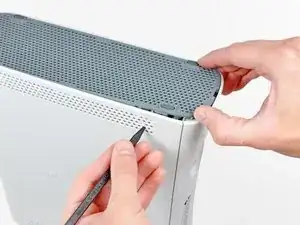
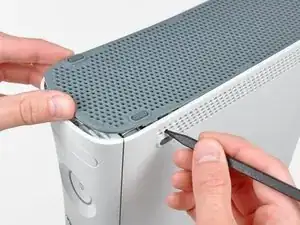
    • Rimuovi la presa d'aria superiore dalla Xbox 360.

  17. IyFVa2YVF16dYNPr
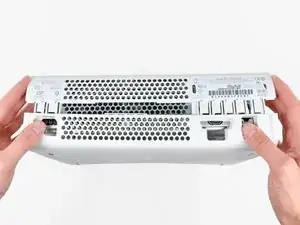
    • Metti in verticale la console con il lato superiore rivolto verso il basso.

    • Rimuovi l'etichetta della garanzia dalla console.

    There is an alternate to breaking the seal. If you open the back first starting with the opposite side of the sticker you can get the rear to "Clam Open" retaining the seal.

    Eric -

    LOL “Romove the warenty seal”

    Alexander Wiand -

  18. bfLLW2eb1mul2OvC
    bfLLW2eb1mul2OvC
    nGyMgcPrm6q5alKf
    PatF4YGqcIFHXTGM
    • La scocca superiore e inferiore sono unite da diverse clip sia sul fronte sia sul retro della console. Questi ganci devono essere rilasciati per separare la scocca inferiore dalla console.

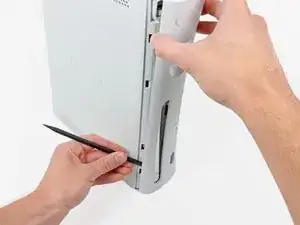
    • Usa la parte piatta di uno spudger per rilasciare i seguenti ganci:

    • Sopra le prese USB anteriori.

    • Sotto le prese USB anteriori.

    • Sopra lo slot per la memoria esterna.

  19. 3xXd6DhVwt4ibPIW
    • Infila la parte piatta di uno spudger sotto l'ultimo gancio posizionato sopra il tasto dell'espulsione del cd e fai leva per rilasciarlo.

  20. G54PXDV62XGnhhuV
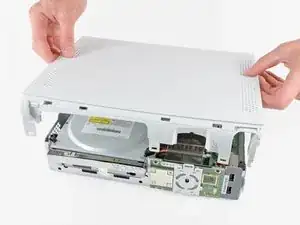
    • Solleva leggermente la parte anteriore della scocca in plastica per assicurarti che sia completamente sganciata.

  21. xCaY2FIFFFI4Isfv
    xCaY2FIFFFI4Isfv
    RSrCtVYWkTQCbQaq
    • La scocca superiore e inferiore sono unite da 7 ganci sul retro della console. La loro posizione è evidenziata in rosso.

  22. Yujni1lYPGpADBlS
    Yujni1lYPGpADBlS
    kOdJT5HjlrWoW44h
    FaKq6NRVtQOZjelM
    • Premi lo strumento di apertura per la Xbox 360 nelle fessure dei ganci vicino alle porte I/O che uniscono la scocca inferiore a quella superiore.

    • Mentre premi sullo strumento, separa la scocca superiore da quella inferiore per rilasciare le clip.

    I didn't have an XBox tool, so I followed instructions in this video for this step (https://www.youtube.com/watch?v=qaxIB6cX...) to pry it open with your fingers and a screwdriver.

    Nick Karnik -

    The small (metal) women's hair clip is best for un-latching the tabs. The screw drivers just make the holes bigger.

    Denny Ross -

    You can also use the pointed end of a plastic spudger to push each clip free while you separate the case with your free hand.

    Michael Carson -

  23. IAAAOka4GMbPLtIU
    IAAAOka4GMbPLtIU
    r1n4vHDX1G6iMJg5
    • Mentre tieni separate le due metà della scocca, usa la punta di uno spudger o dello strumento di aperura per la Xbox 360 per premere sulla lunga clip evidenziata in rosso al centro della console.

    • Il gancio dovrebbe rilasciarsi, lasciando così solo quelli vicini alla presa d'alimentazione ad tenere insieme le due parti della scocca.

  24. ONLOcaEGdYN5F5XJ
    • Premi lo strumento di apertura per la Xbox 360 nelle fessure delle clip restanti vicino alla presa d'alimentazione.

    • Separa la scocca superiore da quella inferiore per rilasciare i ganci.

  25. jrKfppdCFKeYeJTs
    • Metti la console in modo che il alto anteriore sia rivolto verso il basso.

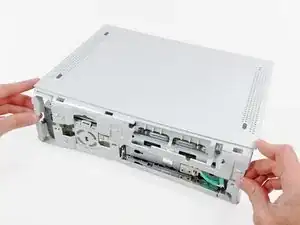
    • Solleva verso l'alto la parte posteriore della scocca inferiore per rimuoverla dalla console.

    • Stai attento a non piegare troppo la scocca vicino alla presa d'alimentazione: si può rompere facilmente.

  26. vKpq2mTLPKe6FEdf
    vKpq2mTLPKe6FEdf
    hPMYNsCmxTPh1auj
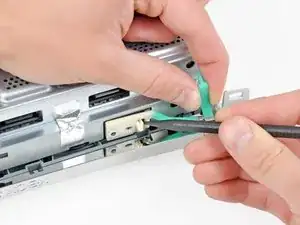
    • Usa la punta di uno spudger per rilasciare il gancio che fissa il tasto d'espulsione al telaio in metallo.

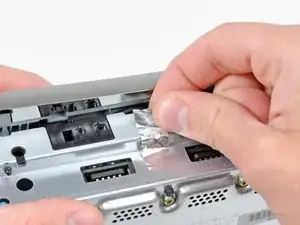
    • Infila la punta di uno spudger tra il tasto d'espulsione e il lettore CD.

    • Fai leva sul tasto d'espulsione e rimuovilo dalla Xbox 360.

    • Puoi usare anche uno strumento di apertura per la Xbox 360 per questo passaggio.

  27. xWrVtTRiATabXKR5
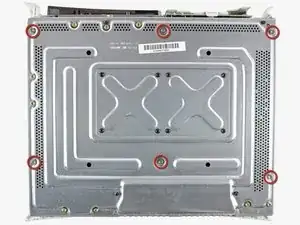
    • Svita le 6 viti Torx T10 argento da 64 mm che uniscono la scocca superiore al telaio in metallo.

  28. xK4P5MWDdRargYm4
    • Appoggia la console in modo che la scocca superiore sia rivolta verso l'alto.

    • Solleva la scocca superiore e rimuovila dalla console.

  29. MZPUUJVPxxANUeoT
    • Rimuovi il nastro argentato che unisce il lettore CD al telaio in metallo.

    Does anyone know if the Silver Tape is Lead Tape?

    Sean -

    Looking at mine, I doubt it. It looks like standard foil tape

    Rukir Gaming -

  30. ZtSZCTiWnI1mFySC
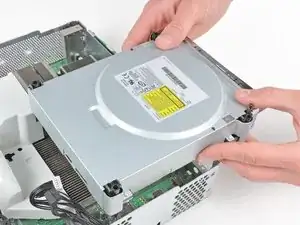
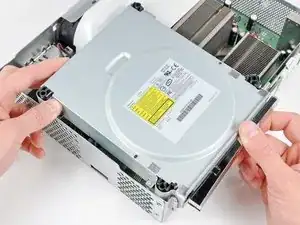
    • Solleva leggermente il lettore CD per avere accesso ai connettori SATA e di alimentazione sul retro del lettore per scollegarli.

    • Non provare ancora a rimuovere del tutto il lettore: i 2 cavi sono ancora collegati alla scheda madre.

  31. aP5BgixloKHsaQOB
    aP5BgixloKHsaQOB
    bFYsJNjL6UUJtumE
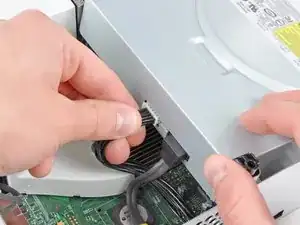
    • Prendi il cavo d'alimentazione e tiralo fuori dalla sua presa sul drive ottico.

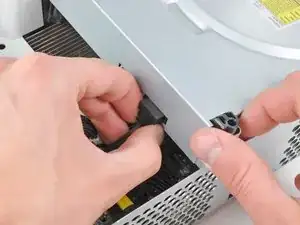
    • Scollega il cavo SATA dalla sua presa sul lettore CD.

    I found the power cable to be very tough to get out, at least it is the first time doing this.

    Nick Flacco -

  32. NlR5YgLZKUOY6y2G
    • Solleva il lettore CD per rimuoverlo dal telaio in metallo.

    Be careful not to lose or break the two teeny metal clips securing the optical drive assembly snugly to the metal casing on either side of the drive's front face. I used a spudger to press in the topmost tines on these clips because they were catching on the drive and bending up. The clips should stay on the metal housing, not come off with the drive.

    Vaughn Baker -

  33. cQCjShViScyHMfJf
    cQCjShViScyHMfJf
    sLNNFLmrJAXxqRSK
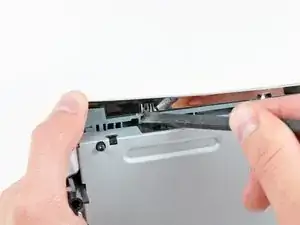
    • Mentre spingi la copertura del lettore DVD verso la parte superiore del lettore stesso, usa la parte piatta di uno spudger per liberare le due clip di fissaggio sotto la copertura.

    Ignore this step.

    Wade -

  34. MDY1gUIs1fcEEWLx
    • Rimuovi la copertura del lettore DVD.

    • Resta solo il lettore.

    Ignore this step.

    Wade -

Conclusione

Per rimontare il dispositivo, segui le istruzioni in ordine inverso.

Walter Galan

693762 Reputazione

24 commenti

who knows xbox360 can use desktop drives?We have all kinds of drives,but i am not sure if it is fit for xbox360.

Thanks

Rex Yang -

That has nothing to do with this guide. If you have any question regarding this equipment, go to the answer section.

oldturkey03 -

General comment, you make no mention of removing the PCB from the DVD drive if it's being replaced. Any particular reason for that?

Pete B -

Very easy to follow, got my drive fixed...thanks!

Brian Davis -

" Replacing a defective optical drive with a replacement optical drive does not work. The replacement will have a different DVD drive key, which the game console will not accept."

Not entirely accurate, that statement.

Having fixed a PS3 blu-ray drive by following the excellent guide on here, tried the same technique.

I had a bad drive in my xbox, and I replaced it with a new drive (of the same type). I took the daughter-board from the faulty drive and transplanted it to the good drive. It involved stripping down both drives, disconnecting 2 ribbon cables and unsoldering about 8 wires, transplanting the daughter-board - and resoldering the wires. Then reassembling. It worked for me, anyway.

Dave -

Sounds like an extremely patience depleting process.

brandonowlgarden -

I did this once on one of the newer 360s that are more basic, with help from someone , using scissors.

brandonowlgarden -

I am getting the famed red ring of death now...it there any troubleshooting I can do to fix this? I followed all steps and made sure that each wire mirrored the old unit.

Dereck Reeves -

you actually can swap the drives out pretty easy. you just rip the key off of the old drive and flash it on the new one. you have to make sure you purchase the same drive model and the use jungle flasher. would they allow an extraction and flashing guide on here? and while you are at it, you can mod them pretty easy as well ;)

daniel sawyer -

How come you do not have the instruction for replacing the laser?

CesarHEB -

How come Ifit it does not have intructions for replacing the XBOX360 LASER?

CesarHEB -

Because, You cannot replace the laser without replacing the drive. It is not possible to replace the laser.

brandonowlgarden -

No instructions on how to replace the PCB or what kind of drives there are?

xChrisS41x -

Great instrucitons

Thomas -

So easy a GIRL can do it! Thanks!

Lynn Sailor -

This guide is incomplete thus the pictured console wont work upon drive replacement. Please finish the steps for flashing for they are a very required step in replacing the drive at all.

Wayne Urban -

Author just ended the repair when there were more steps needed lol. I have done so many of these repairs and it shouldn’t be in the difficult section. If the PCB is ok, just swap it into a different drive deck you know that works. If your PCB is broken , you will need an X360 USB Pro and 3rd part software to extract the key and flash it and original firmware to the new PCB. I should update this tutorial for it is pretty weak.

toreskey -

What kept you from fulfilling your proclamation?

Kai und der Andere -

I realize my 360 is old but I cannot afford to replace it with the one. I replaced the dvd drive and same wont read problem, so I swapped the old board with the new and verified it is the board that is bad, not the drive itself.  Now what do I do? Give up and scrap it? How expensive is the fix to replace the board? Are the parts still available? Im not concerned with the technical difficulty.

Kevin InFlorida -

This guide sucks. He says you cant swap the disc drives without the logic board or it wont work. Then proceeds to swap the drive but doesnt actually show anything about swapping boards too lol

So people will follow this guide and miss a huge key part, thus ending with a nonworking disc drive lol

Crap guide.

gameskeet -

It's right there in the header section. It literally says that this guide is ONLY about taking out (and in reverse order putting back in) the optical drive and that, for a new drive to work, it wont work without extra steps. So only very inattentive people will end with a nonworking drive.

But instead of contributing and adding a corresponding guide on how to exchange the logic board in the drive you chose to nag and have a whinge.

Crap comment.

Kai und der Andere -

Thank you so much. I was able to fix my Xbox 360

Kimberly StClair -

You will have to transfer the daughterboard.

PRAM Colfax -

With out googling it I believe there was 3 diff models of DVD drives so make sure u replace it with the same model drive than remove the pcb board from the old one and put it in the new one because there married to the Xbox main board other wise it won't work with the new replacement . MAn I moded ps1s on and remember most of this stuff like it was yesterday. Fun .fun.

Jasen Weimerskirch -