Introduzione

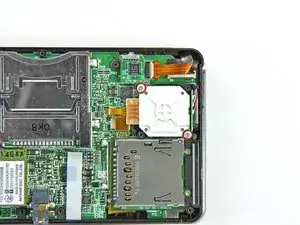
Prerequisito per la levetta analogica.

  1. WciIxkCGqqeSwjDE
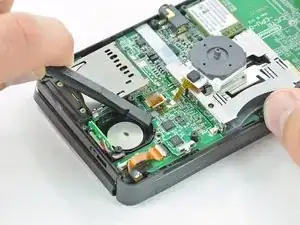
    • Svita le due viti a croce Phillips da 7,7 mm che fissano il retro della levetta analogica alla scheda madre.

    my screws wont stop spining what to i do? i have the same problem with other screws and this leavs my joystick very loss and it is dificult to muve it becuase it is aganst the case not lifted up? any sugestions? (sorry for my bad speling jaja im very bad at speling..)

    AppleTopic -

    I think you stripped your screws. I think the best solution is to change the upper cover of the lower assembly and the screws. The fastest, but temporarily is to stick in some way the joystick housing to the cover, but it won’t last long, so do this only if you have to use your console while you wait the cover to come. Anyway, so not overtighten the new screws, or you will be in the same situation once again.

    Daniele Carminati -

  2. bMBnFDhOIiWPDfD6
    bMBnFDhOIiWPDfD6
    E4TVtF3ttsxMSdVm
    X2gZcTXBxZmTrD5t
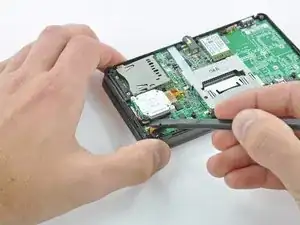
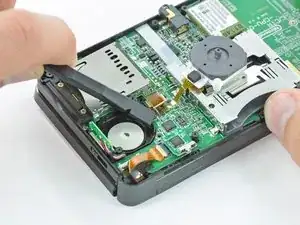
    • Usa la parte piatta di uno spudger per fare leva sul retro della levetta analogica dalla scheda madre.

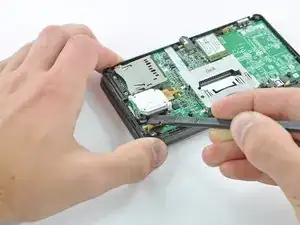
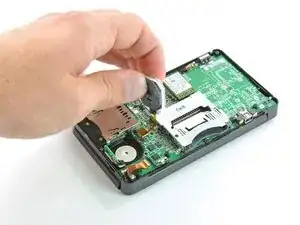
    • Solleva la levetta analogica dalla scheda madre e appoggiala sul suo retro in modo che il connettore del cavo a nastro sia accessibile.

    When reassembling verify that the circle pad control is oriented right. I had to go back in after completion when I realized it wasn't centered.

    Daniel Johnson -

    I would not disable the back side all the way because it could really mess up your 3DS.

    masterspeggy3 -

    From this step, follow this video https://youtu.be/XGdRim2Mvrk?t=627

    you can skipp from step 8 to 20

    lots of unnecessary steps

    Bruno N -

  3. IKPPuB5DIoRiDx2E
    IKPPuB5DIoRiDx2E
    SLSbhMgUFDj5mMLx
    aoqcp6SgbWFZPOht
    • Usa la parte piatta di uno spudger o un'unghia per ruotare verso l'alto l'aletta di bloccaggio del connettore ZIF del cavo a nastro della levetta analogica.

    • Assicurati di star sollevando l'aletta di bloccaggio incernierata e non il connettore.

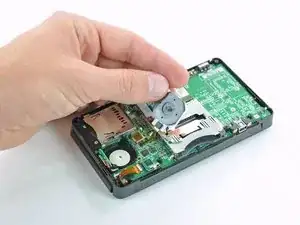
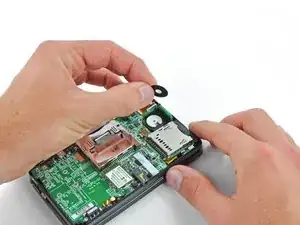
    • Solleva la levetta analogica dalla scheda madre.

    Can you replace a zif socket? The little metal pieces on mine broke off...

    Colton Alverson -

    YOUR &&^&@@ HAHAHAAHA, no you cant you would have to purchase a new motherboard i feek you bro happened in my first time

    vrobinson -

    you might want to find someone who is skilled in component level microsoldering for that

    Samuel Martin -

    The retaining flap on mine broke off, is there any way to fix it?

    Madi Hansen -

    Don't do this step! it is not necessary. you can skip steps 8 through 20

    S Maduras -

    Skip steps 8 through 20. It will save a lot of time. Thanks S Maduras for the warning.

    clarissa.vetintegral -

    Thanks S Maduras! Your tip

    made this super easy. No need for steps 8-20.

    Carl Vero -

    OH MY GOD THANK YOU SO MUCH!!!! I'm sure I would have destroyed my ds if I did all that

    Amber Selley -

    Just like everyone else I recommend skipping to step 21. You don't need to take all the components out to replace the circle pad.

    Callum M. -

    Skip steps 8-20 like they said!! Doing all those unnecessary steps wasted so so much time and frustrated me hugely by causing me to damage my microphone ribbon cable…

    Falcon -

    What do you mean by skipping 8-20? Do I not need to remove the screws in order to replace the lower LCD?

    Marion Saga -

  4. avCvIWYWgJyNbmBI
    avCvIWYWgJyNbmBI
    pYrbGImK2u45deHC
    • Per diminuire le possibilità di perdere le due guaine sotto la levetta analogica, potresti rimuoverle e metterle da parte.

    • Usa uno spudger o la punta di un cacciavite per sollevare le guaine e rimuoverle dal dispositivo.

    When reassembling, you can use the pointy end of the spudger to align the hold again with the joystick. It’ll probably have bounced around while you’re moving other things.

    anthonyhersey -

    If your only goal is to replace the circle-pad, the following steps are unnecessary. You can skip to step 21, the removal of the circle-pad.

    Andrew -

Conclusione

Per rimontare il dispositivo, segui le istruzioni in ordine inverso.

David Hodson

Membro da: 14/04/10

150325 Reputazione

0 commenti