Introduzione

Usa questa guida per rimuovere e sostituire il midframe (telaio intermedio) di un Nexus 5X.

  1. hZuBjDNMirRpxDPW
    hZuBjDNMirRpxDPW
    JWDcUTTe2RHKb3Aw
    CyV6ZtdsOoQKFIlC
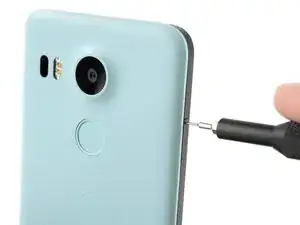
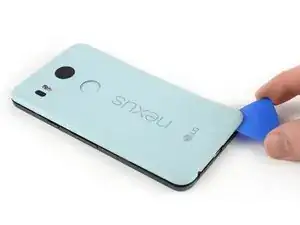
    • Inserisci uno strumento di estrazione SIM nel foro del vassoio della scheda, sul bordo sinistro del telefono.

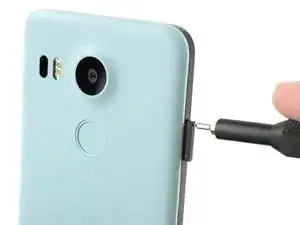
    • Premi per espellere il vassoio della scheda SIM.

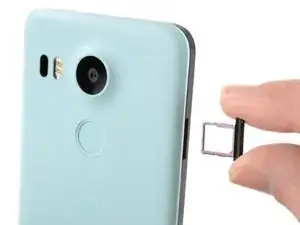
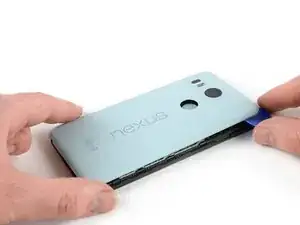
    • Rimuovi il vassoio della scheda SIM.

  2. ICCoMW16jfCrFbcn
    ICCoMW16jfCrFbcn
    sQxCgO3CGWjyHP2m
    MDAUADr5BeVSLDZl
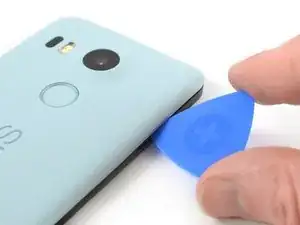
    • Infila un plettro di apertura nell'apertura della fessura del vassoio della scheda SIM; torcila per staccare la prima clip di plastica che tiene fissato il pannello posteriore.

    • Fai scorrere il plettro di apertura lungo il bordo superiore del telefono per staccare le clip di plastica che bloccano il pannello posteriore.

    A guitar pick is a good substitution for the plastic opening tool.

    Sam Sippe -

    Here’s a photo of the location of the 18 tabs that hold the back cover in place

    Steve -

    Twisting sideways didn’t do it for me, but sliding along the edge did. However, at first I didn’t realize that the pick was between the motherboard and midframe, rather than between midframe and back cover like it was supposed to. This led to breaking off a spring-loaded connector on the motherboard, connecting to an antenna (I guess) in the back cover. So far I haven’t noticed any reception issues, but I can’t say for sure.

    In essence: be careful to get the pick towards the back cover, and not “straight in” under the midframe.

    Hampus -

  3. afVYqSRSsfYK5iHi
    afVYqSRSsfYK5iHi
    pIWZAi2MnVlPLqqa
    WCXoRcGIOO46lSW1
    • Continua a far scorrere il plettro di apertura lungo tutti i lati del telefono per liberare tutte le clip di fissaggio del pannello posteriore.

  4. elaUMDhpoLaSyiLC
    elaUMDhpoLaSyiLC
    xC4oPmeXKWyCeJYD
    • Torci il plettro di apertura per sollevare lievemente il pannello posteriore.

    • Ci sono altre due clip in plastica vicino al sensore impronte digitali. Sganciale tirando delicatamente il pannello posteriore.

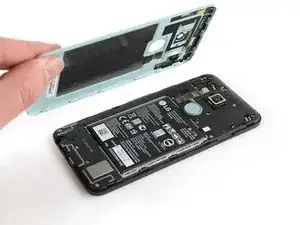
    • Rimuovi il pannello posteriore.

  5. SLBb5Cl3QMGTDxxc
    • Rimuovi le dieci viti a croce Phillips da 3,6 mm che fissano il midframe.

    Some models use a Y1 screw head.

    Kyle Wright -

  6. kbJbMKZvCYpi5Ym1
    kbJbMKZvCYpi5Ym1
    SBDl6Qt1OeRUcuOJ
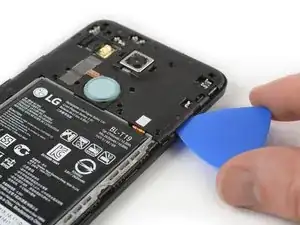
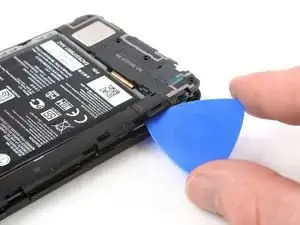
    • Inserisci un plettro di apertura nella fessura del vassoio della scheda SIM e torcilo per liberare le clip di plastica.

    The photo seems to show that the person is opening from the top, which is the opposite of your advice. So, just want to be clear.

    Robert Konigsberg -

    yes, open from bottom first... the pic above shows the finished product after reaching top of phone. I found it best to actually start close to the right of the usbC connector. Pushing inbetween the 2 tabs and up will release the shell.. then work clockwise.

    Chris Mayberry -

    Chris, your advice to start to the right of the usbC connector was excellent, thank you!

    Robert Konigsberg -

    I found that my middle panel was already broken at the narrowest part just to the left of the 2-D scan code on the battery, perhaps from some ham-fisted previous repair. This seems of little consequence, there do not seem to be any electrical connections running through this part.

    Wiley Sanders -

    After a long amount of prying, I discoved that, if used gently, a jimmy can really help get the plastic off

    Timothy Owens -

    I could not remove the cover with the opening tool but had success with the opening picks (the triangle parts). Just slide them under the cover and gently bend and twist the pick to release the cover from the locks. By the way: it’s perfectly normal for the bottom cover part to come loose from the top cover part. It’s designed that way (they interlock).

    Marco Miltenburg -

    Here’s a photo of the location of the 20 tabs that hold the middle assembly in place, and the pry angle needed.

    Steve -

    This is the scariest part but it is the same process of taking a bike tire off the rim: lift up one part of the cover then put a wedge under the lifted section to hold it up then continue around the frame lifting it up and holding it up with the blue picks. You’ll find that after you life the bottom you can wriggle free the rest by hand.

    The 10 screws came out quickly using the IFIXIT.com magnetic screwdriver.

    mcguinness.david -

  7. MPaVeGZ53Yant1bX
    MPaVeGZ53Yant1bX
    1EYFK4Jmr4ZkYCXc
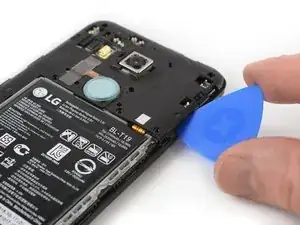
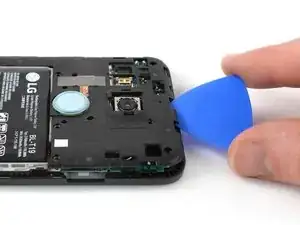
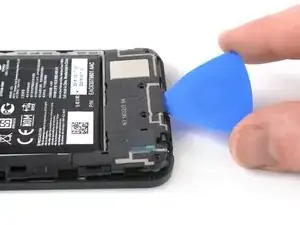
    • Continua a far scorrere il plettro di apertura nella parte superiore del telaio intermedio per sganciare le clip di plastica.

  8. UnqADRuHrCdSINRZ
    UnqADRuHrCdSINRZ
    LfjUs6JGfUqrEVjA
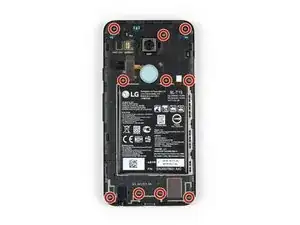
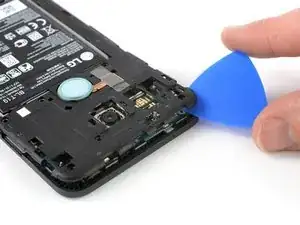
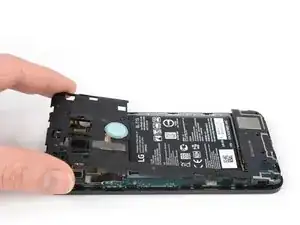
    • Usa il plettro di apertura per aprire, facendo leva, le clip di plastica sul bordo lungo del midframe e sul bordo inferiore.

    • Accertati che tutte le clip sul lato lungo siano sganciate, altrimenti il telaio intermedio potrebbe rompersi nei punti di collegamento.

  9. A65jPFCZQIiwZlZb
    A65jPFCZQIiwZlZb
    CLJTmiqEsupw21Yg
    • Accertati che tutte le clip siano sganciate.

    • Rimuovi con delicatezza il midframe.

Conclusione

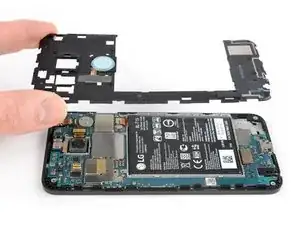
Per rimontare il dispositivo, segui queste istruzioni in ordine inverso. Se il tuo pannello intermedio è danneggiato o rotto, mettine uno nuovo.

Porta i tuoi rifiuti elettronici a un riciclatore certificato R2 o e-Stewards.

La riparazione non è andata secondo i piani? Vai sulla nostra comunità Risposte Nexus 5X per trovare aiuto nella risoluzione dei problemi.

Dominik Schnabelrauch

Membro da: 23/11/16

200657 Reputazione

2 commenti

Has anyone else run into the different screws holding the midframe? I opened my son's phone today to swap out the battery and found the screws to be tri-wing. Imagine my confusion. I've been into to my wife's Nexus 5x before, and it has phillips-head screws. Weird.

Taylor Says So -

I’m trying to confirm whether or not the antenna for cellular signal resides in the loudspeaker, or the bottom section of the midframe. If I replace the bottom piece of the midframe, am I replacing the cellular antenna?

steve d -