Introduzione

Questa guida include uno smontaggio completo per raggiungere il motore della pompa per pulirla o sostituirla. Se l'unità è di seconda mano, questa guida ti permetterà di controllare e pulire tutte le componenti nel ResMed AirSense 10.

  1. CPHuQelAhJULjQjL
    CPHuQelAhJULjQjL
    woq6ZGfewKc1Phtq
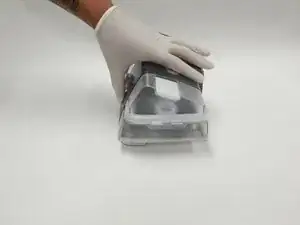
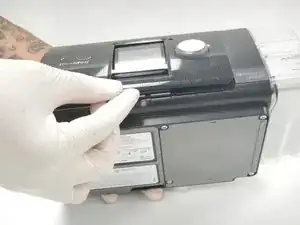
    • Posiziona il ResMed AirSense 10 con il serbatoio dell'acqua rivolto verso di te.

    • Prendi sia la parte superiore che quella inferiore del serbatoio dell'acqua e tirale via dal dispositivo.

  2. PJFCuxvHTjyFeUGw
    PJFCuxvHTjyFeUGw
    pD1YHALW1DRfEYii
    jQXW3rBnVAMREv2p
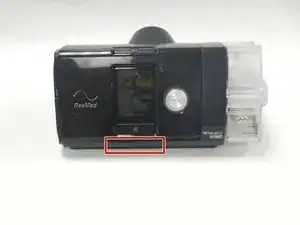
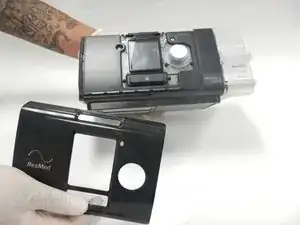
    • Posiziona il ResMed AirSense 10 con lo schermo rivolto verso di te per rimuovere la placca di copertura anteriore.

    • Posiziona un dito sotto l'indentazione sotto al tasto home e fai leva per rimuovere la placca di copertura anteriore.

    • Questo dovrebbe richiedere solo una forza media.

  3. 5p3HRQcm5Gge2GCL
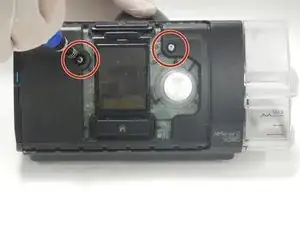
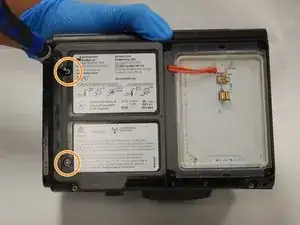
    • Svita le due viti Torx T10 da 14 mm che hai scoperto rimuovendo la placca di copertura anteriore.

  4. hg6wqWUcrshJ1KCN
    hg6wqWUcrshJ1KCN
    4iXxjhqoncDrQOMZ
    jk422iGXZG2Ko211
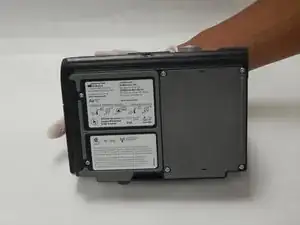
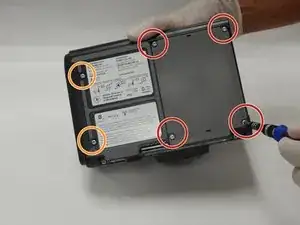
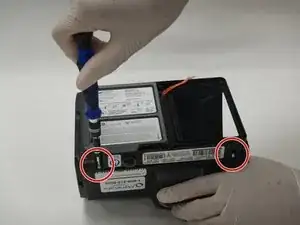
    • Ruota il dispositivo fino a rivolgere la parte inferiore del ResMed AirSense 10 verso di te.

    • Svita le quattro viti Torx T10 da 10 mm, quindi mettile da parte con la placca di copertura in plastica del riscaldatore.

    • Svita le due viti Torx T10 da 14 mm rimaste.

    Suggestion: The 4 screws for thermal do not need to be removed to access the motor nor the connector to thermal be removed. Only remove the two screws 14mm long opposite to the 4 10mm screws

    Alain Butzberger -

  5. wYEceK1Lco2OPy1g
    wYEceK1Lco2OPy1g
    HJNfVLLERa5poQp1
    enS5VHigpw1N1CDC
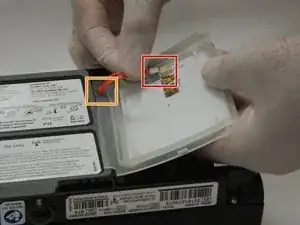
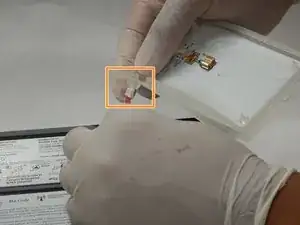
    • Dopo aver rimosso la copertura della placca riscaldante, scollega il cavo arancione dal fusibile.

    • Tira attentamente il cavo arancione attraverso la guarnizione in silicone.

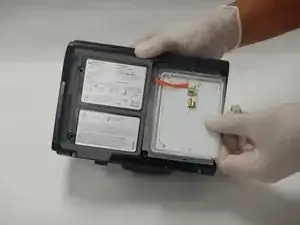
    • Rimuovi del tutto la placca riscaldante dal ResMed AirSense 10.

    Step not needed to reach the motor

    Alain Butzberger -

    Please remove this step as that it is not neccessary to complete this work

    Steven Hicks -

  6. EePt2jV5UiQmMi2t
    • Svita le due viti Torx T10 da 14 mm rimaste che tengono insieme la cornice.

  7. Ghj66jgQKfQZkonm
    Ghj66jgQKfQZkonm
    HtVZ4QrdHIl6B3JK
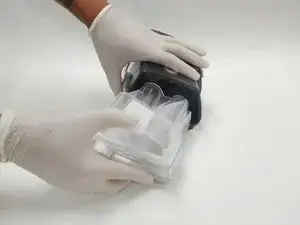
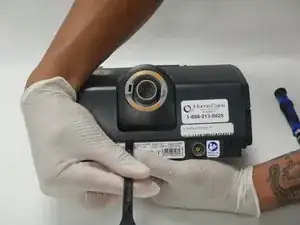
    • Orienta il ResMed AirSense 10 in modo che il retro della macchina sia rivolto verso di te. Lo scarico dell'aria dovrebbe essere rivolto verso di te.

    • Usa uno spudger in plastica per fare leva sulla copertura del ResMed AirSense 10 e rimuoverla dall'unità.

    • Rimuovi del tutto la copertura dal ResMed AirSense 10.

  8. wdY6rTVMpmhMMMfe
    wdY6rTVMpmhMMMfe
    wEfGTkavCDkTbOjF
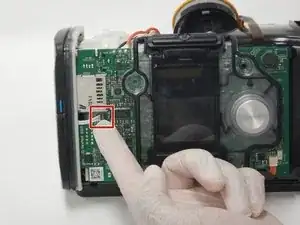
    • Posiziona il ResMed AirSense 10 in modo che lo schermo sia rivolto verso di te.

    • Scollega attentamente il connettore del cavo a 4 pin posizionato a sinistra dello schermo.

    • Rimuovi del tutto il pannello sinistro del ResMed.

    when removing this clip lift up from the wire side slightly then gently pull out.

    Thom -

    Please add the direction where force should be applied. I broke the connector because this visually looked like it should slide outward.

    Steven Hicks -

    The connector on the other end is a lot easier to remove, on side panel

    adquezada -

  9. ToZtOfuewWQAK2kx
    ToZtOfuewWQAK2kx
    YyQS4BgQ2OuUCAhp
    WBUKhYg5svVpCVKS
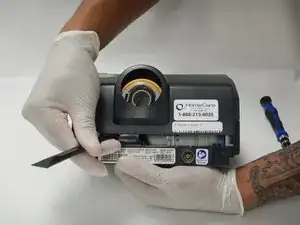
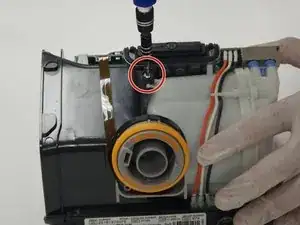
    • Posiziona il ResMed AirSense 10 in modo che lo scarico dell'aria sia rivolto verso di te.

    • Svita la vite Torx T10 da 14 mm che si trova tra lo scarico dell'aria e lo schermo anteriore.

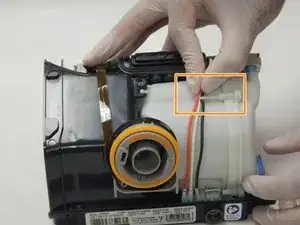
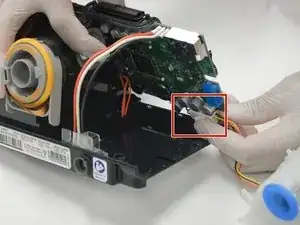
    • Rimuovi i cavi dal gancio della copertura della pompa.

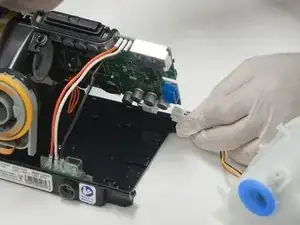
    • Inizia a rimuovere attentamente la copertura della pompa dal ResMed AirSense 10 finché non scopri il connettore del cavo.

  10. XLfoxTQAA6qJGRwF
    XLfoxTQAA6qJGRwF
    tZAmPaiDpJLXvtrC
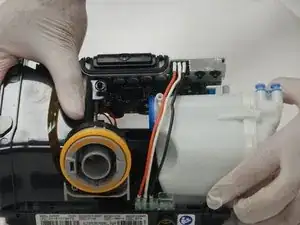
    • Rilascia il connettore dei cavi che collega la copertura della pompa alla scheda madre per scollegare completamente la pompa.

  11. 5rajbODjZXDFpQr3
    5rajbODjZXDFpQr3
    ZECQJGDRWlANHkIU
    kuOpgVF5p1Ij6URl
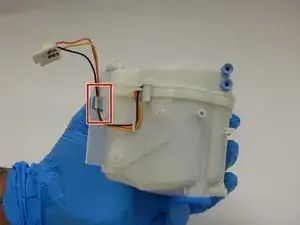
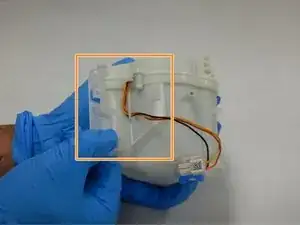
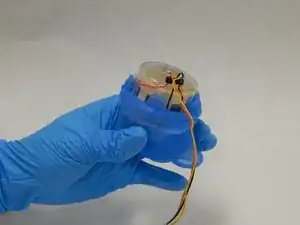
    • Orienta la copertura della pompa in modo che i cavi siano rivolti verso di te.

    • Rilascia i cavi dal gancio più esterno.

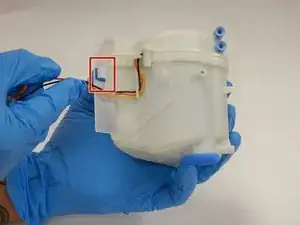
    • Quindi rimuovi il blocco in plastica dalla copertura della pompa.

    Anyone know the air pump part number or where I could get one?

    Timothy Belleson -

  12. IVl2RUVq3xBorY6E
    IVl2RUVq3xBorY6E
    PDLnklQURB3kWiLK
    uxFweuh3S5DsnqPH
    • Rimuovi il cuscinetto in silicone nell'angolo a destra.

    • Rimuovi i cavi dai ganci rimasti.

  13. VuAZpiZE5GjJOyGy
    VuAZpiZE5GjJOyGy
    xBTgCeRHVRhO1Rql
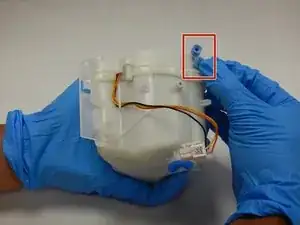
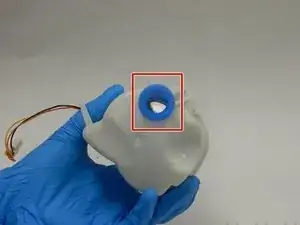
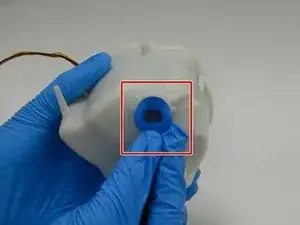
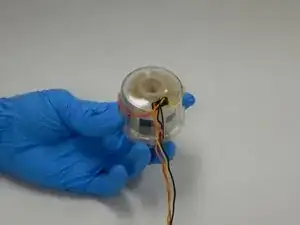
    • Orienta la copertura della pompa in modo che la porta di uscita sia rivolta verso di te.

    • Spingi l'ugello di uscita nella copertura della pompa.

  14. fqOxZDtKFqGB6KoB
    fqOxZDtKFqGB6KoB
    cKK5UDigGIDKnZOx
    1sHDvqAdCYpFALEO
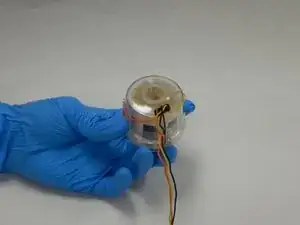
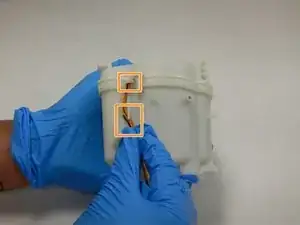
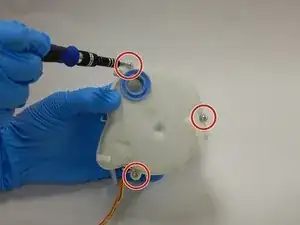
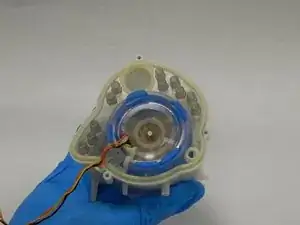
    • Orienta la pompa in modo che le tre viti Torx T10 siano rivolte verso di te.

    • Svita le tre viti Torx T10 da 14 mm.

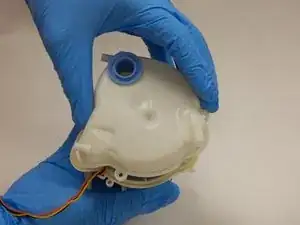
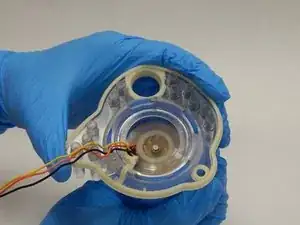
    • Solleva la parte superiore della copertura della pompa.

  15. YdZNpWvOBffqimK6
    YdZNpWvOBffqimK6
    mJV1Pcj3KMx1fDqK
    sxbTYUKdDlYOGV5J
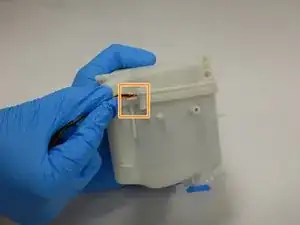
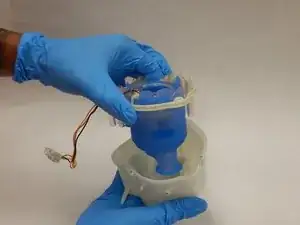
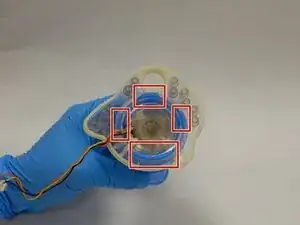
    • Rimuovi il gruppo della pompa dalla sua copertura e giralo in modo che la placca di montaggio sia rivolta verso di te.

    • Dopo aver rimosso il gruppo della pompa, c'è una placca di montaggio che deve essere rimossa per accedere alla pompa.

    • Ci sono 5 linguette in gomma che collegano la placca di montaggio alla calza in gomma che copre la pompa.

    • Spingi le linguette attraverso i fori nella placca di montaggio.

  16. jGQCHLlYwyKYqSIt
    • Separa la placca di montaggio dalla calza in gomma.

  17. OQgLhrRRJcFoybAm
    OQgLhrRRJcFoybAm
    DDfQ3rNV1SsJLYiv
    qskLvMUJDQ3N45rv
    • tira via la calza in gomma per scoprire la pompa.

    • Non danneggiare i cavi mentre rimuovi la calza in gomma.

    • La pompa scoperta può ora essere pulita e venire ispezionata in cerca di danni.

    Hola, soy de Chile y necesito comprar un motor para reemplazar el que está averiado y no aparecen proveedores, si es posible publicar alguno estré agradecido

    edgapereza -

    Can the motor itself be disassembled for deep cleaning? My wife took hers on vacation with us and now it's got an unbearable febreeze smell we can't get rid of. I disassembled everything except the motor itself and thoroughly cleaned all the components like you advised, so the only culprit left is the motor itself. Any suggestions?

    Larry -

    I have a brand new motor for sale. My cost was $238.00. Interested? Mike.whittemore@hp.com

    Mike -

    This is the supplier I used. I also will validate that the replacement worked for me.

    Steven Hicks -

    How do you reset hour meter on the Resmed Airsense 10 after you replace the motor?

    Fred Franks -

    Hi Jasey, did you ever open the pump motor itself? I got a cpap machine that must have been in a fire. The maschine is ok but everything was full of soot particles, I was able to clean neary everything but the pump motor ist glued together and I dont know if the motorcase breaks if I open it nevertheless with a knife or sth.

    A tipp is appreciated, cause a new one from C costs 95$ and I prefer not to buy in C if possible.

    Thanks Chris

    Carl Haupt -

    Here is a description by someone who managed to open the motor:

    https://www.apneaboard.com/forums/Thread...

    Michael Lachmann Tamarlin -

Conclusione

Per rimontare il tuo dispositivo, segui le istruzioni in ordine inverso.

Jacey Cobb

Membro da: 16/09/20

1517 Reputazione

40 commenti

Thank you @jaceyt ! This was spot on.

glove2006 -

Where can i buy a replacement pump?

Shayne Braid -

Alibaba sells the pump. Everyone else is OOS.

Travis Verner -

Where can i buy replacements?

christecnico -

Step 1, find a replacement motor???

jglazer -

The AirCurve 10S looks very similar. Is motor replacement in this unit the same process.

Bob R -

The problem isn’t so much the steps here (but, thanks—I found this after I had done it). The problem is that the clear-plastic fan/motor case cannot be cracked open for cleaning (as near as I can tell). I cleaned as best I could reach with a Q-tip, but to no avail. So, replacement is the only option. :-(

Russell Bateman -

Where or how does one acquire the replacement motor/pump assembly? I have looked at every ResMed supplier website I can find with no success.

bmw-ktm -

Where can you actually find a motor? My friend REALLY needs one.

Geoffrey Van Horn -

I replaced the motor with a guaranteed Resmed Original part, but the machine ran alot quieter but was lazy under load. Has anyone got any suggestions. This sounds like built in obsolescence……………………….in the software???

scottcon -

what was the source of the replacement ? Resmed seem reluctant to provide.

dave jones -

Where may I purchase a new motor for ResMed AirCurve 10 s?

Melanie Knupp -

What is the large blue connector on the other side of the SD card? Any way to reuse any of the parts for other projects?

ba600 -

I found Jacey Cobb on facebook a couple of months ago and contacted him to learn where he got a motor but he has not replied. If anyone knows where to acquire one I would be very grateful.

bmw-ktm -

Is this possibly the cause of a loud whining noise that ramps up and down as you breathe? It definitely sounds like an electric motor ramping up and down.

Rocco Williams -

Mine died a slow death of loud screams over 3 weeks. Looking for replacement motor, but have not found it anywhere. Recall hampering my replacement as it’s just out of 5 years. I’m turning gray again, I too any dying a slow death!

John D’Ginto -

Now, due to ‘COVID’ the supply chain leaves these ‘backordered’ and still can’t find parts, like, the motor. Has ANYONE located parts? There Ought To Be A Law!!!!

PCARRINGTON -

Whining noise started on mine in September, tore it down to clean but also found I couldn’t open the motor casing to deep clean or replace bearings. Spent next 3 weeks waiting for dr. appt. as Apria told me I needed a new prescription before they could replace it. By the time all paperwork got back to Apria, I was put in queue behind many others waiting for machines, was told 6to8 weeks(from 11/15). Followed up yesterday to make sure I was still in queue,was told it could be another 4-6 weeks.

Currently have machine in a plastic box surrounded by pillow bunting inside, with outside wrapped in 2 blankets. Holes cut for Hose and Power Cord. Whining noise still penetrates all that, keeps us both up at night.

Very frustrating that replacement motors are not available anywhere, and that motor casing cannot be opening to clean inside. Now considering using a Dremel to cut the plastic casing open and then Super Glue back shut after cleaning. Ridiculous, feel like I’m in 70”s USSR or current Venezuela!

Chris Micheau -

Where to get its motherboard

John Mohd -

Any idea about its motherboard?

John Mohd -

I found used, genuine replacement motors for the ResMed AirSense 10 here on eBay:

https://www.ebay.com/itm/265571430435?ch...

Sebastian -

where can i buy areplacement motor for resmed machine

George Dixon -

where can i buy replacement moyor

George Dixon -

Found this listing for a “new” motor. Unfortunately more than I’ve got to spend at the moment. Hope it helps someone else though.

https://www.dotmed.com/listing/cpap/resm...

Corey Jackson -

is the RESMED Air Sense AirCurve S10 Motor and the AirSense 10 AutoSet the same?

Tony Goold -

This guide needs to be adjusted when describing what directions to pull the wires. A connector from the modem to mother board broke because it was pulled the wrong way.

Steven Hicks -

If you own a ResMed AirSense, you may follow the detailed instructions here to swap out its pump motor. The text is well-written and includes detailed instructions with illustrations. If you need to fix your CPAP machine, this piece, written by what seems to be an expert, will be a big assistance.

For More Info:-https://thecpapsource.ca/

Cpap Source -

Ottime foto. Cambiato la pompa delle mia Resmed Airsense10 Autoset con una ordinata da Aliexpress. L'unica difficoltà che ho avuto è stata il punto 8: staccare lo spinotto..magari potevi spiegare meglio come fare. Per il resto top!

Geo Chiesi -

- Under "Introduction" the reader should be reminded to use the Magnifying "+" glass that can be seen when we hover the mouse over the picture. Step 8 would take advantage of the words "EXTREMELY CAREFULLY ..." as this connector is EXTREMELY FRAGILE. "Only extremely gently push the black connector out" (to the left on the picture). The maximum enlargement of the left picture on Step 8 MUST BE SEEN. The glove hides part of the connector. A movie and more details on the precision gesture needed for removing it without damage would be welcome.

- My unit gives a message to the effect that the motor has run passed it's maximum life (I used it more than 20k hours) ... but this is no problem, it still works fine.

N.B.: When I reached the motor, I decided not to go any further skipping Steps 15-16-17. I could see that the inside (blower) was not very dirty (definitely not disgusting) and that for an occasional usage (2nd bedroom) it could stay the way it was. Upon reconstruction the unit worked fine.

Thank you.

Michel -

Does anyone know how to reset the Unit Usage Hours (Motor Used Hours Count) ?

Michel -

The job went well after fixing a few whoops during reassembly. What I can't figure out is how to reset the timer now that there is a new motor in the CPAP. You might want to let your viewers know how to do this. I plan to just ignore the warning now that I know there is a new motor in my machine.

Sulo Vaisanen -

@jaceyt this was a beautiful tutorial, very helpful. Thank you. Now I just need to find the part number for the replacement pump motor.

RJ Carmine Glorso -

Where can you find parts for the device. Disassembly is great but . . . If parts are not available, what’s the point?

phudson38 -

Great guide. Thanks.

Bruce Russell -

There is no need to do anything with the heater plate when replacing the motor. Skip that step. Be sure to replace the blue air sensor ports when re-assembling the unit.

gcoxjr -

This really helped, as did a YT video. Between the two it was ‘cake’!

My biggest tip is to note part orientation during disassembly so you can put it back more easily.

I guess that advice goes for most things we fix!

AtlantaMan -

Quick note: it is late in the game, but the motor is the part you’ll want to replace.

Motors are available on AMZN, Alibab, and some other ‘outside’ sources — CPAP shops don’t sell them, and in-channel parts suppliers don’t deal with Users, just registered repair firms. The repair guys might put one in for you as a repair, but it would really be costy, and they don’t sell the motor as a separate part.

My motor went bad: it got extremely noisy over time. The bearings were shot but upon external inspection it looked fine. I dissected an old S9 that worked ok to get a motor to swap into the s10, but the old motor (nearly identical) was filled with dark colored dust —from its operating environment I guess. I read the motor swap would have worked otherwise, but they really can’t be opened and cleaned.

AtlantaMan -

Great guide! My AirSense 10 starting making a whining noise. Ordered a pump from Amazon. Crazy how dirty the innards of the thing were. Really scary. Washed all plastic components with Dawn dish soap. Went back together really smooth!! Thanks again.

James Judd -

https://a.co/d/ct4McBV

Is the part I found on Amazon. Fit perfect!

James Judd -

My ResMed Air Sense 10 is still going OK and not noisy but it keeps popping up with" Motor Life Exceeded" contact care provider.

Should I be alarmed will it stop working?

Jonno41john -