Introduzione

Questa guida riprende dalla guida prerequisita Smontaggio volante Logitech G27. In questa guida ti mostreremo come sostituire i motori che creano il feedback durante il gioco. Dopo aver seguito questa guida il tuo volante Logitech G27 dovrebbe essere completamente funzionante.

  1. JFe3hZpcNcMwfMMY
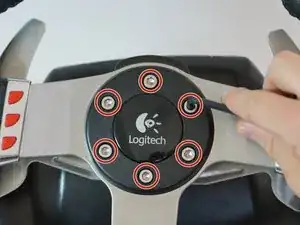
    • Svita le sei viti grigie esagonali da 25 mm con una chiave a brugola da 4 mm.

    • Stai attento mentre sollevi il volante, in quanto ci sono dei cavi delicati collegati alla parte inferiore.

    • Solleva attentamente il volante, ma non scollegarlo dal resto del dispositivo.

    Fijar primero el volante en la mesa para evitar desperfectos.

    Alpc360 -

  2. wnfiUv2VBuSB31AK
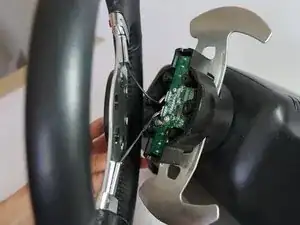
    • Solleva attentamente il volante dal mozzo, scoprendo i cavi e la scheda PCB delle due manopole del cambio.

    Apoyar el volante con las piernas y sacar los tornillos.

    Alpc360 -

  3. NZhmVBB6Bqh3Wu2P
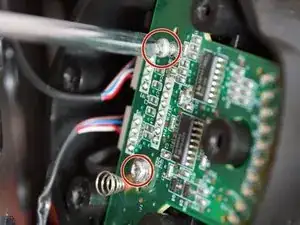
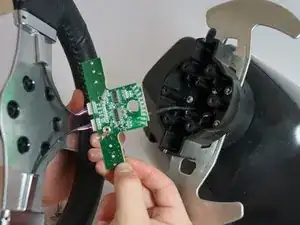
    • Svita le due viti argento che tengono ferma la scheda PCB nel volante con un cacciavite a croce Phillips #1.

  4. foUkt5y4AwJkc2ET
    • Rimuovi attentamente la scheda PCB dal mozzo del volante.

  5. Qtmlc6TkePtrVyam
    • Schiaccia e scollega attentamente il connettore largo a 7 pin sotto la scheda PCB.

    • Stai attento mentre scolleghi questo adattatore: cerca di non tirare dai cavi per evitare di danneggiarli. Invece, fai ondeggiare il connettore in plastica mentre lo tiri per rilasciarlo.

    These screws refused to go all the way back in for me, and one of them stripped completely. If this happens to you, you can get replacement screws that are shorter here - https://www.amazon.com/gp/product/B01MFA...

    This works for the G27, not sure about the G25 or any other wheels.

    Obviously the screws being shorter means the wheel isn't as strongly attached to the base in this direction, so if you have to do this remember not to put unnecessary stress on these screws by pulling the wheel straight off the base.

    SouthernPotato -

    bro i need new long cable i think and that connector or just replace the whole thing .. i put new grease, screw it more tight by the encoder so it woulnt go to the left .. wheel works verry nice tho all my buttons and shifter pedals wont work now tho the lights works dont know what to do now.. and now i kinda regreat opening it.. my wheel run so good now just these buttons are off not working at all and it kinda screws up midle of the game..

    Alexander -

    @alexdinpoik I’ve had the same problem when the 7 pin connectors blue and green cables broke off. First, only the blue one was broken which only took the led indicators gradual increase but all buttons were working then when i tried to plug in back, the green one broke off leading to none of the buttons working but the led indicators just working. Now i’ll try to fix it with iron soldering.

    Okan Akgül -

    okan can u pls share a video of you doing it? so i can do the “copy paste” hahah where can i buy cables and stuff i need for that? whats the name of these white connectors ? im new to this but share me a link to buy. i rather just try to fix it then buy a new wheel since its a great wheel compare to g29 that has bad software and the other wheels are to expensive. g27 cant be found in stores anymore neither and if im gonna buy one it has to be new haha hopefully u can share some knowlage thanks!

    Alexander -

    Where i can Buy the 7 pin cable for Main board please

    Ojilve jose -

    Hey guys!

    i broke the 7 pin cable anyone know where can is buy it? Thanks

    Richard Hajdu -

  6. FiRu5bFZLB5YBEuV
    • Puoi ora rimuovere del tutto il volante dal mozzo. Mettilo da parte finché non rimonti il volante.

    • Svita le tre viti argento da 37,5 mm più interne con un cacciavite a croce Phillips #2.

    • Rimuovi il mozzo del volante e spingi il connettore attraverso il centro del mozzo.

  7. hRAYY1mMrAVKZJFD
    • Puoi ora mettere da parte il mozzo e girare la copertura del volante per scoprire la parte inferiore.

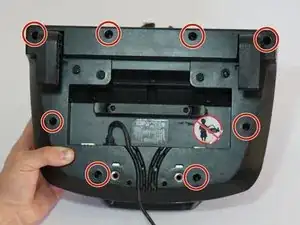
    • Svita le otto viti argento da 15,9 mm tutto intorno sotto la copertura del volante con un cacciavite a croce Phillips #1.

  8. UidVkwPtGC2eJLMK
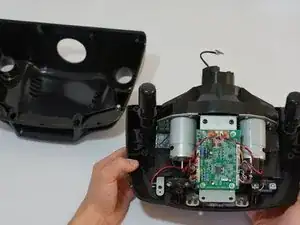
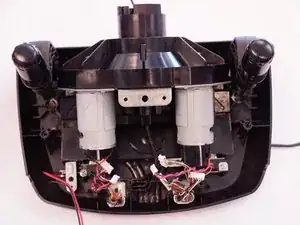
    • Ruta la copertura a testa in su e rimuovine la metà superiore, svelando la maggior parte dei componenti del volante.

    • Puoi mettere da parte la copertura del volante finché non lo rimonti.

    need two new black screes abouve the pcb board.. lost them need to know the size since the screws i replace it with was not exact..

    Alexander -

    Loosen the desk clamps before removing the housing, otherwise you risk breaking something. The housing should come off without having to use any force whatsoever.

    Oula Kuuva -

  9. AmPXsBqhnwifCPIb
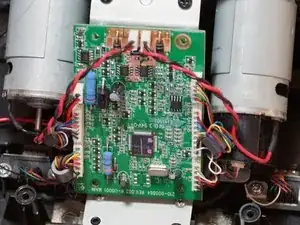
    • Svita le quattro viti argento da 7,3 mm che fissano la scheda PCB verde alla copertura del motore con un cacciavite a croce Phillips #2.

    I’d do steps 9 and 10 in reverse order, the connectors are much easier to unplug while the board is secured in place.

    Oula Kuuva -

    For removing C-Clamps steps 9-13 are unnecessary.

    Etam -

  10. CyrTKTeAZ5fqJSPi
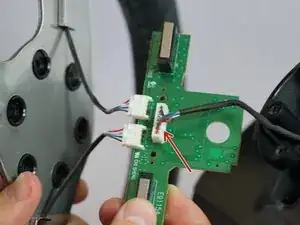
    • Scollega i tre connettori in plastica sulla parte sinistra della scheda PCB.

    • Scollega i due connettori in plastica sulla parte superiore della scheda PCB.

    • Scollega i tre connettori in plastica sulla parte destra della scheda PCB.

    • Tirare i connettori in plastica richiede parecchia forza, ma stai attento e non tirare direttamente sui cavi. Cerca di fare leva o tirare il maschio del connettore.

    • Se ti serva una leva aggiuntiva mentre scolleghi questi connettori, prova ad usare uno strumento di apertura in plastica.

    • Scollegare questi connettori permetterà un accesso più semplice alle quattro viti che fissano il supporto della scheda PCB alla copertura del motore.

    Some of the connectors have locks on them, I would recommend this as a two person job.

    Reuben Andrews -

    I didn't take them off :)

    Evaristo Rivieccio Vega -

    I messed up and broke the cables of the 5 Pin Connector on the right. Can anyone tell me what it’s called so I can buy replacement? The Rest of the cable is stuck in there so I can’t re-use it sadly.

    Felix Weschke -

  11. a4odqtXHQyqDcUbg
    • Rimuovi la scheda PCB dopo aver scollegato tutti i connettori in plastica.

    • Puoi ora metterla da parte.

  12. Hvf5BHMD5r3wZDec
    • Svita le due viti nere superiori da 12,3 mm con un cacciavite a croce Phillips #2.

    • Svita le due viti argento inferiori da 15,5 mm con un cacciavite a croce Phillips #1.

  13. q4XLbMAPFVVY2XSU
    q4XLbMAPFVVY2XSU
    EXbOLKj6XwlTA2Zp
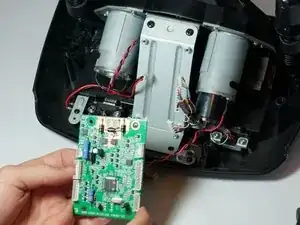
    • Rimuovi il supporto della scheda PCB e il pezzo in plastica trasparente sottostante.

    • Mettili da parte finché non rimonti il volante.

  14. bIEHTG3ed5d1utAo
    bIEHTG3ed5d1utAo
    HdHQ6V3LNXTxR1JQ
    WOWZcP2UveLVM56R
    • Svita le quattro viti da 12,2 mm usando il cacciavite a croce Phillips.

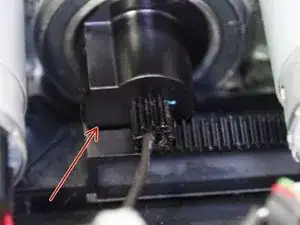
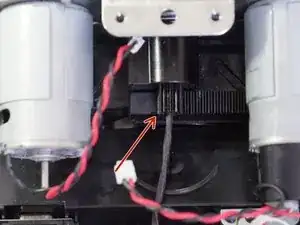
    • Ora i motori e la scatola degli ingranaggi dovrebbero sfilarsi fuori. Mentre li rimuovi, si sfileranno anche la fascia elastica in metallo e il percorso per l'ingranaggio a rotella.

    • Durante il rimontaggio, assicurati di allineare il fermo sull'ingranaggio a rotella con il percorso come indicato nella seconda e terza immagine mentre segui questo passaggio.

    • Dopo aver separato questi componenti, puoi metterli da parte fino al rimontaggio.

  15. YvALiouIuCXapxAO
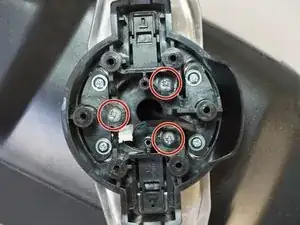
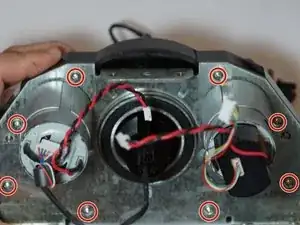
    • Ora svita le otto viti da 15,8 mm che fissano la placca che tiene fermi i motori con la scatola degli ingranaggi.

    • Mentre separi la scatola degli ingranaggi dalla placca dei motori e dai motori assicurati che gli ingranaggi non cadano fuori in quanto sono difficili da rimontare.

  16. CPM6QoALpgvaiRFs
    CPM6QoALpgvaiRFs
    PcL1OWBVk2n6whLm
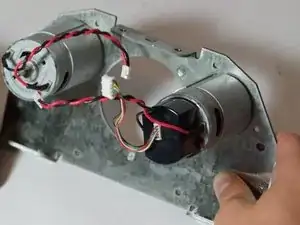
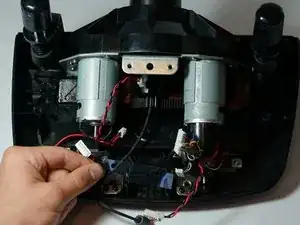
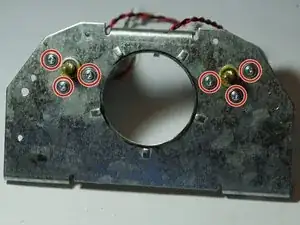
    • Svita le sei viti da 7,4 mm che fissano i motori alla loro placca e sfilali da questa.

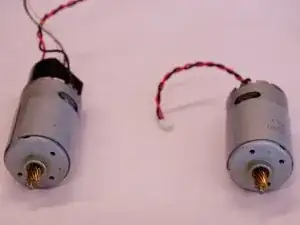
    • La placca dei motori può essere messa da parte e puoi sostituire i motori.

Conclusione

Per rimontare il tuo dispositivo, segui le istruzioni in ordine inverso.

Max Barta

Membro da: 21/04/15

556 Reputazione

7 commenti

Where can I buy this motors?

arthuru59 -

If you do not feel confident doing this yourself, here is a link to a company that could do it for you http://www.mz-simulators.co.uk/services....

Okiura -

Where can i buy this motors ?

onnepultrum -

You can buy the motors from eBay :)

S2 KTS. -

i found 1 of each

going to buy the encoder as well and start with it and then motors if needed

Jeff Bauer -

I found the motor model number

555sh-15260

http://www.czleili.com/english/Detail_pr...

How can I replace the new motor into G27

Billy leung -

how many volts are the moters?

12v or 24v?

Alex Raiz -