Introduzione

In questa guida imparerai come rimuovere i motorini di vibrazione posti nei grilletti. Questa operazione richiederà il completo smontaggio dei tasti dal controller.

  1. nCPWIVIPPnPioQek
    • Rimuovi il coperchio del vano batterie.

    • Rimuovi le batterie.

  2. BCoOrGwESawovJpX
    BCoOrGwESawovJpX
    CYTch3arFkuHOaol
    • Suggeriamo di utilizzare uno spudger di nylon per questo passaggio. Nella foto è mostrato uno spudger di metallo.

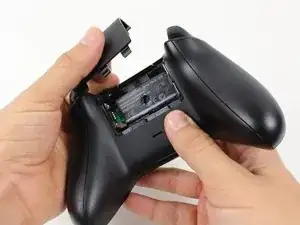
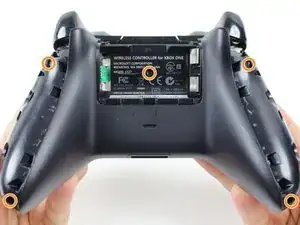
    • Agguanta il controller saldamente per rimuovere la copertura posteriore dell'impugnatura, fai forza con lo spudger nella fessura tra la parte frontale e posteriore della copertura.

    • Stacca la copertura posteriore dell'impugnatura muovendo avanti ed indietro lo spudger. Ripeti questa operazione lungo tutta la lunghezza della fessura, tutt'intorno all'impugnatura.

    Start prying the side plate off underneath the trigger, this makes it easier to disconnect the other clips connecting the side plate to the backplate.

    Brandon -

    One you take it off, is it possible to click it back in?

    Aiden Bear -

    As long as you don’t exceed the couple tons you need to take it off you should be able to put it back.

    Brandon -

    I don’t have a squdger

    TimidFerret4982 Gaming -

    getting those handles back on seems impossible, they just dont fit as well, a gap remains even after snapping into place.

    Dont think ill be doing this in the future

    Spoutin Wyze -

    edit: wiggled the bo9ttom middlewith the handles off and somethign finally “clicked” into place for that extra 1/4 mm for the down arrow on my D-Pad to click back up into place!.

    Spoutin Wyze -

  3. NIQhMF4yRuvR3EOl
    NIQhMF4yRuvR3EOl
    JPprWqFDRTUcXoCS
    • C'è una vite nascosta posizionata al centro del controller, dietro all'etichetta.

    • Usa un cacciavite e fai un foro al centro dell'etichetta.

    • C'è la possibilità di sollevare l'etichetta se non si vuole forarla.

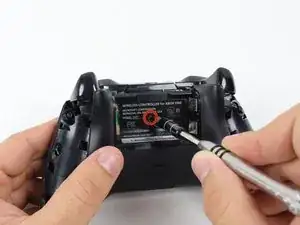
    • Rimuovi le cinque viti da 10 mm poste sul retro del controller usando il cacciavite Torx Security T8.

    i damaged my screws. how do i get the screws out?

    tenzin -

    wait. i just watched a video guide on ifixit's youtube channel about damaged screws. i'll try those methods.

    tenzin -

    It's a t8 or t9 security bit btw, I got the top two out with a regular T8, but the bottom two and middle needed a T9 Security bit.

    David Loper -

    All five faceplate/backplate screws in the controller I disassembled were T8 security fasteners.

    John Dziedzic -

    Am I doing something wrong because I got the tool it said I needed and got the middle screw out but the others have a bump or something in the center of the screw and it won't fit.

    kolton77 -

    The T8 is only good for the middle screw on my One S controller. The others require something bigger

    Matej Skelo -

    These requires SECURITY Torx bits (they have a cannulated hole in the driver). I don't believe the iFixIt branded driver is cannulated but you can buy a set of bits from DeWalt DWAX200 which is overkill but has what you need.

    jhighsmith -

    The driver that iFixIt sells is cannulated.

    jhighsmith -

    where do you get this dumb ass screw driver

    Jake Zweier -

    iFixit Store #IF145-027-3

    VauWeh -

    You can bypass it with a 1.5mm flathead.

    Marianne Sandling -

    thank you for this. worked for me

    Mr Anderson (Evolluisionist) -

    These screws required a T10, not T8.

    Armand -

    TR9. A $10 kit from Walmart has the bit/driver in it and extra goodies to make life simple.

    Matt Martin -

    As weird as it sounds, the top 2 came out for me with a flathead- but the bottom two and the middle one wont

    macybrooksevans -

    If you damage the middle part of the screws you can still take it out with the same screwdriver.

    Kev God -

    Thank-You :)

    Isaiah -

    needed a T8H, not easy to see.

    on a grey green xbox one controller

    Michael -

    On my 1708 controller there are two internal screws near the rumble motors that need to be removed with a T6 non security bit to remove the back cover.

    teeedubb -

  4. CN1rEMvQC3myRLyq
    • Rimuovi la copertura posteriore del controller.

  5. hWBUR3YZiAAiU3As
    • Rimuovi la copertura frontale del controller.

  6. NF1M5HTNtuRwQV66
    NF1M5HTNtuRwQV66
    YPrTGnbbQiLpdCcS
    • Puoi lasciar penzolare liberamente i motori della vibrazione fuori dalle loro prese.

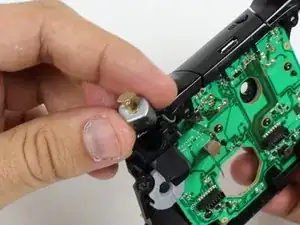
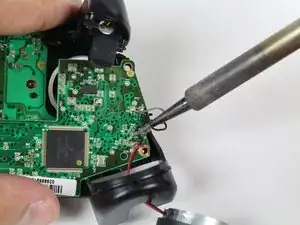
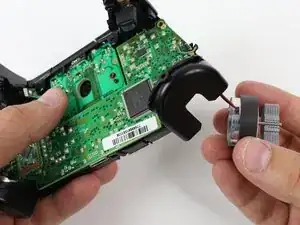
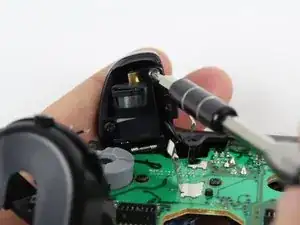
    • Rimuovi la saldatura dei giunti saldati mentre tieni giù il filo rosso e quello verde sulla scheda madre superiore.

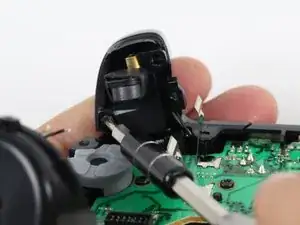
    • Rimuovi la saldatura del filo nero e del filo grigio attaccati alla scheda madre superiore.

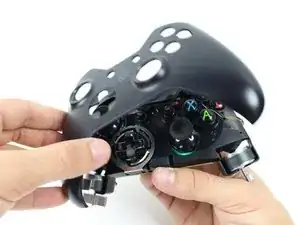
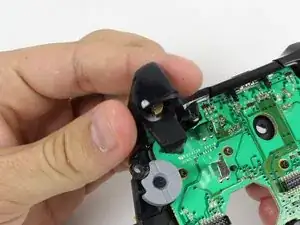
    • Rimuovi i motori di vibrazione e mettili da parte.

    • Fai attenzione a non danneggiare altri componenti o a ferirti mentre usi il saldatore.

    • Per informazioni su come si salda, clicca qui.

    Steps 6-8 aren't completely necessary, and are very risky if you aren't good at soldering. It would seem the only reason to remove the motherboard and mess with all this soldering is just so you can reach both screws on the trigger in step 10. However, you can reach them already with a small-bodied screwdriver. Although you might have to rest the screwdriver on the black square processor to reach the bottom screw, it shouldn't damage the processor or motherboard to jimmy that screw out.

    Robert Rapier -

    like mentioned by ‘Robert Rapier’ you can skip the de-soldering in most cases,

    for example cleaning or changing the buttons is doable, but the grey and black wires are pretty short

    and wired through the inner case so it can get a bit fiddly and you have to be careful not to damage them in the process.

    If you have a soldering station around i would still recommend using it.

    yKekS Yzz -

    Thanks to above commenters. Can confirm I was able to do a button repair without soldering. Thank you all!

    Matt Hunt -

    If you peal back the Kapton tape mounting the grey/black wires there is enough play to maneuver all the boards for cleaning most of the buttons from a soda spill. Cleaning the dimple buttons on the mother board by immersion requires the de-solder...

    agzero -

  7. BY2UC6W4D1LECNDH
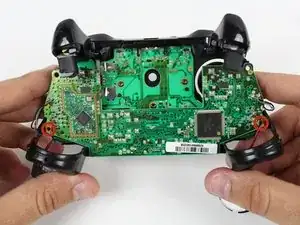
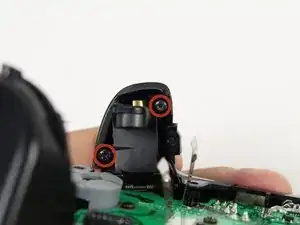
    • Svita le due viti Torx T6 da 7 mm che si trovano vicino alle prese dei motori di vibrazione.

    Are these just T6 screws or Torx security T6 that is cannulated?

    Kenan Vickstrom -

    The outer screws are security screws. The ones on the system boards are Torx.

    Rongwey -

  8. haVbje2oHVch2uMH
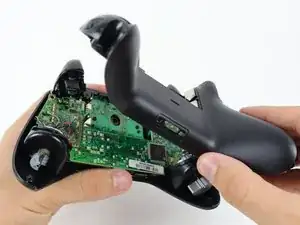
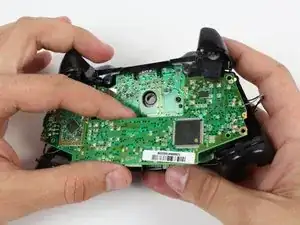
    • Afferra saldamente nella zona centrale i lati della scheda madre.

    • Solleva verso l'alto la scheda madre muovendola delicatamente avanti e indietro.

    • Sollevare la scheda madre richiederà un po' di forza.

    Hola, como se instala el software a la nueva placa base ?

    MANSONN755 -

  9. jmvGURsBm2dTB1RM
    • Rimuovi l'adesivo giallo tenendo i cavi in posizione sopra il controller.

  10. 16i4vRk5ocpOkyRF
    16i4vRk5ocpOkyRF
    jHXPStWO4qmWAdWL
    DWF3KMdZQFpiOH2I
    • Rimuovi le due viti esagonali T6 da 7 mm posizionate dietro i grilletti.

  11. MVBJPXd2ZlbJKyNL
    • Rimuovi le cover dei grilletti.

  12. KRfuQorOMEtbhUQC
    • Dissalda i cavi dalla scheda madre.

    • Rimuovi i motori di vibrazione dal loro alloggio tirandoti dietro il relativo cavo.

    Perso après le remontage ça n'a jamais refonctionné ma manette détecte plus du tout les gachettes et jai changé les joysticks en même temps et eux non plus ne detecte plus….

    Tuto Free -

Conclusione

Per riassemblare il dispositivo, segui queste istruzioni in ordine inverso.

Tommy

Membro da: 22/01/15

1909 Reputazione

10 commenti

After a drop onto tile flooring, the side clip of the outer handle snapped and got lodged into the trigger, causing it to only pull to 80% and go no further. Thanks for this breakdown.

solofrom303 -

My right trigger won't work on gta 5 and on other games it works

Devean Velasquez -

Very strange, Devean. That sounds more like a software problem than a hardware problem, if I had to guess. If you haven't already, maybe check to make sure that your control setup is correct.

Alternatively, see if you can find any other games that your RT doesn't work for, and see what they have in common with GTA - it might be that the trigger isn't registering as fully depressed, or only ever registering when fully depressed.

Liam Gow -

Trying to replace bumpers assembly and green sync button fell out can not figure how to put it back in.

Anthony Bembenek -

Do you know how to remove the plastic plate where the trigger rumble sits?

Angel Marban -

Could you not just pull the wires?

Spencer Alty -

How do you place the wires back onto the trigger rumble?

Timmy Sparkles -

Where would one buy the replacement trigger motors?

Jared Thicc -

Both wires fell out of one of the motors. How would I be able to fix this?

Abler e -

can this guide be reworked to add rumble feature to the powera fusion controller for nintendo switch?

Xavier Beck -