Introduzione
Questa guida è un prerequisito.
Ricambi
-
-
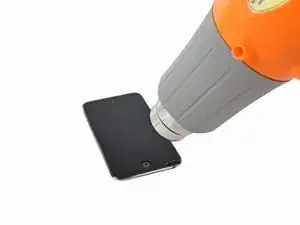
Con la pistola termica impostata su "basso", inizia a scaldare il bordo inferiore del vetro vicino al tasto Home.
-
-
-
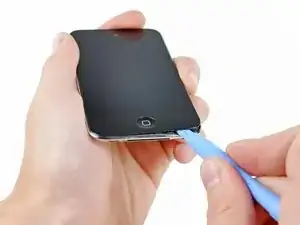
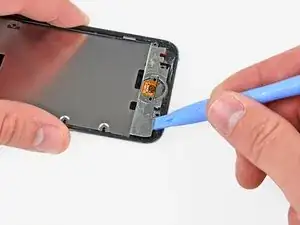
Infila il bordo di uno strumento di apertura per iPod tra il pannello di vetro anteriore e la cornice in plastica vicino al tasto Home.
-
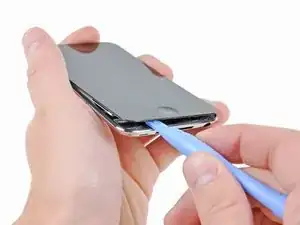
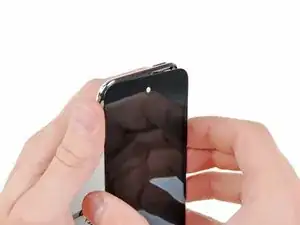
Solleva il bordo inferiore del pannello frontale, stando attento a non piegare troppo il vetro.
-
-
-
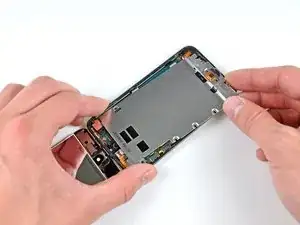
Quando c'è abbastanza spazio per afferrare il bordo inferiore del pannello frontale, sollevalo dal corpo dell'iPod Touch per separare l'adesivo sotto i bordi destro e sinistro.
-
-
-
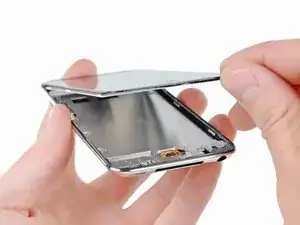
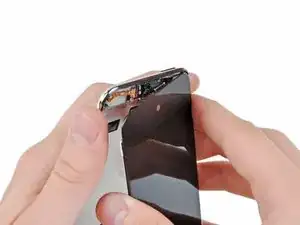
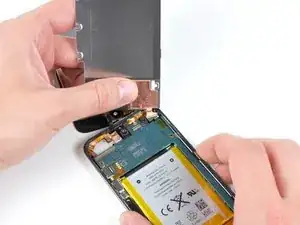
Separa attentamente il bordo superiore del gruppo del pannello anteriore dall'adesivo che tiene fermo nell'iPod Touch. stando prestando attenzione al corto cavo del digitizer che collega le due componenti.
-
-
-
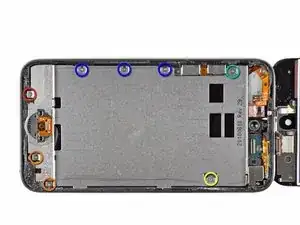
Svita le seguenti otto viti a croce Phillips #00:
-
Una vite a croce Phillips da 3,5 mm
-
Due viti a croce Phillips da 3,0 mm
-
Una vite a croce Phillips da 2,3 mm
-
Una vite a croce Phillips da 2,4 mm
-
Tre viti a croce Phillips da 2,0 mm
-
-
-
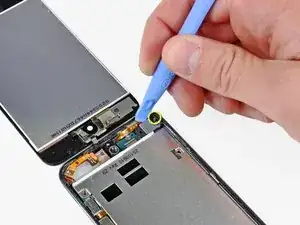
Usa l'estremità di uno strumento di apertura per iPod per sollevare la sottile copertura in acciaio dalla fotocamera posteriore.
-
Rimuovi la copertura in acciaio dall'iPod.
-
-
-
Infila l'estremità di uno strumento di apertura sotto la piastra intermedia in acciaio vicino all'angolo in basso a sinistra dell'iPod Touch.
-
Fai leva lentamente per separare la piastra dall'adesivo che la fissa alla copertura interna in plastica.
-
Se la piastra è ancora attaccata alla scheda madre, riscalda la zona per ammorbidire l'adesivo, quindi separala lentamente dalla scheda usando uno strumento di apertura.
-
C'è un cavo a nastro sottile e delicato sotto la piastra. Mentre la separi, stai molto attento a non strapparlo.
-
-
-
Inclina leggermente la piastra intermedia in acciaio per sganciarla dalla copertura posteriore.
-
Solleva la piastra dalla copertura posteriore e rimuovi il pezzo di nastro di rame incollato sulla fotocamera posteriore.
-


Per rimontare il tuo dispositivo, segui le istruzioni in ordine inverso.

do I have to use a heat gun
Fabiola Winfield -
yes it is crucial
ben folks -
but u can use a hair dryer on warm
ben folks -
I didn't use a heat gun but this was due to the glass being rather shattered and not just cracked in the corner. The rule of thumb might be to not use excessive force, if you see that you need to use the heat gun or a blow dryer as someone suggested. I also wanted to point out the the adhesive strip just around the edges was exposed and it is rather strong so I was able to pull it around part of the edge which actually helped the glass disengage.
nirv -
Hi, thanks to this tutorial achieves replace my iPod battery to 100%, it was difficult, so thanks iFixit!
The only problem I had was with the iFixit screwdriver disappointed me greatly, as it can not remove the screws with the screwdriver.
A tip for those who first make repairs before starting the disarmament carefully read through the tutorial to not make a mistake that could damage your iPod and do not forget to place pieces in a safe place so they are not lost.
Greetings from Guatemala
Alfonso.
Alfonso Espinoza -
well then u suck
ben folks -
Be careful with the heat gun!! Don`t use it too much. You can melt something inside, specially when you`re closing the iPod.
Luiz R -
No man you can use a blow dryer!
Colton B -
Would a heat bead bag be safer option to weaken the adhesive?
Angus McLauchlan -
I had success with as low as 80°C using a hair dryer to melt the adhesive, I kept track of it with a meat thermometer. The battery says it's rated only up to 60°C...
micahvanderhill -
I got through all the parts to take the wifi antenna out!! But, I'm having a hard time putting the stuff back!!
~Palm head~ But thank you ifixit for the great and awesome directions, I understand clearly!! Thank you very much
Kaiden -
A hairdryer perfectly does the job. I’d recommend heating the bottom for 20 seconds, then attempt at inserting a plastic pick between the glass and the chassis. If it doesn’t work, reapply some heat in 10 seconds intervals until the glue gives in. You shouldn’t have to exert lots of force to release the adhesive, heat should do the job.
Then apply some heat to the top of the screen to release the remaining adhesive. Opening is straightforward. Just beware of the ultra little slack of the short yet fragile flexible digitizer cable.
Olivier Biot -
Thanks for the tip!
Sean - Lua Tech -