Introduzione

Se il Rug Doctor non sta spruzzando correttamente, potresti dover sostituire la pompa.

I modelli Mighty Pro ed X3 hanno una pompa, mentre il modello Wide Track (WT) ha due pompe identiche in parallelo. Questa guida è scritta per il modello Wide Track, ma può essere usata per ognuno dei tre modelli.

Strumenti opzionali:

  • forbice per lamiera/tenaglie invece delle pinze a morsa per il tubo
  • Taglia morsa/strumento di rimozione
  • Asciugacapelli/pistola termica
  1. alWyQHtwYremARKD
    • Prima di iniziare, determina se la pompa va sostituita. Riempi il serbatoio con dell'acqua, gira il Rug Doctor sulla modalità tappeto e premi il tasto per spruzzare.

    • Per i modelli a singola pompa (Mighty Pro, X3), se il Rug Doctor non spruzza, la pompa deve essere sostituita.

    • Se spruzza solo a volte, controlla il beccucci dello spruzzatore per delle ostruzioni.

    • Per il modello Wide Track, se il Rug Doctor non spruzza del tutto, devi sostituire entrambe le pompe.

    • Se l'acqua fuoriesce dal beccucci nel modello Wide Track ma non spruzza adeguatamente, controlla il beccucci per delle ostruzioni.

    • Se i beccucci sono puliti, una pompa può essere difettosa, non fornendo abbastanza pressione ai beccucci. Se possibile, sostituisci entrambe le pompe.

    • Se devi determinare quale delle due pompe deve essere sostituita, gira il Rug Doctor sulla modalità tappezzeria. Non scollegare il connettore rapido per gli accessori. Se l'acqua esce dai beccucci come nella modalità tappeto, sostituisci la pompa anteriore.

    • Se l'acqua non esce dai beccucci nella modalità accessori, sostituisci la pompa posteriore.

  2. AvYEEuPuh3j2hafc
    AvYEEuPuh3j2hafc
    Ihx1UPvMckGOn2ID
    fUSLIXW3FdRwqoPG
    • Prima di iniziare lo smontaggio, assicurati che il Rug Doctor non sia attaccato alla corrente e che tutti i serbatoi siano vuoti.

    • Usa delle pinze per prendere e far ondeggiare la boccola per liberarla.

    • Rimuovi la boccola.

    • Se stai avendo problemi, fai leva sotto la boccola per liberarla dall'asse.

    I had a lot of trouble with this step. I started by grabbing each cap with a pair of pliers and wiggling in opposite directions; they would twist but wouldn’t come off. Then I used a screwdriver to try prying one cap off (be sure to put a putty knife or other thin and stiff piece of metal between your prying tool and the wheel to avoid damage). I managed to move the cap off somewhat, but whenever I pried up one side of the cap, the other would go down. I eventually managed it by crushing the cap using a pair of adjustable pliers.

    Steve Wechsler -

    It was a little difficult but i kept moving it side to side and it finally let go

    Len Aubertin -

  3. KLKAegngRjVf1LKS
    KLKAegngRjVf1LKS
    aXevUMBDEgQIEZUP
    wtdvRY5TPUd1oNdJ
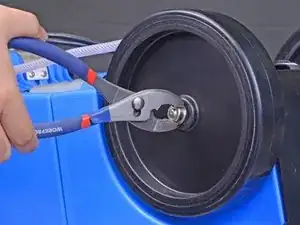
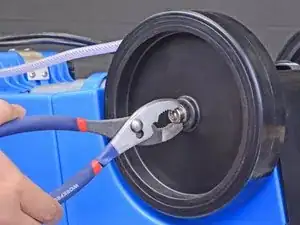
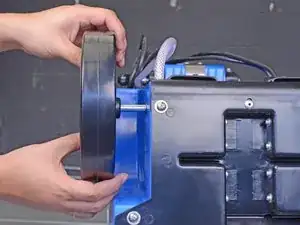
    • Tira via la ruota dall'asse.

    • Tira via l'altra ruota attaccata all'asse dal corpo.

    • Suggerimento di rimontaggio per reinstallare le ruote e l'asse:

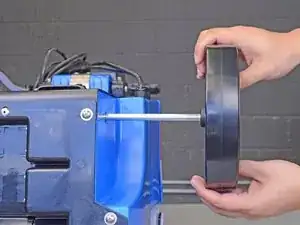
    • Reinfila l'asse e le ruote nel Rug Doctor.

    • Centra la testa di ricambio sopra l'estremità esposta dell'asse.

    • Usa una mazza per fissare in posizione la testa. Dovrebbe essere ben saldo sull'asse.

  4. HPQ25BcfYVMVWaaZ
    • Sgancia il tubo trasparente dal retro del Rug Doctor.

  5. LpZLZRNvsOABHWx1
    • Svita le otto viti a croce Phillips da 15,1 mm che tengono ferma la parte inferiore.

  6. CQOCcJSIBOrKfGgW
    • Svita le cinque viti a croce Phillips da 15,1 mm che tengono ferma la piastra posteriore.

    • Durante il rimontaggio, stringere troppo queste viti potrebbe rompere la placca in plastica.

  7. JEOiVOZrJvgmIV2m
    JEOiVOZrJvgmIV2m
    VFtMd5PqdNGaXhG6
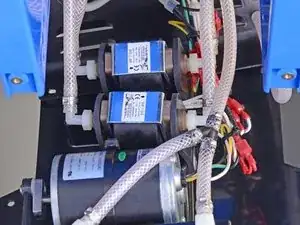
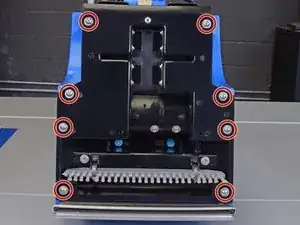
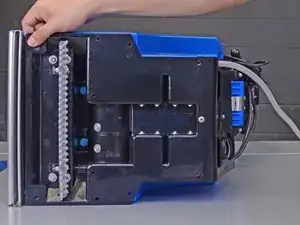
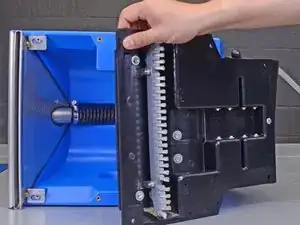
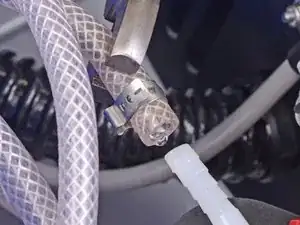
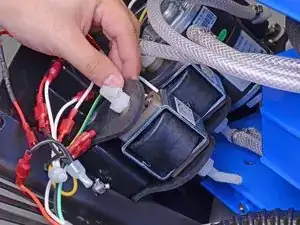
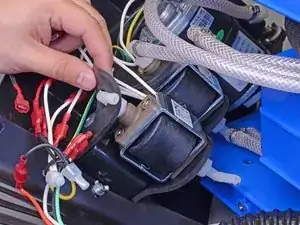
    • Iniziando dall'estremità della spazzola, tira via attentamente la parte inferiore per accedere alle pompe.

    • Questo libererà la lama anteriore in metallo. Potrebbe essere utile riavvitare una vite per tenerla ferma mentre lavori.

  8. iB4PJTQRjm5uUEBD
    iB4PJTQRjm5uUEBD
    FE25wbXNeDQUvLn6
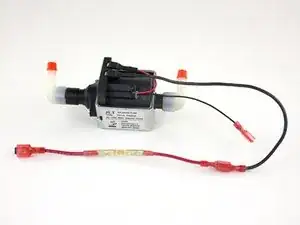
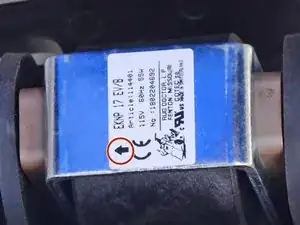
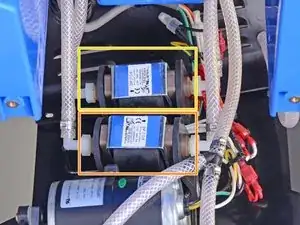
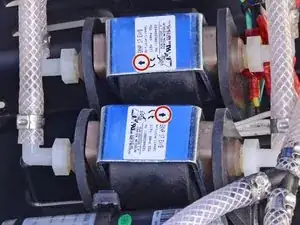
    • Segnati attentamente la direzione della pompa indicata da una freccia sulla sua etichetta. La pompa di ricambio deve essere installata nella stessa direzione dell'originale.

    • Se stai lavorando sul modello Wide Track, determina quale pompa devi sostituire e la sua direzione:

    • Pompa anteriore

    • Pompa posteriore

  9. xml5fpmIZIONk3JV
    xml5fpmIZIONk3JV
    fU5O1xLyxqQdfy6m
    s1dIOTijtumJQ3re
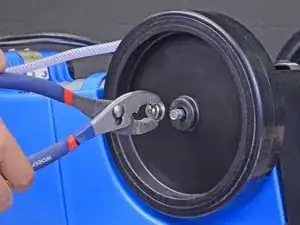
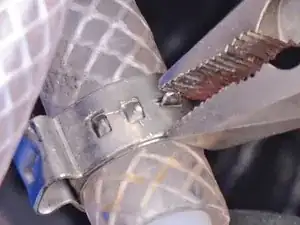
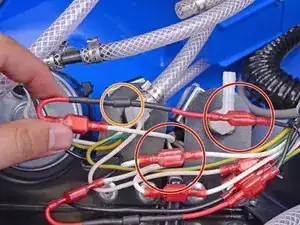
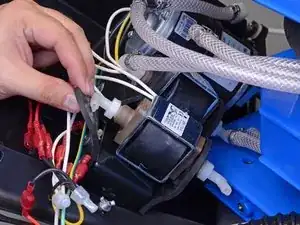
    • Rimuovi le morse crimpate del tubo che lo fissano ad entrambe le estremità della pompa che stai sostituendo.

    • Puoi usare uno strumento per la rimozione delle morse per tagliarle.

    • In alternativa, usa delle pinze per sganciare le piccole alette di bloccaggio sulle morse.

    • Fai leva sulla morsa per liberarla.

    • Usa le dita o le pinze per tirare via le morse dai beccucci della pompa.

    • Il tubo perderà del liquido una volta sfilato.

    • Questo passaggio richiede parecchia forza. Se stai avendo problemi, scalda le estremità del tubo con un asciugacapelli o una pistola termica e riprova.

  10. oL1FwT4pSe2RE4N2
    oL1FwT4pSe2RE4N2
    cyWBUVAZkqlaOTAD
    • Suggerimento di rimontaggio per reinstallare le morse crimpate dei tubi:

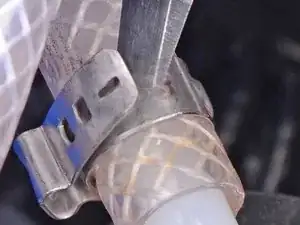
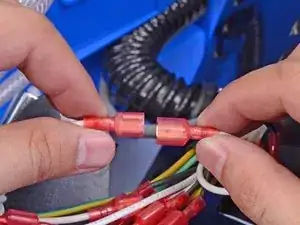
    • Infila la morsa sul tubo, lasciando circa un centimetro dall'estremità.

    • Usa delle pinze per morse o una forbice per lamiera per schiacciare e crimpare le orecchie della morsa.

  11. UQ6tkeBLh3Hiooef
    UQ6tkeBLh3Hiooef
    1GPYrKNEcDJTEDWo
    PhCSw2kpGPGsQMQi
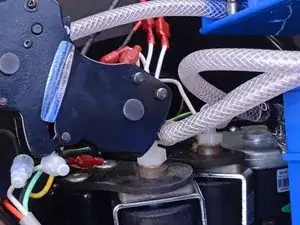
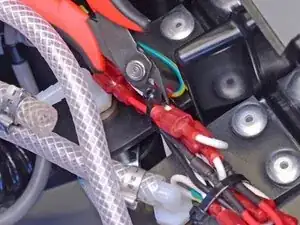
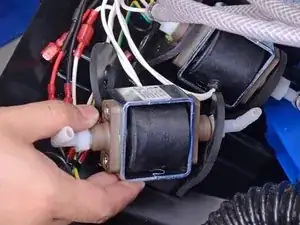
    • Taglia le fascette che tengono insieme il fascio di cavi.

    • Segui attentamente i due cavi che escono dalla pompa che stai sostituendo.

    • I cavi della pompa dovrebbero collegarsi ad un cavo nero ed ad uno bianco.

    • Ci potrebbe essere un diodo in serie con il cavo rosso.

    • Scollega la pompa staccando i terminali del cavo. Questo può richiedere abbastanza forza. Tira i terminali, non i cavi.
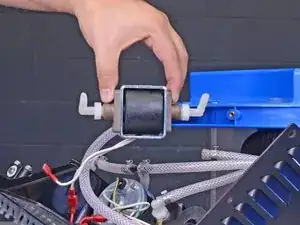
    • Se c'è un diodo in serie, scollegalo e rimuovilo. Non usarlo con la pompa di ricambio.

    The wires did not come apart easily for me. I had to cut into some of the plastic shielding and then I used a small, thin flathead to work them apart. Decided to shrink wrap the connectors with new plastic shrink tubes.

    CHARLES KEYZ -

  12. N6B4bnhS4stdsblG
    • Suggerimento di rimontaggio per installare la pompa di ricambio: collega il fusibile incluso al cavo nero più lungo e spesso.

    • Non usare il diodo in serie con la pompa originale.

    • Ricollega i cavi della pompa ai cavi nero e bianco del Rug Doctor.

    • Il fusibile dovrebbe collegarsi al cavo nero del Rug Doctor.

  13. iyNLPniGuuOIhw2m
    iyNLPniGuuOIhw2m
    wofNwFsxVnsyICNk
    Oc4xqJRZ3Dw1rlVA
    • Tira via il supporto in gomma dalla pompa e sfilalo dal beccuccio della pompa.

  14. OY2JnpBkKNhFRAs6
    OY2JnpBkKNhFRAs6
    ri4thwYWtJS3MSLy
    • Sfila la pompa dal supporto in gomma.

  15. d2X2e5QbAYQUcUIf
    d2X2e5QbAYQUcUIf
    ZpwYffTiTIPMSEtH
    • Rimuovi la pompa.

    • Mentre installi la pompa di ricambio:

    • Rimuovi i cappucci arancioni dai beccucci.

    • Assicurati che la pompa sia installata nella direzione corretta.

    • Controlla che i beccucci siano puntati verso il retro del dispositivo.

    • La pompa di ricambio potrebbe non essere salda nei supporti in gomma come l'originale. Questo è normale.

    Thank you!!!

    Anne Pyres -

Conclusione

Per rimontare il tuo dispositivo, segui le istruzioni in ordine inverso, leggendo i consigli per il rimontaggio.

Arthur Shi

Membro da: 03/01/18

248254 Reputazione

15 commenti

Fantastic. info!!! Thanks for this. Took me while to find it. Some helpful tips. But the biggest was the fact I had two pumps. I wasn’t 100% sure and I was positive I spotted two with just the back cover off. But needed to be sure before ordering. Thanks !

Robert -

I would like to view how to open the housing & replace the pump on the Rug Doctor model DC 1.

Ben Lavadia -

My X3 model rug doctor continuously sprays Until it runs out of water doesn't matter if the red button is pressed or not when you turn on the machine, it starts sprain. Any thoughts?

Mike -

Hi Mike,

Does it full-on spray, or just leak? It could be that the red button is broken. Look through this guide. You may be able to disconnect the spray button wires through the black cutout. If the Rug Doctor still sprays with the button disconnected, then the problem is elsewhere.

Arthur Shi -

We replaced our pump but still does spray. We have the doctor deep carpet cleaner model with single pump.

Do you know which way for sure the pump nozzles should be facing on our model? Maybe they’re in wrong though we are hundred percent sure it’s in how old one came out.

Jerri Estep -

Hi Jerri,

I unfortunately don’t. When you press the spray button, does it sound like the pump revs up? If not, it may be a switch problem.

Arthur Shi -

what the pump # to order

SCOTT -

Hello. mightily pro X3. I pushed red button but very little water comes out…. I am assuming I need to replace the pump? please advise. tank is full of water.

Dede

Dede Antonelli -

Hi Dede,

I would check the nozzles to make sure they are not clogged first. If possible, take the device apart and check the hoses to make sure they’re not clogged.

Arthur Shi -

Hello.  my small track rug doctor machine when filled up with water , when I push the red button  keeps cutting out ant tripping out switch on circuit board also  can someone tell me why it is doing this  ???????? PLEASE

Richie

Richard B -

Do you have any tips on how to open up, split apart or remove the hard plastic piece on the waste water tank for the Rug Doctor Deep Cleaner? It's the top piece where the tools plug into. There is so much gunk underneath there that you cannot get to it by regular cleaning.

Elizabeth Bush -

My rug doctor x3 is putting out water really fast and refill every 3 minutes. Single pump I took the pump apart to the clean and flush dog hair and dirt from previous owner. Just gave to me. Would cut it on and nothing and nothing I could see water in hose. But now its all just going fast can't find any things on the pump if I used it right

Kenneth Kelly -

Some of these comments, I am hoping English is their second language. Some of them, it is obvious English is their primary language, and the review is equally as difficult to understand. Maybe they are bots and the comments are auto generated. I hope it’s that….lol

Anyways… you’re a legend for doing this tear- down. Thank you. One of the best most straightforward tear-downs I’ve ever read… and I fix a lot of stuff. I just wanted to thank you for taking the time to help others. You probably saved me an entire day. I thought the pump was in a different section of the vacuum.

My god is this thing gross on the inside. The repair only took 20mins. I spend another 3 hours removing that brush and soaking it, and chiseling off solid hockey puck sized clumps of hair. The smell is almost unbearable. I debated just tossing it. I will never let someone borrow my rug doctor again. lol.

Seriously tho… thank you. Quality work speaks for itself.

CHARLES KEYZ -

new wires on pump not consistent with wires in machine/ ended up with white wire having same plug end / same with black wires. added fuse to black wire . went to attach to black wire in machine both ends female, white wires both male. ?

dps1951 -

old unit need and update

FERMIN -