Introduzione

Se la tua cassa ha dei problemi nel caricarsi o la porta USB sembra allentata, i contatti elettrici dell'alimentazione potrebbero essere stati danneggiati. Potrebbe essere necessaria la sostituzione della porta USB. Questa guida ti mostrerà come rimuovere la porta USB.

  1. TPdTjBXgaNNyAUQE
    TPdTjBXgaNNyAUQE
    uyxjyBvlQ5EvE4JM
    SXsnMdYGMSiQt6TY
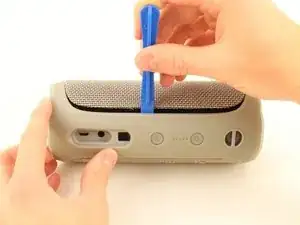
    • Infila uno strumento di apertura in plastica nella fessura tra la copertura e la parte in gomma con il tasto di accensione.

    • Fai leva sulla copertura, iniziando dal lato senza i tasti del volume e del Bluetooth.

    • Mentre rimuovi la copertura, i sei ganci (tre su ogni lato in gomma) che fissano la copertura alla cassa emetteranno dei suoni di scatto.

    • Stai attento a non danneggiare i ganci sul lato dei tasti: fai leva con attenzione.

    • Tira via la copertura con i pollici.

    Important suggested edit to these instructions - make sure to pry off clips/ridges from BOTH sides before attempting removal of the cover.

    I interpreted these instructions as saying you only needed to pry clips from one side - then peel off cover. Doing this broke a clip from the other side. Bummer. I'd like others to avoid that.

    k9612 -

    If you do break a clip - save it. They are relatively easy to glue back into the cover.

    k9612 -

    My Flip4 had a single long clip on the non-button side that ran the entire length of the rubber spine. The other side (with play/ vol buttons) had three seperate clips (middle and both sides) as mentioned above.

    takentrashout -

    What if my speaker battery dies very fast and makes weird crackling noise, is it counted as faulty battery?

    Jayden Koh -

    Yes. I first thought one of the drivers was defective.

    Paul Sommer -

    What was the fix in the end ?

    Jack Mulcahy -

    I used the flared edge of a metal measuring spoon handle since I didn’t have an opening tool. Worked great! Replacement battery from iFixit is on order. Thanks for the guide!

    Greg -

    My battery was glued. Tried it anyway to remove. Battery exploded!!!!

    Don't go on if the battery is glued.

    darthvader007 -

  2. MqSuoCcPNBeHtZpb
    MqSuoCcPNBeHtZpb
    bRHK1IRZthrIHwUj
    YFp1hjI2RBYUSP5B
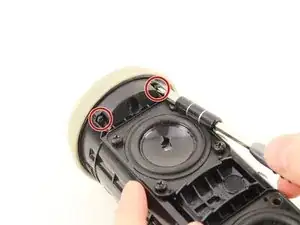
    • Svita le quattro viti a croce JIS #0 da 13 mm che fissano la parte in gomma alla cassa, posizionate su entrambi i lati dell'interno della cassa.

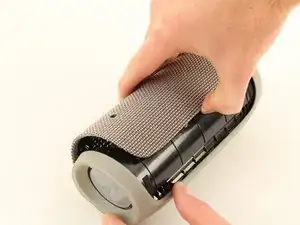
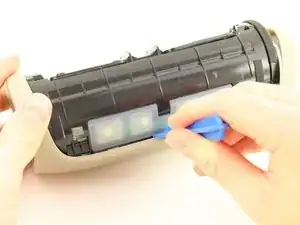
    • Usa lo strumento di apertura in plastica per rilasciare i ganci che tengono ferma la parte centrale della gomma.

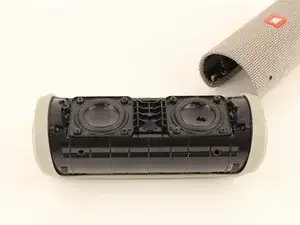
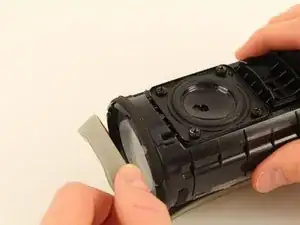
    • Rimuovi un'estremità della parte in gomma con i pollici, quindi dovrebbe venire via del tutto.

    • Fare leva sulla parte in gomma richiede della persuasione.

    • Gli speaker sono dei forti magneti. Tienili lontano dall'elettronica sensibile.

    Suggested Edit : Be careful when removing the screws that they don't get attracted to the speaker (magnet). They can scratch the speaker.

    k9612 -

    Note : screws don't need to be removed from their “channel” (it’s quite difficult). Just unscrew fully and leave in channel.

    k9612 -

    Note or precaution: Place a piece of cardboard over the speaker or use a plastic/rubber/nonmetalic handled screwdriver when loosening/removing the 13 mm screws. The speaker magnets are so powerful that the end of my metal jewelers phillips screwdriver was pulled into the speaker, tearing the plastic/rubber cone. I destroyed two speakers in the process of replacing the battery. Had to buy the speakers from JBL ($16 each).

    Clark Brown -

    The rubber spine was fixed with glue strips.

    Jaider -

    I have 2 Flip 4's bought approx. a year apart. The older speaker was exactly as described here. The newer speaker does not have the 5 end screws, instead it has a twist to lock end plate. Make sure the top screws that secured the rubber end are removed, as these will prevent end cap twisting. I used rubber gloves to get a grip and twist end cap counter-clockwise to unlock. I found that if you grip end cap too tight it makes it even harder to twist off. Someone may find a better solution, like prising the tags around circumference, but be warned these look flimsy.

    Phil -

    Great guide. Only problem is that the battery on mine was in a neoprene sheath and had swollen. It was a bit of a problem to get out. There didn’t seem to be room to fit something to push it out without damaging wires or the motherboard. At the risk of a fire, I worked it back and forth and pulled with a pair of needle nose pliers. Yes there were sparks and some smoke. I did it outside and knew I was risking the whole thing catching on fire. Luckily it went ok.

    Q Switch -

    Great guide! I have a model with the twist-off caps (not 5 screws) with helpful, though subtle, lock/unlock icons on the plastic. Only other problem was replacing the white neoprene battery retainer cover (2 screws). One screw slipped off my screwdriver and fell into the unit - probably stuck to a speaker magnet now. But it doesn't seem to be affecting the sound. iFixit is the best!!

    Jen Morris -

  3. pG2pjcBNnP6P2ZfZ
    pG2pjcBNnP6P2ZfZ
    urdHPnDVFVKxSQaE
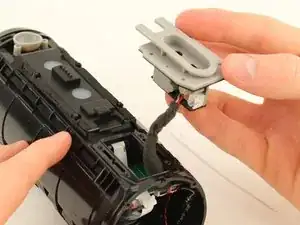
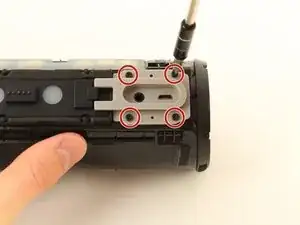
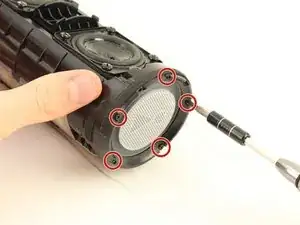
    • Svita le quattro viti a croce Phillips #1 da 9 mm che tengono ferma la porta USB grigia.

    • Libera a mano la copertura grigia della porta USB.

    Minor point: the colour of the USB port and casing is whatever colour the speaker is. Mine was red so never had a gray USB port or casing.

    Yuri Silkin -

  4. mOf1PZsTlV4InLL1
    mOf1PZsTlV4InLL1
    Sxm3rSbnmVaGjo16
    • Svita le cinque viti a croce Phillips #1 da 9 mm per rimuovere la copertura dell'estremità.

  5. flkWSqhZepyd2LPR
    flkWSqhZepyd2LPR
    yqsrrgaAk1RRhSwC
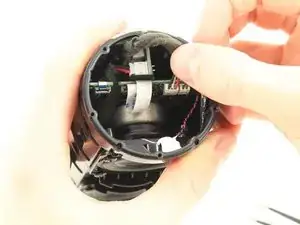
    • Tira il cavo coperto in schiuma grigia scura dallo spazio dove è infilato e spostalo per liberare la strada.

  6. AcWg4YrSmwgQdVhM
    AcWg4YrSmwgQdVhM
    iWSWpPZjO5wKC6KH
    EoBrDIQnucXLEnwp
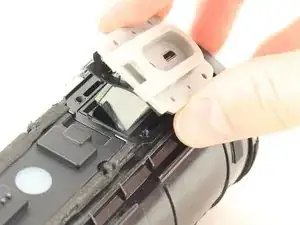
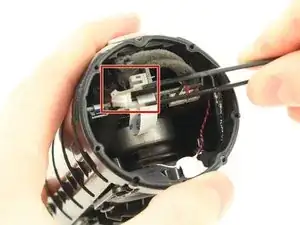
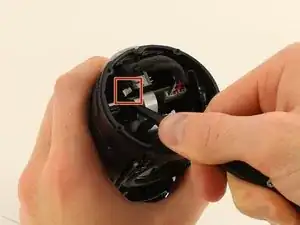
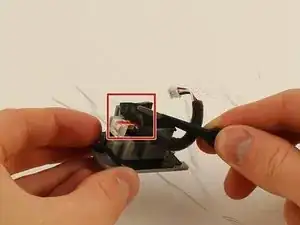
    • Sgancia la presa bianca attaccata alla piccola scheda logica e che esce dalla copertura grigia della porta micro USB usando delle pinzette anti ESD con punta arrotondata.

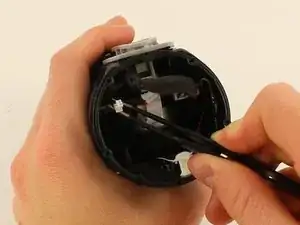
    • Sposta la presa per liberare la strada, tirandola attraverso la fessura nella scheda logica più grande per portarla vicino a alla presa dietro di lei.

    JBL has upped their “security” I see. On mine, this plug is glued in place and the ribbon cable nearby is completely covered in tape so I can’t unhook it.

    Melinda Rabenstein -

  7. lthIEglBEQQSyLJ2
    lthIEglBEQQSyLJ2
    RM6uGfCLg2KhfU4t
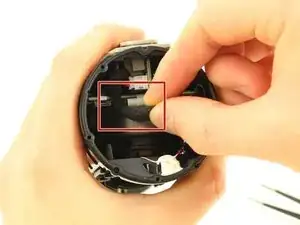
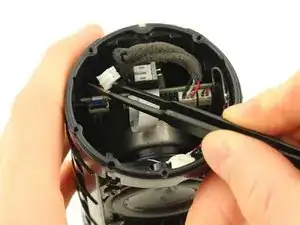
    • Sgancia l'altra presa bianca più piccola dietro la precedente sulla stessa scheda logica piccola usando le pinzette.

  8. EnRQ3iS2BL6TmayO
    • Tira la porta USB grigia fuori dalla cassa.

    • Non strappare questa componente, in quanto è ancora collegata con dei cavi.

  9. eVFG6FMjQCxyWNZP
    eVFG6FMjQCxyWNZP
    RmHoCwWXXYRtGXt2
    4GEusiHTGhgkbWjt
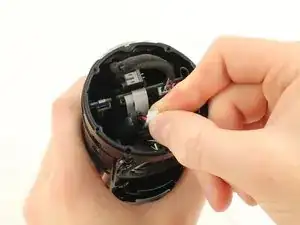
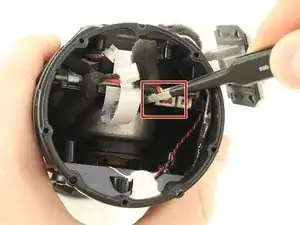
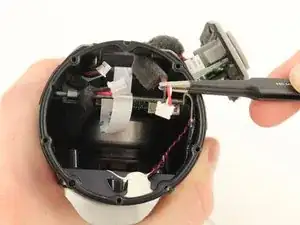
    • Sgancia la piccola presa bianca collegata alla scheda madre e che sta tenendo collegata la porta USB alla cassa.

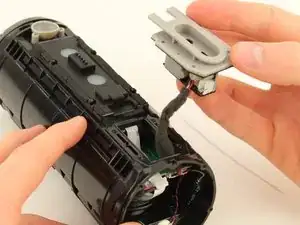
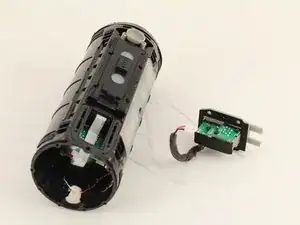
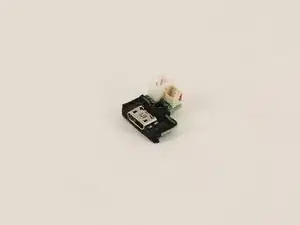
    • Rimuovi la componente della porta USB dalla cassa.

  10. UDETSTqpCPQULho3
    UDETSTqpCPQULho3
    WXASE3ieHwcgJWmf
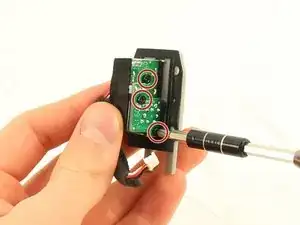
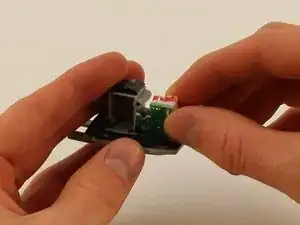
    • Svita le tre viti a croce Phillips #1 da 9 mm che fissano le due piccole schede logiche alla componente della porta USB.

    • Fai leva per rimuovere la piccola scheda logica superiore con uno strumento di apertura in plastica.

    • Dovrai fare un po' di forza per rimuovere questa scheda in quanto è incollata.

  11. VTYI4CScAKLbMuXk
    VTYI4CScAKLbMuXk
    OkVyFPwQy4KTGGN2
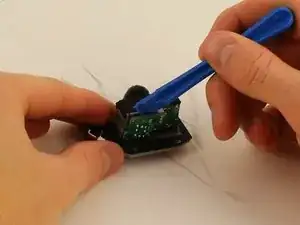
    • Rimuovi l'adesivo nero sotto la componente con le pinzette e rimuovi i cavi sottostanti.

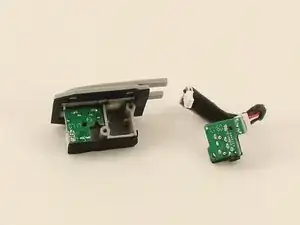
    • Rimuovi la prima piccola scheda logica e i cavi collegati.

  12. BpODGuMVHSbW2255
    BpODGuMVHSbW2255
    pgpqfYmLTvbvNkJn
    • Rimuovi la seconda scheda logica tirandola via a mano.

    • Potresti dover tirare con forza in quanto anche questa scheda è incollata.

    Well presented. Needed. Wire pin descriptions. Thanks

    Nard Curedlard -

Conclusione

Per rimontare il tuo dispositivo, segui le istruzioni in ordine inverso.

Philip Pang

Membro da: 08/10/18

1245 Reputazione

11 commenti

Hi, I need to replace this circuit board where the charging port mounts.

While trying to remove damaged micro usb port, I damaged the tiny wires from the circuit board.

I tried to find this online but no luck so far.

Do you know the code for this PCB?

Thank you,

alex garcia -

hi, where can i buy new circuit board for micro usb charging port?

joseph celerio -

please i need 1… thank you.

joseph celerio -

I have a question on the small circuit board (charge port), one of the female port on it is for power (+5v), but what is another one? Is it D+, D- ?

P.S. I’ve measure that port with micro usb connected to power source, turns out there has no voltage measured, but the bigger one does has 5v measured.

Thanks!

馮會鈞 -

https://www.ebay.com/itm/184156589848

Just ordered one of these. Told it’ll be delivered by August 1st.

Ryan Crammer -

Would be so great if you could tell us where we could obtain a replacement USB port that INCLUDES the little circuit board. All replacement parts I have found are the port itself and not the port including the little circuit board and plugs.

Brett Strydom -

Hi I discovered water on the inside of the on button rubber layer how do I access it?

Benedict Fong -

Thanks. Brought this speaker back to life. Reconnecting the wires was a little bit of a challenge but got it done in the end.

Dave Swindells -

Hello, great guide thanks! Although I am not quite sure what to buy as a connector. I found two different part available the TL and GG on Aliexpress for instance, does anyone know the difference? Does it matter?

jeremykung -

Does anyone know what the values are on the 2 capacitors on the USB board? I took readings on mine and there's nothing.

A BIT -