Introduzione

Usa questa guida per sostituire i pulsanti del volume nel tuo Samsung Galaxy S6.

Questa guida richiede la rimozione del vetro posteriore. Rimuovere il vetro posteriore distrugge l'adesivo che lo tiene in posizione. Segui questa guida per reinstallare il vetro posteriore.

  1. SqQXVymBdpDIKpTT
    SqQXVymBdpDIKpTT
    wntGLmT3Tyu2B2Ko
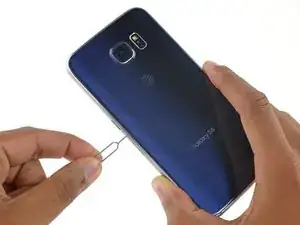
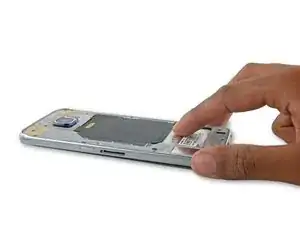
    • Inserisci una graffetta o lo strumento di estrazione SIM nel foro del vassoio della scheda SIM presente sul lato del pulsante di accensione.

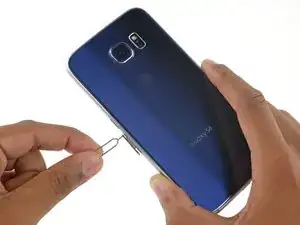
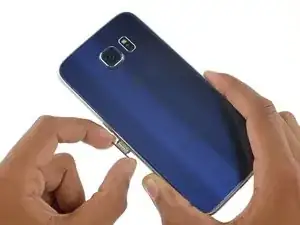
    • Premi per sbloccare il vassoio SIM ed estrarlo parzialmente.

    • Non premere troppo forte, potresti danneggiare il vassoio della scheda SIM.

    It really needs to be stated at the outset that if doing this repair to replace the daughterboard, there is a high likelihood that the display will be destroyed (even if you don’t break the display, the foil backing on it will likely be destroyed rendering it unusable). The PDF version of this guide states this at the beginning, but this online version does not.

    David White -

    Done. Thanks for the tip!

    Minor editor -

  2. QCXAEEFWZCGGwR3W
    • Rimuovi dal telefono il vassoio della scheda SIM.

  3. CupiCKZjIRmealtn
    CupiCKZjIRmealtn
    4XFYUZ3Retk36tLu
    • L'apertura del telefono comprometterà le tenute impermeabili. Prima di procedere devi avere dell'adesivo sostitutivo oppure, se non intendi sostituire l'adesivo stesso, dovrei avere cura di evitare l'esposizione a infiltrazioni di liquidi.

    • Se il tuo vetro è in frantumi, metti del nastro adesivo da pacchi sull'intero pannello per tenerlo insieme durante l'operazione di rimozione.

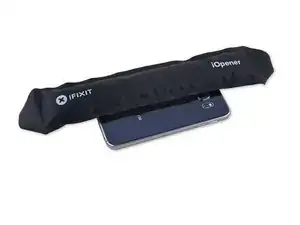
    • Metti l'iOpener sopra il pannello per circa due minuti per ammorbidire l'adesivo lungo i bordi del vetro.

    • Può rendersi necessario riscaldare di nuovo, riapplicando l'iOpener più volte, perché il telefono sia abbastanza caldo. Segui le istruzioni dell'iOpener per evitare surriscaldamenti.

    • Sposta l'iOpener per scaldare la sezione rimanente del pannello per altri due minuti.

    • Si possono usare anche un asciugacapelli, una pistola termica o una piastra calda, ma devi stare attento non surriscaldare il telefono: sia il display OLED sia la batteria interna possono essere danneggiati dal calore eccessivo.

    the way we do it at Get it fixed cellphone repair calgary is with a heat gun, wich is way easier than this, make sure to wear some gloves and dont worry to use to much heat as long as you point just to the back of the phone, (the back panel is thick enough to protect the logic board from over heat) instead of the usual blue plastic piece i sugest to use the thinnest metal razor knife and a business card so you can insert the business card and move it all around the frame, those blue plastic things are way too thick that will break the glass panel if you apply to much pressure

    get it fixed -

    After did that with my own heat pad, the white paint got ripped off but luckily glass back cover did not break. So I scratched all white part of the back cover and now its all transparent.

    Jae Chung -

    haha, the same happened for me after using a hair dryer. While still hot, the paint peeled of very easily. (too bad the mid-frame visually blocks most of the circuits…)

    Michael -

    I used a purpose built heating device at 100 degree celsius. Lower temperatures didn't work.

    ken -

    I used a blow dryer, attached my multimeter heat sensor to the back to monitor the temperature. At 54 degrees Celsius I could separate the back with a suction cup from my phone without damaging the paint.

    LRD -

    I gave up on the hot bag after 4 heat and apply cycles. I was only getting the back up to 60c using an infrared thermometer. I switched to a harbor freight 1500w heat gun set to Low, moving constantly around the back, until the back read 95c. The back came off easily at that point.

    Nathan Wray -

    I found another site that said temps of 203F/95C were required to soften the glues. Once I started using those temps with my heat gun, as well as a tool I made by just cutting the flat front/back panel from a package of screws (any plastic package that has a flat panel will work) , I had the back off in no time. Had I continued to use the plastic pick shown in the instructions, I really doubt I would have gotten the back off since I couldn’t get enough force on the back from my suction cup. The thin package plastic acted almost like a knife as I moved it around the outside edge. WARNING: If you have to reheat the back, REMOVE THE PACKAGE PLASTIC!! It will start to melt from the heat of a heat gun. Good Luck!!

    morttormjch -

    I had a pristine s6 edge I’m replacing the battery in. I can agree with many others about the amount of heart needed and need to where gloves. I had to heat several times using a heat gun. After several attempts phone broke free from suction cup went flying and now I have a phone with broken screen. Oh well, glad it’s not my primary phone. After getting it above 100c, the back glass finally started to separate. You need another person to be ready with a pick. Once you get one pick in, the rest is .

    Brian Gillan -

    Neither I had any success with the iopener. I ended up heating with a hair dryer. The metallic edges become quite hot.

    BTW: My phone’s “Rear Glass” is actually plastic. It didn’t seem like it would crack very easily.

    Michael -

    To get an even heat distribution at just the right temperature to easily pry the back off I used a steam iron, dry, set between wool and cotton. To hold down the phone I clamped it at the long edges with 2 strips of 1/4” furniture grade plywood cut at 7 degrees, screwed to 2’ 2x6; and then clamped the 2x6 to my work table. This made it much easier to persuade to back off without any oops!

    Michael Bielec -

    I used a hot and cold gel pad usually intended for injuries. It needed about 4 cycles of warming the phone but then worked like a charm.

    Sam Turner -

  4. Fw6nGUXcuaFIRkwC
    Fw6nGUXcuaFIRkwC
    HUeKUPTkXmfWZVj3
    nQZTQPZ2JhQWFgLJ
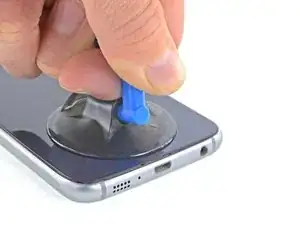
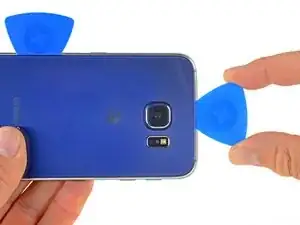
    • Una volta che il vetro posteriore è molto caldo al tatto, applica una ventosa vicino al bordo inferiore del vetro.

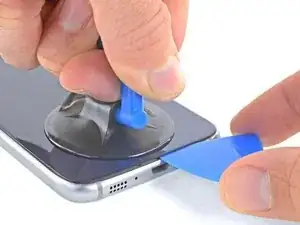
    • Solleva la ventosa per creare una piccola fessura al di sotto del vetro posteriore e inserisci un plettro di apertura nella fessura stessa.

    • Opzionalmente, una volta che il plettro di apertura è inserito, puoi aggiungere qualche goccia di alcol isopropilico nella fessura per favorire il distacco dell'adesivo nei passi successivi.

    If the rear screen is cracked/smashed, you will not be able to use a suction cup to remove it. The suction could would not seal because of the cracks. I tried masking tape, 3M shiny HVAC tape, and others, and the suction could would not seal to those surfaces either.

    I ended up using the sharp point of the smudger to remove some shards of glass to get underneath the cover to leverage it up and out. Definitely use gloves and safety glasses if you have to do this.

    dougpender -

    Thank you for your comment. I needed to see this particular instance of what to do when the back cover was cracked. I was going to try to suction it with tape covering it. This saved me some heartache. You're an angel!!

    Jessie Brooks -

    Be careful during this step- reapply heat before attempting this one (battery issues tend to melt internal “areas” ) and this area is most prone to crack during the lifting of the back plate.

    [deleted] -

    I think it is just about impossible to do this without at least removing some paint on the edges. Order a new back before you attempt this. It has the adhesive already on it and costs less than $10 on eBay.

    Thomas Hayes -

    In order to get in more easily, I normally use the iFlex (the metal one) which is thin enough to create a little space, and then i insert a thinner plastic sheet, just like the default screen protector you might find on some huawei or xiaomi phones. That plus half a drop of alcohol should do the trick. Use caution and be very patient.

    Stefano Restuccia -

    Ridiculous. I put a heat gun on mine for 30 seconds, 3 times, couldn’t get the screen to move AT ALL while pulling very hard with suction cups.

    Enough of this ‘you don’t get to mess with the battery’ nonsense. Quit screwing people over. Also, I love my ifixit kit. I had to make the post less negative.

    Adam Talbott -

    Really struggling removing the screen. It’s not budging at all.

    Paul Knight -

  5. RORfgD2GaFfcZTKD
    RORfgD2GaFfcZTKD
    Iqo6TFJnCEgjMqsP
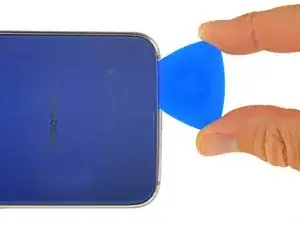
    • Fai scorrere il plettro lungo il bordo inferiore del telefono per tagliare l'adesivo che blocca il vetro posteriore.

    • Eseguita questa parte, può essere utile lasciare il plettro in posizione e utilizzarne un altro per procedere al passo successivo. Lasciare il plettro inserito aiuta a evitare che la colla appena separata possa aderire di nuovo.

    • Scalda di nuovo il vetro posteriore quanto basta per evitare che la colla possa raffreddarsi e indurirsi.

    Be careful that the bottom of the phone is well heated, and add a drop or so of isopropyl alcohol. When I removed the back glass of my S6, some of the black coating on the glass stayed stuck to the adhesive, so to return my phone to its original appearance, I’ll have to get a new back glass.

    Gary F -

    I needed help of a second person to insert the first pick. Apart from that, it was a one person job for me.

    Michael -

  6. YjEYrTI2RbxU6bcm
    YjEYrTI2RbxU6bcm
    RfNPocQykKZiUGZG
    AJkhALnQHiV2AumC
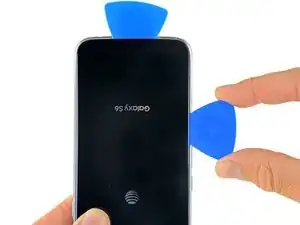
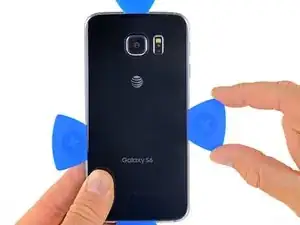
    • Ripeti la procedura di riscaldamento e taglio lungo gli altri tre lati del telefono.

    • Lascia un plettro di apertura sotto ciascuno dei bordi per evitare che l'adesivo si incolli di nuovo.

    At this stage I didn’t use a plastic pick as I think they are too thick and will crack a screen that’s not already cracked. I used a stainless steel

    I sesame blade which does a much better job of cutting through the adhesive. Just be careful not to insert it in too far. I sometimes put a mark on my blade to ensure it doesn’t go in too far.

    Wayne Lyell -

    I used a card like the ones people use to play poker or any card game with. Only one was needed to separate the back without any damage to the paint.

    LRD -

    Be sure to apply a decent amount of heat when removing the last bit of the rear glass, cracked the rear of my screen (only a small amount mind) trying too use too much force not enough heat for the last spot.

    spank2103 -

  7. RD4BdU6nOk2uCQlK
    RD4BdU6nOk2uCQlK
    14RSbSlgRfHLLDwM
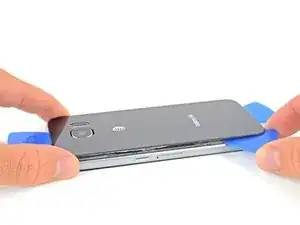
    • Usa un plettro di apertura per tagliare e staccare tutte le parti di adesivo rimaste.

    • Rimuovi il vetro posteriore.

    The rear glass is very fragile. I cracked mine across the camera opening while cleaning off the old sealant. Next time ( I will have to order one and do it again…doh) I’ll place it on a flat surface while cleaning it.

    Greg Scott -

    This is also a really good time to remove the SIM tray

    John Murphy -

  8. odbBTcnmmjwTw5yB
    odbBTcnmmjwTw5yB
    dL1WRFobffomWjxT
    • Per installare il nuovo vetro posteriore:

    • Usa delle pinzette per staccare tutto l'adesivo rimasto sulla scocca del telefono.

    • Ripulisci le aree di incollaggio con alcol isopropilico ad elevata concentrazione (almeno 90%) e un panno privo di lanugine. Passa il panno in un'unica direzione, non avanti e indietro. In questo modo prepari la superficie per accogliere il nuovo adesivo.

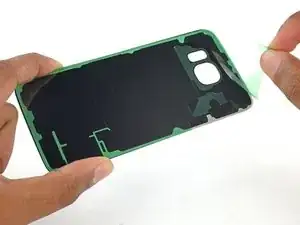
    • Stacca la pellicola adesiva dal nuovo vetro posteriore, allinea con cura un bordo del vetro contro la scocca dell'S6 e premi con decisione il vetro sul telefono.

    • Se stai rimontando il vecchio vetro posteriore, oppure stai usando un nuovo vetro posteriore privo di adesivo preinstallato, segui questa guida.

    You should note that the adhesive strip may need to be fully removed from the frame in order to proceed with repairs. The adhesive on my phone covered all of the screws exposed in the next step.

    Sean Cruz -

    When I did my battery, the adhesive stayed almost 100% on the back glass and was still in good shape. What didn’t remain attached only lifted slightly and I was able to coax it back to its original location with tweezers. I didn’t bother to remove and replace the adhesive layer because mine was still good. I set the glass out of the way where it wouldn’t get dirt on the adhesive while I finished the battery swap. I added some additional heat (hair dryer) after reattaching the glass to make sure the adhesive made the best seal.

    Wayne Thomason -

  9. B6ME41MIiXmNu4ym
    • Rimuovi le 13 viti Phillips #00 da 3,5 mm che fissano il telaio centrale al telefono.

    Make sure you do not mix up these thirteen screws with a hidden 14th screw under the mid-frame chassis, on the left side of the headphone port, on daughter-board. This 14th screw is shorter than the other screws, so make sure you do not replace it with one of the longer screws. It will push up against the front glass and lift it away from the adhesive.

    David Whyte -

    Some of the female threads are soft plastic and will strip out easily (especially those near the bottom). I was pressing down too hard when removing these screws, and several of them stripped out. The frame still screwed together, but I couldn’t get them very tight.

    Jordan Butler -

  10. Ho2IlIrxMAAKrLE3
    Ho2IlIrxMAAKrLE3
    NZQedcChOiqWWaLG
    Csl5mveVaSkJ5dQb
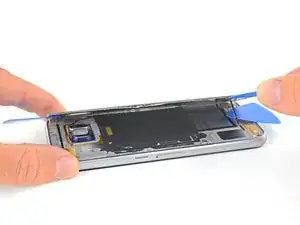
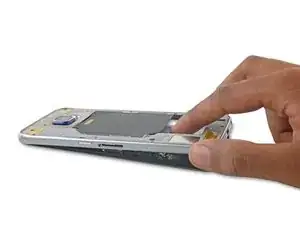
    • Afferra saldamente i bordi del gruppo telaio centrale.

    • Solleva il gruppo telaio centrale mentre tieni premuta verso il basso la batteria per separare il telaio dal resto del telefono.

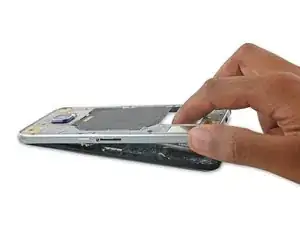
    • Mentre sollevi il telaio centrale, stai attento a non impigliarlo sul jack cuffie o sulla porta di ricarica.

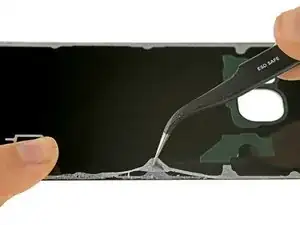
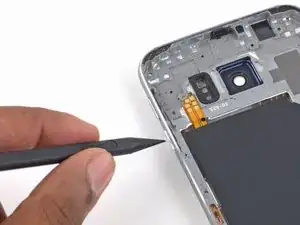
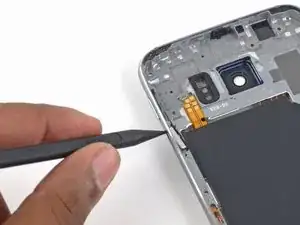
    • Una volta che il telaio centrale è parzialmente separato, fai scorrere con attenzione un plettro attorno ai bordi restanti del telefono per separare la parte superiore del telaio centrale.

    • Stai attento a non infilare per sbaglio il plettro tra il vetro e lo schermo.

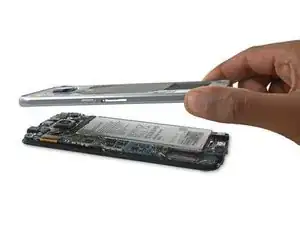
    • Per evitare di danneggiare la porta jack, rimuovi prima la parte superiore del telaio centrale, quindi spingi verso il basso il telaio per sganciarlo dalla porta jack.

    • Se non riesci a separare il telaio, devi forse riscaldare e applicare un iOpener sui bordi del display per ammorbidire l'adesivo dello schermo.

    FIRMLY GRASP IT! - Patrick

    Armen Orbelyan -

    %#*@ coulda told me sooner

    Geronimo Jones -

    Bei diesem Schritt sicher sein, dass SIM Card Fach entfernt ist!

    zikal -

    I found the glue still very sticky here, i had to go around with my picks to free it, its very stuck with a UK version, beware!!

    databeat1 -

    I damaged my screen here a bit, be careful not too slide your pick between the digitizer and the screen.

    Anton -

    i suggest to apply heat on the corners of the front screen to lose the adhesive a lil bit and push from the bottom back of the phone right where the wireless charger is because of the charging port

    get it fixed -

    When grabbing from the bottom, you fun the risk of damaging the charging port and headphone jack. I would suggest starting from the top. This is because the two ports at the bottom slide down into the frame. There is also adhesive that will give you a little resistance.

    Alex Philip -

    Step 18 is not correct, you have to start from the top. You can damage the charge port

    Daniel Yaben -

    On mine the adhesive actually tore away part of the colored film on the back of the screen glass rather than separating from it. I’m guessing applying heat to the screen corners first would help avoid this (I didn’t). https://imgur.com/a/V7vZQ

    Brian Hardie -

    Don’t stick a pick into the screen side of the frame. You will almost certainly start to separate the digitizer and LCD. Plus there is hardly anything to pry against anyway.

    Thomas Hayes -

  11. SvmlQGmFVeLNajve
    • Solleva il gruppo telaio centrale per separarlo dal resto del telefono.

    Achtung! Bei meiner Reperatur, besonders bei Schritt 14, Auf gar keinen Fall versuchen den Kleber mit einem der Plektren zu lösen. Dort kann man schnell zwischen Displayrahmen und Glas rutschen und so das Display beschädigen!!!

    TheECanyon -

  12. WPCh4NDEZFAKqveY
    WPCh4NDEZFAKqveY
    Hltp13KIZeqRHJMM
    • Usa la punta di uno spudger per staccare i connettori a contatto dei pulsanti del volume.

  13. tXaCGjQtb2FJFrfP
    tXaCGjQtb2FJFrfP
    54dSgO33I1gCjhbv
    KFna2VXfKCQ2rylC
    • Con l'estremità piatta di uno spudger solleva i pulsanti del volume dal telaio centrale.

  14. LGvAMLWqVffdMEjU
    LGvAMLWqVffdMEjU
    dRKQFfUHIM2dZcME
    koES1YVghMIq1gA5
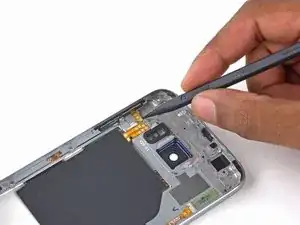
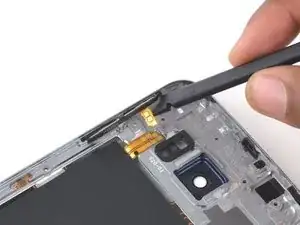
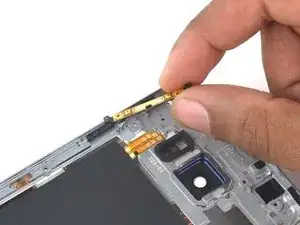
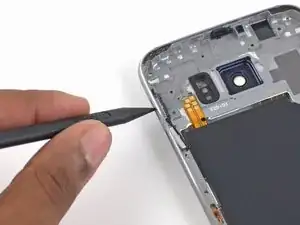
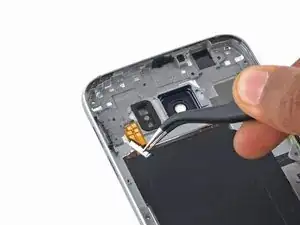
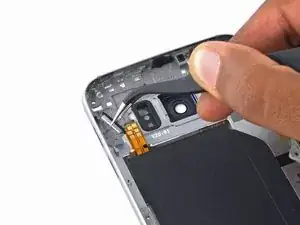
    • Usa di nuovo la punta dello spudger per togliere le coperture dei pulsanti dal telaio centrale.

  15. KYGQbMsEoRPLuAeW
    KYGQbMsEoRPLuAeW
    VF1SLEDLUsXmabnJ
    • Rimuovi le coperture dei pulsanti con delle pinzette.

Conclusione

Per rimontare il tuo dispositivo, segui queste istruzioni in ordine inverso. Segui questa guida per reinstallare il vetro posteriore.

Evan Noronha

Membro da: 06/02/15

223184 Reputazione

0 commenti