Introduzione

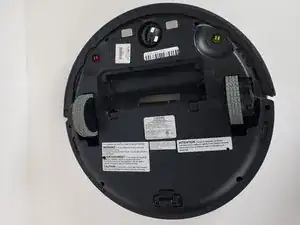
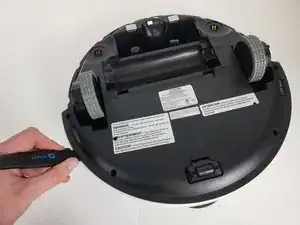
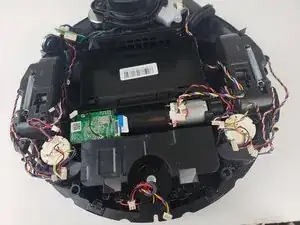
L'Ecovacs Deebot 900 è un robot aspirapolvere automatico. Se le ruote sono incastrate, il Deebot non riuscirà a pulire la tua casa. Segui questa guida per sostituire la ruota dell'Ecovacs Deebot 900.

  1. VHK2cONFvHuigp3j
    • Rimuovi tutte le spazzole dal Deebot.

  2. ZoLK3UZkhrKpFVgt
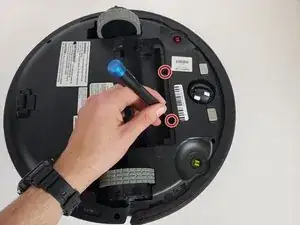
    • Usando un cacciavite a croce Phillips #0, svita le due viti da 12,25 mm che tengono ferma la copertura della batteria.

  3. K2VZcVAmgKmvvij3
    • Rimuovi la copertura della batteria.

    Anyone know where I can buy the battery for the Deebot 900. Evovacs is saying they won’t/dont sell them.

    Mike -

  4. S6j5WVJvdw3KwRYR
    • Usando le due alette bianche sui lati della batteria, rimuovila delicatamente.

    • Stai attento a non strappare il cavo della batteria.

  5. wqInpF4eQPGaQJHN
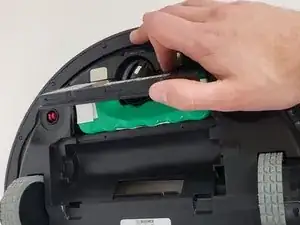
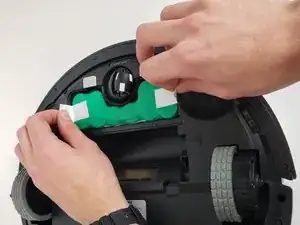
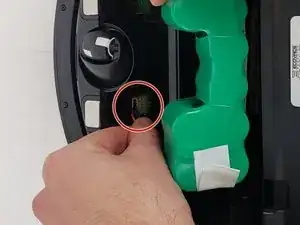
    • Scollega attentamente il cavo della batteria tirandolo da vicino al connettore in fondo al compartimento della batteria.

    I have two issues with these instructions.

    Title is Ecovacs Deebot 900 Battery Replacement. The battery was never replaced the device was reassembled.

    For battery replacement you need a battery it would be nice to have the replacement battery part number as well.

    Rick Sargent -

    I’d like some more info on part numbers, too. I have a Deebot 901 with a battery that, already after 2 years, has deteriorated significantly. Deebot 901 is also called “DE5G.10” in Europe, and it’s existing Battery back has model number ZJ1517-HFR, on which I can find almost no info, let a lone a compatible part somewhere in The Netherlands.

    eymert -

  6. cVHXroOd2QmmmIEx
    cVHXroOd2QmmmIEx
    jQQCtdUFVFH2RmuG
    • Usando un cacciavite a croce Phillips #00, svita le otto viti dal bordo inferiore del paraurti.

  7. H5AgGyvq6XChQPRe
    • Rimuovi la striscia nera sotto il paraurti.

  8. SGHYMJJexfLtrLKY
    SGHYMJJexfLtrLKY
    yoOpbKOnP3As2264
    • Solleva attentamente il paraurti finché non scatta via dalla sua posizione.

  9. UADkZUE2gmBgncyG
    UADkZUE2gmBgncyG
    vMeA13dOwNNT1xUY
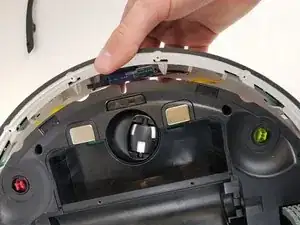
    • Scollega i due cavi che collegano il paraurti al corpo del Deebot.

    • Rimuovi il paraurti anteriore dal dispositivo.

  10. sSRjWadmhwVKaPMQ
    sSRjWadmhwVKaPMQ
    UKy3duFTkfKPFL6X
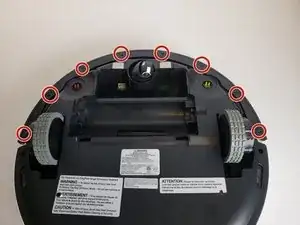
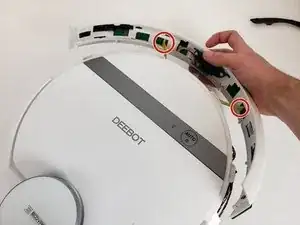
    • Usando un cacciavite a croce Phillips #00, svita le sei viti lungo il perimetro della copertura inferiore.

    This was actually to toughest part. I have a Deebot T9+ and it is slightly different (not much) and it is always a bit scary when you have to remove "plastic fixeners"

    RobinB -

  11. xSlyamjTv56DOfZe
    xSlyamjTv56DOfZe
    dREJOmWpALY52D5N
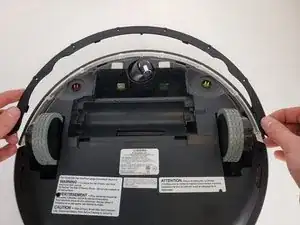
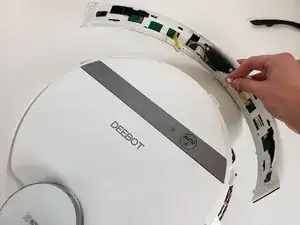
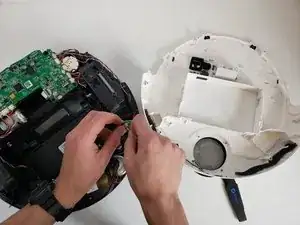
    • Infila un Jimmy nella fessura e fallo scorrere attorno a tutto il robot.

    • Scollega i due cavi e rimuovi la copertura inferiore dal dispositivo.

    Thank you for your work on this guide!

    Dominick Borrego -

    Im not able to remove the bottom case. I have a Deebot 711

    rocksmum -

  12. wkWqUqVuINPJlyPk
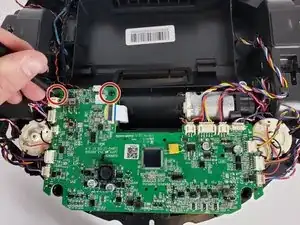
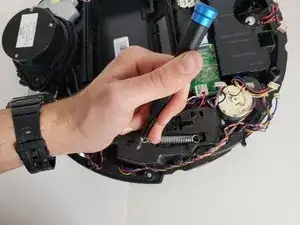
    • Usando un cacciavite Phillips #00, svita le due viti nere che tengono ferma la scheda madre.

  13. vXwsFxyNVRpJ3Y6n
    • Scollega attentamente i cavi a nastro collegati sulla scheda madre.

    • Tieni traccia di dove ogni cavo si collega alla scheda madre.

    It could be give you put letters on the cable connects A to Z on the picture so when putting them back you could check on the picture if you forgot any.

    supertoaster2@gmail.com -

  14. sCZlvqUXlrtxUc4k
    • Scollega gli ultimi tre cavi a nastro sotto la scheda madre.

  15. 6CptTrLbYbsD4TjI
    • Solleva la scheda madre dal Deebot e rimuovila dal dispositivo.

    Salve sto cercando una vostra scheda,mi può aiutare?

    scheda ecovacs zj2025_mb_v0.2_20210301

    Grazie

    xina xin -

  16. gbC6v5aKiN2WLRIg
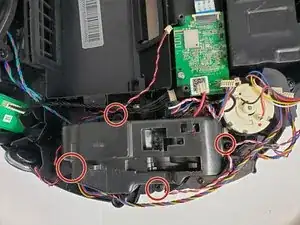
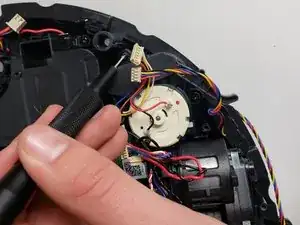
    • Usando un cacciavite o delle pinzette, rimuovi la molla sollevandola e tirandola via da un lato.

  17. PvsZwblWNGRhMGcF
    PvsZwblWNGRhMGcF
    xqDtIvphJU5er4bd
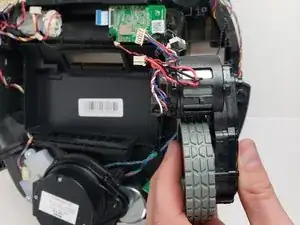
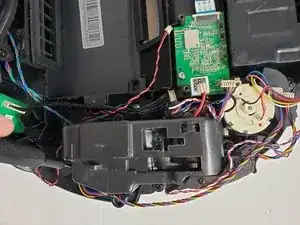
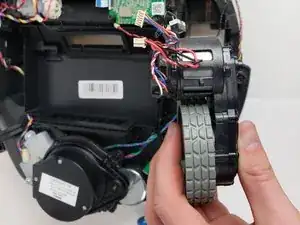
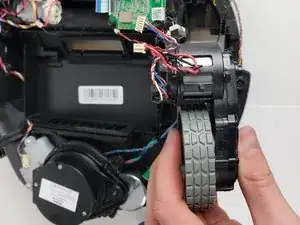
    • Usando un cacciavite a croce Phillips #00, svita le quattro viti che tengono fermo il gruppo della ruota.

  18. okXWBKjlq6ZyKCHd
    • Rimuovi la copertura della ruota.

  19. QowBxWsErstVCCW2
    QowBxWsErstVCCW2
    Ki34V6EmhuNqPHos
    pDOqUDXqrmVyFcQm
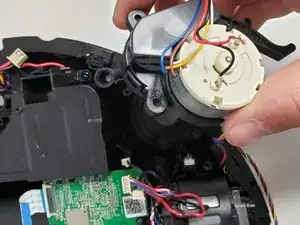
    • Usando un cacciavite a croce Phillips #00, svita le tre viti che tengono fermo il motore della spazzola laterale e tiralo verso l'alto.

  20. roPfvaHNcOgjMauo
    roPfvaHNcOgjMauo
    AtWVUWTUg2eWqIXV
    • Solleva e rimuovi il gruppo della ruota e il sensore collegato (il cavo nero).

Conclusione

Per rimontare il tuo dispositivo, segui le istruzioni in ordine inverso.

Christina Corliss

Membro da: 16/01/20

730 Reputazione

6 commenti

Thanks, it helps a lot

Agoston David -

I have an OZMO 930 that the left driver wheel is stuck. I tried to follow the above instruction, but I can’t go beyond step 10, I can’t take out the cover. Any help will be greatly appreciated,

OldManInChicago -

do you have place to buy ecovac_deebot_900_54_gear ?? I thinking on printing it but after my printed gear to papper shreder I have no hopes it will last.

Plewu Gracz -

Thanks for the guide on the Deebot 900 wheel replacement. Though it has partially helps to resolve the problems, but unable to find a wheel replacement. Hope you can help too.

wong CS -

The rubber tires on my Deebot have worn through. Does anybody have a source for rubber tire replacement? The company wants to sell me two entire wheel assemblies. I find that unreasonable.

akobelan -

To every one that got broken motor gears. You can buy them on ali or ebay. Fix is easy and done even as unprofessional as me. You can also print them if you have god material. I've found 3d printing model for this if someone need it- mail/ pm me.

Plewu Gracz -