Introduzione

Questa guida ti mostrerà come sostituire la scheda IR nel tuo iMac.

  1. hxZiNdMfTd5UBC5X
    hxZiNdMfTd5UBC5X
    jrHdcI6E5RcnJOQh
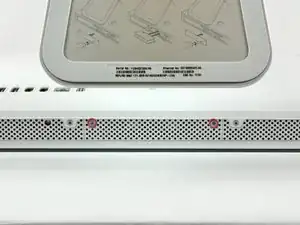
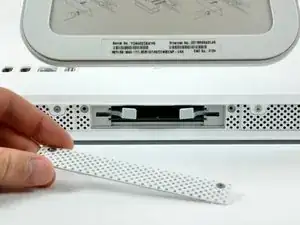
    • Allenta le due viti a croce Phillips imperdibili che fissano la porta di accesso all'iMac.

    • Rimuovi la port di accesso dall'iMac.

    • Prima di iniziare la riparazione, scollega il computer e tieni premuto l'interruttore di alimentazione per 20-30 secondi, per scaricare i condensatori interni.

    That is a really, really unnecessarily complex way of fitting a new hard drive. Thanks, but no thanks...

    annax -

    Citazione da annax:

    That is a really, really unnecessarily complex way of fitting a new hard drive. Thanks, but no thanks...

    annax, if you can suggest a simpler way we're all ears!

    Jake Simmonds -

    I found this guide to be very useful. The installation was super easy, especially since I've never opened my iMac before. I was able to skip steps 6, 7, 9, 10 and 14. Wish I had one of those long skinny magnetic torx screwdriver's though. I had to use duct tape to hold the screws on the end of the bit for step 12.

    I used this opportunity to vacuum out the dust with mini attachments. Much needed after 3 years ;0)

    Awesome site!!! Thanks for sharing your knowledge and saving me time and $$$!

    Eric Patten -

    Yes I did it! thanks for this very good manual

    Philippe d Anfray -

  2. l6WpNmqtB6tTifMa
    • Rimuovi le seguenti quattro viti:

    • Tre Torx T8 da 6 mm

    • Una Torx T8 da 8 mm

    T8's on the MA590LL 17" iMac.

    Endareth -

    8mm screw is 2nd from left - useful when reassembly

    Stefano Speriani -

  3. GCiFY4DTc13hL43o
    GCiFY4DTc13hL43o
    TrmMZuGpeYhtXQbr
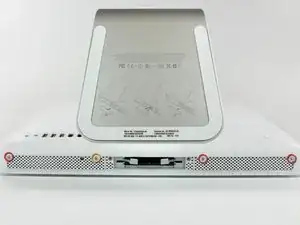
    • Capovolgi il tuo iMac e appoggialo con il lato del supporto rivolto verso il basso su una superficie piana.

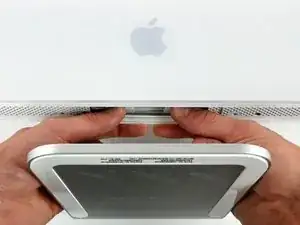
    • Per rimuovere contemporaneamente la cornice anteriore dall'iMac:

    • Utilizza i pollici per premere nei bracci della RAM e tenere fermo l'iMac.

    • Utilizza gli indici per tirare verso di te il piccolo ponte di materiale sulla cornice anteriore.

    • Tira verso l'alto la cornice anteriore con gli indici.

    • Una volta che il piccolo ponte di materiale ha liberato i bracci della RAM, solleva la cornice anteriore dal suo bordo inferiore quanto basta per liberare il bordo inferiore del case posteriore.

  4. vVcHZ6veadAdUm1V
    vVcHZ6veadAdUm1V
    43upA2MYcCjkVqEI
    xVukDXZ33b1NXD5Z
    • Riorienta il tuo iMac in modo che sia in posizione verticale sul supporto.

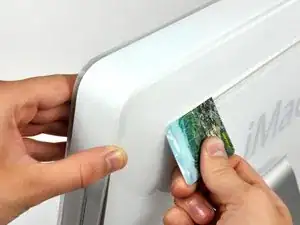
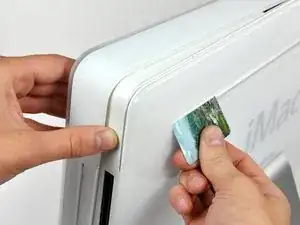
    • Inserisci una scheda di plastica nell'angolo della fessura della presa d'aria vicino alla parte superiore del case posteriore.

    • Spingi la scheda verso la parte superiore dell'iMac per rilasciare il fermo della cornice anteriore.

    • Allontana la cornice anteriore dal case posteriore.

    • Ripeti questa procedura per l'altro lato della cornice anteriore.

    • Potrebbe essere necessario applicare diversi strati di nastro adesivo sulla parte superiore della scheda di accesso per facilitare lo sblocco dei fermi.

    • Se la cornice si rifiuta di sbloccarsi, prova a premere il bordo inferiore sul case posteriore e ripeti questa procedura di apertura.

    Apple uses a powerful magnet to release these latches, but the official tool is not available. If you have access to a few failed hard drives, you can take out the magnets from those, and stack them up to have a magnet strong enough to easily open these latches.

    Simply place the magnet on an upper corner of the machine, and when you hear a click, gently pull the corner of the front case forward. Repeat the process for the other upper corner. Use care not to pull on the iSight cables.

    Note: Use care when handling the hard drive magnets, they are powerful, and you don't want them to snap together on your fingers. OUCH!

    Zaphod -

    You can use a credit card. Mine survived, though it did get a little bent.

    David Bendory -

    I used two credit cards for extra thickness and the latches released very easily.

    James French -

    The magnetic latches are about 2-3 cm from the left and right edges right at the top edge of the case. I just ran a rare-earth magnet over the from of the bezel in this area. You can hear it click when it disengages. RadioShack has these kind of magnets for $3, the call them "super magnets".

    James -

    This was a nuisance. Had to really move the card around to get it to finally release.

    Tim Dougherty -

    Be very careful not to damage the metal clips with a credit card. My iMac was very stubborn and I ended up bending the clips in a way they cannot be bent back. The clips do still work and the front bezel does still go back on, however it no longer sits flush with the back of the iMac.

    Gary Lefebvre -

    The double credit card worked for me. Have to be persistent. It's a very light latch, no force needed or anything, or any click when it releases.

    Julian Wood -

  5. 6BjhpBMMJXMguR2M
    • Appoggia il tuo iMac su un tavolo con il lato del supporto rivolto verso il basso.

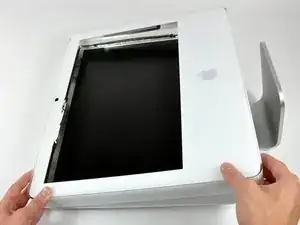
    • Solleva la cornice anteriore dal suo bordo inferiore e ruotala allontanandola dal resto dell'iMac, facendo attenzione ai bracci RAM che potrebbero rimanere incastrati.

    • Appoggia la cornice anteriore sopra il resto dell'iMac.

    I found that it is much easier if you remove the top of the case first, then lay computer back on the stand & remove the bottom as directed.

    G A Long -

  6. JeU6BpqAYHH52fbg
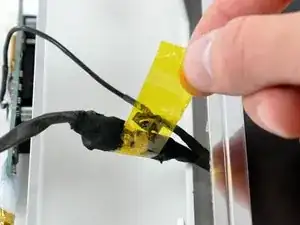
    • Se necessario, rimuovi la parte di nastro kapton (va bene gettarlo via) avvolto attorno ai cavi del microfono e della fotocamera.

    I was able to skip Steps 6 & 7 entirely. The microphone and camera cables had enough slack to flip the front cover off and lie it flat above the rest of the computer.

    Carly Hobeef -

    Step 4 is completely unnessecary. Just lift the bezel up and wiggle it until the metal clips let go. Then lift the bezel straight up.

    Cloudsurfer -

  7. 5CYDVbqHBIKBqYPO
    5CYDVbqHBIKBqYPO
    XfVD2huglrE2dXxG
    • Scollega entrambi i cavi della fotocamera e del microfono.

    Make sure the white wire is on the same side of both parts of the connector before reconnecting.

    It is possible to reconnect the microphone cable in the wrong/reversed orientation with the connector. The microphone will still work but will be muted and result in a "tinny" sound on the receiver's end.

    creecher -

    Can anyone ID these connectors (at least the camera connector) so that I may make an extension (to move the camera out and re-house it myself). I probably have the gear to do the mic already.

    Is the camera connector some standard I can order M & F versions online to terminate to an extension cable?

    hutchwilco -

  8. jSOXsKFLuaRZS62n
    • Rimuovi le due viti T8 Torx che fissano la scheda IR nel case posteriore.

    • La scheda IR dovrebbe allontanarsi dalla scheda logica dopo aver rimosso queste viti.

  9. tuPeKvMgArjDU2lC
    • Scollega il cavo della scheda IR dalla sua presa sulla scheda IR.

Conclusione

Per riassemblare il tuo dispositivo, segui queste istruzioni nell’ordine opposto.

Walter Galan

693762 Reputazione

0 commenti