Introduzione

Sostituisci una scheda della fotocamera difettosa per riacquisire la funzionalità iSight.

  1. SVdq5DjEEbPY35bT
    SVdq5DjEEbPY35bT
    5NTGqqPfJNHjQEls
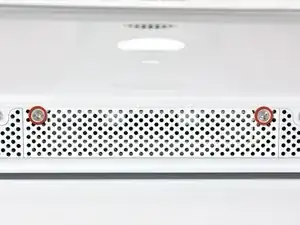
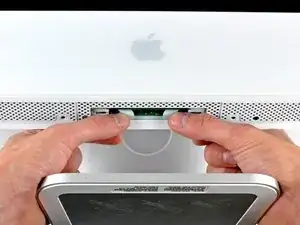
    • Allenta le due viti con testa a croce Phillips che fissano lo sportello di accesso all'iMac.

    • Entrambe le viti restano all'interno dello sportello di accesso.

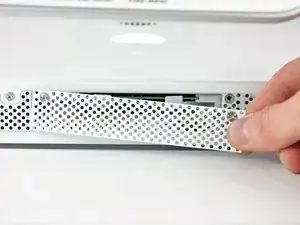
    • Rimuovi lo sportello di accesso.

    • Prima di iniziare la riparazione, scollega l'alimentazione del computer e tieni premuto il pulsante di accensione per 20-30 secondi per scaricare i condensatori interni.

    Swapping in a new CPU and an SSD took me about 10 hours. I did take a dinner break and spent another hour rooting around in my garage to find my thermal paste. Still, this procedure can take a long time.

    gordonhamachi -

    Only a french translation proposal. We use to say “démontage” instead of “installation'“ in that specific case. ;-) (Dismantling)

    francis barbier -

  2. 5fPkIVmbV4xPLqbw
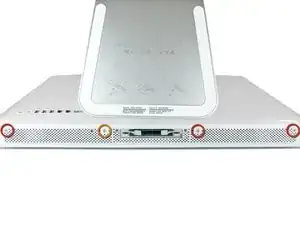
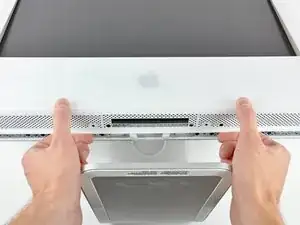
    • Rimuovere le viti seguenti lungo il bordo inferiore dell'iMac:

    • Tre viti Torx T8 da 6 mm

    • Una vite Torx T8 da 8 mm (lato destro dello slot RAM nel modello 2105)

  3. mifhKnEOI112Qck2
    mifhKnEOI112Qck2
    5MYpx1VtHVM4VNl3
    ep11S11CisKiBn2g
    • Riposizionare l'iMac in posizione diritta, sulla staffa.

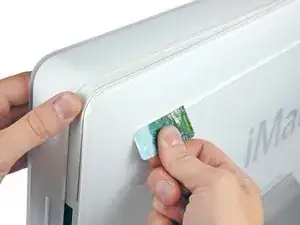
    • Inserire una scheda di plastica nell'angolo della fessura di ventilazione accanto alla parte superiore del case posteriore.

    • Premere la scheda verso la parte superiore dell'iMac per sganciare la chiusura della mascherina anteriore.

    • Rimuovere la mascherina anteriore dal case posteriore.

    • Ripetere la procedura per l'altro lato della mascherina anteriore.

    • Potrebbe essere necessario applicare vari strati di nastro isolante sulla parte superiore della scheda di accesso, per agevolare lo sgancio delle chiusure.

    • Se la mascherina non si sgancia, provare a sollevare leggermente il bordo inferiore della mascherina anteriore dal case posteriore (l'operazione viene spiegata nei passaggi successivi) e ripetere la procedura di sgancio della chiusura.

    I have never seen a pict of the bezel latch, I hope this picture link helps you to figure out what is inside that you need the cc to hit to release, I had a tough time making it work but managed just before I gave up! http://i209.photobucket.com/albums/bb35/...

    ReneBruce -

    the photo of latch is no longer there at Photobucket

    rmshreffler -

    When you put this back together, make sure you place the bevel latches UNDER/INSIDE the case frame.

    robino -

    Citazione da ReneBruce:

    I have never seen a pict of the bezel latch, I hope this picture link helps you to figure out what is inside that you need the cc to hit to release, I had a tough time making it work but managed just before I gave up! http://i209.photobucket.com/albums/bb35/...

    Thanks, your picture helped me.

    robino -

    Rather than through the vent at the back. Ease the bottom of the front bezel away from the screen and then in the gap created between the screen and the front bezel, insert your card here and push up to release the latch. This is especially the method to use, if you have already tried everything else above, as you may have bent the latches, and you'll never get them to relase the conventional way.

    Charlie -

    Good tip. I sort of did this out of desperation before reading this. Seem to work to get it apart. I'll have to see about getting it back together.

    David Sutherland -

    On the 24 inch model, there are no latches. Instead the front bezel has four tabs which slot into the rear case. It's very easy to remove.

    manfred -

    Wow, I really got stuck on the bezel. I tried a credit card, even a flexible metal scraper, nope nothing budged. I finally got going with help from this video: http://www.youtube.com/watch?v=QzuBW3mu7... which the guy has the machine lying on its back, then you can carefully bend the front bezel up until you see the latches, and I got the scraper in front of the screen and un-did the latches that way. Onto the next step!

    sleestack -

    Replaced one of the redundant images of the card going into the slot, with the previously linked image of the latch itself. I was struggling to figure out how to get the thing open, thinking it was a latch that pushed *up* to the top of the system, but it actually pushes *forward* towards the screen. That accounts for the bending of the card, and the excess length required to insert it. After figuring that out, the case came off nicely.

    Matt Falcon -

    Apple uses a powerful magnet to release these latches, but the official tool is not available. If you have access to a few failed hard drives, you can take out the magnets from those, and stack them up to have a magnet strong enough to easily open these latches.

    Simply place the magnet on an upper corner of the machine, and when you hear a click, gently pull the corner of the front case forward. Repeat the process for the other upper corner. Use care not to pull on the iSight cables.

    Note: Use care when handling the hard drive magnets, they are powerful, and you don't want them to snap together on your fingers. OUCH!

    Zaphod -

    This was perfect! I wish the original instructions mentioned the magnets.

    I used magnets I pilfered from an old hard drive.

    veganmo -

    This is definitely the hardest part of this repair. I ended up doing what Charlie did and got it off after a lot of frustration.

    aseisman -

    The iMacs I've taken apart open simply with a magnet. I made a video to show exactly how the latch works inside. You do need a strong magnet like the hard drive internal magnet suggestion however they can be found in many places, just look for 'rare earth' or 'neodymium' and you'll find one. probably .3" cube would be big enough.

    http://youtu.be/yvq035edr-I

    there is the video that shows how the latch works. of course you may need TWO magnets to do both latches at the same time.

    awr -

    Save yourself some headache and get a magnet for this. I used these: www.amazon.com/gp/product/B004PWMVSI/ref=wms_ohs_product?ie=UTF8&psc=1

    Sometimes just one will do the job, other times I've had to use all 4 together.

    Much easier than trying to use a card.

    maccentric -

    sleestack is right on. The youtube vid is excellent for sliding the case right off without spudges and cards, etc. The vid's still there as of today, 9/30/2014. And the guy's foil removal is right on target, too. Very simple to replace the battery. I use this old 2006 computer with an old version of the PC program for Jobclock and only for that with Parallels 6 running the PC app. Don't want to upgrade or change anything at this point, going to milk it a couple more years. Got a nice big i5 for everything else. Oh, happy day.

    infoghost -

    Apple designed the latch to be released with a Magnet. That's it. That is the tool to be used.

    Avoid frustration, hassles, wasted time: simply buy a "neodimio" Magnet.

    Actually yes – IMHO It would have preferred iFixtit had mentioned a MAGNET to release the front Bezel, the credit card in an awkward and misleading (and not so smart) method.

    I hope iFixit will change Step 3.

    Giacomo Santerini -

    Be very careful here. One of the sides did not release using the plastic card. I tried to push it a bit but it would not give. It did work using 2 cards. What I did not realized until the very end, when I turned the imac back on, is that I broke the display. Thanks a lot ifixit. I get the hard drive back to work now but with a damaged display. And I can't even buy a replacement one from you.

    patmainville -

    Yes the screens in these machines are easy to break. I've opened these sorts of machines at least a 40 times. You do need to be very careful with the display. The won't take any pressure from a wayward thumb or finger etc. I have broken one once, trying to get a latch to give. You have to be very conscious not to out any fingers in the display at all.

    BUT, how you think this is anyone's but your own fault is beyond me. iFixit has no blame to take here.

    Please everyone, read through all instructions carefully and learn from others'.

    And to this poster, go buy one of these machines from eBay or find in one in hard rubbish to repair yours. These white iMacs are almost 10 years old now. And are scrap in most people's minds.

    Charlie Nancarrow -

  4. TVTdMHyJpIJ61F62
    TVTdMHyJpIJ61F62
    bOF2QePTeQ4EuiWI
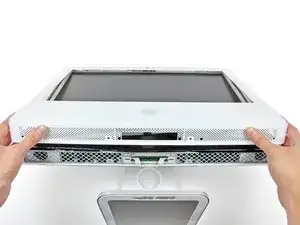
    • Poggiare l'iMac dal lato della staffa su una superficie piatta.

    • Per sollevare la mascherina anteriore dall'iMac, eseguire queste operazioni contemporaneamente:

    • Premere con i pollici le alette della memoria RAM e tenere l'iMac verso il basso.

    • Tirare con gli indici il piccolo ponte sulla mascherina anteriore verso di sé.

    • Tirare la mascherina anteriore verso l'alto con gli indici.

    • Dopo che il piccolo ponte ha liberato le alette della memoria RAM, sollevare la mascherina anteriore dal bordo inferiore, quanto basta a liberare il bordo inferiore del case posteriore.

  5. STegSvCtWJVceTYN
    STegSvCtWJVceTYN
    d6I5d6lQWCKckDg6
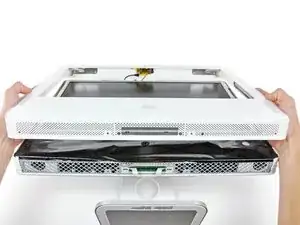
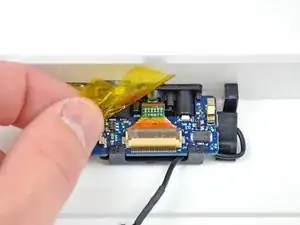
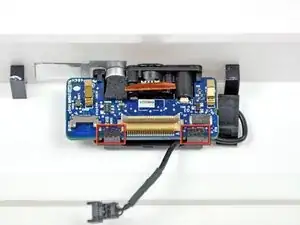
    • Sollevare la mascherina anteriore dal case posteriore e ruotarla per rimuoverla dal bordo inferiore dell'iMac. Attenzione: i cavi del microfono e della fotocamera sono ancora collegati al bordo superiore.

  6. EtWTv5BjBUYYxXYc
    • Se occorre, rimuovere il nastro che copre il connettore del cavo del microfono.

    • Il connettore del microfono si trova vicino alla parte interna del bordo superiore dell'iMac.

    i posted a note on the next page about disconnecting the microphone and camera cable. may help. reed it before disconnect.

    sebalancea -

  7. BXBBr6hbCYCRiSif
    BXBBr6hbCYCRiSif
    VD1EZLPg4WWIU5NV
    N6TB6kbibPCCPykE
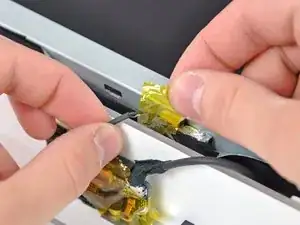
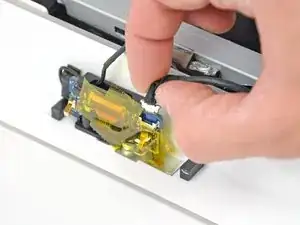
    • Scollegare il cavo del microfono.

    • Scollegare il cavo della fotocamera estraendone il connettore dal connettore femmina sulla scheda della fotocamera.

    • I due connettori del cavo della fotocamera sono delicati e si piegano facilmente. Rimuoverli con attenzione.

    there's no need to disconnect the microphone and camera cable. you can work against a wall and carefully rest the frame and the display on the wall.

    sebalancea -

    Citazione da sebalancea:

    there's no need to disconnect the microphone and camera cable. you can work against a wall and carefully rest the frame and the display on the wall.

    I didn't even use the wall, I just carefully pivoted the frame backwards and laid it on the table without disconnecting the wires

    Bob -

    Be careful. My microphone and camera cables looked a little bit different from this. My camera cable connector did NOT plug directly into the camera board (and I almost tried pulling the cable out of the board), but rather there was a cable to cable connector that was stuffed behind the monitor. I had to skip this step until the monitor was out. I have an early 2006 20" iMac.

    avcaruso -

    My Mac had a different camera board and it didn't appear that the cables could be detached. Leaving them in place and propping up the back of the case worked for me.

    gordonhamachi -

    I agree, no need to disconnect. I used a bunch of books (heavy books), to keep the monitor frame upright.

    osfanatic -

  8. 3UE2X2GlTbUiasbi
    • Se necessario, rimuovi le strisce di nastro adesivo che coprono la scheda della fotocamera.

    • Non dimenticarti di riapplicare il nastro adesivo sulla parte anteriore della scheda della fotocamera per evitare cortocircuiti elettrici.

  9. Jw1rr63osLmmaR6a
    Jw1rr63osLmmaR6a
    yqufdgilnEyyYRoh
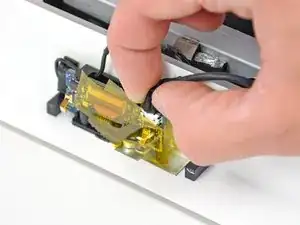
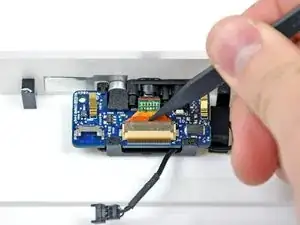
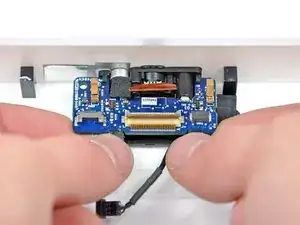
    • Utilizza la punta di uno spudger per capovolgere l'aletta di bloccaggio del cavo piatto della fotocamera.

    • Capovolgi l'aletta dalla parte frontale della cornice anteriore.

    • Utilizza la punta di uno spudger per allontanare il cavo piatto della camera dalla sua presa sulla scheda della fotocamera.

  10. gOQZ2eXmmlhMlpDw
    • Invece di essere fissata da viti, la scheda della fotocamera è fissata da una staffa di plastica nera collegata alla cornice anteriore.

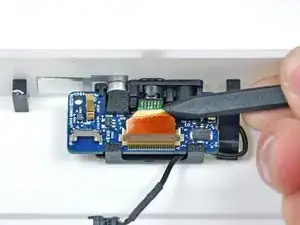
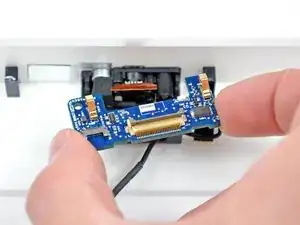
    • Nel passaggio successivo, ruoterai allontanando le due clip di fissaggio nere (mostrate in rosso) dalla scheda della fotocamera per liberarla dalla cornice anteriore.

  11. sFkrZP5BSCDBNFfH
    sFkrZP5BSCDBNFfH
    AoKJvKJmueYLSFSo
    • Utilizza i pollici per ruotare contemporaneamente entrambe le alette di fissaggio, allontanandole dalla scheda della fotocamera mentre spingi la scheda verso l'alto da entrambi i lati con i tuoi indici.

    • Rimuovi la scheda della fotocamera dalla cornice anteriore.

Conclusione

Per rimontare il tuo dispositivo, segui queste istruzioni in ordine inverso.

Walter Galan

693762 Reputazione

0 commenti