Introduzione
Questa guida è un prerequisito.
Strumenti
-
-
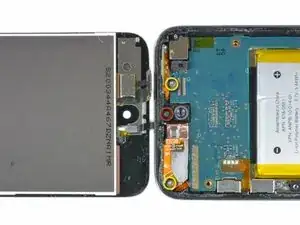
Svita le seguenti tre viti vicino al bordo superiore della scheda logica:
-
Una vite a croce Phillips da 2,0 mm
-
Due viti a croce Phillips da 2,3 mm
-
-
-
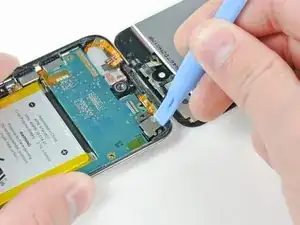
Usa il bordo di uno strumento di apertura per iPod per fare leva delicatamente, senza rimuoverla, sulla fotocamera posteriore dalla copertura posteriore.
-
-
-
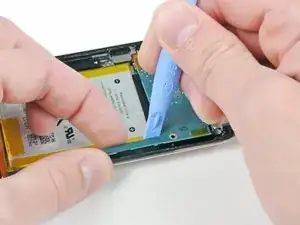
Usa uno strumento di apertura per iPod per sollevare leggermente il bordo della scheda logica vicino alla batteria il necessario per prenderlo con l'altra mano.
-
Stai molto attento a non sollevarla troppo, in quanto il cavo a nastro dei tasti del volume è ancora collegato e si strappa molto facilmente.
-
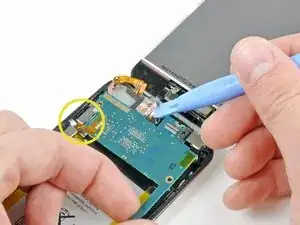
Mentre tieni delicatamente sollevata la scheda logica con una mano, usa uno strumento di apertura per iPod per sollevarla vicino al nastro di rame sul bordo superiore della scheda.
-
La scheda logica si solleverà adeguatamente quando l'ultimo connettore del gruppo dello schermo avrà superato il bordo superiore della copertura posteriore.
-
Per rimontare il tuo dispositivo, segui le istruzioni in ordine inverso.

Can you use the same colour coding as with The above sizes? [HvL]
Hugo van Leeuwen -
These colors are too close together.. One red, two yellow.. Please.
playpets106 -
Thanks for the comment! I adjusted that step, should be much easier to see now.
If you're ever having trouble seeing screw markers or other small details on a step, you can always view a larger version of the image with the "View Huge" link on the top left corner of the image.
Andrew Optimus Goldheart -
Can someone explain what the copper/ribbon is that the lower yellow marked screw goes through is for? Perhaps only heat dissipation? The ipod I have was given to me with much of the glass smashed and picked out, so some of this is just missing. Obviously I can't put it back...
hutchwilco -