Introduzione

  1. XYgKyyR4VJlGpVcv
    • Svita le tre viti Torx T6 che fissano la ventola destra al case superiore.

    on my screwdriver set, the T6 screw driver felt wobbly. It felt like I would strip the screw if not careful. So I used a T7 screw driver, and it was much more snug.

    Bryan Chun -

    Same here. T6 did not fit at all. Too small.

    Bummer. Will have to screw my MBP back together and get a T7 on Monday…

    Oliver Nielsen -

  2. cIwTbXbH4oEZIVHs
    cIwTbXbH4oEZIVHs
    IS5NusyQfhIBgSRZ
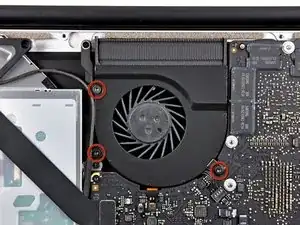
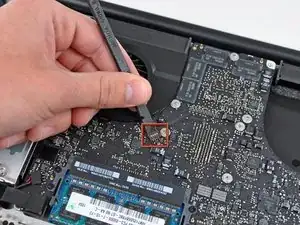
    • Usa la parte piatta di uno spudger per scollegare il connettore della ventola destra dalla sua presa sulla scheda madre.

    • È utile ruotare lo spudger lungo il suo asse sotto i cavi della ventola per scollegare il connettore.

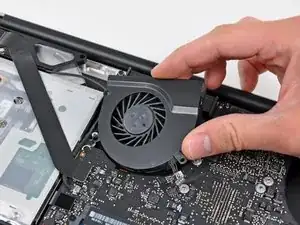
    • Rimuovi la ventola destra dal case superiore.

    There is no way to reconnect the fan cable. It looks like it was soldered onto the logic board. I disconnected it and can't reconnect it.

    Has this happened to anyone else.

    Vicki -

    Vicki, you tore the connector off the board. They can be re-soldered if you are very careful/skilled with a soldering iron, but that is not something that you should try to do if you haven't soldered SMD components before.

    rcoleskelton -

  3. GPVO4Ehoh1AETtlb
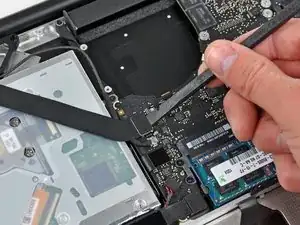
    • Usa la parte piatta di uno spudger per scollegare il cavo a nastro AirPort/Bluetooth dalla sua presa sulla scheda madre.

    • Piega il cavo a nastro AirPort/Bluetooth all'indietro per liberare la strada alla scheda madre.

  4. O1PQny1T2ESKQwa5
    • Scollega il cavo iSight tirando il suo connettore verso l'apertura del lettore CD.

    I was afraid to pull too hard, but wiggling it worked! :)

    Mark -

    This is NOT good advice, ifixit! You should never pull a cable but rather pull or push its connector. In this case, it went well for me the first time, but the second time I pulled the cable out of its connector and now my iSight camera is not working anymore. Thanks, ifixit. Not!

    Rather, use plastic (so you don’t short-circuit anything) tweezers or two tooth-picks or so and push the connector out of its socket.

    That’s actually who it’s described in Apples repair manual for this device that — I think — I also found on this webpage somewhere.

    So: PUSH, don’t pull!

    Colonel Task -

  5. oYGESTZdeZHMQFlk
    • Usa la parte piatta di uno spudger per scollegare il connettore del lettore CD dalla sua presa sulla scheda madre.

    • Piega il cavo del lettore CD all'indietro per liberare la strada alla scheda madre.

    hello i just installed a brand new logic board in my mac, in my mac i have replaced the cd drive with an second ssd - but when i turn the mac on, the OS cant find the second ssd, the cable is in (it clicks in) - does anybody know how to fix this or ?

    Best regards Mathias

    mathiastondering -

  6. SekMnRrwpFQ6sKfQ
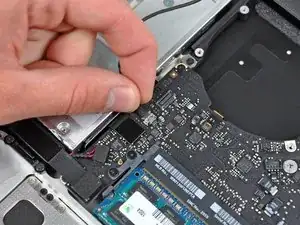
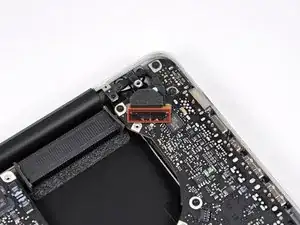
    • Tira attentamente verso l'alto il connettore del subwoofer/speaker destro per scollegarlo dalla sua presa sulla scheda madre.

    Same problem as with step 11. I pried up the connector as shown and can't reconnect it. It looks like it may have been soldered to the logic board. How can this be fixed?

    Vicki -

    The only problem that I face on substituting the top case was when I tried to connect the subwoofer connector to the socket on the logic board. I did some tentatives but on the last the socket on the logic board I suppose unsoldered. Some suggestions?

    Thanks

    Paolo Sperati

    paolosperati63 -

    I did step 16 (disconnecting the hard drive cable) first and then came back to this step - worked for me

    Colin White -

    This connector is just like the ones used for the fans (but has a cushion-like protection over it). Just take it apart just like in steps 8 and 11.

    Andres Lartitegui -

  7. 3HPg13CsbrDBQBWx
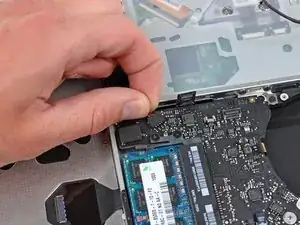
    • Usa la parte piatta di uno spudger per scollegare il connettore del disco rigido dalla sua presa sulla scheda madre.

  8. RwWnMGTsxSQSvJIm
    RwWnMGTsxSQSvJIm
    wZ2SCGMbhBikwKQR
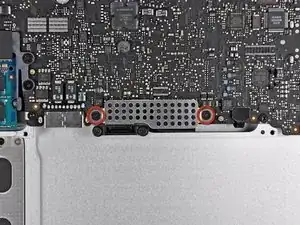
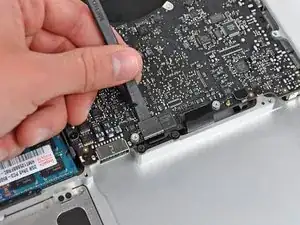
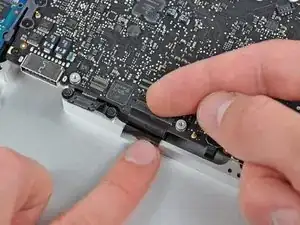
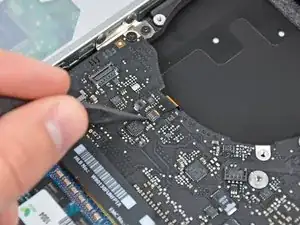
    • Svita le due viti a croce Phillips corte che fissano la piccola schermatura EMI alla scheda madre.

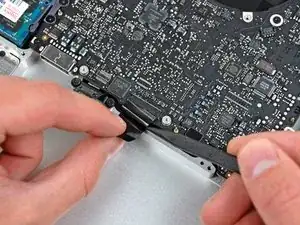
    • Rimuovi la schermatura EMI dalla scheda madre.

    Mine was stuck to the Keyboard Ribbon Cable; needed an extra pull, but it's safe and should come off - it's not attached to anything. :)

    Mark -

  9. TTD4Myj2tc6ARsc1
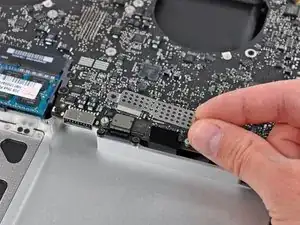
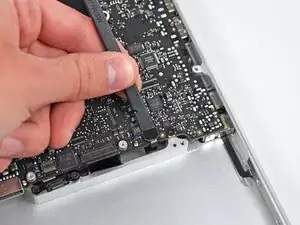
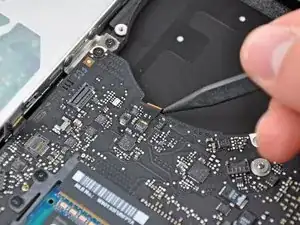
    • Usa la parte piatta di uno spudger per scollegare il connettore del trackpad dalla sua presa sulla scheda madre.

  10. XfNU6hTFqSMgJRxL
    XfNU6hTFqSMgJRxL
    vAIFLSbGELD65Y1t
    • Usa le unghie per ruotare attentamente verso l'alto l'aletta di bloccaggio del cavo a nastro della tastiera.

    • Assicurati di star ruotando l'aletta di bloccaggio, non la presa.

    • Usa la punta di uno spuidger per sfilare il cavo a nastro della tastiera dalla sua presa.

    How will I know I have inserted the keyboard ribbon successfully? After installing a new upper case I can't seem to get the keyboard ribbon to stay in its socket. Or does the EMI sheild hold it in place?

    Cem Catikkas -

    Ditto. It seems very tricky to reinsert the keyboard ribbon.

    GrooveStomp -

    I just did this - it is kinda tricky. The ribbon cable has a flap on top that is designed solely to help you coax the cable back into the socket....don't make the mistake I did and spend an hour trying to feed this flap through the socket. What worked for me was a combination of using the flap with my fingers and tweezers on the actual cable to reinsert it into the socket. Took a few tries, but I got the cable re-inserted, pressed down on the tiny locking thing, and the keyboard cable was in and secured.

    dave -

    Indeed, it is difficult to insert the keyboard ribbon cable. It will stop after about 1mm of insertion. It needs to go in quite a bit further. Angling it slightly, you may be able to get a corner to go in, then straighten the ribbon while applying forward pressure. I reassembled it a few times with that sinking feeling on startup before I realized that it wasn't really making contact!

    dennishodge -

    I've replaced the keyboard, so reinserting the ribbon was particularly tricky. After several failed attempts, here's what finally dawned on me... I took a piece of scotch tape, maybe an inch long. I folded on end on itself, maybe a quarter inch from the top. That left a sticky zone and a non-sticky zone on the tape. I taped it to the ribbon, and was able to use the tape and a "handle" to pull the ribbon into the socket. Afterwards, I carefully removed the tape without pulling the ribbon out of the socket.

    Bryan Chun -

    This was the hardest part for me. Be sure you flip the release flap up before removing or re-inserting.

    Jonathan Daiello -

    This might be obvious to some, but for those for whom it is not, this info is very important. First: only the ribbon is what needs to be pulled out (and inserted later on) not any of the black plastic casing. Second: before you try to pull the ribbon out, you need to flip up the release flap so its vertical (this is the thin black part that is located on the top edge of the black casing). If you don’t do this you will damage the casing or the ribbon or both.

    Greg -

    Vraiment dommage que ce point de blocage très sensible ne soit pas plus développer, il peut compromettre tout le travail et l’état de la machine, c’est la grosse erreur de ce tuto.

    Pour l’instant, je ne suis pas parvenu à retirer ce connecteur et je crains que l’impatience me fasse commettre une erreur irréparable.

    pc-design -

    the flap mentionned is the plastic part the most far to the ribbon, not the part where the finger seem to be pulling. The flap comes off easily.

    Paraita Wohler -

  11. QHFtcPpiHS61kHvF
    • Usa la parte piatta di uno spudger per scollegare il connettore dell'indicatore della batteria dalla sua presa sulla scheda madre.

    Can anyone tell me what the little gold-colored button or switch is on the left side of the cab let connector?

    michael crawford -

    On mine, the plastic tab was almost completely hidden under some fabric-like tape on top of connector.

    Make sure to grab only the glossy plastic tab and pull it up, which rotates upward a metal hinge on the removable part of the connector. That metal hinge is then used as a handle to pull the connector straight out (flat) toward MagSafe.

    I didn’t see the plastic tab, and first pulled up the tape. That caused the metal hinge to pop off. Upon close inspection, it was easy to see where the hinge attached at each end to the top assembly. whew!

    prreitz -

  12. wUQSufkBp5XlHxat
    wUQSufkBp5XlHxat
    DJtfFP1xHDfVqFvy
    Yco5WhRXy1DTRNVl
    • Prendi l'aletta in plastica fissata al blocco del cavo dello schermo e ruotala verso l'ingresso DC del portatile.

    • Sfila il cavo dello schermo dalla sua presa.

    • Non tirare il cavo verso l'alto: la presa è molto delicata. Tiralo parallelamente alla scheda madre, verso l'angolo del case superiore.

    One of the chips in this image was covered in glue. when I flipped the data cable clip, the glue plus encased chip popped right off the board. Does anyone know what chip this is? Without it, my Mac plays the startup chime, but the screen is black. The backlight is on, but it just displays black.

    https://www.dropbox.com/s/befonnaz125fn9...

    Jon -

    I did the exact same thing. I still have the tiny chip. Is there a way to glue it back on or will I need a new logic board now?

    Louis Adams -

    There's a bracket / handle clip attached to the display port. I didn't know it was there and accidentally bent it off. Can't get it back on, but it seems to work OK without it.

    Bryan Chun -

    The pull tab has a small rectangular frame. I used this to gently pull out the plug with both hands, rather than pulling on the cable like in the photo. This worked well.

    Bryan Kring -

  13. YTojQMdSVoWiyVrE
    YTojQMdSVoWiyVrE
    JqngHRNTA6BKReHw
    • Usa la punta di uno spudger o le unghie per ruotare verso l'alto l'aletta di bloccaggio del cavo a nastro della retroilluminazione della tastiera.

    • Assicurati di star ruotando l'aletta di bloccaggio, non la presa.

    • Sfila il cavo della tastiera dalla sua presa.

    I couldn’t see the flap as mine was already popped up. Try looking at it from the side to get a better view of the state of yours.

    Cyrille -

    broke it! be really careful

    zoharargaman -

    I did too. The whole connector actually popped off the board. Were you able to fix yours?

    Dylan -

    I posted a question on this as well. I have an Early 2013 Macbook Retina, and I accidentally popped off the flex cable connectors to the fans. From doing some research, it seems like you can solder it back on but I have no experience in that. Would anyone know where to start, and where to get the tools?

    Tif -

  14. LmMo5UIWC3T1ELDa
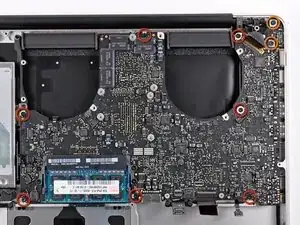
    • Svita le seguenti viti:

    • Sette viti Torx T6 da 3,3 mm che fissano la scheda madre al case superiore.

    • Due viti Torx T6 da 8 mm che fissano la scheda di ingresso DC al case superiore.

    • Non rimuovere ancora la scheda madre! Ci sono delle componenti al di sotto collegate al case superiore che vanno prima scollegate.

  15. OpJpd5X4HTMLVTuk
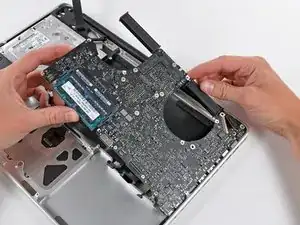
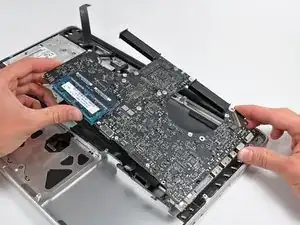
    • Solleva attentamente il gruppo della scheda madre dal bordo sinistro per rimuoverla dal case superiore, stando attento al bordo delle porte che potrebbe impigliarsi durante la rimozione.

    • Non rimuovere ancora del tutto la scheda madre!

    I just took one apart that had some pretty strong adhesive holding the speaker onto the upper case. I had to slip a spudger underneath and pry it up, else it was going to overly bend the mobo before it would release.

    jkamis -

    My board was stuck to the bottom plastic. I had to gently release it by pushing the black plastic beneath the board down, while carefully moving the board upward.

    Jonathan Daiello -

  16. egJsJR41OofDsu4x
    • Solleva la scheda madre a sufficienza da poter usare uno spudger per scollegare il microfono dal case superiore.

    On this step, the microphone was attached to the board so the whole unit lifted off easily.

    seandodd -

    Mine was too; it was part of the speaker assembly, a much better arrangement.

    maccentric -

    me too on model number A1286

    mid 2009

    15 inch

    Balloon Wrangler -

    I have a Mid 2010 15 inch and had one more connection in the corner that needed to be removed, so be careful!!

    Scott Hopper -

  17. IrYRPEX26EM1seMc
    • Fai scorrere la scheda madre lontano dalle aperture delle porte e solleva il gruppo dal case superiore.

    • Prima di reinstallare la scheda madre, è più semplice premere il microfono nel suo alloggio nello speaker sinistro per tenerlo fermo.

    • Per evitare dei danni da ESD, assicurati di appoggiare la scheda madre su una superficie morbida e senza cariche statiche durante le riparazioni.

    After prying off the mic from the top case and carefully lifting the logic board, I realized there was still a wire connected near the display connector, under the board. I was able to disconnect it but I'm wondering if I missed something or if this cable is missing from the instructions. The wire was connected under the board so it could not be disconnected before removing the board.

    Laurent Daudelin -

    This is the magsafe cable. Step 23 details removing the torx screws holding the magsafe board in place. If you remove the screws, you don't need to remove the cable.

    supersuade -

Conclusione

Per rimontare il tuo dispositivo, segui le istruzioni in ordine inverso.

Walter Galan

693762 Reputazione

0 commenti