Introduzione
Segui questa guida per sostituire la scheda madre nel tuo MackBook Pro Retina da 15" di metà 2015.
Non dimenticarti di pulire e riapplicare la pasta termica se rimuovi il dissipatore. Segui questa guida per vedere come fare.
-
-
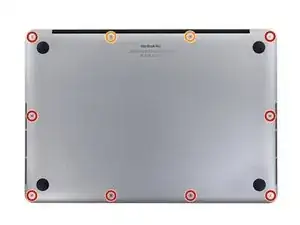
Rimuovi le seguenti viti pentalobe P5 che tengono unita la parte inferiore del case al resto del MacBook Pro:
-
Otto da 3,1 mm
-
Due da 2,3 mm
-
-
-
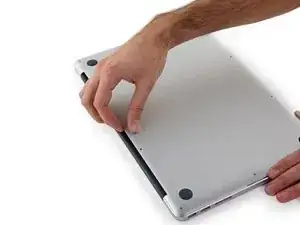
Sollevandolo delicatamente dal bordo vicino alla cerniera del monitor, alza il case inferiore dal MacBook Pro.
-
-
-
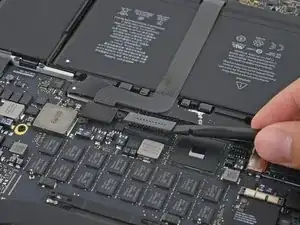
Solleva con cautela ogni lato del connettore della batteria per staccare il connettore dal suo zoccolo sulla scheda logica.
-
Piega il connettore indietro verso la batteria, per evitare che possa fare contatto accidentalmente con la scheda logica.
-
-
-
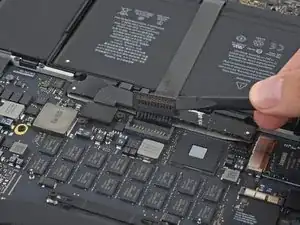
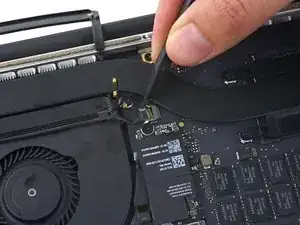
Usa uno spudger o delle pinzette per staccare i tre connettori dei cavi dell'antenna AirPort dalle loro sedi sulla scheda AirPort e ripiegali da un lato in modo che non diano fastidio.
-
-
-
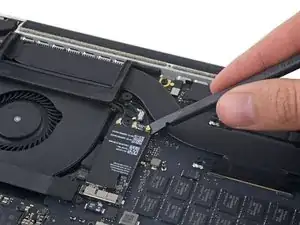
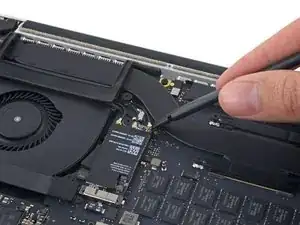
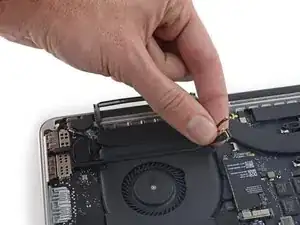
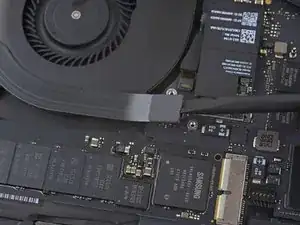
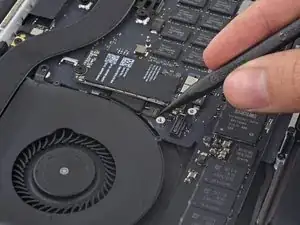
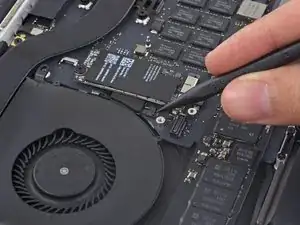
Usa la punta di uno spudger per spingere il connettore del cavo della fotocamera fuori dal suo zoccolino sulla scheda logica.
-
-
-
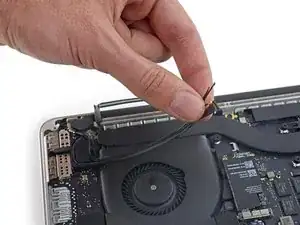
Usa le dita per tirare via dalla ventola i cavi AirPort/fotocamera.
-
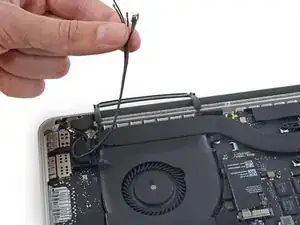
Sfila con attenzione i cavi dal passacavo in plastica.
-
-
-
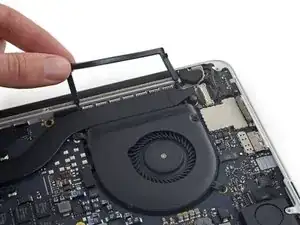
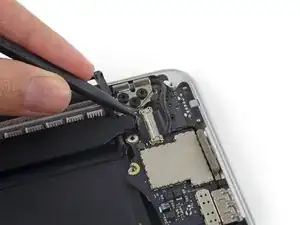
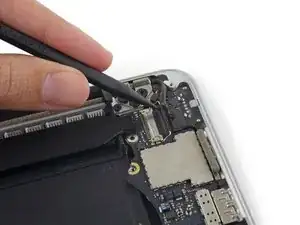
Rimuovi le due viti Torx T5 da 2,2 mm che fissano la copertura del connettore del cavo della scheda I/O.
-
-
-
Rimuovi la copertura del connettore sinistro.
-
Usa l'estremità piatta di uno spudger per sollevare dal suo zoccolino sulla scheda logica l'estremità sinistra del cavo della scheda I/O.
-
-
-
Rimuovi la copertura del connettore destro.
-
Usa l'estremità piatta di uno spudger per sollevare dal suo zoccolino sulla scheda logica l'estremità destra del cavo della scheda I/O.
-
-
-
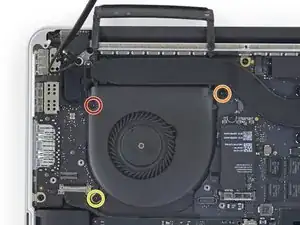
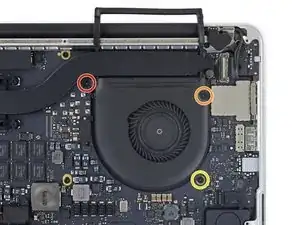
Usa un cacciavite Torx T5 per rimuovere le seguenti tre viti che fissano la ventola di destra alla scheda logica:
-
Una vite da 5,0 mm con una parte cilindrica lunga 2,0 mm
-
Una vite da 4,0 mm a testa larga
-
Una vite da 4,4 mm
-
-
-
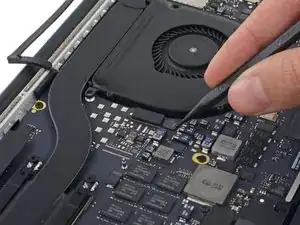
Usa la punta di uno spudger per far scattare la linguetta di bloccaggio sullo zoccolo ZIF del cavo piatto della ventola destra.
-
-
-
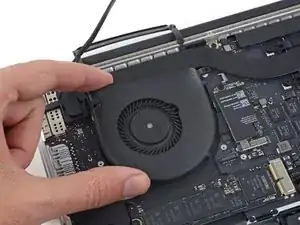
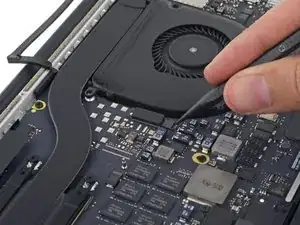
Solleva la ventola e spingi la con cautela verso il bordo posteriore del MacBook per liberare il cavo della ventola dal suo zoccolino.
-
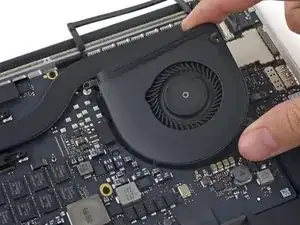
Rimuovi la ventola.
-
-
-
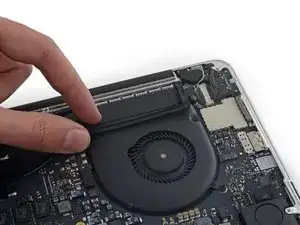
Stacca la copertura in gomma di sinistra dalla ventola e richiedere in modo che non dia fastidio.
-
-
-
Rimuovi le seguenti tre viti che fissano la ventola di sinistra alla scheda logica:
-
Una vite Torx T5 da 3,6 mm a testa larga
-
Una vite Torx T5 da 5,0 mm con una parte cilindrica lunga 2,0 mm
-
Una vite Torx T5 da 4,4 mm
-
-
-
Usa la punta di uno spudger per far scattare la linguetta di bloccaggio sul lo zoccolino ZIF del cavo piatto della ventola sinistra.
-
-
-
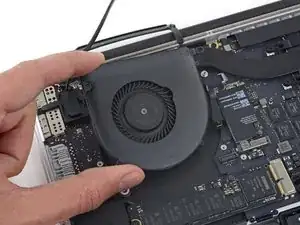
Solleva la ventola e spingi la con cautela verso il bordo posteriore del MacBook per liberare il cavo della ventola dal suo zoccolino.
-
Rimuovi la ventola.
-
-
-
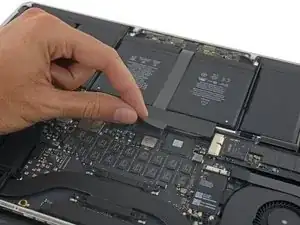
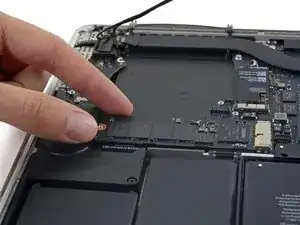
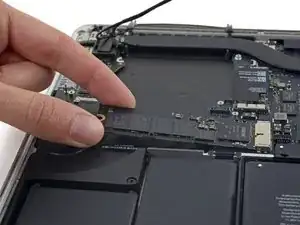
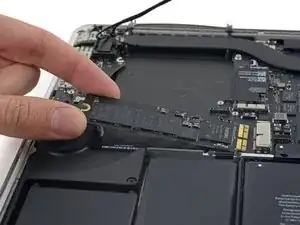
Solleva il lato dell'SSD quanto basta perché superi in altezza l'altoparlante che si trova subito dietro.
-
Tira l'SSD fuori dal suo zoccolino sulla scheda logica.
-
-
-
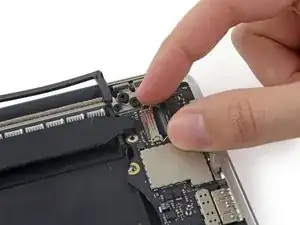
Usa la punta di uno spudger per sbloccare il meccanismo di fissaggio del connettore della scheda I/O.
-
Gira lo spudger e usa l'estremità piatta per far scorrere il cavo I/O fuori dalla sua sede.
-
-
-
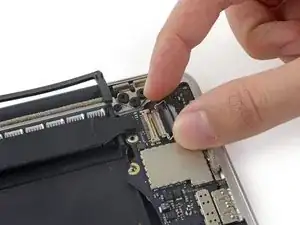
Solleva lievemente il bordo interno della scheda I/O e spingi la scheda stessa verso il centro del MacBook, lontano dal bordo laterale.
-
Rimuovi la scheda I/O.
-
-
-
Rimuovi le due viti Torx T5 da 2,2 mm che fissano la copertura del connettore del cavo del touchpad sulla scheda logica.
-
Rimuovi la copertura.
-
-
-
Usa l'estremità piatta di uno spudger per disconnettere il connettore del cavo del touchpad dal suo zoccolo sulla scheda logica.
-
-
-
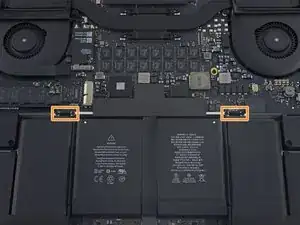
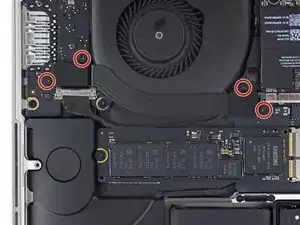
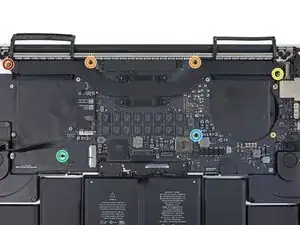
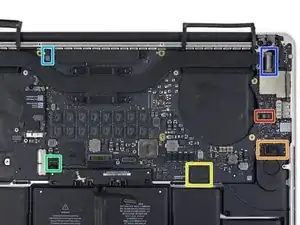
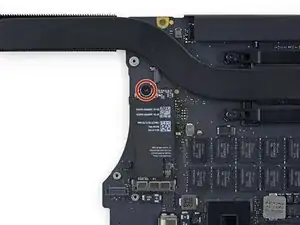
Rimuovi le seguenti sei viti che fissano il gruppo della scheda logica al case superiore.
-
Una vite Torx T5 da 3,8 mm
-
Due viti Torx T5 da 5,7 mm
-
Una vite Torx T5 da 5,6 mm (color argento e con una testa più alta rispetto alle altre)
-
Una vite Torx T5 da 2,6 mm
-
Una vite Torx T5 da 3,2 mm
-
-
-
I passi seguenti illustrano in dettaglio la disconnessione di questi sei connettori. Accertati di leggere ogni passo, perché questi connettori sono di tipi diversi e si staccano in modo differente tra loro.
-
Cavo microfono
-
Cavo altoparlante sinistro
-
Cavo dati tastiera
-
Cavo altoparlante destro
-
Cavo retroilluminazione tastiera
-
In fase di riassemblaggio, assicurati di aver ricollegato tutti questi connettori e che siano completamente in posizione nelle loro sedi.
-
-
-
Usa l'estremità di uno spudger per sbloccare la linguetta di fissaggio sullo zoccolo ZIF del cavo a nastro del microfono.
-
Tira fuori dal suo zoccolo, in direzione parallela alla scheda logica, il cavo a nastro del microfono.
-
-
-
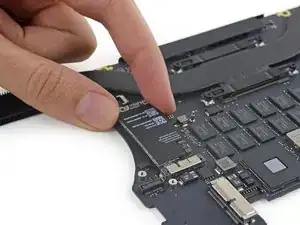
Usa l'estremità piatta di uno spudger per sollevare il connettore dell'altoparlante sinistro e staccarlo dal suo zoccolo sulla scheda logica.
-
Piega con delicatezza il cavo per allontanarlo dalla scheda logica.
-
-
-
Usa la punta di uno spudger per sganciare la linguetta di bloccaggio sullo zoccolo ZIF del cavo dati della tastiera.
-
Tira fuori dal suo zoccolo il cavo dati della tastiera. Attenzione, devi tirare in direzione parallela alla scheda logica e non verso l'alto.
-
-
-
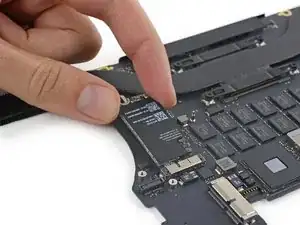
Usa la punta di uno spudger per staccare il connettore dell'altoparlante di destra, sollevandolo dal suo zoccolo sulla scheda logica.
-
Piega con delicatezza il cavo per allontanarlo dalla scheda logica.
-
-
-
Usa la punta di uno spudger per sollevare il connettore della retroilluminazione della tastiera dal suo zoccolo sulla scheda logica.
-
-
-
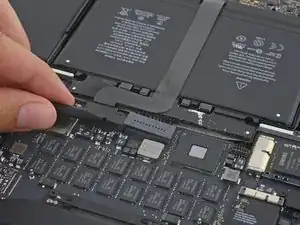
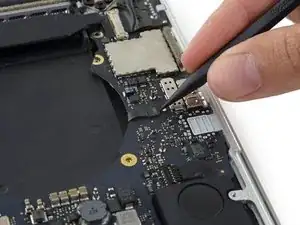
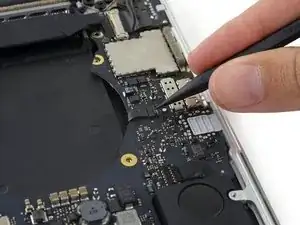
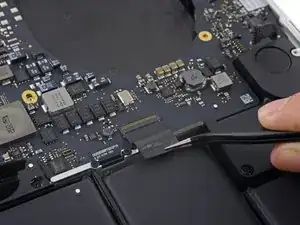
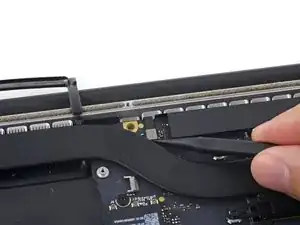
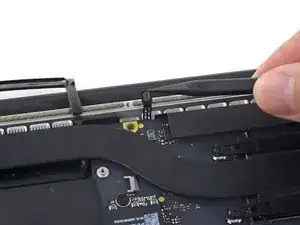
Usa la punta di uno spudger per sganciare il blocco del cavo dati del display e ruotalo verso il lato della porta di alimentazione MagSafe2 del computer.
-
-
-
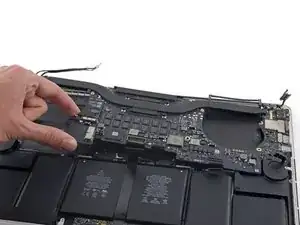
Tira fuori dal suo zoccolino sulla scheda logica il cavo dati del display.
-
Con delicatezza piega il cavo dati del display verso la cerniera del display, per rendere accessibili le viti sulla scheda MagSafe2.
-
-
-
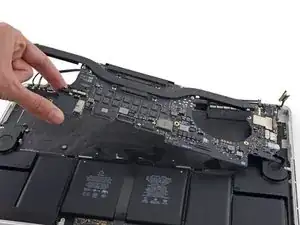
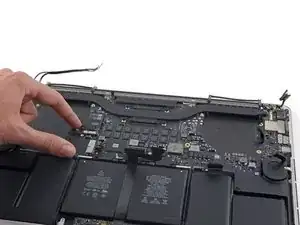
Solleva e tira fuori dalla parete interna del case superiore l'intero gruppo della scheda logica.
-
-
-
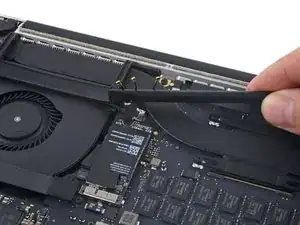
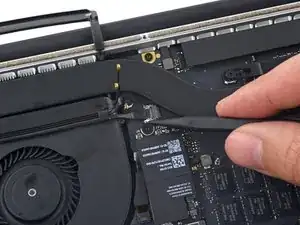
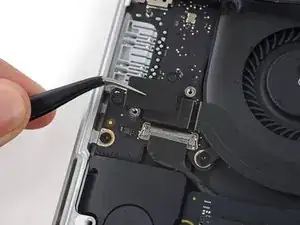
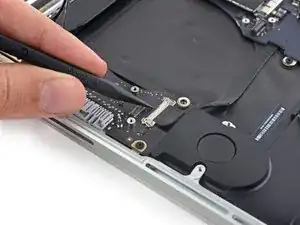
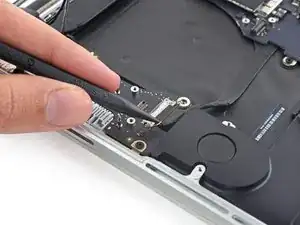
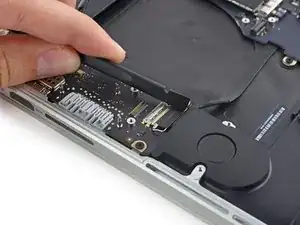
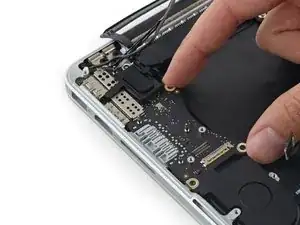
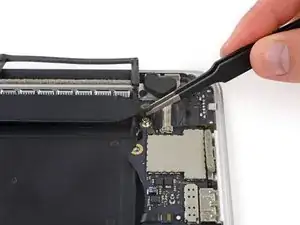
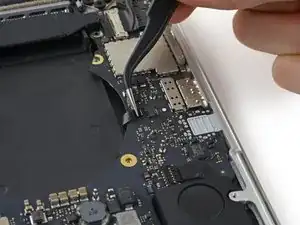
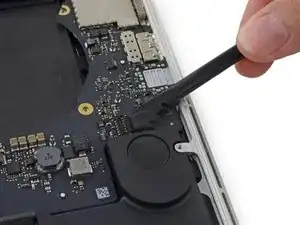
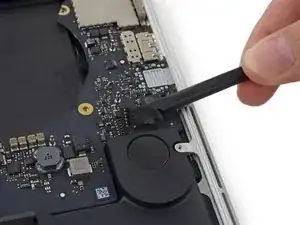
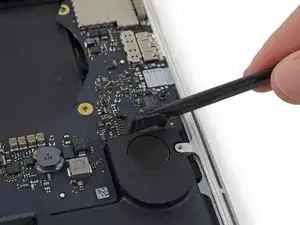
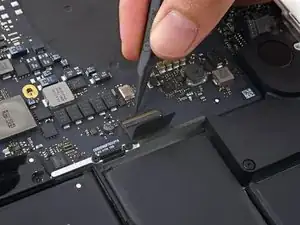
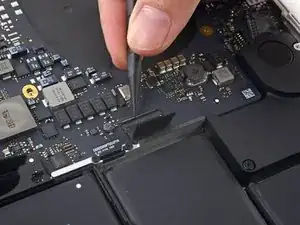
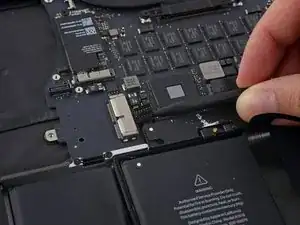
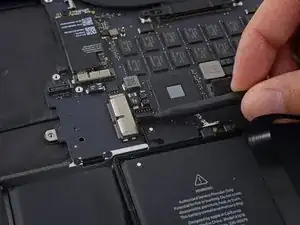
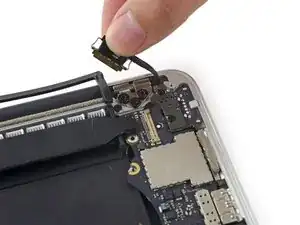
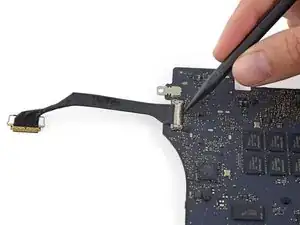
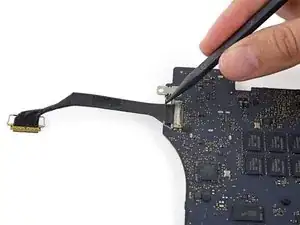
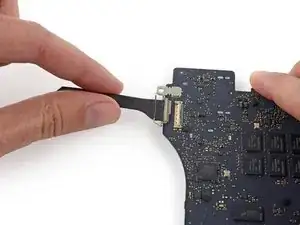
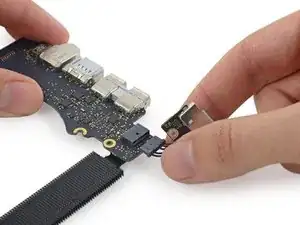
Usa la punta di uno spudger per ruotare verso l'alto l'aletta di bloccaggio in metallo del cavo della presa HDMI.
-
Tira delicatamente il cavo dati HDMI per sfilarlo dalla sua presa nella scheda madre.
-
-
-
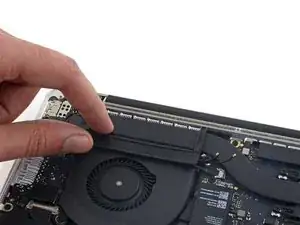
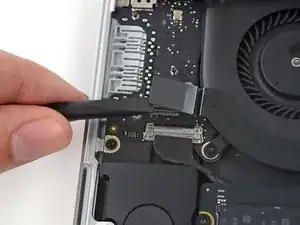
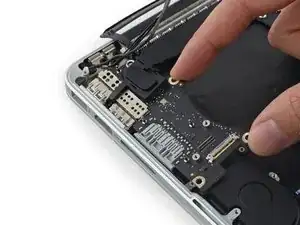
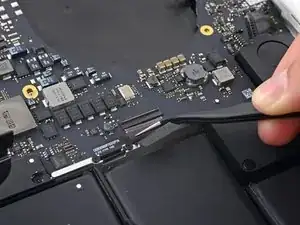
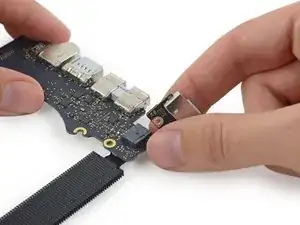
Solleva l'estremità della porta AirPort giusto il sufficiente per farlo passare sopra il dissipatore proprio lì dietro.
-
Sfila la scheda AirPort dalla sua presa sulla scheda madre.
-
-
-
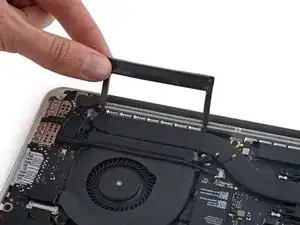
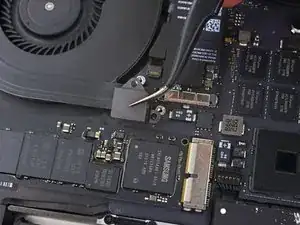
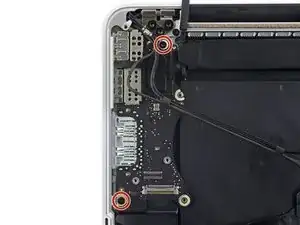
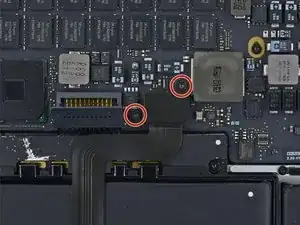
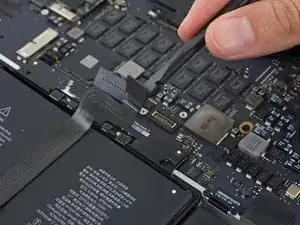
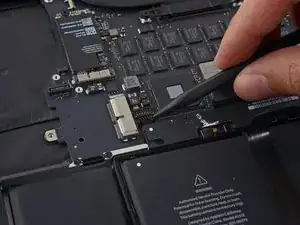
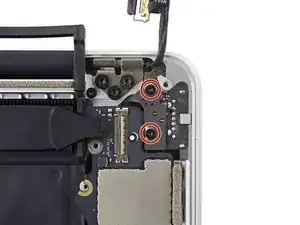
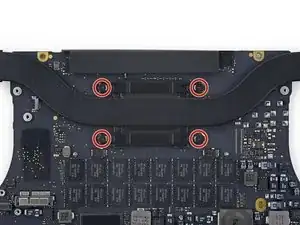
Svita le quattro viti Torx T5 da 3,4 mm dai supporti del dissipatore.
-
Rimuovi i supporti del dissipatore.
-
-
-
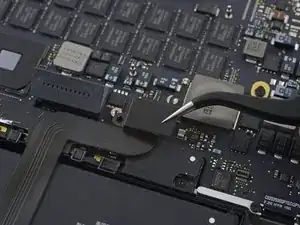
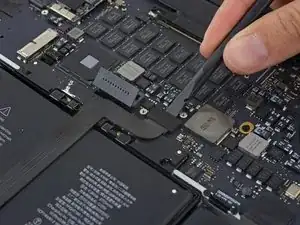
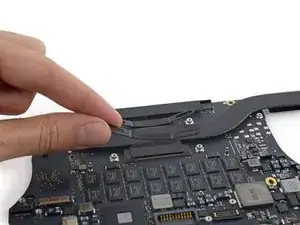
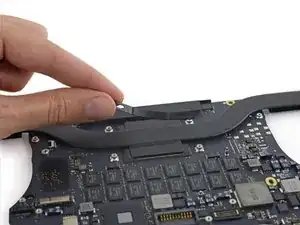
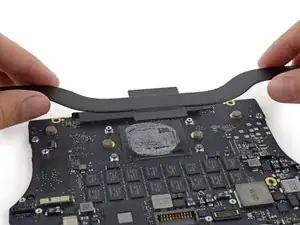
Rimuovi il dissipatore.
-
Durante il rimontaggio, assicurati di pulire la CPU e il dissipatore e di riapplicare la pasta termica sulla CPU. Segui questa guida per vedere come fare.
-


Per rimontare il dispositivo, segui le istruzioni in ordine inverso.
12 commenti
Any tips on where to purchase a replacement logic board?
eBay eBay eBay
What are the sponges between the heat sink and logic board? Where can i get them, or maybe some replacement?
Alex B -
The number of screws listed here is wrong on my model. I had four of the smaller size.
anonymous 1286 -
Just to add to my comment above (I can't edit it because it's anonymous), my MacBook Pro is a mid-2015 15in model 2.8GHz (A1398; EMC2881). For the bottom case it uses six 3.1mm screws, and four 2.3mm screws at the clutch/hinge side of the MacBook Pro. I tried using a 3.1mm screw at the clutch/hinge end, as described in the main article, and they don't fit. It has to be four 2.3mm screws.
anonymous 1286 -
agreed with above 1286...
I have the Mid 2015/A1398/EMC 2909. the hinge end and two middle side screws used a 1.2x50mm screwdriver while the 'opening' end 4 screws used the T3 screwdriver. I guess different builds used different sized screws!!
Tj Bennett -
The instructions below have you basically taking ALL of the guts out of case. I’ve been doing my own apple repairs since before ifixit was a thing and this one is a handful. My battery was swelling and I wanted to remove it before it burst or bent the case so I took it out without having a replacement and it occurs to me that aside from using the solvent (liquid) to remove the adhesive, you could probably do this only taking the trackpad ribbon out. I have mine reassembled now and will research the best battery to buy but I think installation will take about 5 minutes. See if you can slip a plastic gift card under the battery and wag/saw the adhesive out without the solvent before you go through all of this. It might work. Note, don’t bend or put too much stress on the battery and certainly don’t puncture it…
br1ansk -
Battery Recall for 15-inch MacBook Pro Retina mid-2015. Check Apple’s site for recalls, and put in your serial number. They replaced my swelling battery for free, regardless of warranty.
Steve -
As we are only replacing the battery, you can safely skip steps 6-26 and 28-48, no need to disassemble the computer to pull out the battery. Use nail polisher remover I was able to pull a super bloated battery out, without disassembling my MacBook.
John Sikking -
I qualified for the recall. These bloated batteries are dangerous! DO NOT, UNDER ANY CIRCUMSTANCES, PUNCTURE THE BATTERIES!
Thanks for the heads-up on the recall.
Datajockeys -
For battery replacement, I also chose NOT to remove everything, and NOT to use the solvent. I used an iFixit heating tube (from the iPad kits) to soften the adhesive from the keyboard face… NOT the battery itself! Used the iFixit cards. I have four, so the real work is possible BETWEEN two other cards — reduces the chance of puncturing the battery. Worked fine, took a little while, but no problems.
Steve -
I’m having a problem trying to get the screws off. I have a set of pentalobe screwdriver set. I found one screwdriver that fits perfectly on one set of screws, but I am unable to unscrew it. I tried using some force pushing the screwdriver into the screw, but nothing happens. Any suggestions?
henry_k_wong -
All the screws on mine are the same length for some reason.
ccfman2004 -
I would recommend the first step is: Run the battery down to ZERO before doing any next step. This reduces risk to you, people nearby, to the MBP and greatly reduces the risk of fire. Step 2 should be: Double-check that the battery is at zero.
I like others listed below and on YouTube, disagree with these full tear down 70+ steps being the only focus. I get that I have to be careful not to get the acetone solvent near the speakers. I skipped 25+ steps by: tilting the MBP away from the speakers and using very little acetone solvent. More pressure with the plastic cards and only a few drops of solvent. While giving the full set of instructions is fine it should be very clear that you can (at the user’s own risk) do this.
Kenneth Schleede -
As above—I consider full disassembly to be far riskier to fragile cables and connectors than the risk for solvent spillage. I did steps 1-5 and 46-74. No issues. I HIGHLY recommend the iFixit magnetic Project Mat. It’s a white marker board surface gridded into squares and invaluable for labeling part sizes/steps in disassembly.
philtrit -
As above too. I benefitted from the advice. From step 51 onwards, I found a easier way using tip from China battery seller. Use a 2” width plastic scraper/plastic paint scraper to poke under the battery. Use moderate strength to poke and avoid rough handling of the battery so as not to puncture it. There is no need to pry the battery to avoid stressing it, just use a firm poking action under the battery and the double sided tape adhesive will yield. After 5 min of such poking, the entire battery pack can be removed without the hassle of pouring the adhesive remover from step 51 onwards. Get a scraper with a stronger handle so that it is more comfortable to poke.
https://www.aliexpress.com/item/32889670...
Emma Pn -
Heads up as you go…we (husband/wife team) had a notebook that when screws/covers were removed, we marked the step # and actually taped the screws into the notebook noted by the step number. This was very helpful on reassembly and we knew we would be using the exact screw into the original screw hole.
Ann Brainard -
After replacing the batteries myself, I wouldn’t even consider doing it again. Not that it’s difficult to do—that’s not the issue. The issue is aftermarket batteries. I’ve been using notebooks for well over 30 years, and never had satisfaction with aftermarket batteries.
Modern lithium batteries are an amazing technological feat, but a dangerous one. So even putting aside that I’ve never found any aftermarket batteries with quality anywhere near original, I learned “cheap” aftermarket lithium batteries are downright dangerous.
After doing research into what’s involved with manufacturing lithium batteries, I know there are so many corners to cut, you’ll end up with junk regardless of what you pay.
A week after replacing my batteries with those from iFixit, they showed clear signs of failure. Thank goodness iFixit refunded my money.
After having Apple replace my batteries, everything is back to like-new. For my $199, I got not only excellent batteries, but a new keyboard and trackpad as well. That’s it’s done!!!
AnnoniMoose -
Which of the following companies make their own LiIon cells, Apple, Dell, DeWalt, Milwaukee, Tesla, Trek? Ans: NONE OF THEM. All these companies buy their LiIon cells from companies that will sell to iFixit or any other legitimate company. If you want quality, either do the research or pay through the nose for OEM. And note the Apple battery recall. Apple messes up too.
Bartwick -
I found an Apple Support link that said MBP battery replacement was $199, but the 2 Apple Stores near my house would not provide any appointments. Instead, I scheduled an appointment with and “Apple Authorized Service Provider” & that repair center quoted about $750 to replace the battery.
I refused, went home, & opened a chat with Apple Support.
After a lengthy & painful chat session where the Apple tech didn’t want to provide a battery replacement quote (he feared other issues with the MBPr), he finally gave me an Apple price of just under $650 to replace the battery.
Did you go into an Apple store, or mail it in? I’m struggling to reconcile a price of $199 to get a battery + keyboard + trackpad against what I was just quoted 2 weeks ago. The new track pad & keyboard might have been due to repair tech error. i.e. they trashed those repairing your batter & had to toss them in.
Bartt.Shelton@gmail.com -
I took mine in after being quoted for a $199 replacement of battery and keyboard, only to have the repair refused as they found a "water sensor" triggered and now I'm left with my AUD$5,000 laptop with messed up keys. Shame on me for not getting this repaired during COVID while under warranty. This is the first time I've truly been disappointed in Apple, but suppose it was bound to happen someday. I was quoted US$ 1479 to replace the battery and keyboard and the sensor (likely the logic board is replaced as well) if I were to send it in to the US repair center. Any chance these sensors can be triggered by humidity?
C0RT -
I 1000% recommend watching this video and performing the battery replacement without all these steps from this guide and without using the acetone solvent. https://www.youtube.com/watch?v=ImonCWcc... (15" inch Retina MacBook Pro A1398 Mid 2015 Disassembly Battery Replacement Repair)
The video is narrated well and the guy goes slow and zooms in where appropriate. Instead of removing all components, he simply removes the track pad cable, battery cable, and unscrews two of the speaker screws on each side. From there, you can lift up the speaker arms where the video guy uses a thin pry tool to push through the sticky tape. No solvent is needed except for residual sticky stuff leftover.
Instead of the thin pry tool, I just used the plastic cards that came with this ifixit kit. It takes a little force and wiggle/jiggle so take your time using the corner of the card to start.
This method makes a difficult 2-3hr job into a much easier 1hr job.
Spencer -
+1 for this approach! I watched the video that Spencer mentioned. It took me a little over an hour, and it was stress-free. https://youtu.be/ImonCWcc1xk
Chris Wicklas -
Another +1 - I followed the video pretty exactly (after having already gone through steps 1-5 here). I'm not sure it's necessary to clean off the adhesive residue as thoroughly as he demonstrates in the video, but the instructions were clear and the end results were good - trackpad still working fine and new battery already charged to 50%.
Jeff Zinn -
Glad I read these comments before plunging into the iFixit instructions.
+1 for skipping the iFixit instructions and using the youtube video linked by Spencer.
I followed the instructions and had my battery replacement done succesfully.
Instead of the metal spatula like thing he used - I used the plastic ifixit credit card things that came with my battery kit.
It took about 15 minutes of wiggling under the battery to free it from the adhesive but it wasn't too bad.
I did remove the residual adhesive as he indicated with isopropyl alcohol - but after finishing my installation I realized it was completely unnecessary. You can install the new battery over the residual gunk and skip that step.
picardo -
Yes! This YouTube tutorial works great and it was really easy to replace the battery. I needed about 75 minutes.
Perform steps 1-5,
Then skip to step 41.
In 41 + 43 do not unscrew the red marked screws.
In 42 an 45 just lift the speakers, do not remove them.
Skip 44
Up from 53, I did not use the glue remover, the plastic cards were enough.
In step 63 watch out to start from the middle. This prevents you from peeling up the lower „platform“.
Great job :-)
weekendiac -
It’s now February 2024, and the batteries Apple installed have all swelled up just like the originals. Doing a bit of research on the manufacturer, Simplo, I no longer trust them either. Microsoft used Simplo in their tablets, with countless users complaining about bad batteries. A few days ago, I read a post saying Apple now charges $250 instead of the $200 I paid less than three years ago. WOW! Even if Apple would replace my batteries, there’s no way I’m going that route again. Too bad my MacBook won’t boot without batteries. I don’t need them; I don’t want them. I also don’t want a newer MacBook. What to do???
AnnoniMoose -