Introduzione

Usa questa guida per rimuovere la scheda madre del Nexus 5X.

Alcune immagini di questa guida mostrano la batteria già rimosso dal telefono. Non è necessario rimuovere la batteria per eseguire questa procedura.

Quando eseguirai il rimontaggio, ti servirà dell'adesivo di ricambio per riattaccare componenti.

  1. hZuBjDNMirRpxDPW
    hZuBjDNMirRpxDPW
    JWDcUTTe2RHKb3Aw
    CyV6ZtdsOoQKFIlC
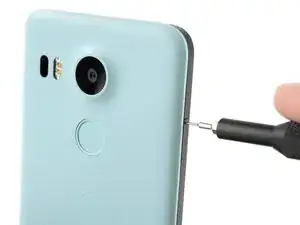
    • Inserisci uno strumento di estrazione SIM nel foro del vassoio della scheda, sul bordo sinistro del telefono.

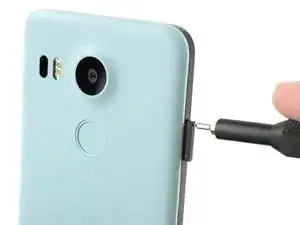
    • Premi per espellere il vassoio della scheda SIM.

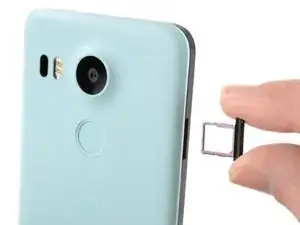
    • Rimuovi il vassoio della scheda SIM.

  2. ICCoMW16jfCrFbcn
    ICCoMW16jfCrFbcn
    sQxCgO3CGWjyHP2m
    MDAUADr5BeVSLDZl
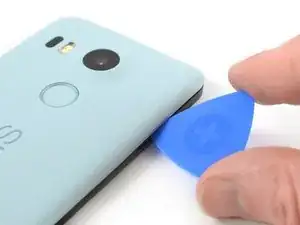
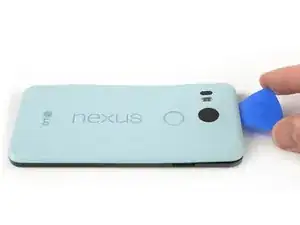
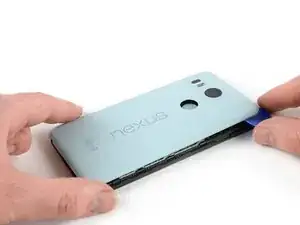
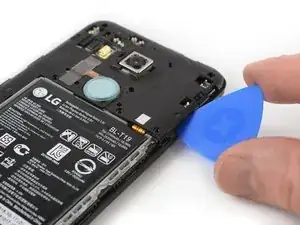
    • Infila un plettro di apertura nell'apertura della fessura del vassoio della scheda SIM; torcila per staccare la prima clip di plastica che tiene fissato il pannello posteriore.

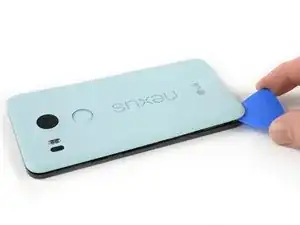
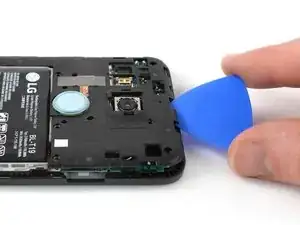
    • Fai scorrere il plettro di apertura lungo il bordo superiore del telefono per staccare le clip di plastica che bloccano il pannello posteriore.

    A guitar pick is a good substitution for the plastic opening tool.

    Sam Sippe -

    Here’s a photo of the location of the 18 tabs that hold the back cover in place

    Steve -

    Twisting sideways didn’t do it for me, but sliding along the edge did. However, at first I didn’t realize that the pick was between the motherboard and midframe, rather than between midframe and back cover like it was supposed to. This led to breaking off a spring-loaded connector on the motherboard, connecting to an antenna (I guess) in the back cover. So far I haven’t noticed any reception issues, but I can’t say for sure.

    In essence: be careful to get the pick towards the back cover, and not “straight in” under the midframe.

    Hampus -

  3. afVYqSRSsfYK5iHi
    afVYqSRSsfYK5iHi
    pIWZAi2MnVlPLqqa
    WCXoRcGIOO46lSW1
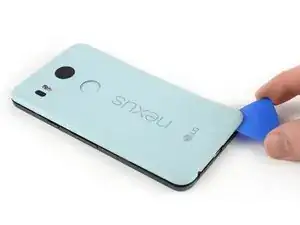
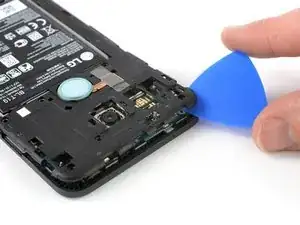
    • Continua a far scorrere il plettro di apertura lungo tutti i lati del telefono per liberare tutte le clip di fissaggio del pannello posteriore.

  4. elaUMDhpoLaSyiLC
    elaUMDhpoLaSyiLC
    xC4oPmeXKWyCeJYD
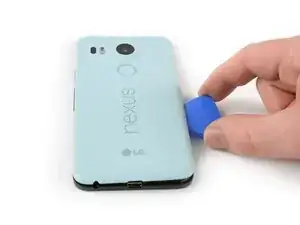
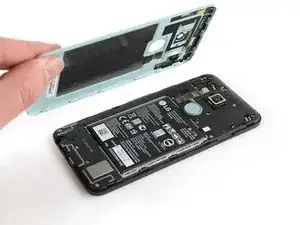
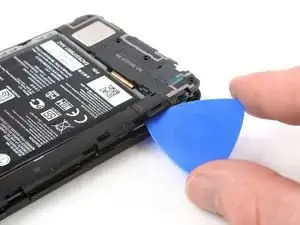
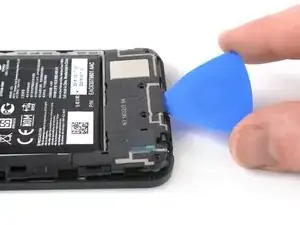
    • Torci il plettro di apertura per sollevare lievemente il pannello posteriore.

    • Ci sono altre due clip in plastica vicino al sensore impronte digitali. Sganciale tirando delicatamente il pannello posteriore.

    • Rimuovi il pannello posteriore.

  5. SLBb5Cl3QMGTDxxc
    • Rimuovi le dieci viti a croce Phillips da 3,6 mm che fissano il midframe.

    Some models use a Y1 screw head.

    Kyle Wright -

  6. kbJbMKZvCYpi5Ym1
    kbJbMKZvCYpi5Ym1
    SBDl6Qt1OeRUcuOJ
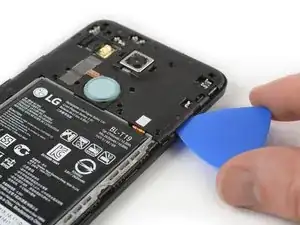
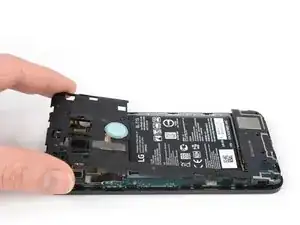
    • Inserisci un plettro di apertura nella fessura del vassoio della scheda SIM e torcilo per liberare le clip di plastica.

    The photo seems to show that the person is opening from the top, which is the opposite of your advice. So, just want to be clear.

    Robert Konigsberg -

    yes, open from bottom first... the pic above shows the finished product after reaching top of phone. I found it best to actually start close to the right of the usbC connector. Pushing inbetween the 2 tabs and up will release the shell.. then work clockwise.

    Chris Mayberry -

    Chris, your advice to start to the right of the usbC connector was excellent, thank you!

    Robert Konigsberg -

    I found that my middle panel was already broken at the narrowest part just to the left of the 2-D scan code on the battery, perhaps from some ham-fisted previous repair. This seems of little consequence, there do not seem to be any electrical connections running through this part.

    Wiley Sanders -

    After a long amount of prying, I discoved that, if used gently, a jimmy can really help get the plastic off

    Timothy Owens -

    I could not remove the cover with the opening tool but had success with the opening picks (the triangle parts). Just slide them under the cover and gently bend and twist the pick to release the cover from the locks. By the way: it’s perfectly normal for the bottom cover part to come loose from the top cover part. It’s designed that way (they interlock).

    Marco Miltenburg -

    Here’s a photo of the location of the 20 tabs that hold the middle assembly in place, and the pry angle needed.

    Steve -

    This is the scariest part but it is the same process of taking a bike tire off the rim: lift up one part of the cover then put a wedge under the lifted section to hold it up then continue around the frame lifting it up and holding it up with the blue picks. You’ll find that after you life the bottom you can wriggle free the rest by hand.

    The 10 screws came out quickly using the IFIXIT.com magnetic screwdriver.

    mcguinness.david -

  7. MPaVeGZ53Yant1bX
    MPaVeGZ53Yant1bX
    1EYFK4Jmr4ZkYCXc
    • Continua a far scorrere il plettro di apertura nella parte superiore del telaio intermedio per sganciare le clip di plastica.

  8. UnqADRuHrCdSINRZ
    UnqADRuHrCdSINRZ
    LfjUs6JGfUqrEVjA
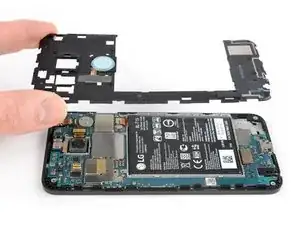
    • Usa il plettro di apertura per aprire, facendo leva, le clip di plastica sul bordo lungo del midframe e sul bordo inferiore.

    • Accertati che tutte le clip sul lato lungo siano sganciate, altrimenti il telaio intermedio potrebbe rompersi nei punti di collegamento.

  9. A65jPFCZQIiwZlZb
    A65jPFCZQIiwZlZb
    CLJTmiqEsupw21Yg
    • Accertati che tutte le clip siano sganciate.

    • Rimuovi con delicatezza il midframe.

  10. Ifqg6MTxcFQ6GQ2l
    Ifqg6MTxcFQ6GQ2l
    kgXBZmhgQmKKwHKW
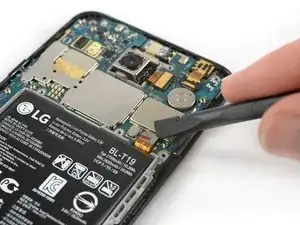
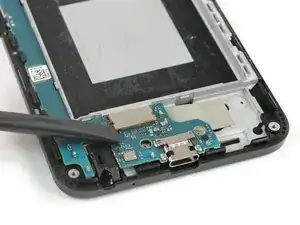
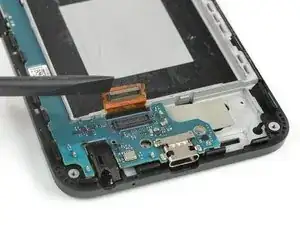
    • Usa l'estremità di uno spudger per staccare, facendo leva sotto di esso, il cavo flessibile della batteria posizionato nella parte inferiore destra della scheda madre.

  11. axVqfYD2tec2WXJi
    • Usa un iOpener per ammorbidire l'adesivo sotto la fotocamera posteriore. Disponi l'iOpener di traverso sulla parte superiore del telefono per circa 30 secondi.

  12. BCgJJxYea4AMXryY
    BCgJJxYea4AMXryY
    uTALNjGV5jgM2Pta
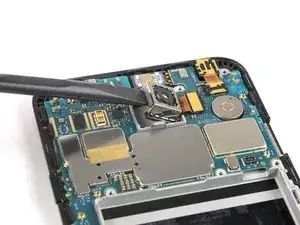
    • Metti l'estremità piatta di uno spudger sul lato sinistro della fotocamera posteriore e fai leva con delicatezza per sollevarla. Accertati che tutto l'adesivo sottostante sia indebolito.

  13. Q4WSU1CLq6G2ohJO
    Q4WSU1CLq6G2ohJO
    BoBefJarNxGS2uB1
    • Usa l'estremità piatta di uno spudger per staccare il connettore del cavo flessibile del display.

  14. ELQpctHjOWCeMfBO
    ELQpctHjOWCeMfBO
    VJKB2euByKL26vqW
    lIZMZDbfm4XiVEVD
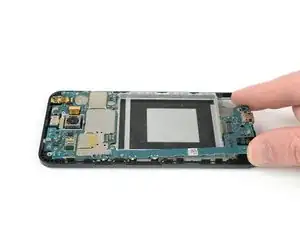
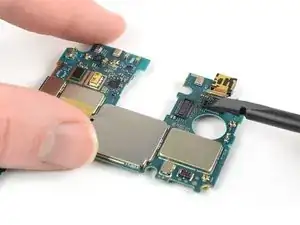
    • Afferra la parte inferiore della scheda madre con le dita e alzala delicatamente dalla scocca.

    • La scheda madre è tenuta in posizione da una piccola clip di plastica vicino alla fotocamera posteriore.

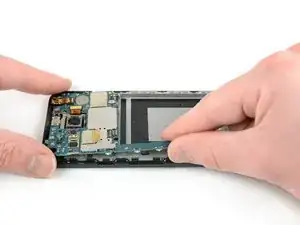
    • Tira con cautela la scheda madre verso il bordo inferiore per liberarla dalla clip di plastica vicino alla fotocamera posteriore.

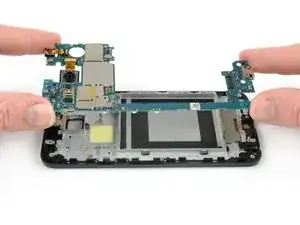
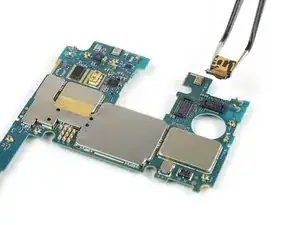
    • Solleva delicatamente la scheda madre dal telaio.

    • Fai attenzione: le due fotocamere sono ancora collegate alla scheda.

  15. qfeGKjQPJJinmbRV
    qfeGKjQPJJinmbRV
    AaOInUs55kSyjBVw
    TkZGkxVytofY3VNr
    • Procedi con i passi successivi se hai la necessità di trasferire sulla nuova scheda madre le fotocamere anteriore e posteriore.

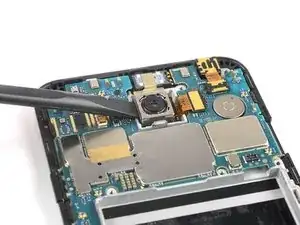
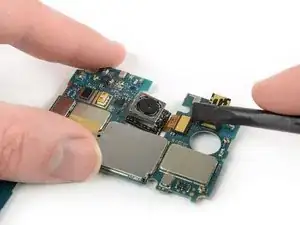
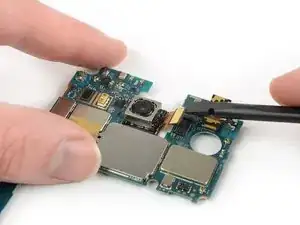
    • Usa l'estremità piatta di uno spudger per staccare il connettore della fotocamera posteriore dalla scheda madre.

    • Rimuovi con cautela la fotocamera posteriore.

  16. 1NP3jo5E4FAVbG6H
    1NP3jo5E4FAVbG6H
    ZVsXLYsbUmDXDBfn
    LlLm1wVCoOcDaRCc
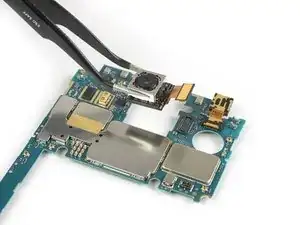
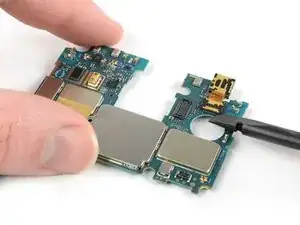
    • Usa l'estremità piatta di uno spudger per sollevare e scollegare dalla scheda madre il connettore della fotocamera anteriore.

    • Rimuovi con cura la fotocamera anteriore.

Conclusione

Se possibile, accendi il telefono e collauda la tua riparazione prima di applicare del nuovo adesivo e sigillare nuovamente il telefono.

Per rimontare il tuo dispositivo, segui queste istruzioni in ordine inverso. In fase di rimontaggio, applica del nuovo adesivo dove necessario.

La riparazione non è andata come previsto? Vai sulla nostra comunità Risposte per trovare aiuto nella risoluzione dei problemi.

Dominik Schnabelrauch

Membro da: 23/11/16

200657 Reputazione

40 commenti

Anyone with the bootloop problem has been successful on returning the 5X to life by replacing the motherboard?

Jago MF -

that's a stupid question. new motherboard means new operating system. maybe you should just use fastboot and flash stock firmware on your phone easy

Alek Kels -

where can I get a new motherboard at?????

Alek Kels -

in most 'google image boot' issues, it is a hardware issue, not software. besides, the phone will not allow a bootloader option.

Chris Mayberry -

yes …….and its the only way after bootloop

damneetsingh2000 -

yes…….and its the only way after bootloop

damneetsingh2000 -

same here! if anybody has luck fixing the bootloop problem by replacing the motherboard please let us know

joe -

hello, today my phone came out of service with bootloop problem . they changed the motherboard , now everything is good

Ioan Robicek -

Has the motherboard part been removed from the "Parts" section??? Not available for purchase anymore??? That would render this guide useless

Jago MF -

What do you mean by useless? Mobos from other suppliers require different take apart?

Emil Eriksson -

I had bootloops within the year of buying this phone but because the LG webpage RA system wasn't working I missed out by a couple days and they want to charge me $180 to repair the phone. They won't budge and I will never buy an LG again. Has anyone found replacement motherboards or fixed this phone?

Jacob Burger -

LG offered me free repair as long as there's no physical/cosmetic/liquid damage.

Warranty expired 20 days ago btw.

Riasat Abir -

my phone was 8 months out of warranty and they just fixed as if in warranty.

Tyson Washburn -

Hi Alek Kels - 12/23/2016 - "maybe you should just use fastboot and flash stock firmware on your phone easy"

How do I do this? I'm having the bootloop problem atm.

Thanks!

Sand.

Sando Kainth -

Don't worry about learning, because it is a hardware issue, not software. The phone will not boot proper past the fastboot.

Chris Mayberry -

It is probably a hardware problem. You can try redoing the software. It didn't work for me. You need to cook your phone. Sounds stupid right? But it works. One of the contacts for the ram or cpu is no longer good. Cooking it will melt the solder and fix it for at least a while. At least it worked for me.

I followed the instructions on a blog. Dev Alex - Oven fresh Nexus 5x.

Matt Johnson -

This is an age old fix for crappy solder points connecting to CPUs or GPUs (most notably in HP laptops). Disassemble the phone and heat the snapdragon chip with a heat gun for 10 seconds. The chip is beneath a metal shield that pops up with a flat screwdriver. I am working to complete this now.. .will let you know how it works.

Chris Mayberry -

..alot of work for a little action. Got the phone to boot after heating the CPU for 15sec, stayed on for 4 minutes before rebooting again. ~sigh~

Chris Mayberry -

Found this forum comment re the rebooting sequence fix...

"The LG G4, V10, and the Nexus 5X are all affected by the bonded flipchip substrate breaking off of the BGA package under the CPU, which usually manifests in bootlooping or screen corruption, and eventually a complete brick. It’s not solder related; the only way to fix it is by completely replacing the CPU package with one that isn’t defective. – FrankTheCat"

Chris Mayberry -

Flashing stock image doesn't work for everybody with the bootloop issue. In my​ case, I can reboot into bootloader and have already installed 3 different stock images successfully and am STILL getting stuck on bootloop. From what I've researched it does seem to be a hardware issue.

Thunor Odinson -

Hey my phone is continously restarting and a

Stucking at bootloop and sometimes it starts but gets restart

pranav g -

Trying the oven bake fix now, just started bootlooping. I'm not counting on it working for long, already ordered a pixel. Thanks for the great guide!

Stephen Moist -

Hi, I know is very complicated but, is it possible to get the data from old motherboard memory storage? any type of hack or something...

Manuel Ramirez -

put it in the freezer for about 20 mins

Tyson Washburn -

Where can i buy a new motherboard

Jochen -

How much it cost to replace motherboard of nexus 5x if it is not in warranty? and what is warranty period for newly replaced part?

Manisha Kulthe -

today i have gone to lg service center and they were askin for 12k rs. for mother board replacement but after bargaining they agreed at 6

damneetsingh2000 -

damneetsingh 2000 where is that service centre

uday -

I need a mother boad nexus 5x. From where can i get it

Nityananda Mondal -

Does anyone knows where I can buy the motherboard for my Nexus 5X.

Candy Beato -

Last day I’m using Facebook APPs suddenly phone are freeze with doesn’t work. When are phone restart display Appear in GOOGLE Logo then phone is OFF, that’s means bootloop problem. Now, I need a mother board LG Nexus 5X. Buy with from where can i get it.

Najmul -

STEP 4 photo, second window on the bottom of the phone from right, (between two red circles) there is little opening (there are few on phone) and there a little device looking as a spring or something. By replacing battery this thing felt off.

I was very careful not to damage anything, but still... so careful… Device looks like to be clued there, I would love to know what is it for, can someone help, please? it looks like a senzor or something

Zdenek Otcenasek -

do a websearch on repairing the nexus 5x bootloop… in the oven! I removed the shield from the side facing the screen, put flux all over especially the samsung chip, and baked it at 400F for 6.5 minutes - samsung chip side up, now the phone is working properly again, enough to backup all files. Eventually replacing samsung chip with new one will be necessary to get good solder contacts.

Shawn Foster -

Bootloop problem sorted!! Thanks OP

Robert Huddleston -

Dec 14, 2017:

Encompass Supply Chain Solutions is parts supplier for LG for the US East Coast time zone area.

Went to their parts web page for the Nexus 5x (LGH790) - https://lg.encompass.com/model/LGELGH790

Motherboard (refurbished) costs $270 and ships in 60 days.

mws3d -

Do you know if is it possible to change 16 Gb main board by 32 Gb mainboard?

Aymeric Golliaud -

hello damneetsingh 2000 ,where is that lg service centre.I also want to change my other board

uday -

i need to purchase the motherboard international

Jackson Makinda -

okay mr ifixit.

Jin Long Zheng -