Introduzione

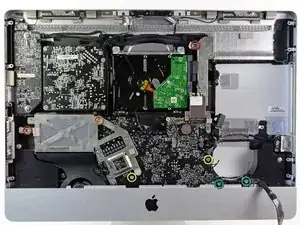
Prerequisito interno. Rimuovere la scheda madre per accedere alle connessioni dell'SSD.
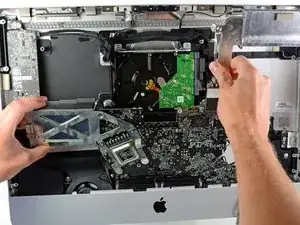
  1. VT6LVGHBjKdFAvRB
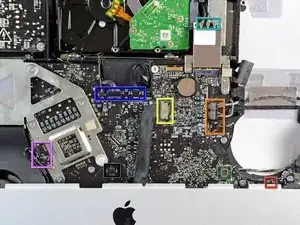
    • Nei passaggi seguenti dovrai scollegare i seguenti cavi:

    • Scheda SD

    • Speaker sinistro/destro e microfono

    • Porta audio

    • Antenna WiFi

    • Sensore della temperatura destro, sensore Bluetooth/luce ambientale/fotocamera/temperatura sinistro e ventola del disco rigido

    • Ventola CPU/temperatura ambientale e tasto di accensione

    • Sensore IR

  2. ImgOCHYkmwtjaKMF
    • Sfila il cavo della Scheda SD dalla sua presa sulla scheda madre.

  3. VVqHNOlUMHcahSJK
    VVqHNOlUMHcahSJK
    NiI2NSTFvQrEvBUl
    ngaOYnvWpnmVR1JB
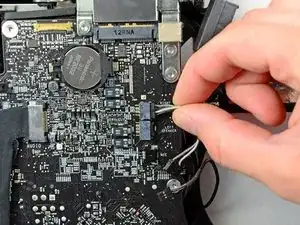
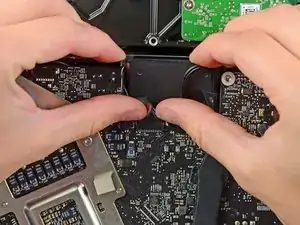
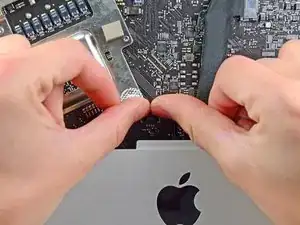
    • Scollega i cavi del microfono, dello speaker sinistro e del destro tirando i loro connettori verso il lato destro dell'iMac.

  4. e5vVanjKyQJN2SSM
    e5vVanjKyQJN2SSM
    MGtMFJFwryJxO2Ni
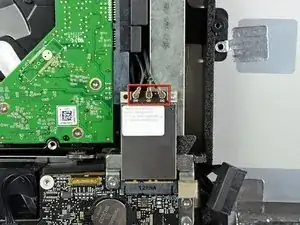
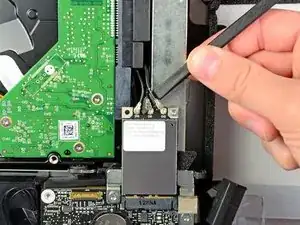
    • Usa la parte piatta di uno spudger per fare leva e scollegare tutti i tre connettori delle antenne AirPort dalle loro prese sulla scheda AirPort.

    • Durante il rimontaggio, collega il cavo senza strisce nella presa CH0, il cavo con una striscia nella CH1 e il cavo con due strisce nella CH2.

    For me it was originally the reverse order. No stripes for ch2, one for ch1 and two for ch0

    anonymous 9512 -

    As another user already posted, cables can be in the reverse order as depicted on the guide. Pay attention before disconnecting them.

    E.g.:

    http://i.imgbox.com/acbhyZD6.jpg

    Vicente Aguilar -

    It was reversed for me as well. Be sure to verify your own system as you take it apart

    frank -

    To simplify this and since there seems to be some variable set ups, take a digital picture of the way it is before following this step so that you can put it back the way it was. (If no digicam then draw yourself a note with paper and pen).

    Robert Wacker -

    Also for me reversed.

    davidevismara -

    Also reversed for mi

    Enoc Sanz Ablanedo -

    I broke the pins, how can I repair it? Or where can I buy a new module? My pins are reversed as well

    Alejandro Monsalve -

  5. ZuVvpUtp2lR25Bne
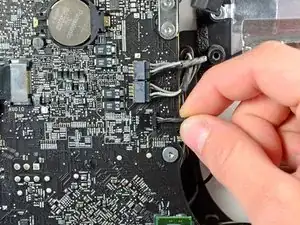
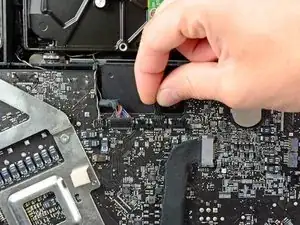
    • Tira il connettore della ventola del disco rigido verso il bordo superiore dell'iMac per scollegarlo dalla sua presa sulla scheda madre.

  6. HTTwPt3DiqELmfDr
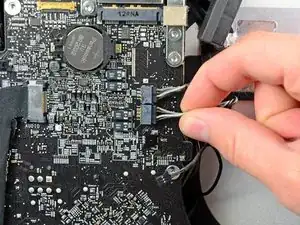
    • Usa le unghie su entrambi i lati del connettore del cavo Bluetooth/luce ambientale/fotocamera/sensore della temperatura sinistro per spingerlo verso il bordo superiore dell'iMac e scollegarlo dalla sua presa sulla scheda madre.

  7. eiqUqIIjSqJmBYIx
    • Usa le unghie su entrambi i lati del connettore del sensore della temperatura destro per spingerlo verso il bordo superiore dell'iMac e scollegarlo dalla sua presa.

    Watch out the plastic around the connectors easily breaks. Mine did not sure what to do and what the implication end up being yet.

    Nicolai -

    Yeah, my wires came out without the socket connector. Then I tried pulling out the connector to fix and it was damaged. I’m going to try putting the wires back in independently. We’ll see how that goes…

    John Knoop -

  8. UuKtspFyOaAjDiPJ
    • Tira il connettore della ventola CPU/temperatura ambientale verso il bordo inferiore sinistro dell'iMac per scollegarlo dalla sua presa sulla scheda madre.

  9. svW6f2xtQ53d3HdI
    • Tira il connettore del tasto di accensione verso l'angolo inferiore sinistro dell'iMac per scollegarlo dalla sua presa sulla scheda madre.

    My connector came of the wire ends. Now it’s fifty fifty I have it on right.

    Heath -

    Mine broke as well. At least it is only 50/50 chance. Plan to put together at the end - screen without screws - to check.

    Lesley Perg -

    Mine came off bare ends as well. Managed to put them back. Seems like the connector on the cable is very fragile as my one came out in two pieces. The iMac is now up and running again!

    david.sandin -

  10. aGCy2Gj5JnxS53vT
    aGCy2Gj5JnxS53vT
    N2ScJqfypSbfOFe3
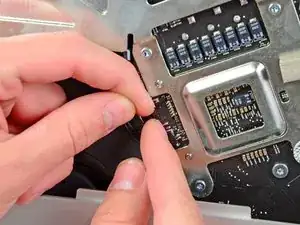
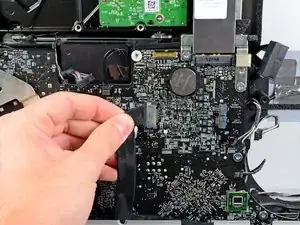
    • Usa i pollici per spingere il connettore del sensore IR verso il bordo superiore dell'iMac e scollegarlo dalla sua presa sulla scheda madre.

    • Tira la scheda del sensore IR verso l'alto da dietro la parte anteriore della copertura esterna.

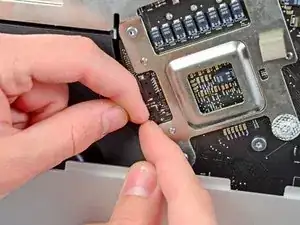
    • Rimuovi il sensore IR e mettilo da parte.

    For some reason this connector was refusing to come out. I ended up just removing the IR sensor board, putting it in a tiny ziploc bag to protect the logic board and sensor and working around it. No worries at all.

    Steven Kelly -

  11. aqSgXJERV5GIRHjW
    aqSgXJERV5GIRHjW
    nuEmSBX5MbRQEnRP
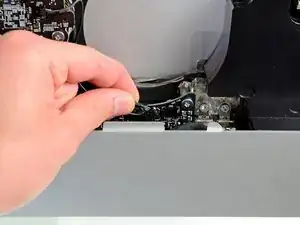
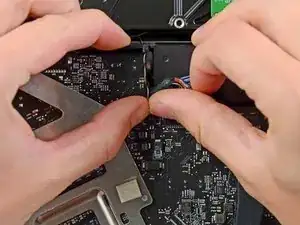
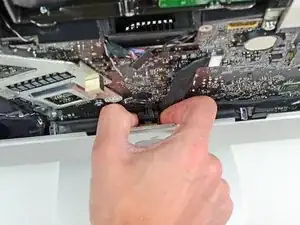
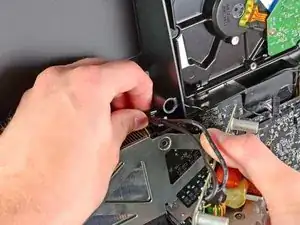
    • Tira il connettore del cavo della presa audio verso il bordo sinistro dell'iMac per scollegarlo dalla scheda madre.

    • Non tirare il cavo verso di te (lontano dalla faccia della scheda madre) mentre lo scolleghi.

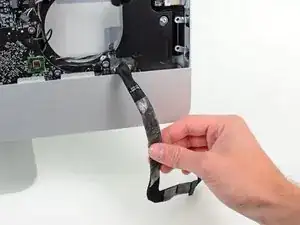
    • Rimuovi il cavo della porta audio dalla faccia della scheda madre e lascialo appeso come mostrato nella seconda immagine.

    Be careful not to kink the audio cable, and take note of it’s positioning for when you put it back in

    tthoma24 -

  12. qfW4DXQC3ErhtSx1
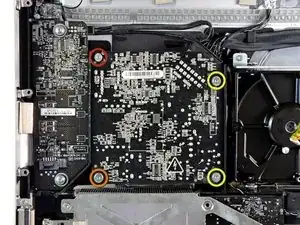
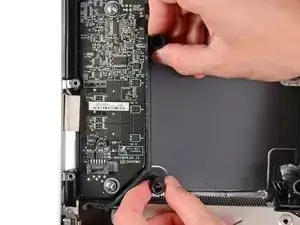
    • Svita le seguenti sette viti:

    • Due viti Torx T10 da 7 mm

    • Una vite Torx T10 da 30 mm

    • Due viti Torx T10 da 25 mm

    • Due viti Torx T10 da 21 mm

  13. XEURv6GFsLQvjlTU
    XEURv6GFsLQvjlTU
    LLjKk3KLjqpkuFtw
    • Svita le seguenti quattro viti dall'alimentatore:

    • Una vite Torx T10 con filettatura grossa da 9,3 mm

    • Una vite Torx T10 con filettatura grossa da 25 mm

    • Due viti con filettatura grossa da 22 mm

    • Tira gli angoli in alto a destra e in basso a sinistra dell'alimentatore lontano dalla copertura posteriore per smuoverlo dai supporti attaccati agli angoli dell'alimentatore.

    There was no need to remove the power supply.

    kyoder11 -

    I agree with kyoder11, no need to remove the power supply. But pay attention to not damage it when pull the logic board.

    Luca Waldner -

  14. cBwwTX4f5TagEyIO
    cBwwTX4f5TagEyIO
    rJOEBeRVNaROSGPA
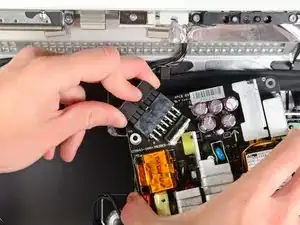
    • Solleva attentamente l'alimentatore dalla copertura esterna e ruotalo per accedere al blocco del cavo come mostrato, ricordandoti che i cavi di uscita DC e ingresso AC sono ancora collegati all'iMac.

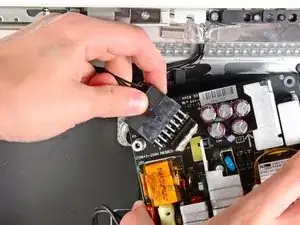
    • Scollega il cavo di uscita DC sganciando il meccanismo di bloccaggio sul connettore mentre tiri il connettore stesso lontano dalla sua presa sull'alimentatore.

    • Dopo che il meccanismo di bloccaggio ha liberato la presa, tira il connettore dell'uscita DC via dall'alimentatore.

  15. sdnmVsIpZm3T6nUQ
    • Scollega il cavo dell'ingresso AC sganciando il meccanismo di bloccaggio mentre tiri il connettore lontano dalla sua presa.

    • Rimuovi l'alimentatore dalla copertura esterna.

  16. 6pLpKCPmsSs1YbRA
    • Rimuovi il muro di plastica installato alla destra della scheda logica dei LED.

    I didn’t need to remove this.

    kyoder11 -

  17. PcmK1n2mVApFbI6w
    PcmK1n2mVApFbI6w
    owuWj2dHl2eLw6Nc
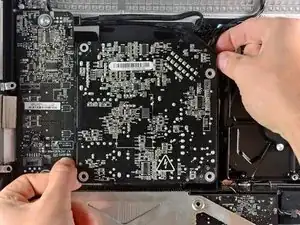
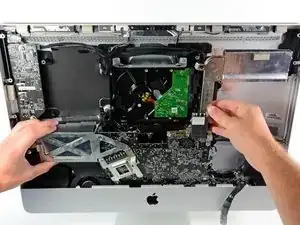
    • Tira leggermente la scheda madre lontano dal retro della copertura esterna, quindi sollevala per liberare la parte anteriore della copertura.

    Be careful when balancing the mother board here, you can damage the RAM bays if not careful. (Had a friend do this, good by motherboard and iMac.) Just be careful and aware of how you have it sitting.

    Robert Wacker -

    Before you lift the logic board, remove the infra-red receiver ( have a look at the logic board replacement guide )! It will make your life a lot easier.

    Like stated also in the video, it's easier if you put the iMac on its foot again.

    sefw4t2efwef -

    This was a great tip. Removing the IR made my life easier when putting the board back in place.

    fansntt -

    ABSOLUTELY! Board seemed stuck half way out. Found a way to remove the IR sensor assembly, and the rest seems like cake.

    Carl -

    Yes you should definitely remove the IR board. Which is why step 31 tells you to do so :P

    John M -

Conclusione

Per rimontare il dispositivo, segui le istruzioni in ordine inverso.

Andrew Bookholt

585555 Reputazione

0 commenti