Introduzione

Usa questa guida per sostituire uno schermo rotto o guasto nel tuo Samsung Galaxy A50.

Nota: in seguito alla sostituzione dello schermo si può perdere la funzionalità del sensore impronte digitali. Le patch di sicurezza installate dopo settembre 2020 non supportano questa riparazione.

Questa guida ti spiega come sostituire solo lo schermo lasciando al loro posto il telaio e la scheda madre originali. Tuttavia, alcuni schermi sostitutivi per questo telefono sono forniti preinstallati in un nuovo telaio, il che richiede una procedura molto diversa. Accertati di avere la parte corretta prima di iniziare a seguire questa guida.

Prima di smontare il tuo telefono, scarica la batteria sotto il 25%. La batteria può prendere fuoco e/o esplodere se forata inavvertitamente, ma le possibilità che questo succeda sono molto più basse se è stata scaricata in precedenza.

In fase di rimontaggio, ti servirà adesivo di ricambio per riattaccare alcuni componenti.

  1. Tter6xHe42gG2BMm
    Tter6xHe42gG2BMm
    sR6YlmvO5nGrTnXR
    bRDLPC3aeq1gXgWx
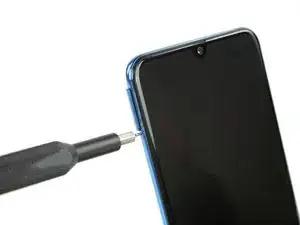
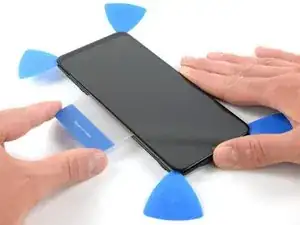
    • Inserisci uno strumento di estrazione SIM, una punta cacciavite per estrazione SIM o una graffetta raddrizzata nel piccolo foro sul vassoio SIM sul lato sinistro del telefono.

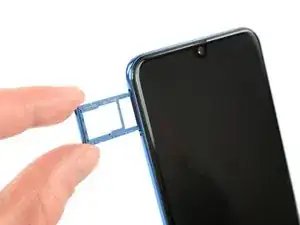
    • Premi con decisione per espellere il vassoio.

    • Rimuovi il vassoio della scheda SIM.

    • Quando rimetterai al suo posto le schede, accertati che siano correttamente orientate all'interno del vassoio.

  2. hQqQMV2uIHPIJMNq
    • Per prima cosa, spegni il telefono.

    • Scalda un iOpener e applicalo sulla cover posteriore per ammorbidire l'adesivo.

    • L'adesivo utilizzato sul Samsung Galaxy A50 è molto tenace. Se non riesci ad aprire il dispositivo con l'iOpener, puoi provare con un asciugacapelli, una pistola termica o una piastra riscaldata. Stai attento, però, a non surriscaldare il telefono: sia lo schermo AMOLED sia la batteria interna sono sensibili al calore eccessivo.

    Überhitzen das Gerät nicht, das AMOLED-Display und der Akku sind sehr hitzeempfindlich.

    Nur ein kleiner Tippfehler-Hinweis: (Überhitze das Gerät nicht)

    Jonas Hahn -

    OK, korrigiert. Das kann übrigens jeder machen, iFixit ist ein Wiki.

    VauWeh -

    how long should the heat pack be used for?

    David Hall -

    The heat pack is in the wrong position in photo - the glue that you are heating is actually all around the edge of the phone!

    David Hall -

  3. SaR1nWctkfCekyW2
    SaR1nWctkfCekyW2
    F6WgLBgnrW1bSZdS
    wMENyH4P5ZXwdQXU
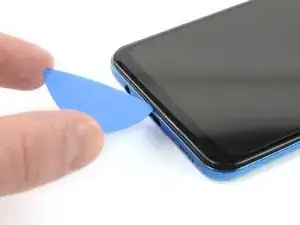
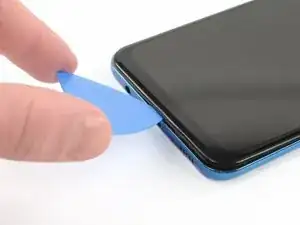
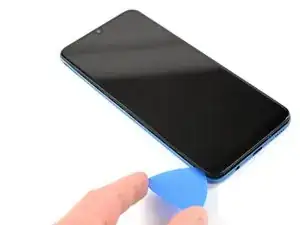
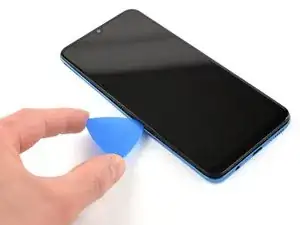
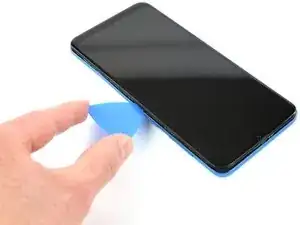
    • Inserisci un plettro di apertura dal lato inferiore del telefono vicino alla porta USB-C.

    • Se non riesci a infilare il plettro di apertura tra la cover posteriore e il midframe, puoi usare una ventosa oppure del nastro adesivo tenace per sollevare il pannello posteriore quanto basta a creare una fessura.

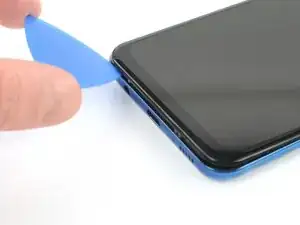
    • Fai scorrere il plettro di apertura fino all'angolo inferiore sinistro.

    It would be much better to attempt the opening from the top of the phone as there is a delicate flex PCB antenna at the bottom just where you stick the pick in that can get damaged.

    David Hall -

  4. J6hoMZYSHdAR3St6
    J6hoMZYSHdAR3St6
    6lcmRp4Rgrvs5Mgv
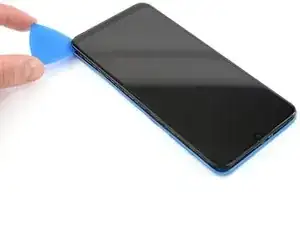
    • Inserisci un secondo plettro di apertura e fallo scorrere dal fondo fino all'angolo superiore sinistro per tagliare la colla.

    • Se hai dei problemi nel procedere, applica dell'altro calore per ammorbidire ulteriormente l'adesivo. Segui le istruzioni per l'iOpener per evitare il surriscaldamento.

    • Lascia i plettri di apertura nella loro posizione per impedire che la colla possa riattaccarsi.

  5. JeOJFGaHeVgLGwhJ
    JeOJFGaHeVgLGwhJ
    yArlWRJHNyBgskmB
    sg2pqmNKAs4fVnWn
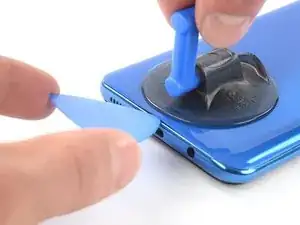
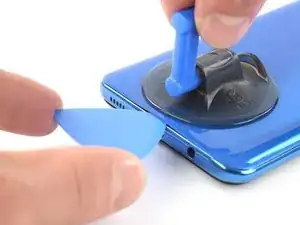
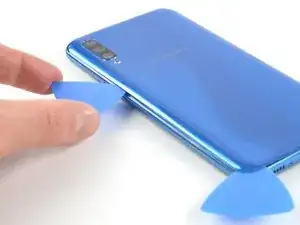
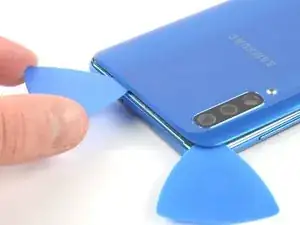
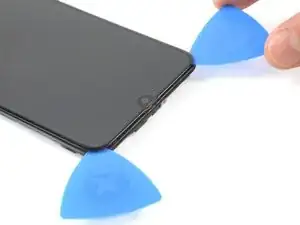
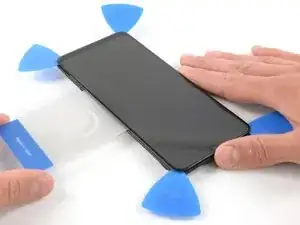
    • Inserisci un terzo plettro di apertura sotto l'angolo superiore sinistro del pannello posteriore.

    • Fai scorrere il plettro di apertura lungo il bordo superiore del telefono.

    • Lascia il plettro di apertura nell'angolo superiore destro per impedire che la colla possa riattaccarsi.

  6. cWya5vxHi3KMPW4j
    cWya5vxHi3KMPW4j
    oCfao3PLFWBonI5w
    VHcirgPVDSFwhxGi
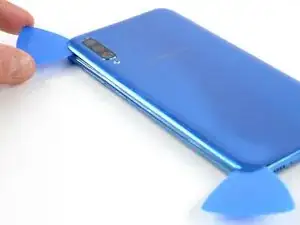
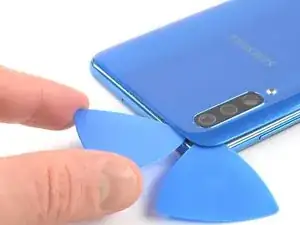
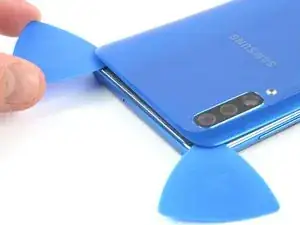
    • Inserisci un quarto plettro di apertura sotto l'angolo superiore destro della cover posteriore.

    • Fai scorrere la punta del plettro di apertura lungo il lato del telefono fino all'angolo inferiore destro per tagliare l'adesivo.

    • Lascia il plettro di apertura nell'angolo inferiore destro per impedire che la colla possa riattaccarsi.

  7. kIkBXjkFmSSdLs5C
    • Rimuovi la cover posteriore.

    • Dopo aver installato la cover posteriore, applica una pressione forte e costante sul telefono per diversi minuti per favorire un buon incollaggio. Una buona soluzione è disporlo sotto una pila di libri pesanti.

    Very straight forward and simple replacement to do with the right tools, I used my hot air gun work station so this might have been alot easier for me then someone without one? Hair dryers work too, just in case a hot airgun station is not available to you dont worry you can do this repair without, but some form of heat will make life alot simpler :)

    Matthew Newton -

  8. WVI6nRb1nSMWSGgH
    • Rimuovi le 13 viti a croce Phillips #00 lunghe 4 mm.

    To separate the screen from the mid-frame a few pointers I picked up from a video
    1. use a hard pry tool such as iFixit Opening Tool
    2. start on a long side about quarter way down from corner
    3. work around the frame careful not hook the button assembly

    Code Jason -

  9. CRHDLwJGoJCxBOoY
    CRHDLwJGoJCxBOoY
    1aBAEPVXflQt5RXG
    kGmHNhoPcMSrlOi4
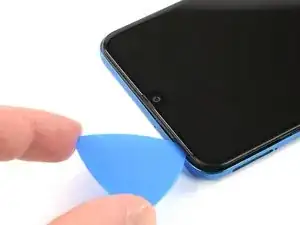
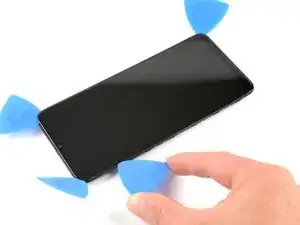
    • Inserisci un plettro di apertura tra lo schermo e il midframe nella parte inferiore del telefono, al di sopra della porta USB-C.

    • Fai scorrere il plettro lungo il bordo inferiore per sganciare le clip.

  10. DsGiJEtDJPnADDPo
    DsGiJEtDJPnADDPo
    PMyuxmGFRADklYMa
    sjQOSkPdHkJ5YTnP
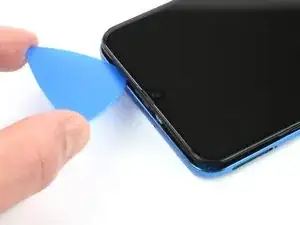
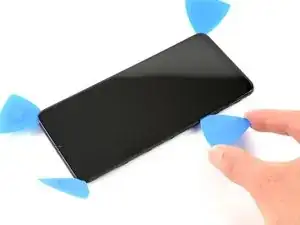
    • Continua a far scorrere il plettro lungo il bordo sinistro del telefono per sganciare le clip.

  11. WXMTgpNI4rWSgpBa
    WXMTgpNI4rWSgpBa
    RZWKpWOZmIblvqoM
    • Fai scorrere il plettro di apertura lungo il bordo superiore.

  12. EIdPPpmEVuFHUFMM
    EIdPPpmEVuFHUFMM
    cDVOxhcBiRsJiYqb
    s1FuyKT51goegcL6
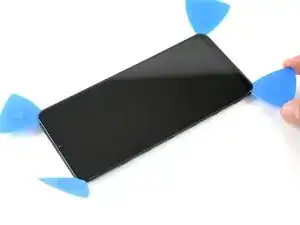
    • Fai scorrere il plettro di apertura lungo il bordo destro fino a raggiungere l'angolo inferiore destro del telefono.

  13. OqjiaORnQHVMUsBk
    OqjiaORnQHVMUsBk
    OKQmTq5DPo6kKHGh
    • Accertati di aver sganciato tutte le clip che fissano il midframe.

    • Stacca il midframe del telefono.

  14. et2slvL3JoopN6TW
    et2slvL3JoopN6TW
    Wm2L6KdX3ddXQgJN
    • Usa uno spudger per scollegare la batteria sollevando il connettore dal suo zoccolo.

  15. SFXFwdZit55slN2n
    SFXFwdZit55slN2n
    KwEWjJhsH6bUtOFX
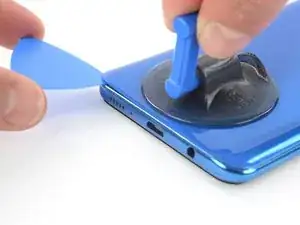
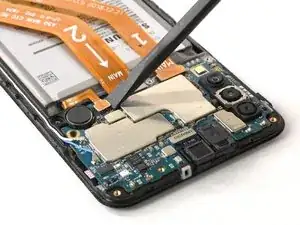
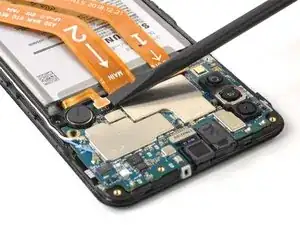
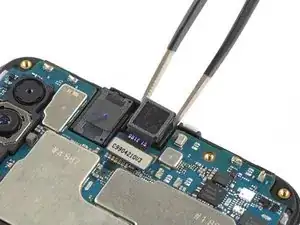
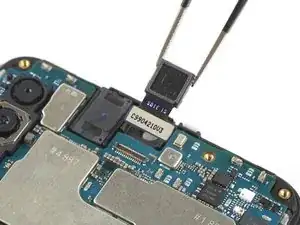
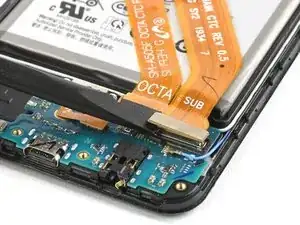
    • Usa uno spudger per scollegare la fotocamera anteriore sollevando il connettore dal suo zoccolo.

  16. MXbVqnV5wRZRwFIQ
    MXbVqnV5wRZRwFIQ
    sjAtWKl4Yl2PAPgA
    • Rimuovi con delicatezza la fotocamera usando delle pinzette.

  17. siUdxndxiMdRaR2N
    siUdxndxiMdRaR2N
    l5B2nOlObFJgWMlC
    x4RVkZXoLsEUnVY3
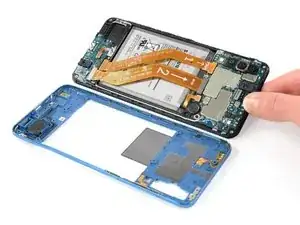
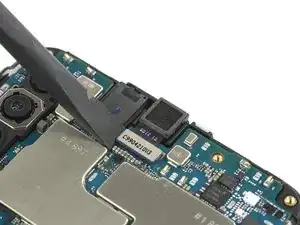
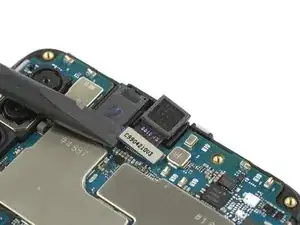
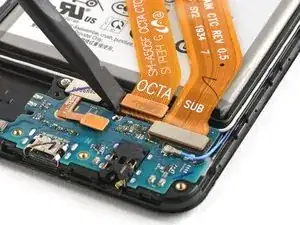
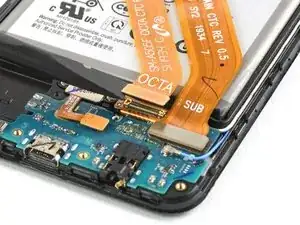
    • Usa l'estremità piatta di uno spudger per sollevare e disconnettere dalla scheda madre i cavi flessibili di interconnessione e dello schermo.

    • Ripiega con cura i cavi da una parte in modo che non diano fastidio.

  18. 1sBaJruYps53ALFJ
    1sBaJruYps53ALFJ
    6nVrITnxTiuNwsEK
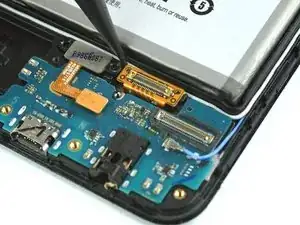
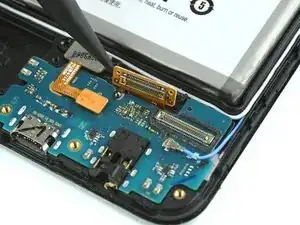
    • Usa la punta di uno spudger per allentare il connettore dello schermo sopra la scheda figlia.

  19. cP1C2HWR5RxaIIoa
    cP1C2HWR5RxaIIoa
    xhfpMxJAtklsYhU6
    • Scalda un iOpener e applicalo sullo schermo per almeno due minuti per ammorbidire l'adesivo sottostante.

    • Disponi una ventosa vicino al bordo destro dello schermo e tira con forza decisa e costante per 30 secondi per ammorbidire l'adesivo.

    • Se il vetro posteriore del telefono è crepato, la ventosa potrebbe non aderire bene. Cerca di sollevare la cover con del nastro adesivo tenace oppure applica della supercolla (cianoacrilica) per incollare la ventosa e lasciala asciugare prima di procedere.

  20. qg6AfWYGvg6Pvgk6
    qg6AfWYGvg6Pvgk6
    2cupTnNRlrukkXxD
    • Applica nuovamente sullo schermo un iOpener riscaldato per circa un minuto.

    • Tira la ventosa verso l'alto e inserisci un plettro di apertura nella fessura che si crea tra lo schermo e la scocca.

    • Inserisci il plettro di apertura a una profondità di circa 2 mm e non di più.

  21. ycHxolQmCJvblkFb
    ycHxolQmCJvblkFb
    wu5qfQTHIT1MWDTj
    LPyIUAfsJiO2gGFO
    • Fai scorrere il plettro di apertura fino all'angolo inferiore destro.

    • Lascialo in posizione per impedire che la colla si riattacchi.

  22. FjAbCJCPEJraW6gL
    FjAbCJCPEJraW6gL
    bRovyWpbbHvK2SmK
    4ESlYoytTCc2eXia
    • Inserisci un secondo plettro di apertura e fallo scorrere fino all'angolo superiore destro del telefono per tagliare l'adesivo.

    • Lascia il plettro nella posizione finale per impedire che la colla possa riattaccarsi.

  23. BowniRlFOZAdo2JJ
    BowniRlFOZAdo2JJ
    cgwvIliuEKNNhJrE
    qwR56cRCMbsxKgAV
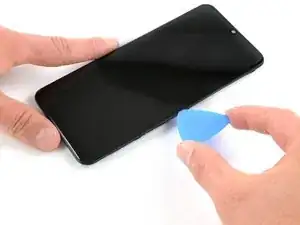
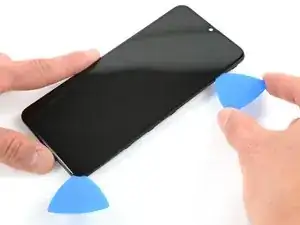
    • Inserisci un terzo plettro di apertura e fallo scorrere fino all'angolo superiore sinistro.

    • Lascia i plettri in posizione per impedire che la colla possa riattaccarsi.

    • Se diventa difficile tagliare la colla, scalda di nuovo e riapplica l'iOpener.

  24. PfrHXdubHQJdweKE
    PfrHXdubHQJdweKE
    NoRrmO4CNd2fmKMG
    KFYy6HQaggDq6WFf
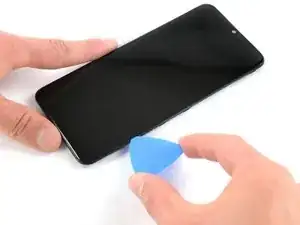
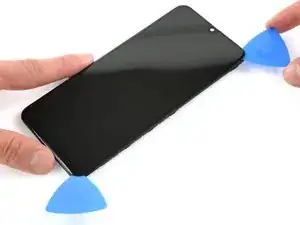
    • Inserisci un quarto plettro di apertura nell'angolo superiore sinistro.

    • Fai scorrere il plettro di apertura fino all'angolo inferiore sinistro per tagliare l'adesivo. Lascialo lì per impedire che la colla possa riattaccarsi.

  25. dOUNNfCZtYbCdVIX
    dOUNNfCZtYbCdVIX
    LBfUN2dIMZeZX4Ce
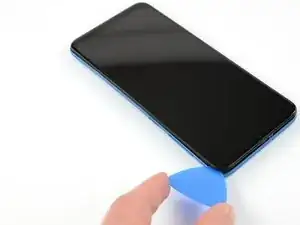
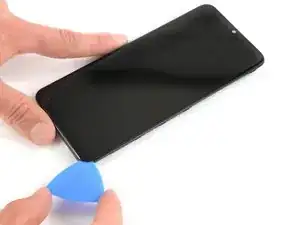
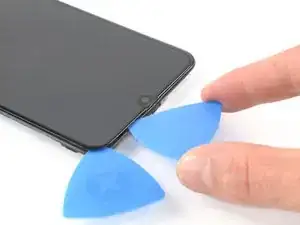
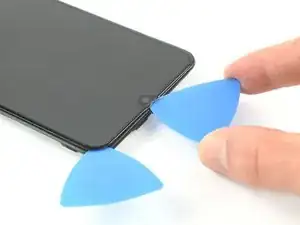
    • Inserisci un quinto plettro di apertura e fallo scorrere lungo il bordo inferiore del telefono per finire di tagliare l'adesivo perimetrale.

    • Per non danneggiare i componenti interni, inserisci il plettro di apertura solo per 2 mm circa.

  26. oHqSaffhyNxYLgHd
    oHqSaffhyNxYLgHd
    3tRG4UWhcXLeTJwb
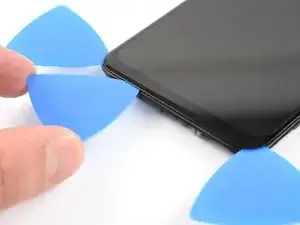
    • Applica un iOpener riscaldato allo schermo per ammorbidire l'adesivo sotto il display.

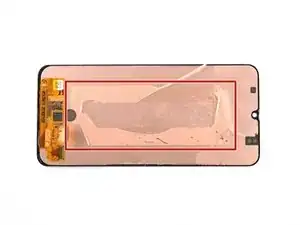
    • Mentre aspetti, prendi nota della forma a rettangolo dell'adesivo disposto sul retro dello schermo.

    Beste

    Hoe kan ik de achterkant van het scherm bekijken wanneer ik deze pas loskrijg twee stappen later?

    Met vriendelijke groeten

    Sébastien

    Roesbeke Sébastien -

  27. M5H4eyjJDjRAwPhf
    M5H4eyjJDjRAwPhf
    SfQGbvbN5uKbepmF
    eTJXECfVqcv2N6vO
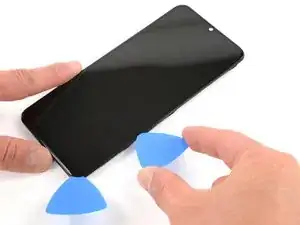
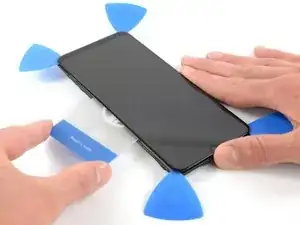
    • Inserisci una scheda di plastica nel bordo sinistro scollato del telefono.

    • Premi verso l'interno la scheda di plastica falla scorrere avanti e indietro attraverso l'intera area coperta dall'adesivo.

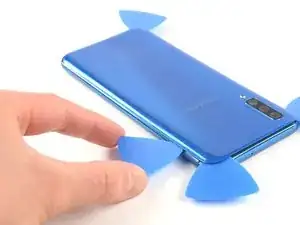
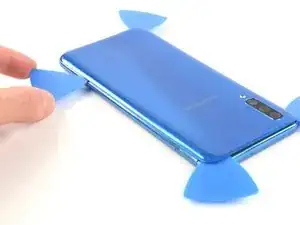
    • Una volta che sei sicuro di aver tagliato tutta la colla, rimuovi i quattro plettri di apertura dagli angoli dello smartphone.

  28. FUDDEFbhBsaH1XQQ
    FUDDEFbhBsaH1XQQ
    X4JOZoJYZIm2ZEw2
    Q4m1obbrOdZ2QOjH
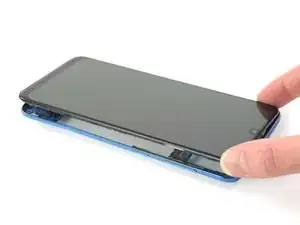
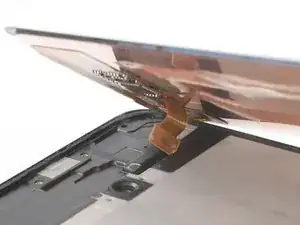
    • Solleva lo schermo dal bordo superiore del telefono.

    • Fai passare con attenzione il cavo dello schermo attraverso il telaio.
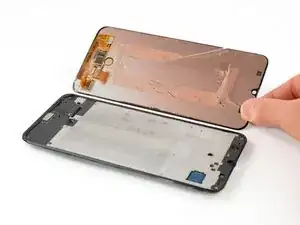
    • Rimuovi lo schermo.

Conclusione

Se possibile, accendi il dispositivo e collauda la tua riparazione prima di installare l'adesivo sostitutivo e sigillare nuovamente il telefono.

Il modo migliore di riattaccare il nuovo schermo è di applicare sul retro del display stesso un foglio di biadesivo tagliato su misura.

Per rimontare il tuo dispositivo, segui queste istruzioni in ordine inverso. Applica del nuovo adesivo dove necessario dopo aver pulito le aree interessate con alcol isopropilico (concentrazione oltre 90%).

Porta i tuoi rifiuti elettronici a un riciclatore certificato R2 o e-Stewards.

La riparazione non è andata come previsto? Prova delle soluzioni di base ai problemi, oppure rivolgiti alla nostra comunità Risposte per trovare aiuto nella risoluzione dei problemi.

Adriana Zwink

Membro da: 18/12/19

47656 Reputazione

24 commenti

considering it is embedded within the display assembly, any chance that the fingerprint sensor is affected by replacing the screen?

Steve B -

Hi Steve, the fingerprint sensor is not embedded within the display as you can see here. The sensor is fixed under the frame and can be seen through the hole in the frame.

Adriana Zwink -

Hey, I followed this procedure to replace my screen and now, whenever I am charging my phone it keeps on rebooting itself every 3-5 seconds, or even when it’s not charging and is just idle. I tried to open it up and realign everything however it didn’t help and kept rebooting. So I am not quite sure what I did wrong and was wondering if you have ever experienced that, and what to do about it.

Nishtha Sharma -

sounds like you may have damaged the battery in some way, try replacing the battery!

Braydon Vanvelzor -

A good instruction, but if you change the screen without a midframe, it will not work.

Kaig -

Which one is easier way to replace the screen on a50? With or without frame? Thank you.

Teemu Laulajainen -

With the frame. Without the frame you have to follow this guide. With the frame you only have to remove all the internals and place on the new mid-frame that is pre-attached to the new display.

BAM5 -

With frame is significantly easier (but more expensive)

jcage19 -

I replaced the screen with a frame. Yes, it was pretty easy. Few things I would like to note up: the back cover was in this particulary phone pretty tight. I warmed it and tried to extract, but still it bended enough to crack the paint inside. Kind of spider web crackling if you get my idea. So try not to bend it too much. Other thing was with the ear speaker. It was placed on a “cradle” or “hub”, dont know exact word, but anyway the speaker came out in two pieces. Adhesive tape inside it was not so strong. I could see the electric wires inside. So when taking it off, pry it from beneath, not from side. I put the ear piece back together and it was not harmed.

Teemu Laulajainen -

One more question about this. I hope you have experience about it. The finger print sensor doesn’t work with new screen. It took daughterboard out and I projected the brightest led through the finger print sensor hole. I was in dark toilet. No light whatsoever came thorough. And this finger print sensor technique is optical. I paid 66e from this screen from China. I thought you would get a decent one with that price. Has this happened anyone?

Teemu Laulajainen -

A friend has given me A50 Ear speaker not working on calls, I cant hear them they can hear me.

Tried tests receive dosent give dial tone.

apparently had new screen (not fitted by me) do i need to replace complete new screen or just ear piece Speaker?

any help gratefull.

Mark balfour -

Try just with new ear piece first, its cheaper. (By now you propably already did…) the ear piece is a separated component from screen.

Teemu Laulajainen -

I went through this repair and when I powered it on, the LCD came on, but there was no touch. Thinking it was just a defective LCD, I sent it back and got a replacement; the replacement they sent me didn’t come with a midframe, but didn’t respond to touch either (one of the comments above said “if you change the screen without a midframe, it will not work. “). I ordered a new cable and STILL no touch. Is it possible for the port on the board to be bad? The LCD and Digitizer are together on the same cable, but one works and the other doesn’t. Is there something (like the aforementioned midframe) that causes the digitizer not to function, but allows the LCD to?

Zuckerton -

Hello I have this question / problem, too. Could anybody please help us?

Martin Pittner -

Try power on safe mode. Triple check cables. Understand that woth vary bad luck you really got defective screens. I’m done with buying screens from china. Getting perfect quality screen is like a lottery.

Teemu Laulajainen -

Let me guess… you insist we BUY an Iopener… %#*@ half this repair read was advertising. Annoying as F&^%#

nicole wiedig -

Hi @nicole, in this guide the iOpener is used, but a hair dryer or heat gun could also be used.

Adriana Zwink -

my touch sceen not working

aidan -

I'm sorry that your repair didn't worked. Have you tried some basic troubleshooting, or asked our Answers community for help?

Adriana Zwink -

I accidentally damaged the “E4” antenna at the bottom while opening it, as you can see here https://i.imgur.com/XfvVt3Q.png

What was this antenna for? Where can I get a replacement?

Nekzuris -

What adhesive do I need for the back cover? Is a regular double-sided tape enough? Thanks.

knezi -

Hi @knezi! Yes, regular thin double-sided tape works fine. In our store we offer also pre-cut tapes for your use: Tesa 61395 Tape

Adriana Zwink -

I connected tft display to my a50 and the light underneath the display works but the display itself doesn't and also this is the second display that i tried the first one was amoled from aliexpress and it worked for like a month and then i once placed it on the table and only the touch part of the display worked but it didn't show anything

lucian Vondra -

Hii, I tried to fix new screen in samsung A50 and now the screen shows nothing.

Ssozi Arafat -