Introduzione

Usa questa guida per sostituire un display rotto o guasto del tuo Samsung Galaxy S9 Plus.

Prima di smontare il tuo telefono, scarica la batteria sotto il 25%. La batteria può prendere fuoco e/o esplodere se forata inavvertitamente, ma le possibilità che questo succeda sono molto più basse se è stata scaricata in precedenza.

Nota: questa guida ti spiega come sostituire solo il display mentre lasci il frame originale, la scheda madre e la batteria al loro posto. Tuttavia, alcuni schermi sostitutivi per questo telefono sono preinstallati all'interno di un nuovo frame (chassis) e questo richiede una procedura molto diversa: il trapianto delle parti interne del tuo telefono e l'installazione di una nuova batteria. Assicurati di avere la parte di ricambio corretta prima di iniziare con questa guida.

Questa guida prevede la rimozione della cover posteriore di vetro. Ti servirà dell'adesivo di ricambio per riattaccare il pannello posteriore al telefono. Se il tuo display di ricambio non include l'adesivo, per fissarlo usa un nastro biadesivo tenace come il Tesa 61395.

Se il frame è danneggiato o piegato, è importante sostituirlo, altrimenti il nuovo schermo potrebbe non essere montato correttamente ed essere danneggiato a causa della pressione non uniforme su di esso.

La procedura di separazione del display dal suo chassis di solito comporta la distruzione del display, quindi non seguire questa guida a meno che tu non intenda sostituire in ogni caso il display.

  1. SPUojd6GbtYKZRiM
    • Spegni il telefono.

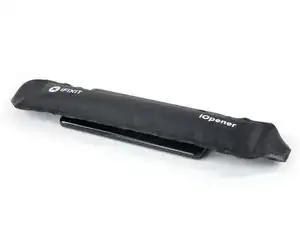
    • Usa un iOpener per indebolire l'adesivo sotto il vetro posteriore. Applicalo per almeno due minuti. Può essere necessario ripetere quest'operazione diverse volte nel corso della rimozione della cover posteriore.

    • L'adesivo nel Samsung Galaxy S9 Plus è molto tenace. Se non riesci ad aprire il dispositivo con l'iOpener, puoi usare anche un asciugacapelli, una pistola termica o una piastra riscaldata. Stai attento a non surriscaldare il telefono: sia il display AMOLED sia la batteria interna sono sensibili al calore eccessivo.

    I don't know how much longer should I use for the min heat gun.

    Hui Chen -

    Only heat it up so you can still handle the phone. That depends on your heat gun. Wearing (ESD-)gloves might give you some extra degrees.

    Tobias Isakeit -

    It is very very hard to remove the back glass due to the adesive… I don't know if it is possibile (at least for everyone) to remove it wothout broking the glass

    Luigi -

    This is nearly impossible without breaking the glass or risking overheating. I would say apply heat repetitively for 6-8 minutes. The very most adhesive is across the bottom so push the pry stick way in. I generally start on the rear side.

    Thomas Hayes -

    Whoah NO. It will damage the camera and other sensitive electronics.

    D Harlo -

    Heating the back is essential, challenging, frustrating and, for first-timers such as myself, seemingly impossble, but I will say don't give up...I'll have another comment later.

    cbclistener -

    I tried with the iopener but I gave in after three attempts. I then used a hairdryer and a pizza oven infrared thermometer, heating in increments. 60C did the trick and I was able to get the first pick in. Further heating was necessary to ease the rest of the back off, all to 60C.

    Chris Harrison -

  2. PQKIKM1KtiktSPx4
    • Nei passi seguenti, taglierai l'adesivo che fissa la cover posteriore.

    • All'interno della cover posteriore, l'adesivo è disposto come illustrato nell'immagine.

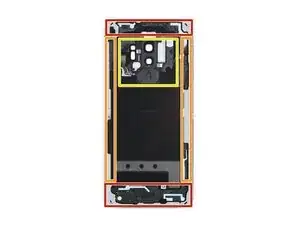
    • L'adesivo deve essere tagliato nelle aree evidenziate:

    • Parti dove l'adesivo ha un forte spessore

    • Parti dove l'adesivo ha spessore ridotto

    • Evita di far leva o tagliare in questa zona per non danneggiare il cavo flessibile del sensore impronte digitali..

    The yellow portion labeled "Avoid prying in this area" is also pretty heavily glued. I had luck using heat to soften it, but I messed up my fingerprint sensor because the image above is mirrored - I sliced through the right side because the image says it's on the left. The fingerprint sensor cable is actually on the right (when viewing the back side of the phone) on the same side as the phone's volume control.

    Nick Tipton -

  3. vxtP6Nsx2M66cjIW
    vxtP6Nsx2M66cjIW
    VlE33pPfTcFIgD5v
    • Se il vetro posteriore del telefono è crepato, la ventosa potrebbe non aderire bene. Cerca di sollevare la cover con del nastro adesivo tenace oppure applica della supercolla (cianoacrilica) per incollare la ventosa e lasciala asciugare prima di procedere.

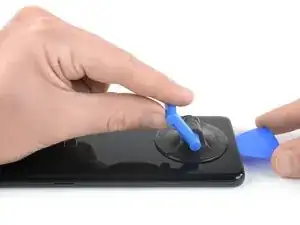
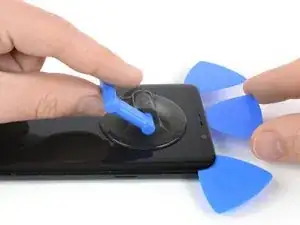
    • Fai aderire una ventosa alla cover posteriore.

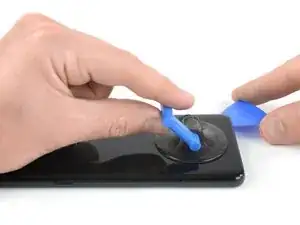
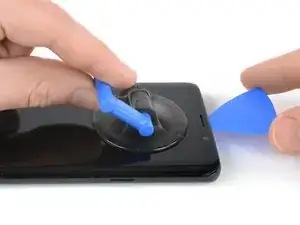
    • Solleva il bordo inferiore della cover posteriore con la ventosa per aprire una sottile fessura tra il vetro e la scocca.

    • Questa azione può richiedere una forza consistente, ma è necessaria solo una minima fessura per poter inserire il tuo strumento di apertura. Se hai dei problemi, applica dell'altro calore per ammorbidire ancora l'adesivo e prova di nuovo. La colla si raffredda molto in fretta, quindi può essere necessario riscaldarla più volte.

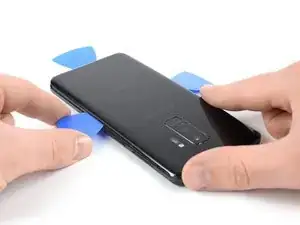
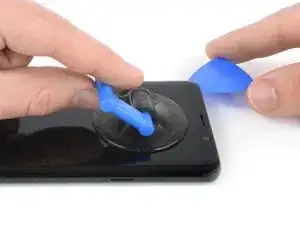
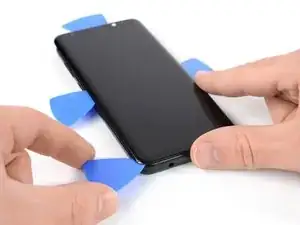
    • Inserisci un plettro di apertura nella fessura e fallo scorrere fino all'angolo inferiore destro.

    This is the most challenging part. The suction cup can barely hold for the amount of force required...but here's a tip, especially for the first-timers like me. It's not obvious in this image, but the back, curved as it is as it attaches to the frame, is curved because the surface under the back is also curved. Therefore, using an angle for the pick that's a bit tilted up will help to get under the back, and get the cutting of the adhesive started.

    Don't let that give you too much confidence, though. Sufficient heating of the back, to make the adhesive soft enough to yield to the several picks, is essential. Go slow, if you go too fast, or don't have enough heat, you WILL break the glass...as I did. Replacements, fortunately, are easy to find and not too expensive.

    cbclistener -

  4. svFeofEQKnT6GS4A
    svFeofEQKnT6GS4A
    aBxYvHrhFq14ill4
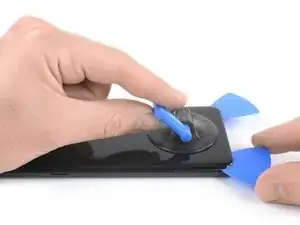
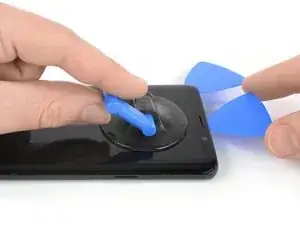
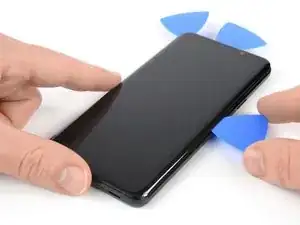
    • Inserisci un secondo plettro di apertura e fallo scorrere fino all'angolo inferiore sinistro.

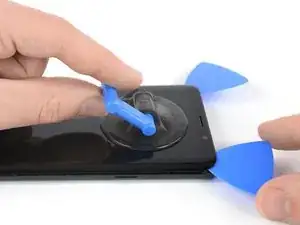
    • Inserisci un terzo plettro di apertura nella parte bassa del telefono. Questo attrezzo dovrà rimanere in questa posizione durante tutta la procedura di apertura per evitare che l'adesivo possa riattaccarsi.

  5. BxPqWDXMu24ddD55
    BxPqWDXMu24ddD55
    RISoupVRvj25yEIr
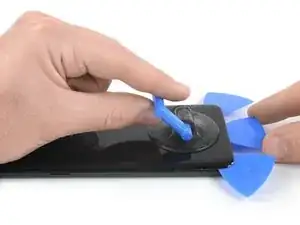
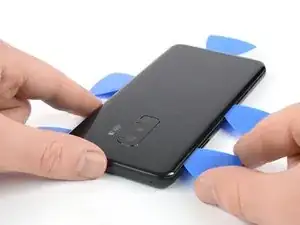
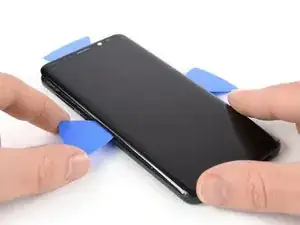
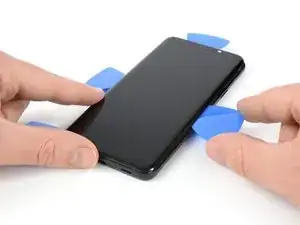
    • Inizia a far scorrere lungo il lato del telefono la punta del plettro di apertura che si trovava nell'angolo inferiore sinistro.

    • Lascia il plettro di apertura in posizione dopo che avrai tagliato l'adesivo lungo metà lato del telefono.

    • Fai scorrere il plettro di apertura che si trovava nell'angolo inferiore destro fino alla metà del lato e lascialo lì.

  6. 4GiKTMQKxXFCIhbm
    4GiKTMQKxXFCIhbm
    AELcqeWTvaUkbSHP
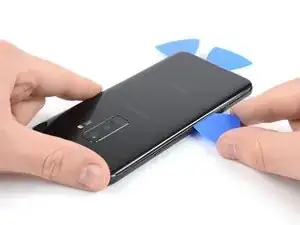
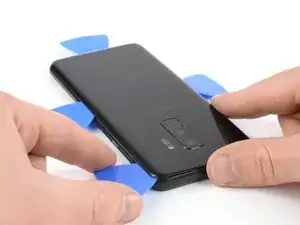
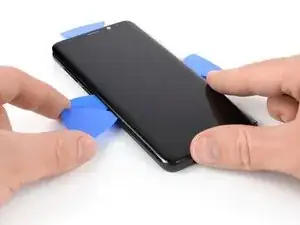
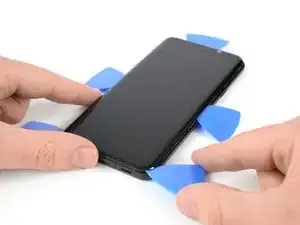
    • Inserisci un quarto plettro di apertura sul lato destro della scocca e fallo scorrere fino all'angolo superiore destro.

    • Fai scorrere un quinto plettro di apertura lungo il lato sinistro del telefono fino all'angolo superiore sinistro.

    • Usa il plettro di apertura per tagliare l'adesivo rimasto sotto la parte superiore della cover in vetro.

    • Aspetta ad aprire del tutto il telefono. Il cavo flessibile del lettore di impronte digitali è ancora connesso alla scheda madre.

  7. 5VjRBIulGhpUhxQn
    5VjRBIulGhpUhxQn
    XoUpbUYyDom3N4NF
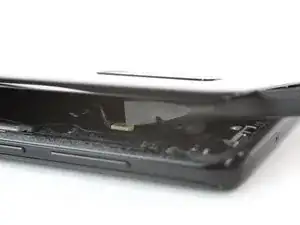
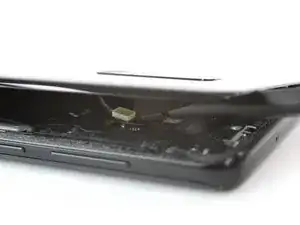
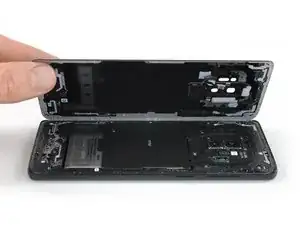
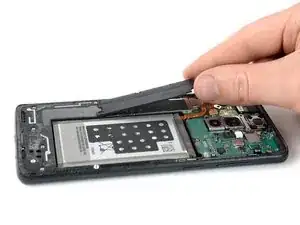
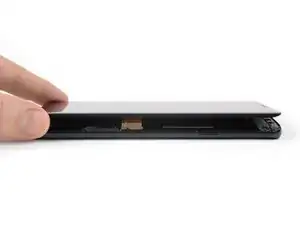
    • Alza con cautela il lato del vetro posteriore dalla parte dei pulsanti del volume.

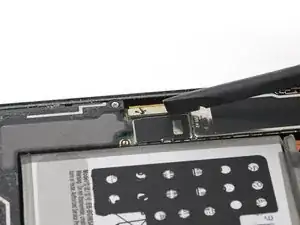
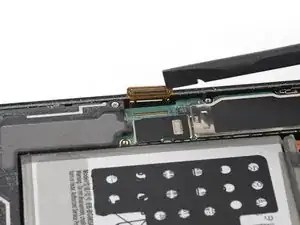
    • Usa l'estremità di uno spudger per sollevare e scollegare il cavo flessibile del sensore impronte digitali.

    On my G965U, the fingerprint reader remained in the phone, and instead of disconnecting the flex cable from the motherboard, it was only necessary to disconnect the flex cable from the back glass where it was glued lightly

    lyellread -

    I also have a G965U model S9+, and its fingerprint read also remained in the back glass.

    Nick Tipton -

    It's easier to pop the button up than it is to reattach it when reassembling the phone. Well, I sure hope it goes better for you than it did me. (:

    Daylen Westwood -

  8. hwKdSb1q5wbfJcQ4
    • Rimuovi il vetro posteriore.

    • In fase di rimontaggio segui questa guida per sostituire l'adesivo e fissare di nuovo il vetro posteriore.

    • Nel caso tu voglia sostituire il vetro posteriore, segui questa guida per trasferire sulla nuova parte la cornice della fotocamera con il sensore impronte digitali.

    Is it necessary to replace the rear glass adhesive? I have given up on water resistance, just want it to hold in one piece.

    Zachary Shaw -

    Hi Zachary,

    in order to assure that the rear glass sticks to the rest of the phone assembly you have to replace the rear glass adhesive once you removed the rear glass. However you can use a narrow and strong double sided tape, tesa tape or our precut adhesive card. All of these will do their job however as you just mentioned you will lose the water protection of your phone. Before installing all of these it is very important to remove the old adhesive backings (for example with high isopropyl alcohol 90% or higher).

    Sadly it's not possible to replace the rear glass without new adhesive.

    Dominik Schnabelrauch -

    Is the L shaped stocker with the three holes(first pic in step 2) in it essential? It came off when i was using iso to get the adhesive off. Just wanna know before i put the phone back together.

    Thanks

    Bob

    Bob Erto -

  9. aXHuGDrKZHADlYuS
    • Rimuovi le nove viti a croce Phillips #00 da 4 mm.

    Don´t forget to unscrew the two screws on the left side (one near the battery, and one near the edge).

    Janny 4real -

    My s9+ NFC screws in this step are different sizes most are the same except one is shorter and coloured black and another is just shorter. The phone will not charge now, how can you find out which screws go where?

    H8redflip -

    11 screws need to be removed here. Watch the video to confirm the remaining 2.

    Nick Tipton -

    The 9 screws shown won't let the bracket up unless you finish with the 2 more screws. (near edge and bottom of the bracket).

    Daylen Westwood -

  10. QmFI2i3JivkeHcMx
    QmFI2i3JivkeHcMx
    LSMLXtpxhi5cXfNd
    vkY6vSFuo2nJGYAA
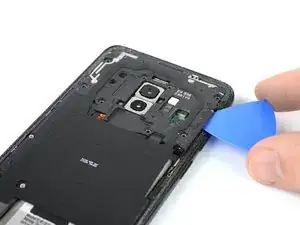
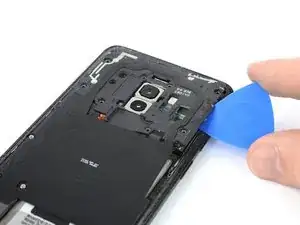
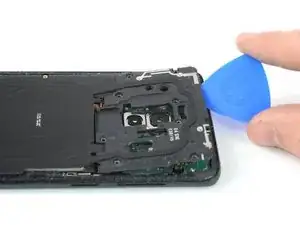
    • Inserisci un plettro di apertura sotto il lato destro della cover di plastica che contiene l'antenna NFC e la bobina di ricarica wireless.

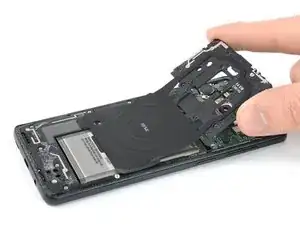
    • Torci il plettro di apertura per staccare la cover dalle sue clip di plastica.

    • Lavora tutto attorno alla cover di plastica, facendo leva per sganciare le clip rimaste.

    I used a pointed metal spudger to pop that piece. The picks were more difficult here. There's an arrow that points the spot that needs to be opened.

    Daylen Westwood -

  11. acHgOqVFmxUkKB5G
    • Rimuovi la cover di plastica che contiene l'antenna NFC e la bobina di ricarica.

  12. 4vovYKM1kCqvQGBV
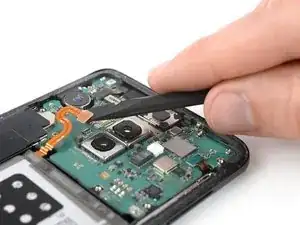
    • Usa l'estremità piatta di uno spudger per sollevare e staccare il cavo flessibile della batteria.

  13. UJYVM2pITTPlbvVp
    • Rimuovi le due viti a croce Phillips #00 lunghe 4 mm.

  14. WDoJNfjGl11tUPet
    • Rimuovi dalla scheda madre la cover di plastica.

  15. RyVfDmyCJ3bPpXme
    RyVfDmyCJ3bPpXme
    sUoPHlBuMi5SGdUR
    • Usa l'estremità piatta di uno spudger per scollegare il cavo flessibile dello schermo.

  16. YOfD6KbX2IJ2OoGX
    • Prepara un iOpener e applicalo sul display per almeno due minuti per ammorbidire l'adesivo sottostante.

    • Può rivelarsi necessario scaldare e applicare l'iOpener per diverse volte consecutive per poter scaldare abbastanza il telefono. Segui le istruzioni per l'iOpener per evitare il surriscaldamento.

    • Se il display è rotto, applica del nastro adesivo sul vetro per impedire alla rottura di espandersi e prevenire danni fisici dovuti alle schegge di vetro.

    • Stendi delle strisce sovrapposte di nastro adesivo da pacchi trasparente sul display dell'iPhone fino a coprire l'intera superficie.

    • In questo modo i frammenti di vetro resteranno uniti tra loro e potrai lavorare su un elemento strutturalmente integro quando dovrai staccare e sollevare il display.

    • Indossa occhiali di sicurezza per proteggere gli occhi da pezzi di vetro che potrebbero volare in giro durante la riparazione.

  17. Y4GZqLaQdfPBHdjS
    Y4GZqLaQdfPBHdjS
    6KmvGBwtNEOFIYcD
    • Quando lo schermo è caldo al tatto, applica una ventosa al bordo superiore del telefono.

    • Se lo schermo del telefono è crepato, può darsi che la ventosa non aderisca bene. Cerca di sollevare il display con del nastro adesivo tenace, oppure applica della supercolla (cianoacrilica) alla ventosa e lasciala aderire prima di procedere.

    • Inserisci un plettro di apertura nella fessura e inizia a tagliare l'adesivo facendo scorrere l'attrezzo fino all'angolo superiore sinistro.

    to just replace the screen with the Digitizer would I have to remove the back still?. I've removed the broken glass screen but the replacement didn't have the film inside it and I see a foil covering what I assume is the lcd.

    John Chambers -

    In this step start from the bottom, not the top. I tried for an hour with a heat gun on the top, the bottom worked first try.

    Pi Ohmy -

  18. JVYNISshZJRM4RnX
    JVYNISshZJRM4RnX
    QMTL63RPoIKnIdxi
    ptUhWrjTOuP4mbcp
    • Inserisci un altro plettro di apertura e fallo scorrere fino all'angolo superiore destro del telefono.

    • Inserisci un terzo plettro di apertura per impedire che l'adesivo si riattacchi nel corso della rimozione dello schermo.

  19. NbKrLNbV1UyviaWL
    NbKrLNbV1UyviaWL
    UTrGpFKkRnxGAyVn
    • Inizia a far scorrere il plettro di apertura a destra fino a metà del lato della scocca per tagliare l'adesivo.

    • Se diventa difficile eseguire il taglio, scalda e applica di nuovo l'iOpener.

    • Fai scorrere il plettro di apertura a sinistra fino a metà del lato della scocca e lascialo in posizione.

  20. wAjmbZlGHnLAdspj
    wAjmbZlGHnLAdspj
    kmRNXu2rQVNKmuvZ
    • Inserisci un quarto plettro di apertura nel lato sinistro della scocca e fallo scorrere, tagliando l'adesivo, fino all'angolo inferiore sinistro.

    • Il cavo flessibile dello schermo è disposto appena sotto il punto centrale vicino al pulsante di accensione e quindi potrebbe interferire con il tuo attrezzo di taglio.

  21. F1slP6GSKR2CuQEN
    F1slP6GSKR2CuQEN
    xkOm2K6mwIgGZOKb
    wTJnimDSKsoPkLCT
    • Inserisci un quinto plettro di apertura sul lato destro e fallo scorrere verso il basso.

    • Fai scorrere il plettro attorno all'angolo inferiore destro e taglia l'adesivo rimasto sul bordo inferiore del display.

  22. fSXowDiCrQLQXfYW
    fSXowDiCrQLQXfYW
    vkhfO5oftpOSs1dY
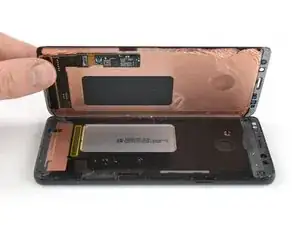
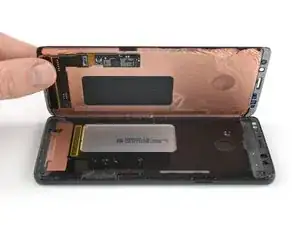
    • Una volta tagliato l'adesivo su tutti i lati del telefono, puoi sollevare lentamente lo schermo verso l'alto e rimuoverlo.

    • Il cavo del display passa attraverso un foro del telaio centrale; sfilalo con attenzione per poter liberare il display.

    • Prima di installare un nuovo schermo, è molto importante rimuovere ogni traccia della vecchia colla dalla scocca e pulire le aree incollate con alcol isopropilico (concentrazione >90%) e un panno privo di pelucchi.

    • Se il telaio è piegato o se sono rimaste tracce di colla o vetro, il nuovo schermo potrebbe non installarsi correttamente e danneggiarsi. Se necessario, sostituisci il telaio.

Conclusione

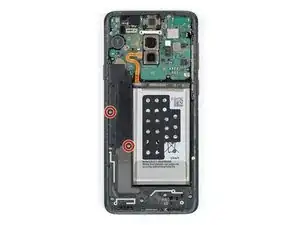
Confronta il pezzo sostituito con quello originale, potresti dover trasferire componenti rimasti sulla vecchia parte o rimuovere adesivi sul retro del componente nuovo prima di installarlo.

Il modo migliore di fissare il nuovo schermo e tramite un foglio di biadesivo pretagliato. Applica il nastro al retro dello schermo, poi fai passare con cura il cavo del display attraverso il telaio. Allinea lo schermo e premilo in posizione.

Per rimontare il tuo dispositivo, segui i passi qui sopra in ordine inverso.

Se possibile, accendi il telefono e verifica la tua riparazione prima di applicare del nuovo adesivo e risigillare il telefono.

Porta i tuoi rifiuti elettronici a un riciclatore certificato R2 o e-Stewards.

La riparazione non è andata secondo i piani? Vai sulla nostra comunità Risposte per trovare aiuto nella risoluzione dei problemi.

Dominik Schnabelrauch

Membro da: 23/11/16

200687 Reputazione

10 commenti

I need only 205 Minutes for changing…. 5 Minutes heat up to 60°C , then…

Kerker S -

bonsoir

où puis-je trouver la coque arrière du s9 plus? puisque le mien est endomagé.

boubajinior@gmail.com

Boukary OUEDRAOGO -

Bonjour,

voici le lien sur l’article en question : ++Galaxy S9+ Rear Glass Panel/Cover

et voici le lien sur le tutoriel pour l’échange : ++https://www.ifixit.com/Guide/Samsung+Gal...

Sandra Hiller -

210$ for the screen is more expensive than having it repaired for you in a lab…

Daniel S -

how to change sansung galaxy S9 plus (screen) LCD flex belt?

Black 1213 -

where i do get s9+board

gemedahailu151@gmail.com -

Why aren't there any visuals for the installation? This is more of a screen removal guide than a screen replacement guide…

James Leung -

Just finished installing front screen and battery. Everything is working correctly. phone is currently charging. One thing that I did on mine was use a heat gun at 212 F at the bottom of the glass while also using the suction cup to pry up slightly. it created a large enough gap to get a pick started. Also used a lot of 99% isopropyl alcohol in the teardown and glue clean up. 10/10 guide. Thank you!!

themadmaxof07 -

I need help please. While on steps 7/8 removing the rear glass and disconnecting the fingerprint sensor. I removed the glass successfully however the rear camera lens and fingerprint sensor stayed intact with the phone. Is it safe to carry or have I goofed up?

David Allen -

Hi, if you don't break the flat cable i think will be OK if the sensors and cameras stays with phone. Check it before you glue the scren and the rear cover

Andreu de Cabo Sindin -