Introduzione

Questa guida ti aiuterà a sostituire gli speaker se stai avendo dei problemi con l'audio.

  1. dKTaxZjIUAsyAXlI
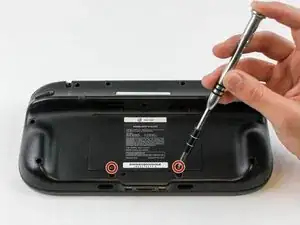
    • Appoggia il GamePad a faccia in giù e svita le due viti da 4,7 mm con un cacciavite a croce Phillips #00.

    tried to unscrew the 10 Tri-Wing size Y1 screw with my iFixIt toolkit

    unfortunately the tool is too “fat” and short, it cannot reach 4 screws on the corners of the gamepad.

    having the iFixIt toolkit and needing to purchase an additional slim screwdriver it’s a shame…

    Antonello Iannone -

  2. jQnDZvXRQvPOXfpG
    • Solleva e rimuovi la copertura della batteria.

  3. qZN3PgyACtZ5Tw4i
    qZN3PgyACtZ5Tw4i
    nDakTZouVNlkKPKx
    o4RQ44lFuusIk4uU
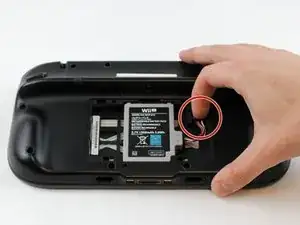
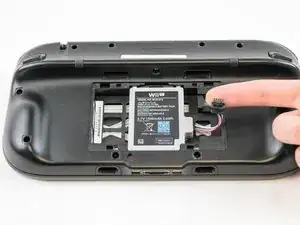
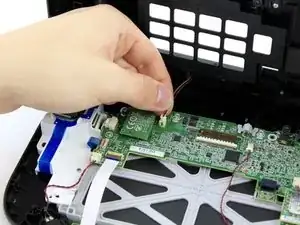
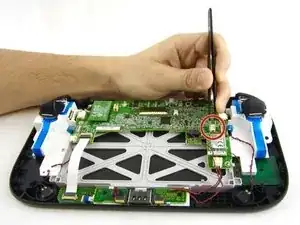
    • Con le dita, premi sul connettore della batteria e tiralo all'indietro.

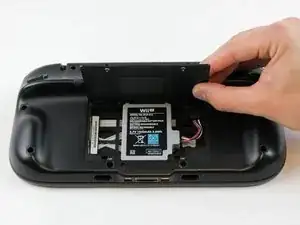
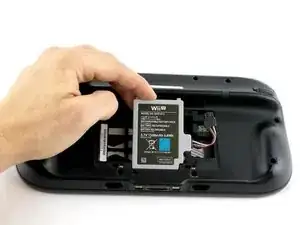
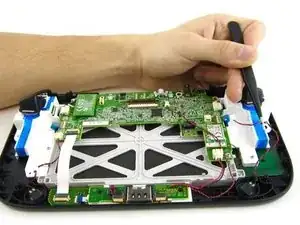
    • Rimuovi la batteria dal suo alloggio.

    Battery lifts up from the bottom not the top like the photo shows.

    Tyler Schommer -

  4. IlOVIxDuCaqAuWCO
    IlOVIxDuCaqAuWCO
    iNj1oAZjk4bbQA1g
    CfComIPOOBMDkYhT
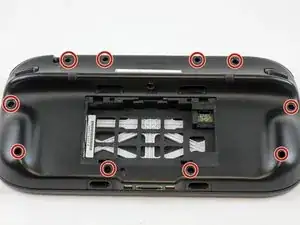
    • Svita le 10 viti da 9 mm attorno alla copertura esterna con un cacciavite Tri-Wing Y1.

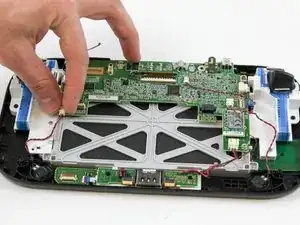
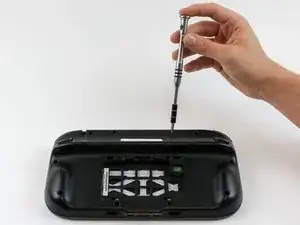
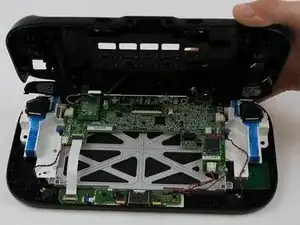
    • Solleva la copertura posteriore.

    • Sollevala delicatamente, in quanto il motore della vibrazione sulla copertura posteriore è ancora collegato alla scheda madre con un cavo.

    I used a small blade tip to life up on the black squares that covered the screw holes. Replacing them after.. I skipped that as it seemed impossible they would even stick back down.

    Chris -

    I am having trouble getting the two screws on the hand grips as the screws are too deep. What should I use to get them?

    [deleted] -

    I ended up having to buy some cheap amazon screwdrivers and are very disappointed

    [deleted] -

  5. MBTkFeprlTH425NV
    • Scollega il connettore del motore della vibrazione dalla scheda madre con le dita.

    Do not pull by the wires! If you do, you better be pretty good at soldering.

    Brandon -

    I agree. A circle over the plug would have been better as the picture looks like you just pull on the wires lol.

    Chris -

    Thanks for the comment. I did get a set of tweezers and the negative cable broke anyway. They really could have done a better job at using a different connector for that.

    Kristen Bartholomew -

    Great. Didn't pull on cord. Whole thing ripped off.

    August -

    Why in the world is this thing so tightly connected?

    Andrew Moore -

    Thanks for the comment. I did get a set of tweezers to try to pull it out but still ended up breaking the negative cable. They really could have used a better set of cables and connectors for this.

    Kristen Bartholomew -

  6. lQpCMiEjbuhZ6I1t
    lQpCMiEjbuhZ6I1t
    FVXXJNUkL6InP1Lb
    • Con le dita, scollega il cavo dello speaker sinistro dalla scheda madre.

    Speakers are connected with solder so removing them is not possible without requiring soldering later on. I left them both connected and instead of removing the motherboard completely I just "hinged" it carefully down to facilitate the work following step 18.

    dietcokediva -

    Thank you for offering this info because I spent 20 minutes between scratching my head and searching for any alternatives to just the image above, which had a wire nut/housing (and mine certainly did not). As I began to have an anxiety attack (

    Missy Leap-Courtney -

    Mine also did not have connectors for the speaker. But like mentioned above, I was able to do repair WITHOUT the need to unsolder the speaker wires. Thanks!

    Louis Bellanca -

  7. ToqplyUlLtDhitp1
    ToqplyUlLtDhitp1
    nvgg1TfBOOiNpeoE
    • Scollega il cavo dello speaker destro dalla scheda madre con delle pinzette.

    Note that on some units (presumably later ones), the speakers are soldered onto the motherboard.

    Ryan Finnie -

Conclusione

Per rimontare il tuo dispositivo, segui le istruzioni in ordine inverso.

Valentina Cerruty

Membro da: 10/02/16

3345 Reputazione

Un commento

Awesome guide, replacement speakers worked flawlessly!!

Christopher Harris -