Introduzione

Guida solo prerequisita per rimuovere la staffa di supporto inferiore su un iMac da 27" del 2017.

  1. IkLPB52BKFCosy5l
    IkLPB52BKFCosy5l
    GWeQuJBpgU2XsRKa
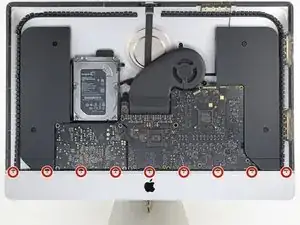
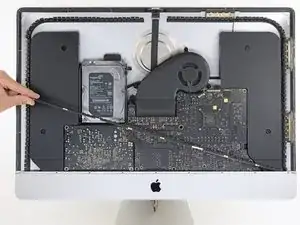
    • Usa un cacciavite a croce Phillips per svitare le nove viti da 3,2 mm che tengono ferma la staffa di supporto.

    • Potresti dover rimuovere l'adesivo dello schermo dal bordo inferiore dell'iMac per accedere alle viti.

    These are new steps from when I did this on my late 2015 retina iMac so I believe step 25 and 26 are optional (you can cope without doing it).

    Amuseme -

    I did not find it necessary to remove these screws and this bar

    James Orwin -

    I lost these 8 during the reassemble. The manual tells I need eight 3.2mm screws.

    Can anyone help to clarify what screws I need. I don't really understand this size. Is this M2x3mm?

    Daniel -

  2. wTfuMb3E45pGiUFT
    • Rimuovi la staffa di supporto inferiore dall'iMac.

    No comments on this ?

    It's quite possibly the most difficult part to put back in the entire process

    The screws are tiny and the there is no easy way to line up the holes on the bracket with the screws

    Having got this far - it wasn't even all that necessary to remove this part in the first place

    Severe pain in the neck

    Eoin -

    After an hour of painstaking mess - I managed to get 7 out of the 9 back in

    By that time I could care less about the remaining 2

    Eoin -

    With the right tools and technique, the bracket can easily be replaced in under a couple of minutes.

    Use a screwdriver with a magnetized tip which frees up one hand and place a screw on the tip first.

    Then line up the screw hole on just one end of the bracket and using a pair of tweezers from the side, hold the bracket in place while you put in the screw.

    Next, do the same on the other end of the bracket. After that, all of the screws in the middle are quick to replace. I didn't really have to touch the bracket again after the end screws were in place.

    Hope that helps someone else since removing this bracket does make later steps a bit easier.

    Max Z -

    I used Max Z tweezers technique but screwed one screw in at the end and then worked my way to the other end.

    Stephen B -

Conclusione

Per rimontare il tuo dispositivo, segui le istruzioni in ordine inverso.

Adam O'Camb

Membro da: 11/04/15

195148 Reputazione

0 commenti