Introduzione

La guida che riguarda la tastiera e i moduli annessi è importante per tutte le altre guide su questo dispositivo, in quanto i passaggi elencati ti permetteranno di avere accesso alle parti interne del portatile. La guida potrebbe tornarti utile anche nel caso il trackpad o la tastiera fossero danneggiati e ci fosse bisogno di sostituirli.

  1. ymqFViOS3THGYJjZ
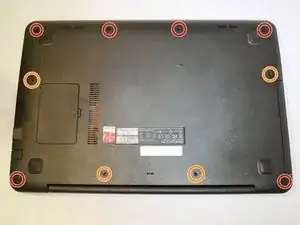
    • Rimuovi le seguenti viti Philips #0 dalla scocca inferiore:

    • Sei viti da 9 mm

    • Quattro viti da 11 mm

    Screws are 9mm instead of 90mm.

    Also the 2 screws in the back corner (screen attachement side) have a slighlty bigger diameter (9mm in length as well) so they are not to be mixed with others 9mm lenght screws.

    Laurent Potterat -

    thank you, thank you for your comment. It's the only place on the entire www that makes that clarification.

    river2438 -

    are these screw sizes accurate. im looking for 9mm and 11mm screws for the asus x555la laptop also whats the M size of the screw ? cant seem to find the right screws online.

    Matthew Bennett -

    https://www.how-fixit.com/laptop-repair-...

    says remove 10 screws (SCREW M2.5*8L, SCREW M2*12L, SCREW M2*9L) on the bottom case.

    It looks like there was an image of which was which but it’s not showing for me!!

    A base screw pack for Asus x555l laptop on eBay says: The pack contains 2x8mm 4x12mm 4x9mm !!

    davidafloat -

    Just wondering where is 11mm located? Is it on the middle? And the rest of 9mm are on the corners?

    rudolphbarcellano -

  2. XXPtxxWZMeKdwvrM
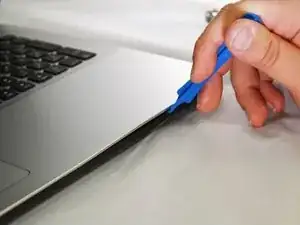
    • Usa lo strumento di apertura in plastica per separare la scocca inferiore e superiore.

    • Inizia inserendo lo strumento di estrazione tra scocca inferiore e superiore, dalla parte anteriore del portatile.

    • Continua passando lo strumento tra le due scocche così da disancorare quella frontale.

    • Non rimuovere completamente la scocca superiore, poiché è ancora connessa tramite due cavi a nastro che verranno disconnessi nei passaggi successivi.

    On my X555LA there seems to be a center snap or two that won't release. Edges are all free on all sides, but somewhere in the middle it's tied down with no give.

    tmaccabe -

    It finally came loose, after one of two center snaps broke. It seems you are supposed to push the bezel slightly back towards screen as you start to lift it. Lift it too much at first, and they catch vigorously.

    tmaccabe -

    Yes I encountered this problem as well, there are 2 very annoying clips at the center of the keyboard, a little force will be required to release them.

    Nathan Early -

    Actually, after this step there’s a shortcut: go to step 7 (skip 3-6), don’t disconnect the ribbon cable, just peel it off the HDD carefully, move the board aside. Go to step 8, instead of “lifting” slide HDD out. Skip step 9.

    Saves at least 10 minutes and avoids disconnecting cables that don’t need to be disconnected.

    Sergey Sobolev -

  3. SORRSBcqAXLsRgQH
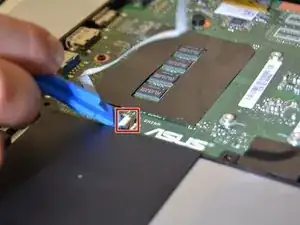
    • Per rilasciare il connettore ZIF, apri la piccola aletta bianca.

    • Il connettore potrebbe avere una base bianca con una piccola aletta grigia rotante.

    • Tira il cavo a nastro bianco per estrarlo dalla presa e disconnetterlo.

    • Dovrebbe essere necessaria poca forza per estrarre il cavo.

    Die Lasche ist grau.

    Helga Koch -

  4. uuReKWdOeHxJ2UU1
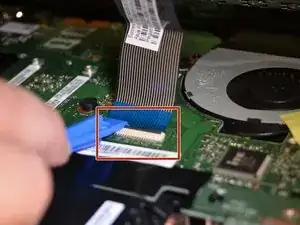
    • Per aprire la linguetta ZIF che tiene fermo il cavo della tastiera, apri la linguetta grigia verso l'alto.

    • Estrai, esercitando poca forza, il cavo a nastro nero e blu dalla sua presa.

    Beim wieder Zusammenbauen bekomme ich die Lasche nicht wieder verankert, sie hat keinen Halt.. wird sie eingeklemmt oder funktioniert das irgendwie anders? Danke!

    nana.belke -

    this step can be omitted: you can remove the disk even without disconnecting the black and blue ribbon cable out of its connector.

    giulia lizzani -

    This step can be omitted if you can prop the keyboard up and get access to the disk screws with a screwdriver, not entirely easy.

    It’s probably best to release the ribbon cables. Flip up the narrow grey clamps, up beyond the vertical, and slip the cables out.

    To put them back in, keep the clamp strips up, then push the flat cables in. They go in 4 or 5 mm. Then rotate the clamp strips back down. Give a gentle tug on the cables to make sure they’re firmly held.

    Fixit User -

  5. Wx4ya4ZTwrXBMoFy
    • Ora puoi rimuovere la tastiera e la scocca superiore, così da accedere alle parti interne del portatile.

    front panel and keyboard is saprate item ?

    or

    single item

    deepak diggekar -

    prise this keyboard

    deepak diggekar -

    is pune india avalable

    deepak diggekar -

    And how do you replace the actual keyboard - that's the key point missing here!

    Darren Wogan -

    The keyboard and palm rest seem to need to be replaced as a single item. What about the mouse pad - this is a separate item, held on by three screws, which may well need to be swapped from the old keyboard and palm rest combination. However no mention is made of that here - why not? I thought IFixit was normally meant to be good with this sort of thing.

    Darren Wogan -

    P.S. I bought a combined item (don’t even think about trying to do the keyboard alone). The mousepad does potentially need to be separated from the old keyboard rest and transferred to the new item. There are 3 screws to be undone - though these can be fiddly and stiff. Anyhow, mine was successfully replaced using this approach, including swapping the mousepad over as described.

    Darren Wogan -

    Nice that you posted a few pics, but you need at least a dozen more to really show people how to open this laptop. Getting outthe motherboard is not recommended for rookies!

    Michael James -

Conclusione

Per riassemblare il tuo dispositivo, segui i passaggi al contrario.

Alex Turner

Membro da: 28/09/15

1864 Reputazione

2 commenti

Truly useless guide

vic_1199 -

Could use some more steps on how to removed completely, including the touch-pad.

Can this be revised soon with more steps and pics? Please.

I need to replaced this keyboard because I have some non-working keys.

Frank P. -