Introduzione

Utilizza questa guida per sostituire una qualsiasi delle ventole del laptop MSI GS65 Stealth Thin 8RE.

Le ventole sono il sistema principale di raffreddamento della CPU. Ci sono due ventole su ciascuno dei due fianchi del laptop per espellere l'aria calda. Per capire se dovete sostituirne una o entrambe, utilizzate il Dragon Center MSI per controllarne la velocità e il funzionamento. Se una delle due ventole gira più veloce per compensare, allora significa che quell'altra non funziona. Se il portatile ha delle temperature fuori dalla norma e le ventole non stanno girando ad alti RPM, significa che dovete sostituirle entrambe.

Al passaggio n. 8 di questa guida dovete applicare la pasta termica al portatile. Per evitare di danneggiare il vostro portatile utilizzandone troppa, vi prego di guardarvi questa quida prima di cominciare: Thermal Paste Instructions . Assicuratevi inoltre di spegnere il vostro portatile e di scollegare quasiasi cavo di alimentazione dallo stesso.

  1. F4oYI5VclH4PBOIO
    F4oYI5VclH4PBOIO
    jsHJxuVVxLjUwKl3
    IknPiP2NACrTj3Nm
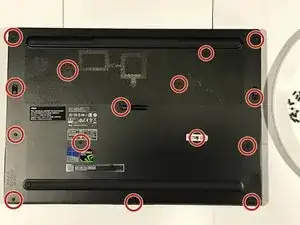
    • Rimuovi le 15 viti Phillips #00 da 6 mm dalla cover posteriore.

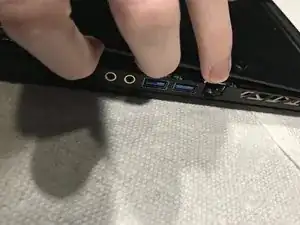
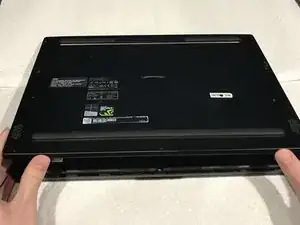
    • Rimuovete con delicatezza la cover posteriore aiutandovi con delle leve in plastica. Iniziate dalla parte frontale fino ad arrivare al lato cerniera.

    • Potreste iniziare partendo dalla porta Ethernet. Infilate un'unghia (o qualcosa di simile) sotto al pannello, lungo il bordo, fino a che non si stacca.

    • Quando rimonterete la cover dovrete inserirla fino a sentire un "clic".

  2. NFkLCmtE3FxvUiOI
    NFkLCmtE3FxvUiOI
    UDn2PiBNKxWT3lE3
    ucon63Nb5xGCiOam
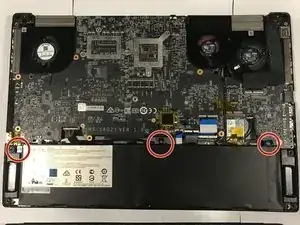
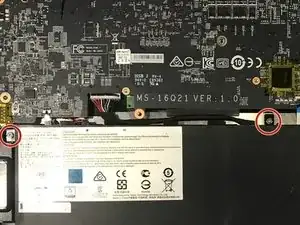
    • Svitate le tre viti Phillips #00 da 4 mm che fissano la batteria.

    • Sollevate parzialmente la batteria facendo attenzione.

    • La batteria è ancora collegata alla scheda madre, non tirate eccessivamente i cavi.

  3. xaWMvBAvvaXZId5A
    xaWMvBAvvaXZId5A
    IHBQKEjgLFkLJOML
    XN6xWglPLOIM1ZTq
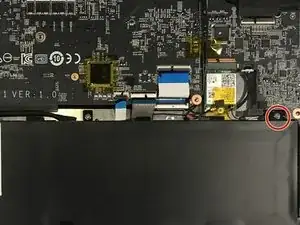
    • Scollegate il connettore della batteria tirandolo con piccoli movimenti.

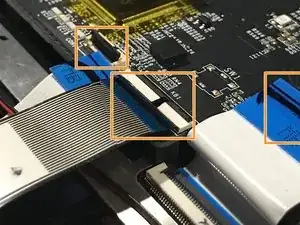
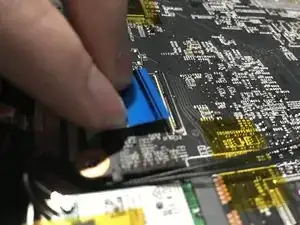
    • Sbloccate e scollegate i vari cavetti bianchi e blu dalla scheda madre sollevando i piastrini di bloccaggio neri dei connettori ZIF con una leva in plastica.

    • Dopodiché tirate delicatamente il cavo.

    • Quando rimontate il laptop, assicuratevi che i cavi con connettore blu siano completamente inseriti prima di abbassare il piastrino nero di bloccaggio.

    • In questo passaggio ci sono 4 di questi cavi con connettore blu.

  4. hdPmjCDdYXA6xWXK
    hdPmjCDdYXA6xWXK
    TYnblx4DwwRwZA5J
    QyKCCypEJHCxOR2Q
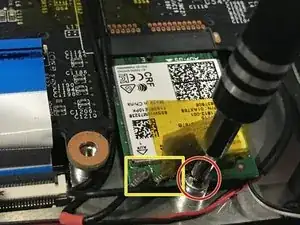
    • Svitate la vite Phillips #00 da 4 mm che fissa la scheda WiFi.

    • Fate molta attenzione a non scollegare i cavetti quando sollevate la scheda WiFi, perché potrebbe risultarvi molto difficile ricollegarli.

    • Sollevate leggermente la schedina e fatela scorrere fuori dalla propria sede per rimuoverla.

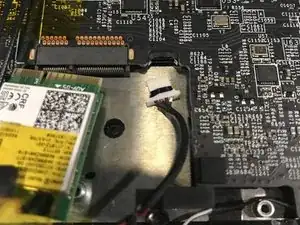
    • Aiutandovi con una pinzetta o con le dita e facendo molta attenzione, scollegate il cavetto con connettore bianco che sta accanto alla scheda WiFi.

  5. s3QKkNcxqFx1mTRQ
    s3QKkNcxqFx1mTRQ
    msYe24PrfChRDXnK
    bqiCBFHXylbxcdBt
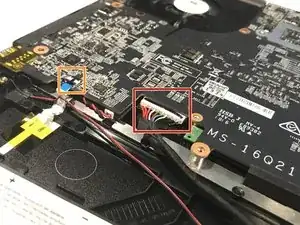
    • Scollegate gli ultimi connettori dalla scheda madre allo stesso modo di quelli blu che avete scollegato prima.

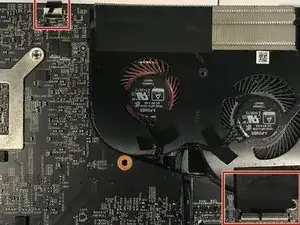
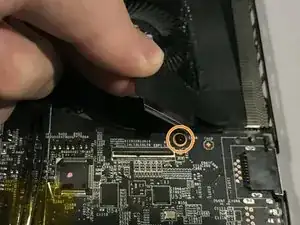
    • Rimuovete lentamente il cavo tenuto dal nastro adesivo nero dalla ventola.

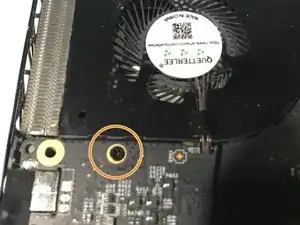
    • Svitate le due viti Phillips #00 nere da 6 mm posizionate sotto a ciascuna ventola.

    One screw is below the GPU fans, the other is beneath the CPU fan on the other side.

    Jonathan Taylor -

  6. eHx5CpxFC3tjWHYi
    eHx5CpxFC3tjWHYi
    FFDE4j6CtWenKLVb
    V6XlYBhGWGrlvP2I
    • Controllate di aver rimosso qualsiasi cavetto indicato nei passaggi precedenti dalla scheda madre.

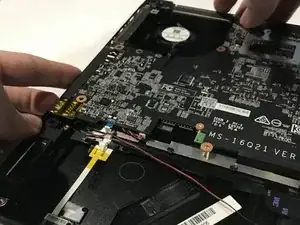
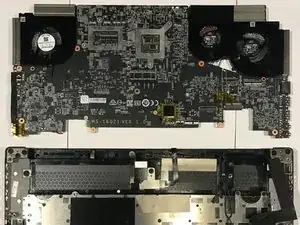
    • Estraete delicatamente la scheda madre.

    • Il metodo più facile sembra essere quello illustrato nella prima fotografia.

    • Fate passare la scheda WiFi attraverso il foro nella scheda madre che si trova tra la ventola della GPU e i circuiti stampati.

    • Non dimenticatevi di farla passare nuovamente attraverso il foro quando rimontate il laptop!

  7. wmREoKwOSRD4PKGZ
    wmREoKwOSRD4PKGZ
    gWWeKXxTlI1iCbEW
    FJyR1qSDbqFhfNn1
    • Capovolgete la scheda madre.

    • Fate MOLTA attenzione a non spanare le viti in questo passaggio! Se è la prima volta che fate questa operazione, le viti potrebbero essere difficili da svitare, quindi fate in modo di non spanarle. Potete esercitare più pressione quando svitate, ma state attenti a non danneggiare la scheda. Queste viti sono uguali a quelle della batteria.

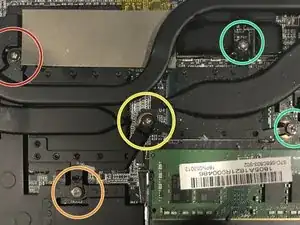
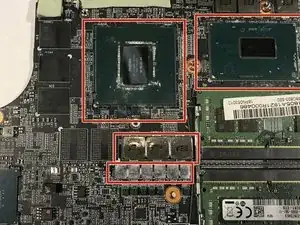
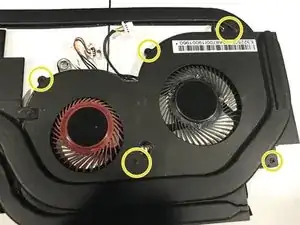
    • Accanto a ciascuna vite ci dovrebbe essere un numero, svitate le viti in quell'ordine e riavvitatele allo stesso modo (non invertite l'ordine quando rimontate). Se non siete sicuri di quale sia l'ordine, dovrebbe essere questo:

    • Prima vite: rosso

    • Seconda vite: arancione

    • Terza vite: giallo

    • Quarta e quinta vite: verde, l'ordine qui non importa

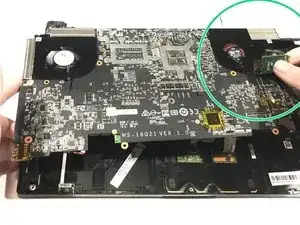
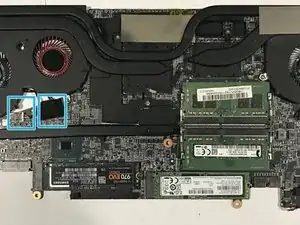
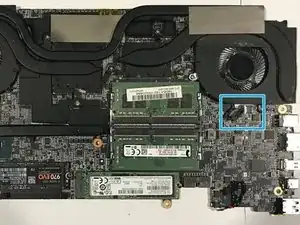
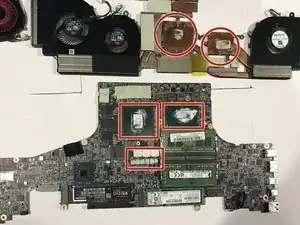
    • Scollegate i cavi di ciascuna ventola: 2 per la ventola della GPU e uno per la ventola della CPU. Uno dei due cavi della GPU si trova sotto a un nastro adesivo nero.

    I flipped the board around and placed it in the bottom part of the cover. This let me put a little more pressure down on the screws with less risk of bending the board. And OH BOY were they tight.

    jerodriguezlucas -

  8. gT2KpsuUK34jMRVT
    gT2KpsuUK34jMRVT
    blLr32VcBJ6T3vyJ
    RoPIfWWL535H2tAC
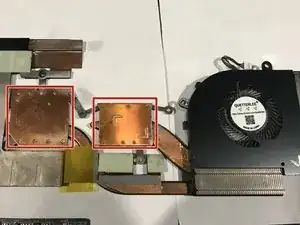
    • Ora separate le due parti con delicatezza.

    • La vecchia pasta termica potrebbe aggiungere resistenza alla rimozione del circuito di raffreddamento, in ogni caso controllate di aver tolto tutte le viti indicate nel passaggio precedente.

    • Rimuovete la vecchia pasta termica utilizzando uno straccetto imbevuto di alcol isopropilico.

    • Prima di procedere assicuratevi di aver pulito bene tutta la vecchia pasta termica.

    • Quando applicate la nuova pasta termica, tenete a mente che ne basta una piccola quantità al centro del processore e che verrà spalmata quando rimonterete il circuito di raffreddamento.

    • Fate molta attenzione a non sporcare i circuiti con la pasta termica!

  9. AiHaNAk2BKlShQGN
    AiHaNAk2BKlShQGN
    bILDpTbVPyVqLpSJ
    5RJataJw51PudwaF
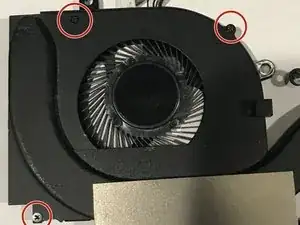
    • Per sostituire la ventola della CPU, che è quella che si sostituisce di solito, rimuovete le tre viti Phillips #000 da 3 mm dalla ventola che volete sostituire.

    • Per sostituire la ventola della GPU, rimuovete le cinque viti Phillips #000 da 3 mm dalla doppia ventola.

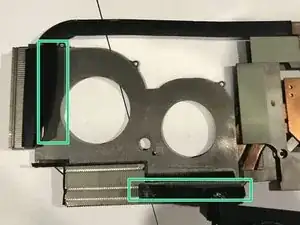
    • Togliete il potente nastro adesivo che sigilla le lamelle di raffreddamento.

    • Dopo aver rimosso la/le ventola/e da sostituire e aver montato quella/e nuova/e, seguite tutti i passaggi della guida in ordine inverso.

    • Mentre seguite la guida al contrario, ricordatevi di applicare la pasta termica e di collegare tutti i cavi.

    Great description, very helpful! Only for me it’s not necessary to remove the heat pipes. The fans can be removed by pulling them out sideways. Just a little lift of the heat pipes is enough to create room.

    Michiel van der Meulen -

    Yes what Michiel said - step 8 is unnecessary, so you don't need thermal paste. Leave it connected and just pop out and replace the fan.

    Side note: Might make sense to replace BOTH fans even if only one is having problems. I replaced the GPU fans about a year ago and now my CPU fan went out. Wish I had replaced both last time...

    Chris Bowlds -

Conclusione

Dopo aver seguito questa guida partendo dall'ultimo passaggio per rimontare il vostro portatile, collegatelo all'alimentatore, aspettate qualche secondo e poi accendetelo. Ora dovrebbe funzionare tutto a meraviglia; in ogni caso, se doveste riscontrare qualche problema, vi toccherà di controllare se avete ricollefgato tutti i cavi e i connettori alle loro rispettive prese.

Wesley Yates

Membro da: 04/02/20

190 Reputazione

10 commenti

Thanks for guide

Elliot -

Very helpful, thank you!

The only issue I encountered was removing the GPU fan. I couldn't get it from “picture 2 to picture 3” in Step 9 as easily as you did it here. Frustrating!

Scott Skanes -

Very helpful guide! I replaced the GPU fan, got it all put back together, and freaked out a bit when it didn’t power on at all… then I realized there was an important note in the conclusion to PLUG IT IN first. Phew!

Jeff Breuer -

Amazing guide. Many thanks to the author!

Alen Suran -

Could someone please explain what the heck those smaller components below the GPU chip are, that are visible in Step 8 and are outlined by 2 rectangles, and why do they also need cooling from thermal paste and heat sink?

Phas0r -

This was amazingly helpful—thank you!

Phas0r -

However, I have a few extra comments or details for anyone else doing this.

1.) I think it’s better to leave the battery connector until you flip the motherboard. On my system it was actually impossible to pull it out without at least lifting the motherboard. There’s some extra rubber pad on my laptop that is glued onto the laptop’s base and it blocks the battery connector from being pulled out. This piece is completely missing in the photo in this guide so there’s some variation between my system and the one used here. Even after lifting the motherboard so the piece was not in the way, I felt uncomfortable tugging on the electric cords rather than the plastic, because that connector is *very* tight, and it was impossible to grasp the plastic of the connector. Only after flipping the motherboard over, was I able to get a grip on the white plastic of the connector and managed to pull it out.

Phas0r -

2.) One of the ZIF connectors is oriented opposite to the others. That stumped me for a while. Most of them have the tab that you need to flip on the same side as where the cable is inserted, but one of them had the tab on the opposite side.

Phas0r -

3.) In step 4, I was also confused about how to actually pull out the WiFi card. It’s completely impossible to grasp it with fingers—there just isn’t enough room. I don’t understand the part in the guide about slightly lifting it either. Anyway, the solution is to simply pull on the kapton tape (after the screw is removed, of course) rather than trying to grab the card itself. That piece of tape makes it so easy!

4.) Also, reconnecting those “tiny wires” on the WiFi card is actually pretty simple: they just snap into the connector.

5.) I mention 4.) because for me it was impossible to thread the WiFi card through the hole by the GPU fans, as instructed in step 6. Maybe the layout of the wiring varies, but on my laptop, the wires for one of the GPU fan was blocking me from sliding the WiFi card through, and then those “tiny wires” came off the card as I was trying to do it. I say don’t bother and just disconnect them. I found out later that it was easy to reconnect.

Phas0r -

Even after the warning I strip a screw in "Step 7". How I fixed it?

1. STOP trying to get it out, you're just gonna make worse.

2. Grab a small piece of plastic tape and put it between the screw and the screwdriver. Try it now.

Note: If it doesn't turn STOP, fold the tape and try it again. Remember every time you fail you make it worse.

3. After getting it out, replace the screw with a new one. If you're as lazy as me, just use one from the battery instead.

Andres Hernandez -