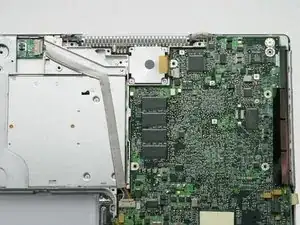
Introduzione

Sostituire una ventola difettosa è piuttosto facile e manterrà il tuo portatile alla giusta temperatura.

  1. hrdON2aDSgeNeU2G
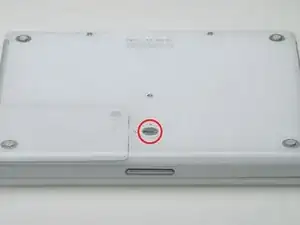
    • Usa una moneta per ruotare la vite di bloccaggio della batteria di 90° in senso orario.

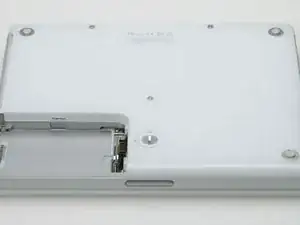
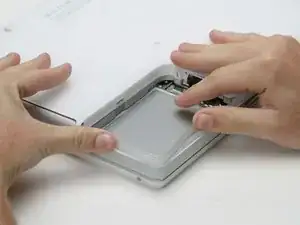
    • Solleva la batteria dal portatile.

    Also unplug the computer just before taking the two steps described above.

    Ken Horner -

  2. TAshvQ6ofQr66abp
    • Il tuo PC dovrebbe essere approssimativamente come questo.

    Don’t we need to remove the screws before the next step?

    David -

    Remove the two long screws along the back edge, and the shorter screw in the middle. Torx T-8. Pry up the rubber feet, and unscrew the three Phillips screws that hold the feet in place. Putting the silver collars back requires a little bit of fiddling to get them oriented correctly so they sit flush with the bottom case.

    Robin Ray -

    Step 10 should come after step 15.

    Robin Ray -

  3. YPApTHnrHf5XuLo5
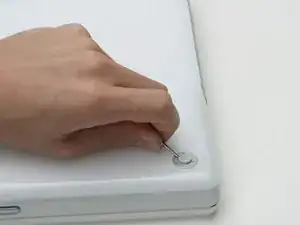
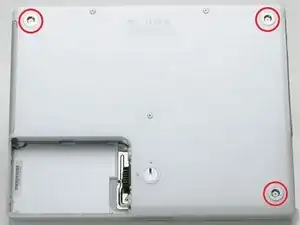
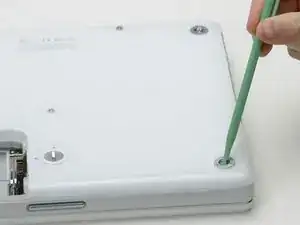
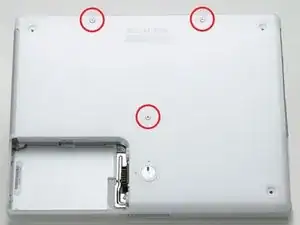
    • Utilizza un ago (o un oggetto che preferisci) per rimuovere i tre piedini di gomma dalla parte inferiore del dispositivo.

  4. jp2cyAVPdd4NU4st
    • Rimuovi le tre viti a croce Phillips di 5,2 mm appena scoperte.

    Screw sizes are 2.5mm x 6mm flat low profile head or cheese head.

    Xnriqu -

    this should be after step 12 no?

    panakabear -

    This should be step 3.

    Ken Horner -

  5. FcMBBGQMOfyHQTjP
    • Utilizza uno spudger o un cacciavite a taglio per svitare i tre anelli di metallo contenenti i paraurti in gomma.

  6. T5fFqxZCPhLYpPdM
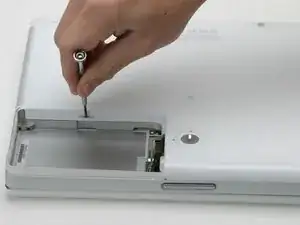
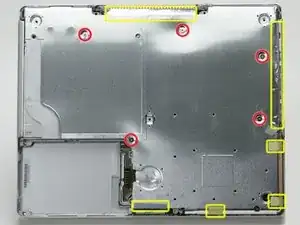
    • Rimuovi la vite esagonale di 10 mm e le due di 20 mm utilizzando un cacciavite hex di 2 mm. In alternativa, utilizza un cacciavite a chiave Torx T8.

    FYI, the two screws at the top of this picture are longer than the one in the middle of the case. Don't mix them up!

    JuciusMaximus -

    Top screws are 20 mm, middle one is 10 mm. These have thread lock.

    commenter -

    The 3 long screws (not the ones under the rubber feet) are 2.5mm x 20mm metric. Head style is cheese head. i found replacements for these at ACE hardware, for about $0.08 each in a flat head drive style which IMO are better than the hex style that can easily be stripped.

    Xnriqu -

    I'm using a T9 here as my T8 is way too small.

    Matt -

    Two of the hex screws here got stripped. Please, replace them ASAP and I would recommend not putting them back just to not risk making them stuck. I spent 30 minutes trying to get those two out.

    Anton Barbone -

  7. sY3IBOLySFJcsHvK
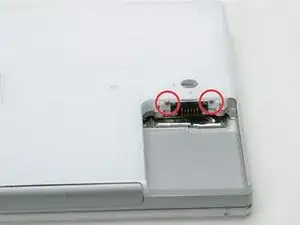
    • Rimuovi le due viti a croce Phillips di 4,2 mm da entrambi i lati dei contatti della batteria.

  8. GNldj36AZSe61Qa1
    • Respira profondamente. Potresti dover provare diverse volte, ma ti promettiamo che il case inferiore viene fuori.

    • Spingi dentro i bordi sottili del case inferiore che circonda il vano batterie, piegando in dentro le alette, dopodiché sollevalo per liberare quell’angolo del case inferiore.

  9. qmSVaUO6YekPIwhH
    • C’è una fessura sulla parete del vano batteria che blocca il case inferiore in posizione. Utilizza un piccolo cacciavite a taglio per sollevare il bordo inferiore della fessura e tira su il case inferiore per liberare la fessura dalle alette che lo trattengono.

    If your iBook's been opened many times (Like mine has been) then this piece may be broken.

    If it's cracked down the middle or a little off, what you'll want to do is use your bent paperclip from a few steps later (or another screwdriver) and pull the second piece away from the shell when you start lifting. should pull right out

    Christian Wacker -

  10. JL3UxJ6ebTfH6511
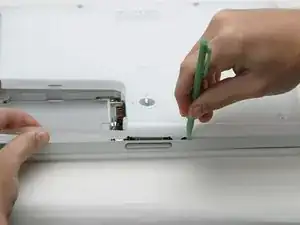
    • Fai scorrere uno spudger lungo la giuntura tra il case inferiore e quello superiore sulla parte anteriore del computer per liberare le alette che bloccano il case inferiore. Solleva il case inferiore e continua a utilizzare lo spudger fin quando senti tre click distinti.

  11. fPhExjIgBC1ISmwn
    • Continua a far scorrere lo spudger intorno all’angolo destro anteriore. Ci sono due alette sul lato del computer con le porte, una vicino all’angolo anteriore e l’altra vicino alla porta da cui esce il suono.

    isn’t this step out of order? It belongs much later I think

    panakabear -

    This should be step 4.

    Ken Horner -

  12. oSHmIJHiWFNq1bOR
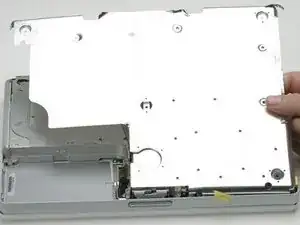
    • Una volta che la parte anteriore e i lati del case inferiore sono liberi, gira il computer in modo che la parte posteriore sia rivolta verso di te e tira il case inferiore in alto e verso di te fino a quando le alette non si liberano (potrebbe esserti utile muovere il case su e giù).

    You might wanna use your spudger to pry up those back tabs to. You might break the bottom case just wiggling around waiting for it to pop loose.

    neato -

    The orange screw on my machine has no head on it and is simply a flat surface. There is no way to remove it and consequently I completely trashed my unit attempting to remove the top cover.

    There went a few bucks all for nothing as I had a spare HD sitting here ready to put in!

    Calum -

    Be aware that you may need to use a spudger at the front of the computer to separate the metal shield from the bottom case.

    michael leahy -

  13. 2cHZO2WNAGejhuyj
    • Rimuovi le piccole molle unte con i tappi di plastica bianchi da entrambi i lati dei contatti della batteria.

    Clean the springs and put them back, hopefully without breaking the small plastic pieces on the top of each spring. One of mine broke off and the other one was already missing. Poor design.

    Ken Horner -

  14. Z5KoHOuUkSQUF2qG
    • Il tuo portatile dovrebbe apparire all'incirca così.

  15. sLKILBRasqJj6MYB
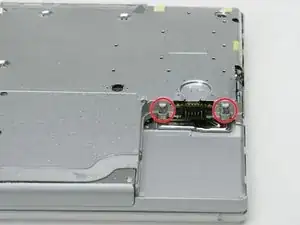
    • Rimuovi le cinque viti a croce Phillips da 5,8 mm dalla cover inferiore.

    • Togli il nastro adesivo e il foglio di schermatura delineati nell'immagine.

    Upper left screw is 4.5 mm and has smaller head. The other four are 6 mm.

    commenter -

    Don't peel back the long foil shielding pictured top right! It should stay attached to the bottom shield that you are removing.

    neato -

    Citazione da commenter:

    Upper left screw is 4.5 mm and has smaller head. The other four are 6 mm.

    All of the five screws are the same 6 mm in length (iBook G3 600 MHz)

    florguh -

  16. 5MG5yuWjBD1sAQn6
    • Solleva la cover inferiore.

  17. wSxIkBNRAKuQbCHA
    • Il tuo portatile dovrebbe apparire all'incirca così.

  18. SHV2VdaDGRelrKga
    • Rimuovi la vite a croce Phillips sul lato sinistro della ventola (potrebbero esserci due viti).

    • Tira fuori la ventola dal suo alloggiamento e scollegala dalla scheda logica.

Conclusione

Per riassemblare il tuo dispositivo, segui le istruzioni in ordine inverso.

iRobot

Membro da: 25/09/09

0 Reputazione

0 commenti