Introduzione
Ero preoccupato per l'acquisto dell'iMac 27" di fine 2015 perché c'erano così poche informazioni al riguardo. Ho potuto trovare solo alcuni video specifici per lo smontaggio e pochissime informazioni sull'aggiunta o l'aggiornamento ad un SSD.C'erano tonnellate di informazioni sul modello del 2014 e dell'inizio del 2015, ma niente su quello di fine 2015. Quindi eccoci qui.
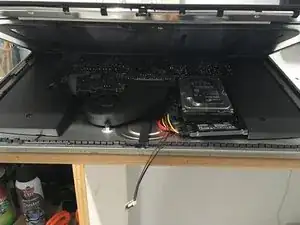
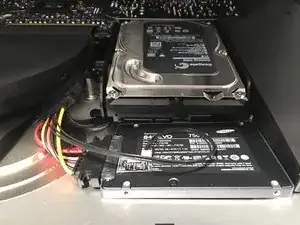
Scollegherò il cavo SATA e di alimentazione dall'HDD, aggiungendo un SSD da 2,5" (lasciando l'HDD al suo posto).
Strumenti
-
-
L'apertura dell'iMac Retina può essere complicata e servono gli strumenti giusti. E ti serviranno alcune cose per aprire il case e per installare correttamente l'SSD.
-
Ecco la guida aggiornata di iFixit sullo smontaggio che ti mostra in cosa ti stai cacciando. Smontaggio display iMac Intel 27" Retina 5K
-
E i nostri amici di OWC hanno un ottimo video su come rimuovere completamente l'HDD e sostituirlo con un SSD, ma la presente guida mostrerà come lasciare semplicemente l'HDD e installare l'SSD. https://vimeo.com/139364064
-
Assicurati di avere gli strumenti essenziali, come: Pro Tech Toolkit e Jimmy per aprire l'iMac, io ho ho usato un bisturi medico, essendomi accorto che il "plettro per chitarra" era troppo debole e troppo spesso. Il "Jimmy" sarebbe un ottimo sostituto del bisturi.
-
Avrai bisogno anche del sensore termico digitale OWC In-Line, in modo che la temperatura dell'iMac rimanga sotto controllo. Altrimenti le ventole gireranno a tutta velocità. Questo kit OWC include anche il nastro necessario per richiudere il case dell'iMac. https://eshop.macsales.com/item/Other%20...
-
-
-
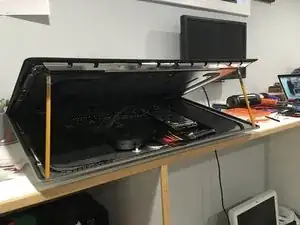
Le guide aggiornate di iFixit e OWC suggeriscono di scollegare i cavi del display, in questa guida non sarà necessario. Ho tenuto il mio iMac in posizione orizzontale e dopo aver aperto il display ho semplicemente usato due normali matite per reggere il display su entrambi i lati.
-
-
-
Qui puoi vedere che ho staccato il cavo SATA dall'HDD, ho collegato il cavo del sensore termico OWC e ho già collegato l'SSD.
-
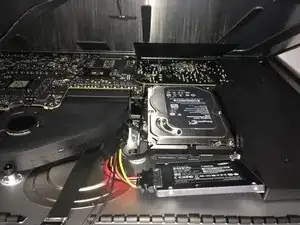
Il cavo OWC è un po' rigido, ma è bastato attorcigliarlo un po' per far sì che l'SSD poggiasse piatto all'interno dell'iMac. L'intera nicchia dove ho posizionato l'SSD è normalmente vuota, il posto perfetto per un piccolo SSD.
-
-
-
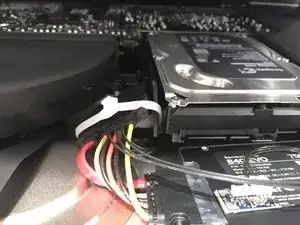
Successivamente ho collegato il sensore di temperatura all'SSD, mantenendo i cablaggi il più possibile ordinati e compatti.
-
Qui ho anche fissato l'SSD all'iMac con alcuni quadrati adesivi 3M. Dato che l'iMac proprio qui presenta una curvatura, avevo bisogno di qualcosa che lo tenesse in posizione, ma che fosse anche più spesso della maggior parte degli adesivi. https://smile.amazon.com/dp/B00O1WFF8U
-
Ho usato quattro quadrati in totale, ma li ho raddoppiati. Impilandone uno sopra l'altro due volte; uno nella parte posteriore sinistra e uno nella parte anteriore destra.
-
-
-
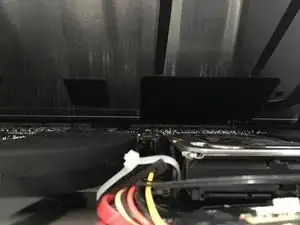
Da ultimo ho semplicemente legato il cavo del sensore termico al supporto dell'HDD con una fascetta per tenere tutto al suo posto.
-
Volevo anche tirare il cavo OWC il più lontano possibile dal display. Come si può vedere dalla seconda immagine c'è ancora molto spazio, poiché il cavo OWC e la fascetta sono ben al di sotto dell'HDD e del condotto della ventola.
-
-
-
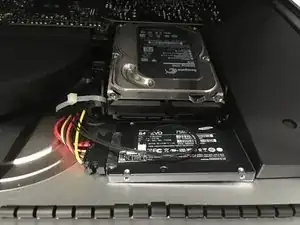
Ecco fatto! Non posso usare l'HDD da 2 TB, ma sono stato in grado di installare un SSD con il minimo sforzo e rischio senza rimuovere il display, scollegare i cavi del display, o rimuovere l'altoparlante, o l'HDD.
-
Come bonus, le versioni HDD dell'iMac sono distribuite come "Fusion Drives" e quindi hanno anche un SSD PCIe. Il mio aveva un SSD da 128GB installato, quindi ora ho accesso a questo come unità extra. Ho intenzione di installare Windows sull'unità PCIe tramite Boot Camp.
-
Per rimontare il dispositivo, segui queste istruzioni in ordine inverso.

126 commenti
Hello, in the last part of closing the iMac, what is the adhesive that you use? I bought some on ebay but its not strong enough. thanks.
PCosta -
My link was in the post: https://eshop.macsales.com/item/Other%20...
It includes the thermal sensor and the tape.
If you are installing an SSD to replace the HDD on iMac 2013 and later, you don't even need the thermal sensor cable from OWC because the heat info will be read through S.M.A.R.T. I think that OWC thermal cable for iMac 2013 and later is a scam. The reason why you need the thermal sensor is that Seagate HDD has a proprietary thermal port back in 2010. The thermal info cannot be read by SMART back then. The new iMac from 2013 (probably 2012 included) will no longer need the thermal sensor cable.
Evan -
Well, unless someone has a definitive answer on if it's needed or not I'd still recommend it. Plus it comes with the tape needed to secure the iMac.
Doesn't the newly installed SSD block the fans natural airflow path being placed there?
@chrisray No. The new 5K iMacs have the external fan hole coming out the center of the back of the case. The older iMac's had a thin vent that ran horizontally along the top third of the back case, and that might have been blocked. But on the 5K iMac the plastic fan in the middle pushes air straight out that vent on the back. The SSD does not impede on that at all.
Can you use SSD Fan Control app to keep the fan at the normal speed?
A VIEW -
Why would you want to? Just use the thermal sensor and the fans will stay in check, no need for a piece of software. https://eshop.macsales.com/item/Other%20...
Justin Winchester -
So this guide basically shows you how to install a regular non Apple SSD in a imac that already has a “fusion drive”?
So now you have the hdd that was not moved and the Apple pcie ssd and now the new non Apple ssd right?
gleeglee217 -
Correct. The big take away is that I didn't have to move or remove anything. I was able to add my own SSD, and use Apple's built-in SSD. However I did lose the 2TB Fusion drive, and I'm not the least bit sad about that.
Justin Winchester -
Thanks for the guide, One question though. Did you find or have experience any issues being the fusion drive still in there? Not sure how the two SSD's would behave and work, but i want to make sure there are no conflicts between them. Also, I am assuming you must have seen lot of improvements in terms of performance, read/write, speed etc after the SSD replacement, right? Mind sharing the before and after if you have recorded something?
Mohit S -
The fusion drive is completely disconnected, so it does nothing but take up space.
Modern computer can handle multiple drives, doesn't matter their type. The SSD are two different drives so the iMac just mounts as such. The iMac (or any computer) can really handle as many drives as you could connect to it, internally, or externally. So no there would be no conflicts between SSDs, HDDs or any mix thereof.
Yes, SSDs are insanely faster and better in every way. I did not run any benchmarks because I never even booted this iMac with the Fusion drive. I installed the SSD before I even booted it up for the first time. But you can look up any benchmarks for my SSD vs a standard WD 7200RPM drives
Justin Winchester -
In Justin’s case, the boot time would probably not change all that much since the operating system is effectively on the ssd part of the “fusion drive.” The big performance improvements will start to show up when you put more than 128 GBs of data on your system.
Rick Harman -
Can someone explain why the existing hard drive doesn’t need the OWC thermal sensor? Why can’t you just disconnect the cables from the HDD and reconnect them to the replacement SSD?
Copywriter Ben -
This config just leaves the HDD in place unused, Instead of removing it. All you are doing here is saving a few bucks for the 2.5” to 3.5” adapter frame and fully removing the HDD.
The original Apple HDD has a build in thermal sensor which Apple leverages. When you replace the drive with either a HDD or SSD you need to replace the now missing sensor Apple uses to manage the systems cooling. Thats why you need to add the OWC in-Line sensor.
Dan -
As Dan stated, any drive other than Apples requires the thermal sensor. And yes it only saves you a bit of money ($15 dollars) but it saves you A LOT of time, makes the SSD addition WAY easier, and you are FAR less likely to damage your iMac since you don’t have to remove any components.
Justin Winchester -
Bonjour, question de novice mais peut-on ajouter plutôt un SSD M2 sur l’iMac 27" (fin 2015) ? Avec la même procédure ?
Vincent -
No you cannot.
Justin Winchester -