Introduzione

Guida solo prerequisita! Questa guida fa parte di un'altra procedura e non va usata da sola.

Usa questa per disconnettere la batteria in sicurezza prima di iniziare le riparazioni in un MacBook Air di inizio 2020.

  1. 4a1VSQBgdQXAZah2
    • Prima di iniziare questa procedura dovresti disabilitare la funzionalità Auto Boot del tuo Mac. Auto Boot accende il tuo Mac quando apri il coperchio con lo schermo può attivarsi accidentalmente in fase di smontaggio. Usa questa guida oppure segui le istruzioni abbreviate qui sotto per disabilitare Auto Boot.

    • Se il tuo MacBook funziona con Big Sur v11.1 o successive, disattivare l'Auto Boot potrebbe non funzionare. Puoi procedere normalmente, ma assicurati di scollegare la batteria appena sei dentro.

    • Prima di iniziare, spegni completamente e stacca dall'alimentazione il tuo MacBook Pro. Richiudi il display e ribalta il laptop mettendolo a faccia in giù.

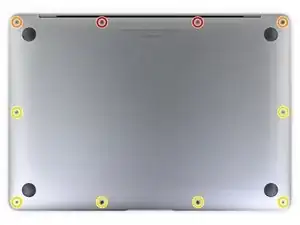
    • Usa un cacciavite pentalobe P5 per rimuovere le viti seguenti:

    • Due viti da 7,9 mm

    • Due viti da 7,1 mm

    • Sei viti da 2,6 mm

    • Per tutta la durata della riparazione, tieni traccia di ogni vite e assicurati di rimetterle dov'erano per evitare di danneggiare il tuo MacBook.

    P5 is also a PL4 (so confusing) - i like the wiha 26764 thanks to @mayer for this post. P5 pentalobe and 1.2 pentalobe screwdriver

    greg -

  2. 4Kra6VLGEa3eGmd6
    4Kra6VLGEa3eGmd6
    n2KBoBfiUOZCO63H
    t3JGRsWcjgyPKFRl
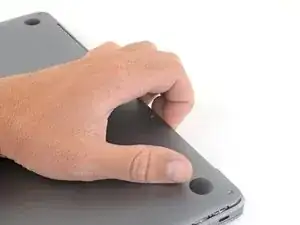
    • Infila le dita tra lo schermo e il case inferiore per sollevare dall'Air la cover stessa.

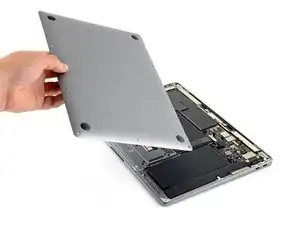
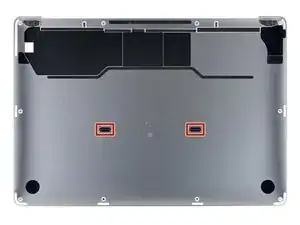
    • Rimuovi il case inferiore.

    • Per reinstallare il case inferiore:

    • Posizionalo e premi con decisione per far scattare le due clip nascoste sotto. Dovresti percepirle e sentirle scattare al loro posto.

    When reassembling, the “snaps” are in the middle of the laptop (from top to bottom), and just to the left and right of center. I assumed it was near the hinge so it took a bit for me to hear the snaps.

    Laurie McCall -

    Laurie, the two clips are outlined in the third photo of step two. Hope this helps—happy fixing!

    Carsten Frauenheim -

    What tool kit should I use for this?

    Lucas Lee -

    the second picture is m1 air right?

    the antenna cable position does not match later picture

    Paul -

  3. xVJrmDjjKX3L1VEp
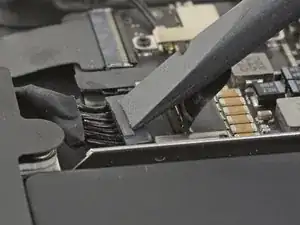
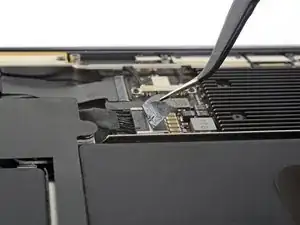
    • Stacca il nastro adesivo che copre il connettore della batteria quanto basta per scoprire lo stesso connettore.

    This image is incorrect correct for the A2179 EMC 3302 model, also doesn’t match the next image in this guide

    Steven Friar -

    There is other guide for the model you reffer to, I was using that one until i realize it was different, this is the one you are looking for: MacBook Air 13" Retina Late 2020

    Marco Rojas -

    I initially thought the image was incorrect, but I was just looking for the connector in the wrong place. This picture IS correct for the A2179 EMC 3302. Note that the connector is on the left side of the heat sink (the black thing with parallel ridges in the picture and on the computer), and the connector wires gather together towards the left the side of the computer, not the back. Note that "left side" assumes the Air is upside-down, with the hinge on the side farthest away from you (I'm not doing the "right speaker is on the left side because it's upside-down" thing that iFixit does in step 5).

    Bryan Gillson -

    How do you find out if you have a Retina Late or Retina Early model?

    Inji E -

  4. NZT3TL4hoGyeLE6L
    NZT3TL4hoGyeLE6L
    XZ2jGZmJoO1c5OHn
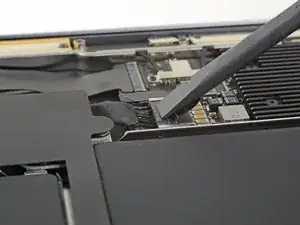
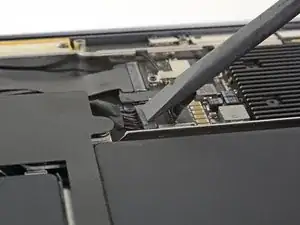
    • Usa uno spudger per far scorrere il connettore della batteria parallelamente alla scheda logica, tirandolo fuori dal suo zoccolo sulla scheda.

    It’s stuck can’t get it out

    Jeansceem Jeansceem -

Conclusione

Per rimontare il tuo dispositivo, segui queste istruzioni in ordine inverso.

Carsten Frauenheim

Membro da: 10/03/20

110750 Reputazione

0 commenti