Introduzione

Guida prerequisita per scollegare la scheda logica di un MacBook Air 2019.

  1. mCpNcwDmVvCIexvU
    mCpNcwDmVvCIexvU
    WCiJUh1bJboPNur2
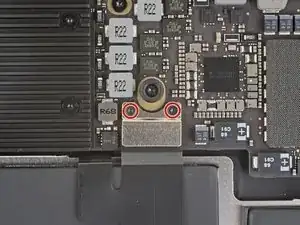
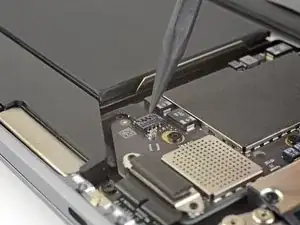
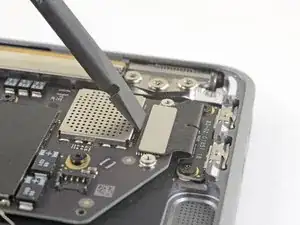
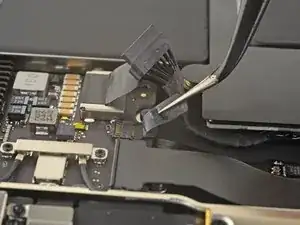
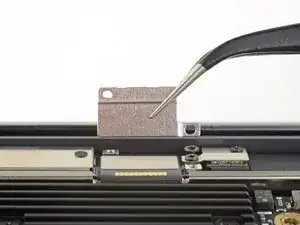
    • Usa un cacciavite Torx T3 per rimuovere le due viti da 1,4 millimetri che fissano la staffa del connettore del trackpad.

    • A seconda delle condizioni delle tue punte, potrebbe essere più adatto utilizzare un cacciavite Torx T4.

    • Rimuovi la staffa del connettore del trackpad.

    My machine used T4 screws

    johann beda -

    Me too! I tried with T3 and it wasn’t working.

    Rose Alshuaibi -

    I stripped my screws trying to get them out with a t3 driver...

    Aubrey Corcoran -

  2. Sw6VN6VuYRYAnW2T
    Sw6VN6VuYRYAnW2T
    iGLvdxo4pDlVZOh6
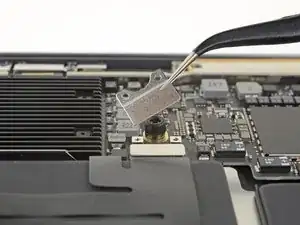
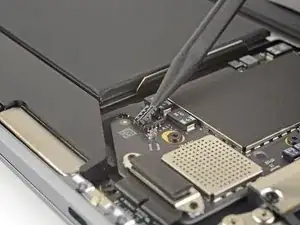
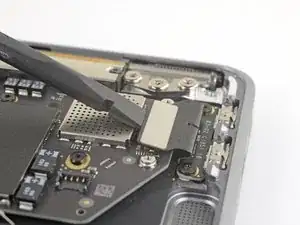
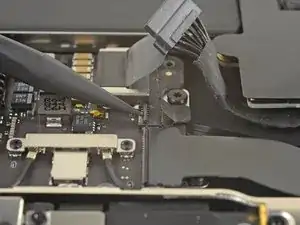
    • Usa l'estremità piatta di uno spudger per far leva sul connettore del cavo del trackpad per sollevarlo dal suo zoccolo.

  3. 2ANOeBCRlLS1Elpu
    2ANOeBCRlLS1Elpu
    gVBNK32AwYwuWQFx
    hRm4xZQXbIkkT4O5
    • Se lo speaker di sinistra è già stato disconnesso, salta questo passo.

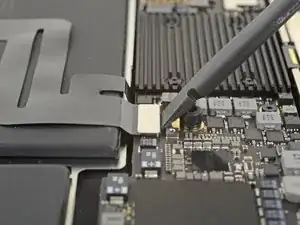
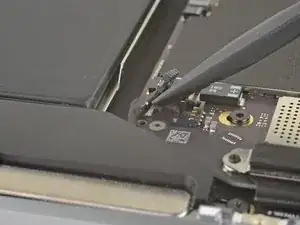
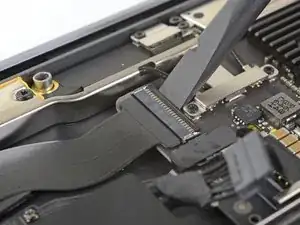
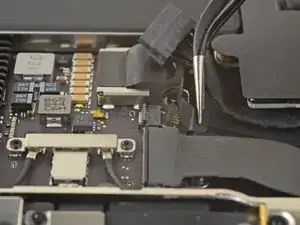
    • Fai scorrere l'estremità di uno spudger sotto il cavo dell'altoparlante e fai leva per sollevare il cavo stesso e scollegare l'altoparlante.

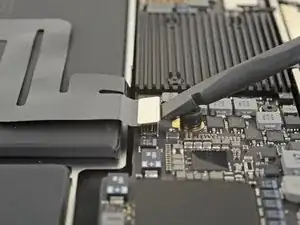
    • Con il connettore scollegato, fai scorrere l'estremità piatta di uno spudger sotto il cavo per staccare l'adesivo che fissa il cavo alla scheda logica.

    I think step 15 was a mistake because it’s a repeat of step 10.

    Ryan R -

    Yeah, the speaker is already removed at this point.

    Jason _ -

  4. IHRbrlPXF2JApiqk
    IHRbrlPXF2JApiqk
    LyZ1foqy1wvBlOiv
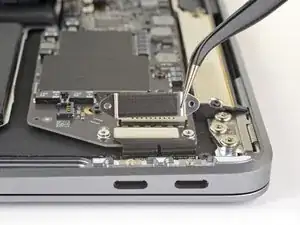
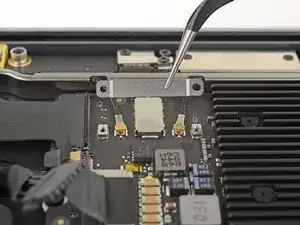
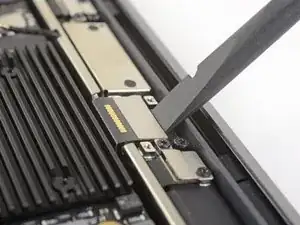
    • Usa un cacciavite Torx T3 per rimuovere le due viti da 1,3 mm che fissano la staffa del connettore della porta USB-C.

    • Rimuovi la staffa del connettore USB-C.

    There is no need to remove the logic board!!

    Skip steps 16 through 28 and go to step 29 to release the trackpad cable from the battery. then follow steps to 30 through 33 to release the battery. The battery can be removed by slipping it counter-clockwise under the trackpad cable. The new battery can be slipped in place in the same way.

    Much easier!!

    josephgray -

    Agreed. Took me a minute to realize that I had to slide the top right screw bracket between the logic board and the case to get enough clearance for the rotation. Many thanks.

    w98fxr -

    Removing a few of the logic board screws allowed me to get the to right screw bracket under the logic board to give enough clearance as w98fxr mentioned.

    johann beda -

  5. M3RvYGtmREQuaLZ2
    M3RvYGtmREQuaLZ2
    B6AMphVrIvwKpisH
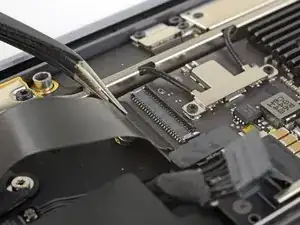
    • Usa l'estremità piatta di uno spudger per sollevare il connettore del cavo USB-C fuori dal suo zoccolo sulla scheda logica.

    please reconsider removing the logic board and and usb-c connector as is recommended in the prior step. i had a very difficult time reconnecting the usb-c connector

    Mario Obejas -

  6. BjgmhIFsgtdRtuUi
    BjgmhIFsgtdRtuUi
    hgUoCSOomRaZZNMa
    XNTm2JBIuDLHFUKi
    • Usa uno spudger per sollevare la piccola aletta di bloccaggio del connettore ZIF del cavo della scheda audio.

    • Fai scorrere il cavo della scheda audio fuori dal connettore ZIF.

  7. RK65AOeFDCjfyyWv
    • Stacca il nastro adesivo nero che copre il connettore del cavo della ventola.

  8. EvCAoAoChgdZSUpP
    EvCAoAoChgdZSUpP
    VORkbyxUw5mQoLXP
    EBqFtxhhx5MFDscb
    • Usa l'estremità a punta di uno spudger per sollevare l'aletta di bloccaggio del connettore ZIF del cavo della ventola.

    • Fai scorrere il cavo della ventola fuori dal connettore ZIF.

    There may not be a locking flap. If not, just pull the fan cable out of the ZIF connector.

    rmilton -

  9. tXgZY3PV2kPaADlE
    tXgZY3PV2kPaADlE
    WAgCyw6YIrvC3RQH
    • Usa un cacciavite Torx T3 per rimuovere le due viti da 1,4 mm che bloccano la staffa del cavo di antenna.

    • Rimuovi la staffa del cavo di antenna.

    These are T4 screws

    Richard Arnett -

    The MBA I just finished with were T3. I'm fairly confident with my tools as I recently updated/upgraded nearly my entire set with WiHa. I should also mention the many tools acquired from iFixit over the years have all been were exceptional lasting years. There's no doubt iFixit would have been my source but a close friend went to work for WiHa. His discount(s) & being motivated to help him was a major impact. For anyone not having such an advantage IMHO tools from iFixit are one of the best values anywhere. Let's not forget; buying from iFixit will also help to push "Right to Repair" forward. Here in Minnesota Right to repair ALMOST PASSED. Many believe it will become law during the next session! I can't tell you how proud this would make me. I would obtain as many service manuals as possible and post them all online!!! What a great dream...

    admin -

  10. SIwpML6D2V1THnvW
    SIwpML6D2V1THnvW
    HSbt4VrCJOZJWJeX
    vMkn5IqQ1LgQrMRK
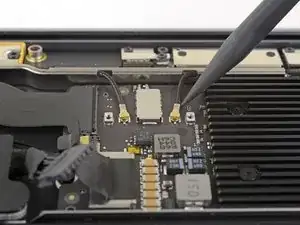
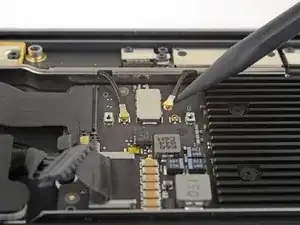
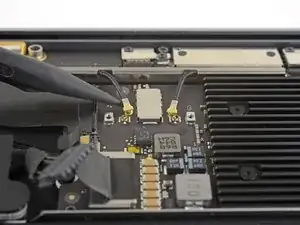
    • Inserisci l'estremità punta di uno spudger sotto uno dei cavi di antenna vicini al connettore. Fai leva per alzare e scollegare il cavo.

    • Ripeti l'operazione per l'altro cavo di antenna.

    Be SUPER SUPER CAREFUL pulling off the gold WiFi antenna connectors! As described, use the spludger to press up the black cable just behind the metal connector. I tried to ping them off from the bottom of the gold connector where it clips into the socket on the motherboard and ended up pulling off the SMD sockets from the motherboard - huge and costly mistake that will probably render it useless.

    Neale Whyatt -

  11. JwduCSLFH2CcraAQ
    JwduCSLFH2CcraAQ
    kTylWJvDOGiAPbQS
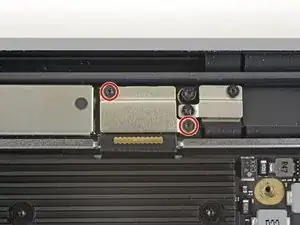
    • Usa un cacciavite Torx T3 per rimuovere le due viti da 1,5 mm che fissano la staffa del connettore del cavo dello schermo.

    • Rimuovi la staffa del connettore del cavo dello schermo.

  12. cELhRfbeZrcbMPps
    cELhRfbeZrcbMPps
    kHkPDOnxWduTqHLa
    • Usa l'estremità piatta di uno spudger per sollevare il connettore del cavo dello schermo.

    How do I reconnect display connector??

    Kris Queck -

    Just align the plug section of the display flex with the socket on the logic board and gently press it in until it locks in place. Do not force it but just ensure it’s correctly aligned before pushing it into the socket.

    Peter Newman -

    Pro tip: You can remove the two T5 screws on the LCD connector side (located to the right of the display connector and to the left of the heat shield). From there, tilt the whole skinny LCD board towards the logic board connector and gently pinch the connector in to the socket. Before laying the skinny board back down, screw in the shield from Step 15 so it doesn’t pop out of the socket again.

    jason4 -

Conclusione

Per rimontare il tuo dispositivo, segui queste istruzioni in ordine inverso.

Adam O'Camb

Membro da: 11/04/15

195148 Reputazione

0 commenti