Introduzione

Segui questa guida per installare correttamente l'adesivo sullo schermo del tuo Google Pixel o Pixel XL dopo una riparazione.

Alcuni schermi di ricambio non includono la griglia della capsula auricolare. Se il tuo schermo di ricambio non la ha, assicurati di trasferirla da quello originale prima di installarlo. Oppure puoi acquistarne una nuova qui.

Prima di iniziare, dovresti già aver rimosso lo schermo del tuo Pixel e averlo messo da parte. Puoi trovare le istruzioni dettagliate per entrambi i modelli ai seguenti link:

Google Pixel

Google Pixel XL

  1. xTF46TySntNsiFJl
    xTF46TySntNsiFJl
    CvMLkMkJe3RPXGtk
    hjZTVJQtZ6G1qMBR
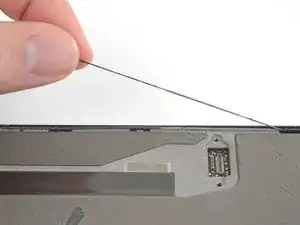
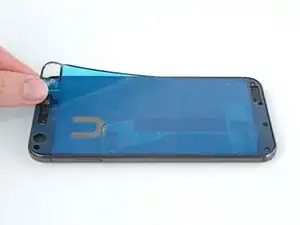
    • Stacca e rimuovi tutto il vecchio adesivo del display dalla scocca del telefono.

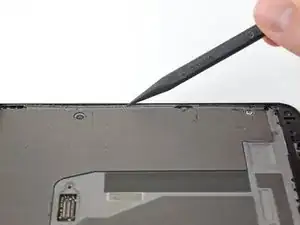
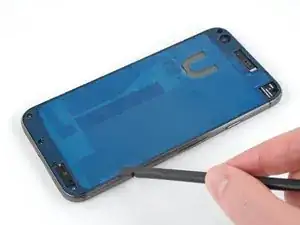
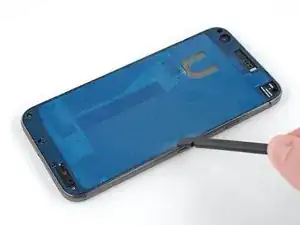
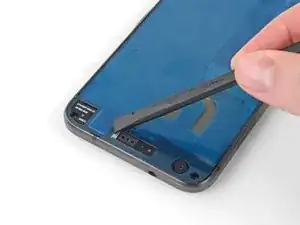
    • Usa la punta dello spudger per pulire e rimuovere residui di colla.

    • Utilizzando strumenti di metallo potresti graffiare il vetro!

    • Se stai reinstallando il display che c'era già, rimuovi anche tutto il vecchio adesivo da quello.

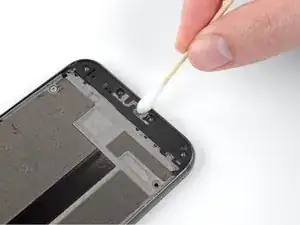
    • Per risultati ottimali, pulisci l'area sotto la colla rimossa con alcol isopropilico al 90% o superiore per preparare la superficie per il nuovo adesivo.

    • Sebbene l'alcol isopropilico ad alta concentrazione sia generalmente sicuro per l'uso con l'elettronica, può intaccare l'imbottitura in schiuma sul telaio centrale. Fai attenzione mentre pulisci i bordi stretti del telaio.

    Isopropyl Alcohol will damage the foam padding if you aren’t careful - the pad will dissolve away.

    Jackson Schleich -

    That’s a good point, Jackson! I added a warning to the step.

    Taylor Dixon -

    What if i remove the foam padding? Is it okay to install the display back without the foam?

    PalmY Phokham -

    That’s okay! The foam padding just acts as a support for the display, so your new display might be a little more vulnerable to a crack in the future. If you’re really worried about it, you can look for a replacement midframe part with the foam still attached.

    Taylor Dixon -

    Removing the adhesive took FOREVER for me. What ended up working best for me was to use a dry thumb and friction rubbing back and forth to get the gummy adhesive to kind of ball up and come off. Oh, and to really get the bits of adhesive along the edges I ended up removing the midframe to more easily get at it. Finally, I used rubbing alcohol and Q-Tips to get any remaining bits and pieces.

    Steven Crider -

    +1 on removing the midframe to clean it… it’s a hassle to remove if you’re only replacing the screen, but it keeps you from accidentally melting the foam padding with IPA.

    Mr. Porter -

    A lot of the adhesive was stuck to my screen rather than the chassis. In the process of scraping it off, I removed some of the white paint which served as the background near the speaker area. This is kind of unsightly and noticeable when reinstalled. You might want to caution folks to use a rubber utensil rather then the metal one I used, as the background on the display side can be scraped off and leave a gap in the paint.

    Eric Kreps -

    I used a spudger for the most part, combined with some heat from a hairdryer from time to time, and lots of isopropyl alcohol (at least on the screen half… as mentioned by others, be careful about going too crazy with IPA on the midframe, as the pad will melt.) At one point, I got a little cocky and tried using my tweezers (dipped in IPA), and it worked great for about 30 seconds before I left a small scratch… which is visible from the outside.

    Only use non-abrasive, non-metallic tools for cleaning.

    Mr. Porter -

  2. MooIq3wXf33HLMWs
    MooIq3wXf33HLMWs
    O16JACqLjYoHYZQs
    c14tcRUZwTKfQD1v
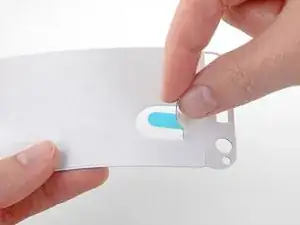
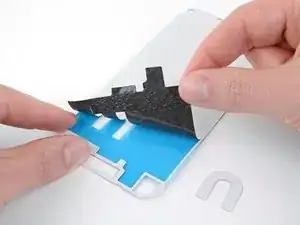
    • L'adesivo di ricambio dovrebbe essere applicato solo ai bordi della cornice, ma potrebbe arrivare con la parte centrale piena.

    • Per rimuovere la parte centrale non necessaria, rimuovi attentamente la parte centrale degli strati bianco (carta) e nero (adesivo) , iniziando dall'apertura a forma di U.

  3. TXHIHb6RvlpboXSH
    TXHIHb6RvlpboXSH
    BBrEx3PwHKueX43X
    • Rimuovi e scarta la restante protezione in carta, scoprendo l'adesivo sottostante.

    What the pics above don’t really point out is that - at least for the example I received - If you start out at one top corner and are extremely careful, you can peel the backing off in essentially one piece going down along the long edge, along the bottom and back up the other long edge to the other top corner. I messed that part up but once I was done it was clear that’s how it was supposed to work. That said, mine had an extra piece of backing up top that was separate from the rest which had to be pulled off after.

    Also, I managed to stretch out one of the long edges and had to snip it with scissors to get the pieces to fit properly. So, be careful about that but if it happens it’s really no big deal to fix.

    Steven Crider -

    There is a little square on the adhesive covering that should be removed before you remove the rest. Otherwise, you will have just that little chunk of covering left, and won’t be able to touch much of the adhesive pad while trying to get it off. I managed it, but doing it the other way around would have saved frustration and removed any risk of stretching out the glue.

    Can we all agree that thinner phones is not worth this crap?

    Jessy Exum -

  4. OvZl1YUIfRMAqIVn
    OvZl1YUIfRMAqIVn
    bFjRfeti2pNVGKxJ
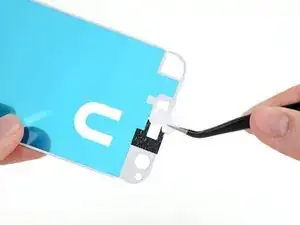
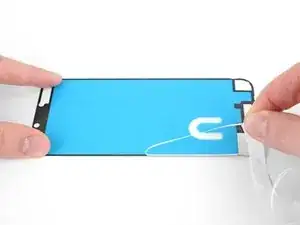
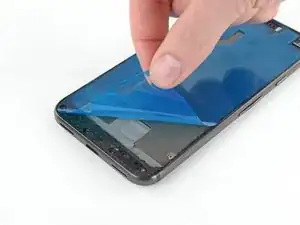
    • Tieni il foglio adesivo con l'adesivo scoperto rivolto verso il basso e allinealo attentamente sul bordo inferiore del telefono.

    • Assicurati che il foglio adesivo sia orientato correttamente, con l'apertura rettangolare per la capsula auricolare in alto.

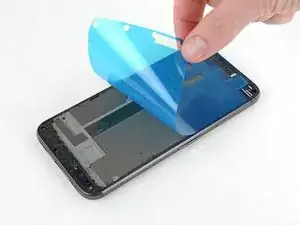
    • Una volta allineato correttamente, abbassa il resto del foglio adesivo sul telefono.

    This was honestly easier than I thought it would be. The only complication is that the right side of the plastic was just a hair too wide, so the glue lined up perfectly on the left side, but wouldn’t fit in perfect on the right. I simple pushed everything down as best as I could, removed the cover, and then used the tweezers to make sure the right side of the adhesive was in the groove.

    The problem could have been on the left side if I inserted the glue holder different, so it would work either way.

    Jessy Exum -

  5. CX1cRCyKdkMJZJHH
    CX1cRCyKdkMJZJHH
    byko1f1N2xAurWag
    XlOc1CONNaJvmQtb
    • Premi saldamente l'adesivo in posizione.

    • Puoi usare la parte piatta di uno spudger per premere lungo i bordi ed altre zone difficili da raggiungere.

    I held the spudger facing the inside, rather than over the edge towards the outside as pictured here, and my sides missed the spot in a few places. (I’m gonna try pushing them in place with the spudger after I peel, but I thought I would share that this direction I pushed might be why they missed their mark.)

    Mr. Porter -

    The plastic adhesive sheet was SLIGHTLY too big to fit perfectly into the grooves. One side went in fine, but I had to use the tweezers to fit the other side of glue into the track properly (pushing down before pulling the sheet off would likely have mashed up the adhesive).

    Jessy Exum -

  6. 4C5YIJQYPKR1B6S1
    4C5YIJQYPKR1B6S1
    LTOIfjPVE2iBOmYd
    • Rimuovi e scarta la protezione in plastica, scoprendo l'adesivo dello schermo.

    Once I peeled the backing off I had to take a few minutes with the spudger to tamp down a few places where the adhesive wasn’t flat. No biggie.

    Steven Crider -

  7. 22Y3sCWnC6n1lYx2
    22Y3sCWnC6n1lYx2
    KvlDCQ1gkvGZTdri
    • Una volta scoperto l'adesivo, è meglio non toccarlo, né con le mani, né con lo schermo. Se puoi, cerca di tenere sollevato lo schermo dal resto del telefono (come mostrato nell'immagine) mentre esegui queesto passaggiio.

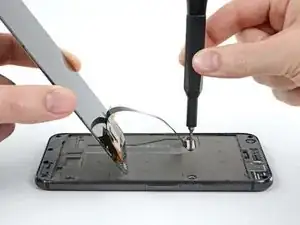
    • Ricollega il connettore del cavo dello schermo.

    • Riavvita la copertura del connettore.

    • Accendi il telefono per assicurarti che la riparazione abbia avuto successo.

    • Non rimuovere o spostare il cavo dello schermo mentre il telefono è acceso.

    I tested the the display BEFORE attaching the adhesive in the previous step because if something wasn’t right I didn’t want to have wasted the adhesive. Just a quick power on/off, unplug the display and then apply the adhesive.

    Steven Crider -

    How do you know if phone is on without display?

    George Erfesoglou -

    Connect the display without re-adhering it to do the testing! Then when you’re sure it’s working you can disconnect it and apply the new adhesive.

    Taylor Dixon -

  8. H2ZCiYIEG1jxbbNr
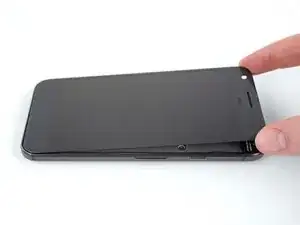
    • Quando sei sicuro che lo schermo funzioni correttamente, allinealo attentamente con la copertura e premilo saldamente in posizione.

    • Per aiutare l'adesivo a fare una presa migliore, scalda il perimetro dello schermo e poi appoggia il telefono con lo schermo rivolto verso l'alto sotto una pila di libri per 30 minuti.

    The new display was slightly raised along both long edges so I heated it up with a hair dryer and VERY GENTLY used my thumbs to press down along the edges until I could feel the display begin to flatten out and sit properly. Didn’t take long for this to happen (10min?). Once I got to this point I heated it up one last time, layed a microfiber cloth over the display and set a heavy (not crazy) stack of books on top and let it sit for 30min (as recommended above). When complete the display was nice and flat but after a while it started to bow up again, so I re-heated it, applied books and waited another 30min. Ended up having to do this three (3) times before it stayed flat. After several hours it’s still flat.

    Steven Crider -

Conclusione

Porta i tuoi rifiuti elettronici a un riciclatore certificato R2 o e-Stewards.

La riparazione non è andata come previsto? Prova delle soluzioni di base ai problemi, oppure rivolgiti alla nostra comunità Risposte per trovare aiuto.

Taylor Dixon

Membro da: 26/06/18

66704 Reputazione

2 commenti

What is the included tesa tape for?

Koelton Carere -

The Tesa tape is to adhere the battery to the frame. You don't want anything moving around inside your phone--that can stress, damage, or disconnect ribbon connectors.

David Bauman -