Introduzione

Questa è una guida solo prerequisito! Questa guida fa parte di un'altra procedura e non è pensata per essere utilizzata da sola.

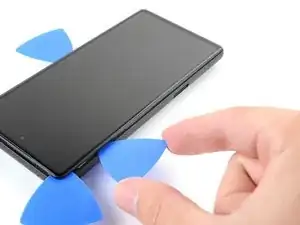
Usa questa guida per rimuovere lo schermo del tuo Pixel 6a.

  1. 1ktaJWZciivZZEBB
    1ktaJWZciivZZEBB
    ZGrRFiNn42nPecSX
    • Lascia che la batteria si scarichi al di sotto del 25% prima di iniziare questa riparazione. Una batteria carica può incendiarsi se danneggiata.

    • Spegni completamente il telefono e scollega tutti i cavi.

  2. Ddj6QlmyySZgoW6a
    Ddj6QlmyySZgoW6a
    hUPVuKPNoCOJIqv2
    UhmIq1ec1LqlbRRu
    • Prima di iniziare la riparazione, prendi nota di quanto segue:

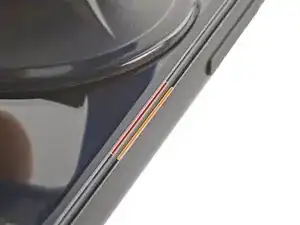
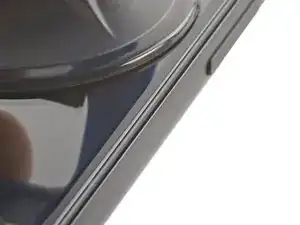
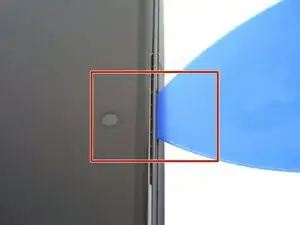
    • Fessura dello schermo: questa fessura separa lo schermo dal resto del telefono. Non fare leva su questa giuntura.

    • Fessura della cornice: è qui che la cornice in plastica progettata per proteggere lo schermo incontra il telaio. È tenuto in posizione da clip di plastica. È qui che dovresti fare leva.

  3. B4XmlLPKYSnV1PtM
    B4XmlLPKYSnV1PtM
    S4TQyeCDn3EskMeA
    OkUlPCHPR5ZCuiZ3
    • I prossimi tre passaggi dimostrano l'Anti-Clamp, uno strumento che abbiamo progettato per facilitare la procedura di apertura. Se non stai usando l'Anti-Clamp, salta tre passaggi per un metodo alternativo.

    • Per istruzioni complete su come utilizzare l'Anti-Clamp, consulta questa guida.

    • Se lo schermo è rotto, coprilo con uno strato di nastro adesivo trasparente per aiutare la ventosa ad aderire.

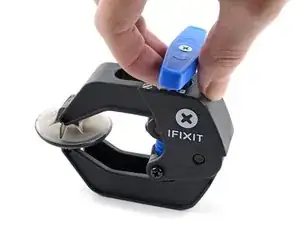
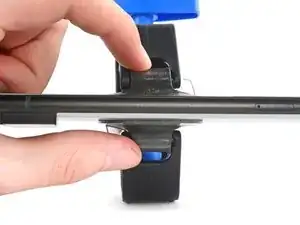
    • Tira indietro la maniglia blu per sbloccare i bracci dell'Anti-Clamp.

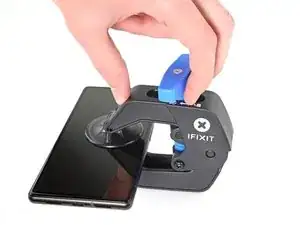
    • Fai scorrere braccia sul bordo destro del telefono.

    • Posiziona le ventose vicino al centro del bordo destro del telefono, una nella parte anteriore e una nella parte posteriore.

    • Premi le ventose insieme per fargli fare presa.

    • Se ritieni che la superficie del tuo telefono sia troppo scivolosa perché l'Anti-Clamp possa fissarsi, puoi utilizzare del nastro adesivo per creare una superficie più aderente.

  4. avKhQOBuYNinwNTv
    avKhQOBuYNinwNTv
    OBC6ev4OGvLn5k3k
    dDP2GHbKtZABXswZ
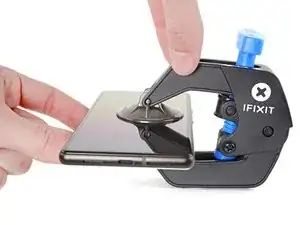
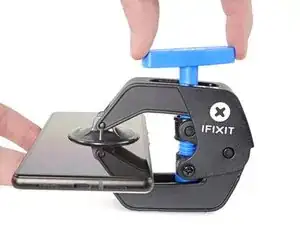
    • Tira in avanti la maniglia blu per bloccare i bracci.

    • Ruota la maniglia in senso orario di 360 gradi o fino a quando le ventose iniziano ad allungarsi.

    • Assicurati che le ventose rimangano allineate l'una con l'altra. Se iniziano a scivolare fuori allineamento, allenta leggermente le ventose e riallinea i bracci.

  5. ZOEgPTBuGCxVuDoi
    ZOEgPTBuGCxVuDoi
    XfTtNr3mYArPBsxZ
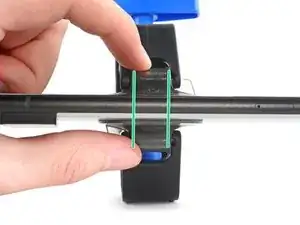
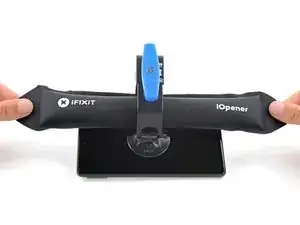
    • Riscalda un iOpenere fallo passare attraverso i bracci dell'Anti-Clamp in modo che aderisca al bordo destro del telefono.

    • Puoi anche usare un asciugacapelli, una pistola termica, ma il calore estremo può danneggiare il display e/o la batteria interna, quindi procedi con cautela.

    • Attendi un minuto per dare all'adesivo la possibilità di staccarsi e presentare uno spazio di apertura.

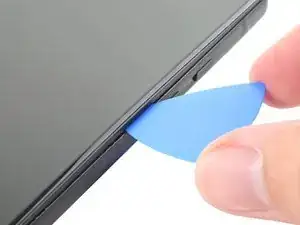
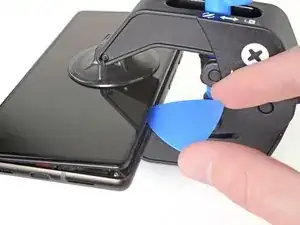
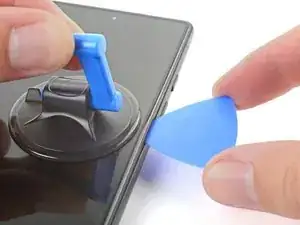
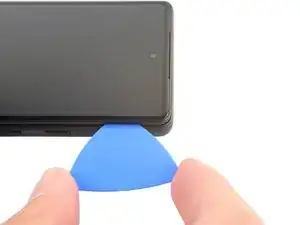
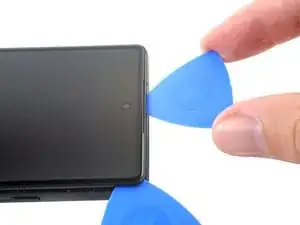
    • Inserisci un plettro di apertura sotto la cornice dello schermo quando l'Anti-Clamp crea uno spazio sufficientemente ampio.

    • Se l'Anti-Clamp non crea uno spazio sufficiente, applica più calore all'area e ruota la maniglia di mezzo giro in senso orario.

    • Non girare più di mezzo giro alla volta e attendi un minuto tra i giri. Lascia che l'Anti-Clamp e il tempo facciano il lavoro per te.

    • Salta i due passaggi successivi.

  6. XBVUE1Uv6VUMgXwN
    • Scalda un iOpener e appoggialo sul bordo destro dello schermo per due minuti.

    • Puoi usare anche un asciugacapelli, una pistola termica o una piastra calda, ma fai attenzione a non surriscaldare il telefono: lo schermo e la batteria interna sono entrambi suscettibili ai danni da calore.

    What's a good temperature to set to hotplate to for a repair like this?

    David -

    I used a hair dryer to heat up the adhesive. Unfortunatly the IOpener did not work for me. Even with the hair dryer, it was quiet difficult to soften the adhesive. It might have been due to the phone beeing only a few months old.

    It was quiet difficult to seperate the screen, but it eventuelly worked. I feel like it took the heat a while to move through the cover and heat up all of the adhesive. After almost giving up, I tried again after a few minutes without heating it again and it suddenly worked. So keep that in mind.

    LetsTryThisNext -

    Agree with LetsTryThisNext's comment -- it takes a while for the adhesive to loosen. Expect to be at it for 20, 30 minutes -- with the iOpener not working (for me either), re-microwaving the iOpener, then hair dryer, then suction cup not sticking, etc. Good idea to give it a few minutes between each heating attempt.

    Steve -

    The iOpener worked for me - once I got the expectation right that it was going to take a while.
    Went through about 5-6 cycles of:
    * Heating for 40 seconds (1100W microwave); applying to phone for 2 minutes; heating for 30 seconds; applying to phone for 2 minutes; allow to cool for 10 minutes

    Could probably have done with one more cycle to get glue even more sticky TBH but when it lifted it was obvious.

    Karl Laird -

    Took me 3 heat cycles with the iOpener. Basically I did 30 seconds in 1000W microwave and left to heat adhesive for 5 mins, then after stuggling to get the pick in for a few minutes, I did 10 seconds microwave then a couple of mins warming adhesive and a couple of mins failing to get the pick in. Then on 3rd attempt after anothe 10mseconds in the microwave, i got in easily. Seems like the adhesive really takes a while to melt. I also improved my technique with the suction cup which seemed to help lift the screen. Once you are in it is easy to release the remaining clips.

    Mark -

    Hair dryer on high for about 10 seconds did the trick. Had to blowdry it about 3 times. iOpener did not get hot enough

    Leon -

    iOpener did not work for me as well. The hairdryer approach, as Leon mentioned, worked for me, too. I used the Jimmy tool to get access for the picks.

    Alex -

    I started with a single edge razor blade and made 1-2 inch cuts to the bezel seam, then applied the opener with a hair dryer on low about 6 inches away. After no more than 2-3 minutes I applied the suction cup, and used a combination of the straight edge razor and picks to open the screen. It was very easy.

    SteveDK -

  7. XDaaq12ecnEIq4yD
    XDaaq12ecnEIq4yD
    alGoFZ4wLLdAvZAw
    BRy5TKDEcKNO3UDD
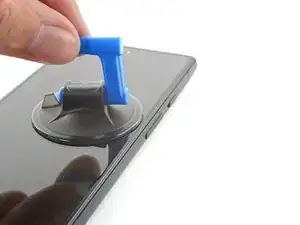
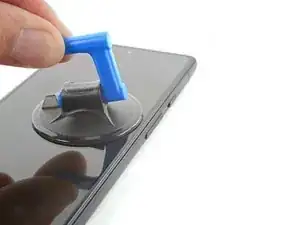
    • Applica una ventosa sullo schermo, il più vicino possibile al centro del bordo destro.

    • Tira la ventosa con una forza forte e costante per creare uno spazio tra la cornice e il telaio.

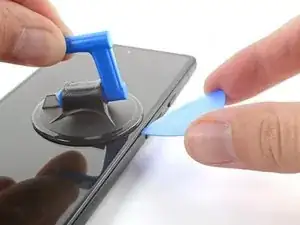
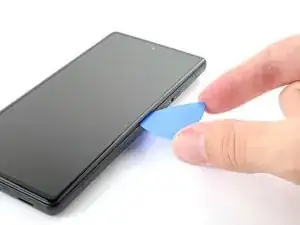
    • Inserisci un plettro di apertura nella fessura.

    • A seconda dell'età del tuo telefono, questo potrebbe essere difficile. Se riscontri problemi, applica più calore sul bordo e riprova.

    • Se il display è gravemente incrinato, coprirlo con uno strato di nastro adesivo trasparente può consentire alla ventosa di aderire. In alternativa, al posto della ventosa è possibile utilizzare un nastro molto resistente. Se tutto il resto fallisce, puoi incollare la ventosa allo schermo rotto con la supercolla.

    Would be helpful to have alternative solutions offered here for those with shattered screens, since suction cups don't work.

    Paul York -

    Hi Paul.

    Thank you for your comment! I have updated the step to provide an alternative solution for shattered screens.

    Alex Diaz-Kokaisl -

    Would just like to note that in my particular case even tape or super glue did not work, due to the screen being shattered right along the spot where you need to place the suction cup. I ended up resorting to inserting a razor blade into the seam to open it just enough to insert the pick.

    mkirwin -

    I'm in the same boat as mkirwin no amount of pulling with the suction cup worked, I had to use a razor blade to get the seam separated enough to insert a pick. Maybe I didn't heat up the adhesive enough but that stuff is super strong

    Tanner Davis -

    If your suction cup is not working properly: Heat it up a little bit and it will have a lot more suction.

    LetsTryThisNext -

    Ditto, needed to use a razor blade to get it started. Thank you mkirwin & Tanner D for posting that tip here.

    Steve -

    I'm having trouble pulling on the suction cup, keeping the phone down and inserting the pick all at the same time. The suction doesn't hold unless I use my other hand to keep the phone down, but then I can't use the pick. Is there a way Im supposed to keep the phone locked down?

    Jemay A Fassom -

    Would something like this suffice in lieu of a razor blade?

    I, too, cannot a gap with the suction cups.

    https://www.amazon.com/JerryRigEverythin...

    badlydrawnface -

    After hours of not getting any movement at all, I ended up putting a hot pack (like for a sore back) under the phone and the iOpener on top, on the right side, and that was enough to get through this step...

    Jessie -

    This is really misleading, the iOpener doesn't work very well to heat it up, I've spent hours on this, and the tabs are definitely not enough to get it started on their own.

    Stuck -

    Same as the above comments, got nowhere with the opener + pick, had to jam a razor blade in first, and then used picks.

    Lee -

  8. aKADaMwDF1Su2ytM
    aKADaMwDF1Su2ytM
    ojCAATkuclM4RkHa
    CNQEOHFpaOTP5Nlf
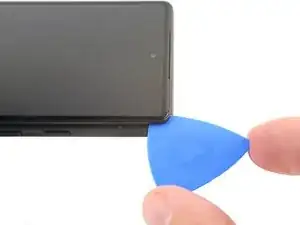
    • Mentre stai ancora facendo presa, ruota il plettro verso l'alto formando un angolo ripido.

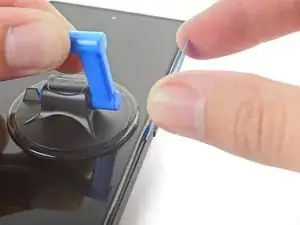
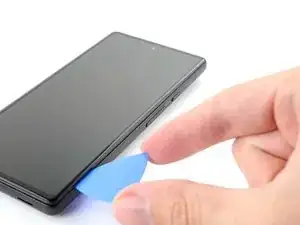
    • Spingi dentro il plettro con cautela mentre fai leva per riposizionare il plettro di apertura nella giuntura della cornice.

    • Inserisci il plettro solo di 3,5 mm per evitare di danneggiare le parti interne.

    Unfortunatly my plectrums I got with the pro tool kit bent way too easy to open up this first crack between screen and housing. But the reason might have been, that the adhesive was not soft enough yet

    LetsTryThisNext -

    I gave up with the suction cup. My screen was too cracked. Instead, after applying heat to loosen the glue, I used a very tiny flat head precision screwdriver to prise the screen open. Not recommended as it leaves a tiny scratch, but saves a lot of hassle. See also https://www.youtube.com/watch?v=vxdaaTd7....

    Robert Baker -

  9. fm3oG32vJ2EEBhuc
    fm3oG32vJ2EEBhuc
    gBarY33TTTBZCBZS
    T1RrWIEZYKqCKLue
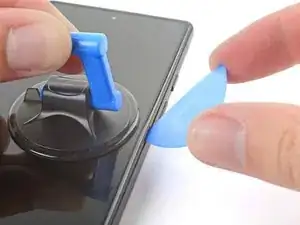
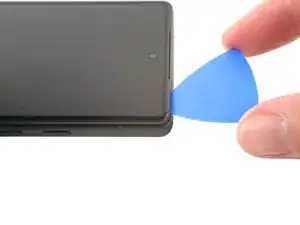
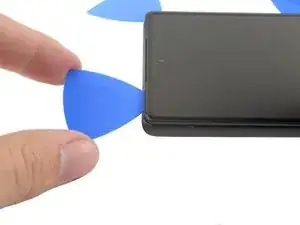
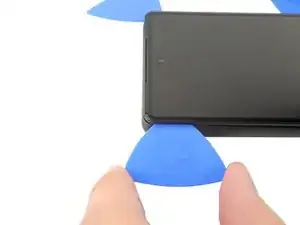
    • Fai scorrere il plettro lungo il bordo destro per rilasciare le clip di plastica che fissano la cornice al telaio.

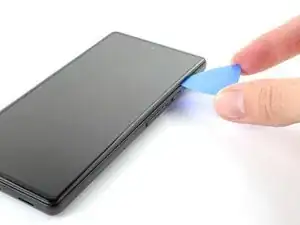
    • Posiziona il plettro sul bordo in alto a destra prima di passare al passaggio successivo.

  10. dfU45x4Vk5SuSwn1
    dfU45x4Vk5SuSwn1
    GEBiXPOdSYHlB2oP
    QbSiwkPDRt5wPR2F
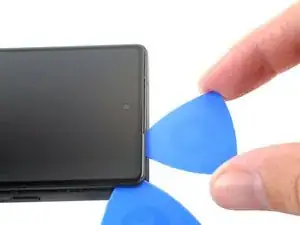
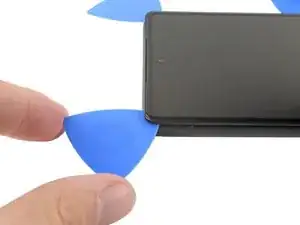
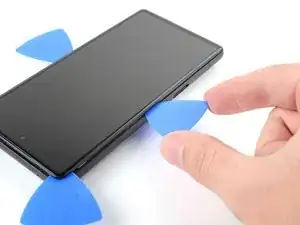
    • Ruota il plettro di apertura intorno all'angolo in alto a destra del telefono per rilasciare le clip.

    • Lascia il plettro di apertura nell'angolo in alto a destra per evitare che le clip si blocchino nuovamente.

    • Inserisci il plettro solo per 4 mm per evitare di danneggiare le parti interne.

  11. MsjU6gcvUNhlBLuU
    MsjU6gcvUNhlBLuU
    LUT1jGbhZPrJ4FFO
    FL2DT6sQmAqd2TjO
    • Inserisci un nuovo plettro di apertura nello spazio appena creato.

    • Fai scorrere il plettro lungo il bordo superiore per rilasciare le clip.

    • Quando tagli l'adesivo attorno alla fotocamera anteriore, inserisci il plettro di solo 3 mm per evitare di danneggiare l'obiettivo.

  12. NkLX4XJsx4UEFs6e
    NkLX4XJsx4UEFs6e
    yHuNMCvi4SaACvqa
    odm622mGQ4Njy6KU
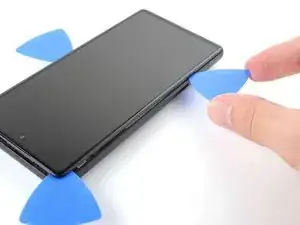
    • Ruota il plettro di apertura attorno all'angolo in alto a sinistra del telefono per rilasciare le clip.

    • Lascia il plettro di apertura nell'angolo in alto a sinistra per evitare che le clip si blocchino nuovamente.

    I found that using the side of the pick instead of the point made it easier to keep from over-inserting the pick and it provided more area to keep the glass separated from the frame. It was also easier to slide it around the edges this way. Still had to use the point to get under the frame initially.

    mark schneider -

  13. NLdAYs426UBCVRRt
    NLdAYs426UBCVRRt
    LKjkWexcYPlXuaoI
    rOTvEBRGLhXVPsqb
    • Inserisci un nuovo plettro di apertura nello spazio appena creato.

    • Fai scorrere il plettro lungo il bordo sinistro per rilasciare le clip.

    • Inserisci il plettro per solo 3 mm per evitare di danneggiare le parti interne.

    • Ripeti la procedura di rotazione e scorrimento per il bordo rimanente.

    • A questo punto, lo schermo dovrebbe essere separato dalla cornice. Se c'è ancora resistenza attorno ai bordi dello schermo, usa un plettro di apertura per rilasciare eventuali clip rimanenti.

  14. K4nbDrlDYXZWeYaD
    K4nbDrlDYXZWeYaD
    6thrOjZMdkmIPSey
    LNBsKTiIt5oiS4Td
    • Non provare ancora a rimuovere completamente lo schermo. È ancora collegato al telaio tramite un cavo flessibile.

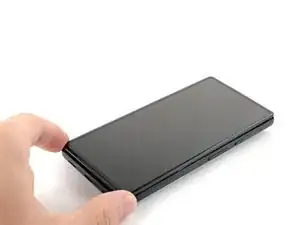
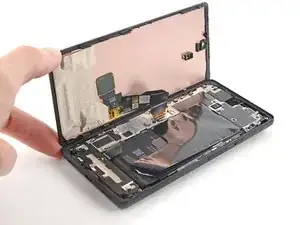
    • Solleva il bordo destro dello schermo verso l'alto e verso il lato sinistro del dispositivo, come per aprire un libro.

    • Appoggia lo schermo capovolto e parallelo al telaio prima di continuare.

    • Non torcere lo schermo o allontanarlo troppo dal telaio per evitare di danneggiare il cavo flessibile.

  15. 4aDiGqShEoknkpOW
    4aDiGqShEoknkpOW
    OAULhXU5sTSSnHiC
    nUiacYiY3BDiH12K
    • La staffa del cavo del display è fissata con ganci metallici.

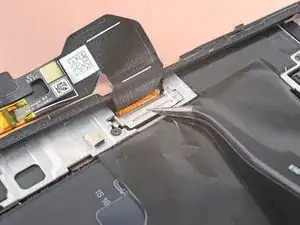
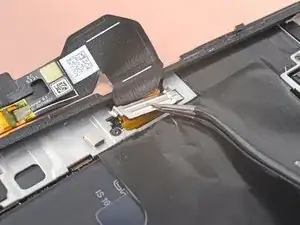
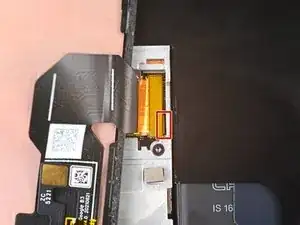
    • Usa delle pinzette per piegare il lato inferiore del coperchio verso l'alto, rilasciando la clip metallica

    • Rimuovi la staffa del cavo dello schermo.

    • Durante il riassemblaggio, inserisci per primo il lato superiore della staffa prima di premere sull'altro lato. La mancanza di questa precauzione potrebbe risultare in scintille e danni alla scheda logica.

    Does anyone know what happens if I lost the metal clip to secure the display cable?

    Emmanuel Medina Morales -

    Hi Emmanuel.

    Oh no! Unfortunately, this clip is pretty important for securing your screen's press connector, and we don't sell it separately. You should be fine as long as you don't drop your phone...but you may be able to tape it down with some masking tape as a rough fix. Another alternative would be to find a destroyed Pixel 6a and scavenge the clip.

    Alex Diaz-Kokaisl -

    I'm confused about the instructions and the pictures. The pictures imply that the clip should be bent, but the text may describe the method that I applied:

    I inserted tweezers at the left side of the clip (there where the springy part snaps under a metal tab). By carefully placing each 'tweeze' of the tweezer on both sides of the tab, it is possible to gently pushing the springy part to the right, and then it releases without having to deform that entire bracket.

    After re-reading the instructions, that may be what is implied, but if one were to look at only the pictures it could suggest something different.

    Hugo van Galen -

    Yes I did Hugo's method and it worked well. Using tweezers I directly pried the springy part from under the metal tab.

    Joe Rayner -

    Similar to above, struggled to pry this off based on the description+photos, needed to consult a separate video and a bit of trial and error to eventually release it.

    Lee -

    If you look right at the bottom end of the bracket there's a couple sets of holes right next to the screw. If you insert each end of the tweezers into those holes and tilt the tweezers the bracket pops right out.

    Danielle Cerisier -

  16. yeTt2M2MLgLnruM2
    yeTt2M2MLgLnruM2
    KJOLElfVnkARMy2c
    VbPvu4SwZAYmGtW2
    • Fai molta attenzione a eseguire questo passaggio, poiché rischi di danneggiare i minuscoli componenti attorno al connettore a pressione.

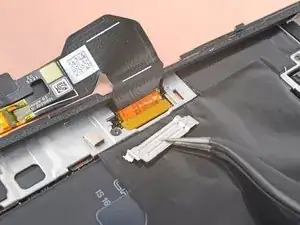
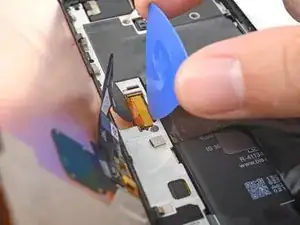
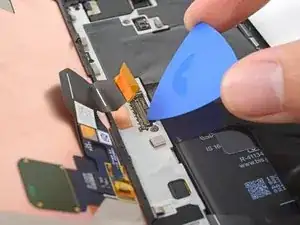
    • Inserisci la punta di un plettro sotto il bordo inferiore destro del connettore a pressione del cavo del display, vicino alla foro della vite.

    • Solleva e scollega il connettore del cavo del display.

    • Per riattaccare i connettori a pressione come questo, allinea con cura e premi verso il basso su un lato finché non scatta in posizione, quindi ripeti sull'altro lato. Non premere verso il basso al centro. Se il connettore non è allineato, i pin possono piegarsi, causando danni permanenti.

    be incredibly careful when removing and installing the cable, the many tiny components along the edge and under the tab are incredibly fragile. This is one of, if not, the most important step.

    Jeffrey Leon -

    At this step I had some trouble to reattach the connector. When I pushed down one side the other would pop up again. I solved the issue by carefully pressing down both sides with the tweezers.

    LetsTryThisNext -

    silly me totally forgot to reattach "The display cable bracket is secured with metal clips." soooooo maybe tell silly people like me to do that at the end lol. phone will work, but i feel if i drop it the cable may disconnect.... oh well

    Aleksander Szadurski (Max209) -

    Don't put the ribbon back in until you have cleaned the old adhesive off and installed the new adhesive!

    Wesley Shippey -

    I'm struggling with the reattachment. I think I've got it and then when I try to test the screen I'm getting nothing. Even tried to attach my old cracked one and nothings happening.

    Does this mean I've damaged something?

    Jamie B -

    Obviously the most critical step.
    When reassembling 2 things helped me:
    1/ You can actually let the new screen rest on the phone at a 90+ degrees angle (thanks to the small plastic edges on the screen) , which leaves you both hand free

    2/ You can gently unfold the display cable to make it more flexible

    Paul Jacques -

    During reattachment, make sure you fully plug in the cable. I tested as indicated by turning on the screen and all seemed good. Closed down the screen and then realised it was not reacting to touch... Was very worried but reopening it, turns out I hadn't fully plugged in the screen connector. All good now

    Adrien C_v__l_es -

Conclusione

Confronta la tua nuova parte di ricambio con la parte originale: potresti dover trasferire i componenti rimanenti o rimuovere i supporti adesivi dalla nuova parte prima di installarla.

Per riassemblare il tuo dispositivo, segui queste istruzioni in ordine inverso.

La riparazione non è andata come previsto? Prova delle soluzioni dei problemi di base o chiedi aiuto alla nostra comunità Risposte Google Pixel 6a.

Alex Diaz-Kokaisl

Membro da: 16/01/22

117664 Reputazione

0 commenti