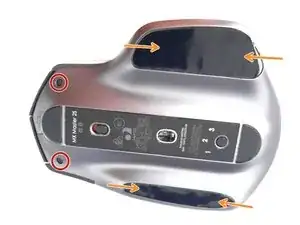
Introduzione

  1. 1KYGFBXEjBCNtXCW
    1KYGFBXEjBCNtXCW
    ArY2SMUF4KIBfKAK
    dQ3AhFsLE5mqyIZA
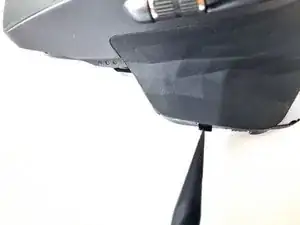
    • Verifichiamo che il mouse sia spento, lo giriamo per accedere alle 6 viti poste inferiormente.

    • Nota che per accedere alle viti sotto gli adesivi, devi rimuoverli o almeno alzarne la parte finale. In questa guida non li rimuoverò ma li solleverò facendo attenzione a sollevare solamente la parte finale.

    • Rimuovi le Due viti T5 sul fronte.

    • e le 4 viti tipo Phillip sotto gli adesivi, 2 per ogni lato.

    • Se maneggiati con cautela e se non sono consumati dall'utilizzo, gli adesivi possono essere riutilizzati senza problemi.

    if the problem is that the scroll wheel spins freely, the button next to it controls that.

    Rob Miller -

    The stickers have two layers. To avoid de-laminating them, stick a sharp, flat object underneath the edge of the sticker and try to carefully pry up all of the material at once.

    Maddison Hellstrom -

    Yes, this is a great comment. I accidentally separated the two layers and I had to glue them back together on one side. You want to peel up both layers at once and not separate them, ideally.

    David Richardson -

  2. dndD3uYMC2WXFPVa
    dndD3uYMC2WXFPVa
    LJ2V3wgROmR2HeBf
    huMX12mV14IGu5um
    • Per separare le due parti che compongono il guscio del mouse, aiutatevi con una tessera c con lo strumento di apertura iFixit inserendolo principalmente nella parte frontale e sul lato dove non ci sono i pulsanti.

    • Fate attenzione perché entrambe le parti sono collegate internamente da un connettore a nastro. Non esercitate troppa forza quando le separate.

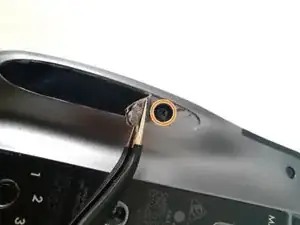
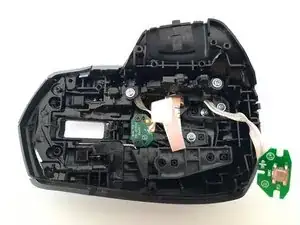
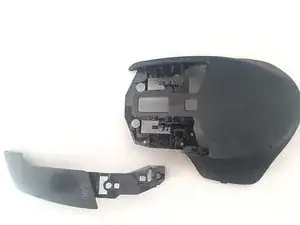
    • Separate con cautela le due parti.

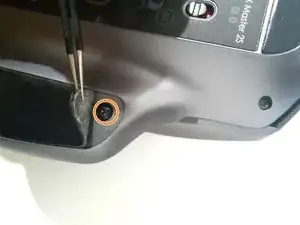
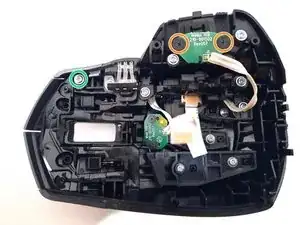
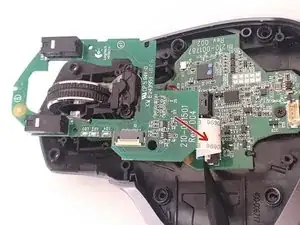
    • Solleva il gancio in plastica per rilasciare il cavo a nastro.

    • Scollega il cavo a nastro dalla sua presa.

    the ribbon connector clamp flips up 90 degrees from pcb

    Rob Miller -

    This comment was super helpful, thank you Rob! Just pry the little white piece up very gently to free up the ribbon.

    Pete Richardson -

  3. xplUjZxTYXZYSi2W
    xplUjZxTYXZYSi2W
    WewIlNGNSKVuWCOT
    jmiHWtJW1mLEdUhL
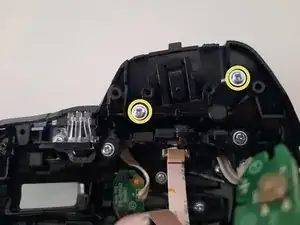
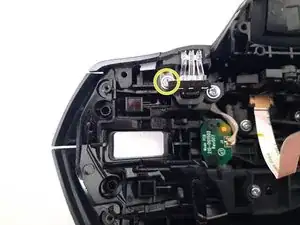
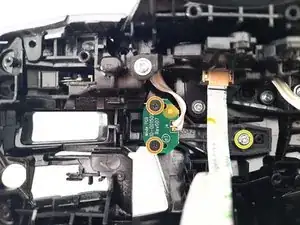
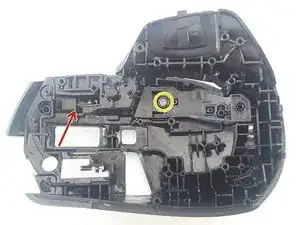
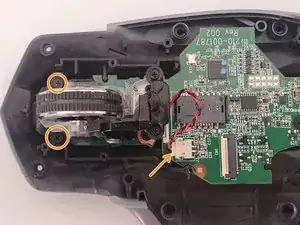
    • Svitate e rimuovete le viti nere dalla piastra del pulsante.

    • In questa fase svitate anche la vite che tiene insieme la calotta superiore e quella laterale.

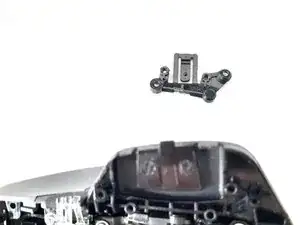
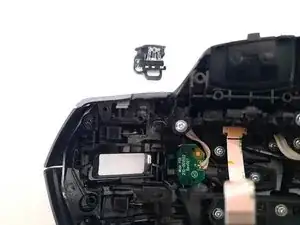
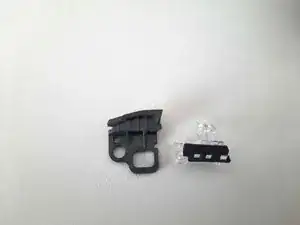
    • Rimuovete il meccanismo del pulsante.

    • Per quanto riguarda la calotta superiore, vi si trovano due tipi di viti, entrambi di tipo Phillips, che richiedono cacciaviti a stella. Le 4 viti nere fissano la scheda elettronica e le restanti (di colore argentato) fissano le parti in plastica.

    When reassembling, don't tighten the silver screws too much. The way the upper case fits into the lower case, this button may end up held down. On my system (macOS, no Logi software), this caused the cursor to not work at all

    Mike -

  4. OjWyDnDynlHsNOkt
    OjWyDnDynlHsNOkt
    MNF2BnkVQQAonHii
    e4esQINY6KFV1KZB
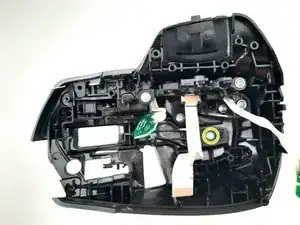
    • Svitate le viti che fissano il pezzo e rimuovetelo delicatamente. Se volete potete facilmente separare i pezzi del diffusore per pulirlo.

  5. Klofrbnbs1VwmKfX
    Klofrbnbs1VwmKfX
    LpeiEnfMyR3PVgQA
    vOgOgnLUgkPtVOUK
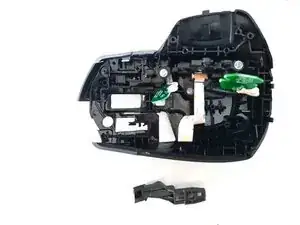
    • Svitate le due viti che fissano il tasto.

    • Mentre rimuovete le viti spingete delicatamente in avanti il tasto.

    • Prestate particolare attenzione alla molla che sostiene il tasto. Serve a evitare che il pulsante si muova verso l'alto. Non è sostenuta dal tasto, ma soltanto dalla struttura del mouse. Non c'è bisogno di toccarla, ma se volete potete rimuoverla una volta che avrete rimosso il tasto intero.

  6. KkTFIWdvytEFBWSZ
    KkTFIWdvytEFBWSZ
    QhRtgGpsRqQPLsw3
    OpY1rPVN2DqSsUAV
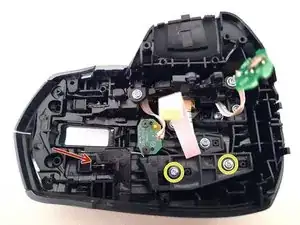
    • Svitate le viti nere dalla piastra inferiore.

    • Svitate la vite che fissa il tasto.

    • Rimuovete delicatamente il tasto di plastica.

  7. SkIfKlFyggIHRva5
    SkIfKlFyggIHRva5
    wS1HFsdNHa6kxYL4
    GX1GtHeIPTPUuhvi
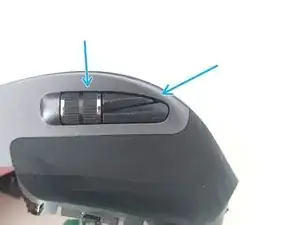
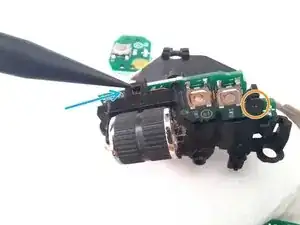
    • Svitate le viti che fissano il meccanismo di scorrimento e i tasti laterali.

    • Premete leggermente la rotella dall'esterno del mouse mentre dall'interno estraete il meccanismo aiutandovi, eventualmente, con una leva in plastica. Cercate di non forzare la cosa in modo da non danneggiare i cavi e il meccanismo.

  8. 2idUDnePHflKoxAA
    2idUDnePHflKoxAA
    NInhakYjIjEETdf2
    3iNIxjjaxOVrSfMP
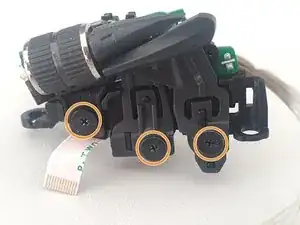
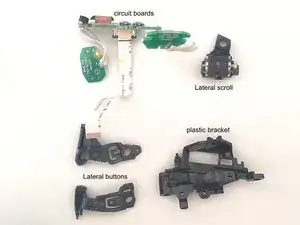
    • Svitate le viti che fissano i tasti e lo scroll.

    • Utilizzando una leva o un plettro di plastica finite di smontare il meccanismo.

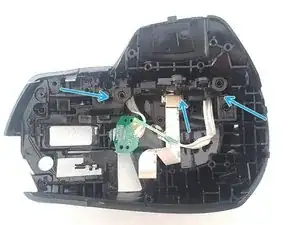
    • Ora rimuovete le viti che fissano la scheda elettronica.

  9. bMCdjOQhCXMltYYQ
    bMCdjOQhCXMltYYQ
    c1fNQb1GX3uV6aoV
    XcwWXrBnPGXmsDYL
    • La calotta laterale è fissata tramite tanti gancetti al guscio del mouse. Guardate le immagini e aiutatevi con una leva o un plettro in plastica. Contemporaneamente potete rimuovere il tasto destro, come vedrete nel passo successivo.

  10. J1ZR1AUVIA5EyTnN
    J1ZR1AUVIA5EyTnN
    XgqNZudoj3kABX4c
    • Svitate la vite che fissa il tasto.

    • Mentre estraete la vite spingete delicatamente il tasto in avanti.

    • Ricordatevi della molla, esattamente come per il tasto destro.

  11. gsJjM5lUgN6VE4yT
    gsJjM5lUgN6VE4yT
    fXnMjSKlHoXnHQxM
    NUBpC2Vc5Be615Yn
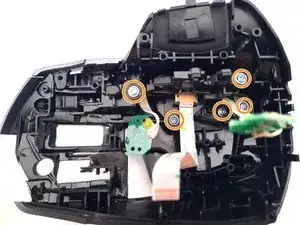
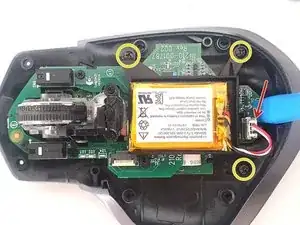
    • Svitate le tre viti del cassetto batteria e scollegate il connettore dalla scheda madre.

    • Svitate le viti di una delle due schede madri.

    • Fate attenzione al connettore a nastro che unisce le due schede, aiutatevi con una leva in plastica o qualcosa di similare per evitare di danneggiarlo.

  12. hVtR21HBXv2W3jH4
    hVtR21HBXv2W3jH4
    S2xW2bi4tFW5h3jE
    HiuNaZfSm3LGexFK
    • L'intero meccanismo è fissato con due viti soltanto e collegato tramite un cavetto che alimenta un piccolo motore. Sul fondo del meccanismo c'è una piccola molla, fate attenzione quando sollevate il tutto.

    • Svitate entrambe le viti e scollegate il cavetto.

    Donde puedo conseguir el rodillo de este raton, lo he buscado por eBay y por Aliexpress y no lo encuentro

    joseluischongkoon -

  13. EDAPeBLkrN5bQovr
    EDAPeBLkrN5bQovr
    jLIVCAgrAjjHBwrC
    tLcV5nHY4AZIxJAh
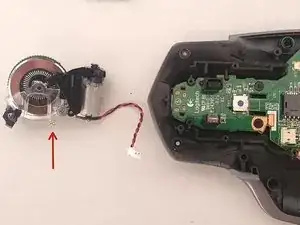
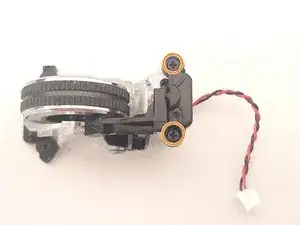
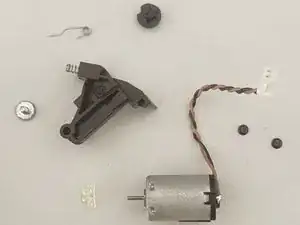
    • Rimuovete le due viti che che fissano la cover del rotore e rimuovetela delicatamente.

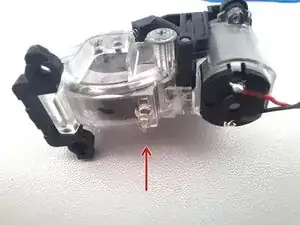
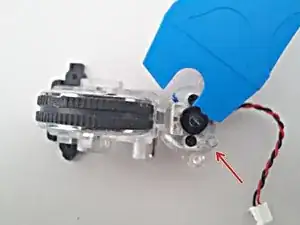
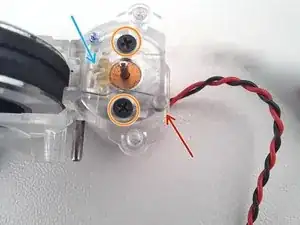
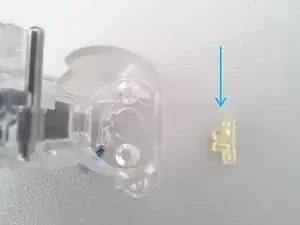
    • Rimuovete la vite che trattiene il pezzo in plastica. Attenzione, per rimuoverla dovete rimuovere anche la piccola molla che la collega al supporto trasparente dove appoggia la rotella di scorrimento.

    • Inserisci qui la traduzione

    • Inserisci qui la traduzione

    The last picture showing that spring is too blurry, and the spring popped off before I could see where it was supposed to be. Now I can't figure how to add it back since it doesn't seem like it does anything

    Mike -

    Hi Mike! Look at the 1st picture in the step 14. With a red arrow, that is the first spring (or strap, I don't know what's is the name for that), It's a support for the "rotor motor cover" (step 13, 3rd picture).

    A 2nd spring (step 14, 3rd picture) is a support (or "shock absorber" maybe) for the scroll wheel, It's is located inside the black plastic piece.

    Victor Crespo -

    As a followup to my previous comment. The spring is the only piece left from the reassembly, and my scroll wheel works just fine

    Mike -

  14. MvgoUpupiLFMxbdD
    MvgoUpupiLFMxbdD
    In3SukigUdaVKtj5
    BCwRVWHfYosSiY3s
    • La freccia rossa indica il perno mostrato nel passaggio precedente, tenetevelo in mente durante lo smontaggio.

    • La freccia blu indica il "supporto in gomma" che sostiene il motorino. Quando rimuovete il motorino è facile che anche il supporto in gomma si stacchi. Rimontarlo è davvero semplice, mettetelo nella posizione in cui l'avete trovato prima di rimuovere il motore e aiutatevi con delle pinzette o uno strumento simile.

    • Svitate le viti che fissano il motore e il gioco è fatto.

  15. NgYFNNLBUNve5cBB
    NgYFNNLBUNve5cBB
    cTKUh3QA5BFZxDgl
    sOJPvleKClowuhyP
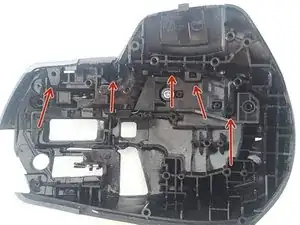
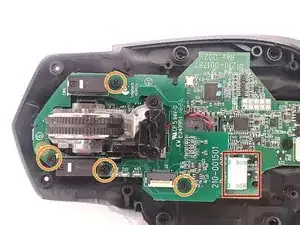
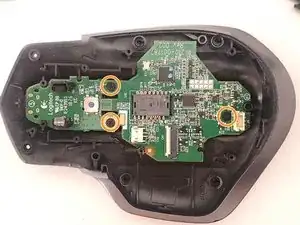
    • Svitate le tre viti che fissano la scheda madre.

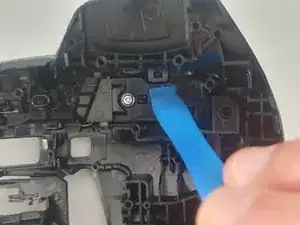
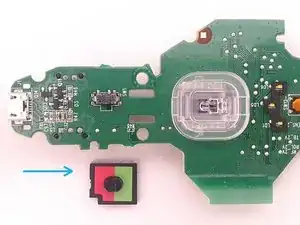
    • Rimuovete il pulsante di accensione e tenetevi in mente la sua posizione.

Conclusione

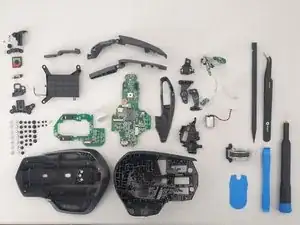
Per rimontare il tuo dispositivo, segui le istruzioni in ordine inverso.

Victor Crespo

Membro da: 20/07/15

1637 Reputazione

30 commenti

I’m not sure I see any reason why anyone would to this and risk it being ruined. In other words, what are the potential benefits? Cleaning?

John Smith -

Yup cleaning that scroll wheel, and maybe even the switches if your really dirty. 15 min made my mouse new again

drawsmatthew -

Hello!! It is a spectacular product, with its mistakes (nothing is perfect ;)). The fundamental objective of this guide is simply to answer the question How does it work, what is inside? It can serve as a guide to clean it (either both scrolls or the button contacts), change the battery, etc. Everything that can contribute to extend its useful life much more.

Victor Crespo -

Read the name of the site

Fabrizio Schwarz -

There is a very clear example of why one would need to do this. Certain 2s's, including my own, have a fundamental flaw. At some point, the pressing of the thumb-button, the one located below where the thumb is positioned, gradually results in the button getting stuck. For some reason, this results in the mouse movement not registering.

To resolve this issue, you can loosen a screw located button, but this can only be done when the mouse is disassembled, as it is contained within the mouse itself.

Yize H. -

Used this guide to clean my scroll wheel, took me 15 min, super easy. Didn’t need to remove anything, just opened it up and disconnected the 1 ribbon cable from the top half.

I used some clear tap folded on itself and ran it through the scroll wheel a few times. Only a bit of dust came out but the difference is crazy, its totally free spinning now.

Stop convincing yourself your scroll wheel is fine, open it up, clean it out and its even better.

Thanks iFixit

drawsmatthew -

It’s actually a REALLY good mouse

Jacob Fenn -

Very helpful since I need to replace the Li-on battery.

RonE -

Can be used without the lithium-ion battery, just like a normal wired mouse

Victor Crespo -

Great guide Victor. Thanks for mentioning the fact that you can use the mouse without battery - I was wondering about this since I was worried about long term use.

Fabrizio Schwarz -

Thanks you!!!

Victor Crespo -

Perfect! Mine had the base button not working, or perhaps not clicking anymore. I already have a new one so i'll try this for entertaining purpous and see whats wrong with it!

Réda Taoussi -

Thanks! the gesture button kept sticking so I needed to clean it out and it works now. I struggled at first though since the pictures only showed 4 screws. I didn't realize there were 6 until I re-read it..

poochyena -

Hello everyone! Some tricks to repair the led? My mouse is all operative but the movement led is apparently dead..

martino_toderi -

Great guide. Helped me when base button got stuck in 'cliked' position making the whole mouse unusable. Fixed in 15 minutes.

Paweł -

owners kitten caught its first mouse - turned out to be an excpensive one used this to dissemble and glue the RMB to the prongs where it came off it is now setting for 24hrs with chemical metal but the instructions were top notch !

Paul Haggett -

Excellent guide but I would have appreciated driver sizes since they are not all the same. And kudos to Logitech; this version seems so much more serviceable than the original MX Master.

John Mangos -

Hi @mangosjohn, the drivers used in this guide are listed at the top: Phillips #0 Screwdriver, Phillips #00 Screwdriver, and T5 Torx Screwdriver.

Amber Taus -

Thank you @amber. I had drivers for each step in mind since similar looking screws needed a different bit, but I admittedly did not see the list at the top either.

John Mangos -

Both this mouse from eBay.

Anyone have any idea why the left button behaves as the right button?

I can't seem to find what is the issue with it.

Adrian -

Hi.

Did you verify this problem by trying the following?

1. Installing and config the button with Logitech Logi Option+ Downloads - MX Master Wireless Mouse – Logitech Support + Download

2. Checking the native mouse settings in the operating system (Windows, Mac or Linux).

3. Test the mouse (see the menu, you can test each button independently) Mouse Test - Check Mouse Button, DPI, Sensor, and Double Click (clickspeedtest.io)

Victor Crespo -

Thanks so much for this guide! I spilled bubble tea on my mouse and decided I'd proactively take it apart and give it a wash (soap and water for the non electronic parts, isopropyl alcohol for the electronic parts), as even if the electronics didn't get ruined from the spill, the sugar made it very yuck to use. This is my first time taking apart an electronic device, and this guide made it a relatively simple process. Surprisingly satisfying too! I managed to lose a screw and ended up with two extra screws, but I suppose that can't be helped given that I spilled a bunch of the screws onto the floor at least two times. Hopefully this mouse will keep on working for many years yet. Thanks again, it was super helpful.

Jenny Huang -

You're welcome! I'm glad to hear that the guide was helpful to you in taking apart and cleaning your mouse. It can be a bit daunting to take apart an electronic device for the first time, but it sounds like you did a great job. It's definitely satisfying to fix something yourself and make it like new again. As for the lost screw and extra screws, those things happen even to the most experienced tinkerers! Hopefully, your mouse will continue to work well for you for years to come. You're welcome! I'm glad to hear that the guide was helpful to you in taking apart and cleaning your mouse. It can be a bit daunting to take apart an electronic device for the first time, but it sounds like you did a great job. It's definitely satisfying to fix something yourself and make it like new again. As for the lost screw and extra screws, those things happen even to the most experienced tinkerers! Hopefully, your mouse will continue to work well for you for years to come.

Victor Crespo -

Okay, I want to know what the part number is for the secondary scroll and back and forward buttons for the MX Master S2. Haven't been able to locate that part just yet. I need to replace it because it is doing the double click thing on both buttons.

Remo Blockade -

Thanks for sharing this. Could you tell me where to place the spring in the upper left corner on picture 3 from step 14?

Pieter De Wit -

Hi, thanks! See Picture 1 from step 14: The red arrow shows you where the spring goes, notice that the tips point to the left in the image.

All best!

Victor Crespo -

Excellent guide, comme Yize H. - 5 juil. 2023 le laser de mouvement ne fonctionnait plus car le bouton de gestes sous le pouce (thumb-button) était collé/bloqué , après ouverture et derrage , ma souris qui a 3 ans fonctionne à nouveau.

Mickaël MICONNET -

Confirming that loosening the thumb button screws also helped it stop randomly triggering and opening the Alt+Tab menu, or making the pointer stop moving while all the buttons still work.

One thing worth mentioning is that the bottom stickers have 2 layers and it's possible to peel off only the top one, which leaves the adhesive still on the mouse and does not provide access to the screws. Make sure you peel off the entire sticker from the bottom on the first try, otherwise the stickers might not adhere perfectly together again.

Rodrigo López Dato -

Thank you for this guide. My side button got stuck in, preventing my mouse cursor from moving for some reason. Disassembling and re-assembling the mouse solved my problem. Here's to 6 more trouble-free years. I love this mouse!

Jared S. -

Incredible unreliable product! Thank you so much for the description!

Béci Roboz -