Introduzione

Tutorial di base per smontare l'iPhone X.

  1. SLIWlhhPUFLULXjO
    SLIWlhhPUFLULXjO
    DDBFAmfYMdH6XUbS
    • Premi il tasto standby / riattiva e il tasto meno del volume per spegnere il telefono.

  2. 6wiJqTr25Zx2F2nb
    6wiJqTr25Zx2F2nb
    VykmNiEK43kXvsmH
    5saDXZrg32vQJ1yt
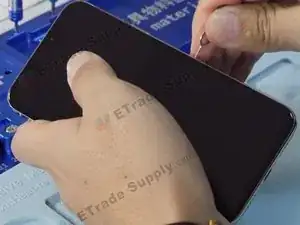
    • Utilizza il cacciavite Pentalobe per rimuovere le viti del connettore di ricarica. Riscaldare il telefono con una pistola termica renderà l'apertura del telefono più facile.

  3. hawT1ldxFQbbdIAl
    hawT1ldxFQbbdIAl
    rhNs4GIASlIXEnFr
    c2WSvxLfJoIP6vsL
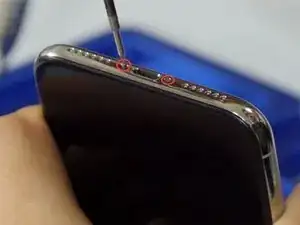
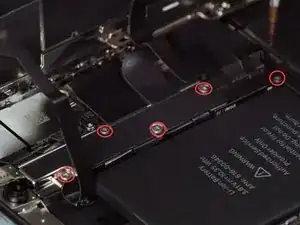
    • Rimuovi le 5 viti evidenziate nell’immagine con il cacciavite a punta triangolare.

    • Queste viti sono tutte di dimensioni diverse, quindi segnati le loro posizioni.

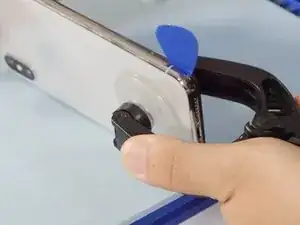
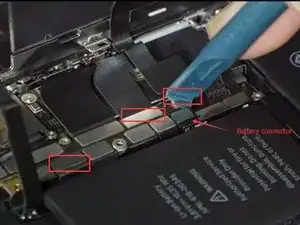
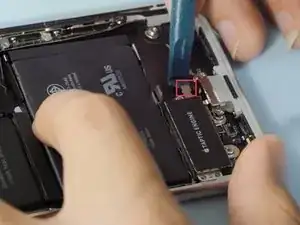
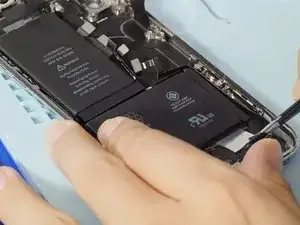
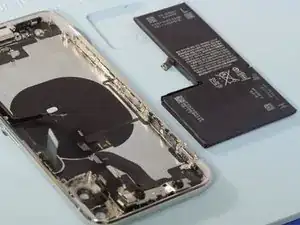
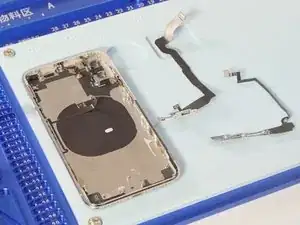
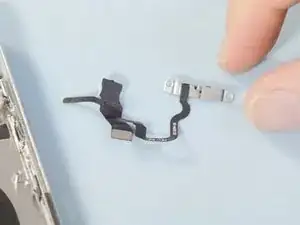
    • Rimuovi i connettori batteria/schermo LCD/touch screen/ricevitore/speaker con uno spudger.

    It’s an OLED screen, not LCD..

    Sverre Siggerud -

    need the screw sizes if anybody has them

    Alan Kmiecik -

    Hi Alan, you can find the screw sizes in step 13 of our screen replacement guide.

    Adam O'Camb -

    Hello, I need help please Is the same screwdriver used for all 5 screws? that is to say the Tri Point Y000

    Imanol Tanta -

  4. iUq2fSpNFPuRKPZl
    iUq2fSpNFPuRKPZl
    PXIcHTXlFLcO1YRc
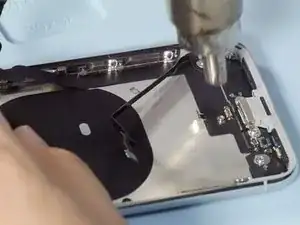
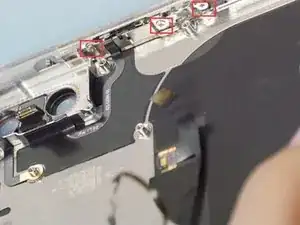
    • Togli le 3 viti Y000 e riscalda il cavo flat con una pistola termica, poi rimuovi con cautela l'altoparlante voce.

  5. RDXyKPinUESLHWUf
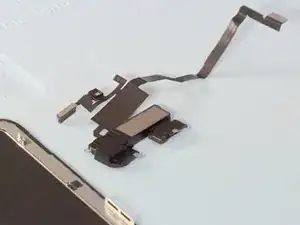
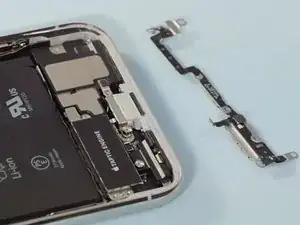
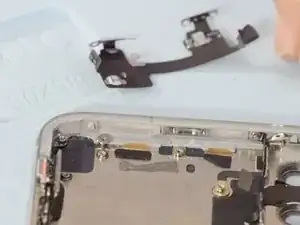
    • Rimuovi le 2 viti e togli la placca di metallo, rilascia i connettori della fotocamera posteriore.

    • Anche queste viti sono di dimensioni diverse

    Remove SIM card and tray.

    Dani G -

    WE need a picture of all the part that need to be removed here… if the rear cameras (the square silver shapes) need to be removed before the motherboard, direction as to that is needed.

    liznewkirk -

    Motherboard does not need to come out yet

    Notice the screw furthest left in picture. There is a connection to the front-facing cameras that need to be gently popped up to remove the antenna.

    Alan Kmiecik -

    the leftmost screw in the picture is the longer one

    Cire Ekratz -

  6. mjXZcYhS5uNi2UpD
    mjXZcYhS5uNi2UpD
    t1kIDetgG3GCuDDJ
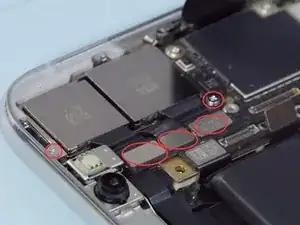
    • Scollega con uno spudger tutti i connettori dalla scheda madre.

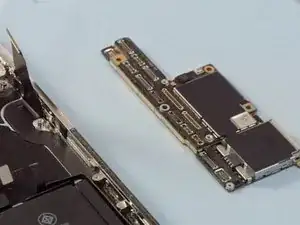
    • Svita 3 viti a croce Phillips #00 dalla scheda madre per poterla rimuovere.

    I feel like the last ribbon cable towards the top of the board needs to be addressed here. It's the cable right under the IR sensor for facial recognition in step five. It completely hid itself from my view and I feel like this can happen to someone else. It would be awful to destroy that cable or anything else.

    Felix Robinson -

    I can’t get the motherboard off because of that hidden flat cable at the top of the phone! I see no way to disengage it. Am I screwed?

    liznewkirk -

    So, yeah. This step in particular is missing about three more steps, without which you are in danger of tearing the IR sensor. So here’s the missing info. After releasing the connectors from the board:

    * remove the two Phillips screws, under the top lip of the phone chassis, holding the front camera assy in place.

    * Pull the camera assy forward just enough to loosen the IR cable that lays across the board. No need to un-stick the ribbon cables from the chassis.

    * use a spudger to disconnect the antenna cable from the board, directly under the IR cable.

    * gently remove the laminate board while carefully pushing the ribbon connectors out of the way with a spudger.

    Jim Thorpe -

    the leftmost screw (in the picture) is longer than the rightmost one

    Cire Ekratz -

  7. G4poKF2Y5ElC2Otn
    G4poKF2Y5ElC2Otn
    HJ6xKRcOZoSSCEBG
    IyIKsxs4SNSx1JPk
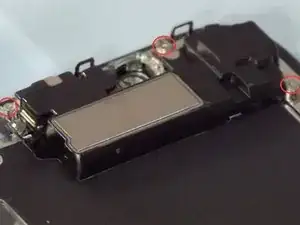
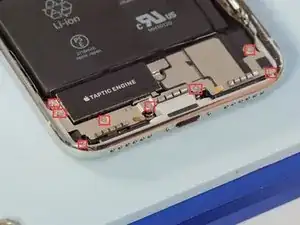
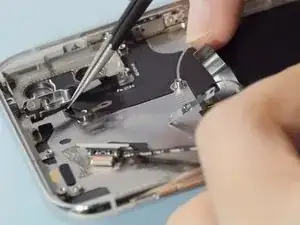
    • Svita le 8 viti sulla piastra di supporto e rimuovi la piastra stessa facendo attenzione a non rompere il piccolo connettore collegato subito sotto al Taptic Engine.

    • Rimuovi gli altoparlanti e il Taptic Engine.

    Remove 9th screw that hold small metal plate in place on top of the speaker connector.

    Dani G -

  8. yDIFvbECrjGGVtuX
    yDIFvbECrjGGVtuX
    sZShqwXPHWPerTGr
    • Stacca con le pinzette i 4 adesivi per poter rimuovere la batteria.

  9. 6QjG4NHWmxSTA1n5
    6QjG4NHWmxSTA1n5
    EfvSTDu6QWYZ4MyE
    • Riscaldando la camera frontale con una pistola ad aria calda sarà più facile rimuoverla.

  10. GAnwOxBBToGwqbuh
    GAnwOxBBToGwqbuh
    UydSiwBWYmS1MHWX
    IoDPdKCI6ws1jile
    • Rimuovi le 4 viti sul frame mostrate nella foto.

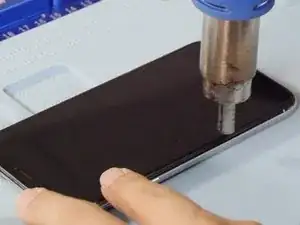
    • Il riscaldamento del cavo flessibile della porta di ricarica ne renderà più facile la rimozione.

    Don’t forget to unscrew the two screws on either side of the port and the two in the side wall next to the port.

    Bonrad C -

    What size and type of screw is the one on the side that holds the interconnect cable in?

    Jonathan Weinraub -

  11. ESRgSon2N4UEAHFo
    ESRgSon2N4UEAHFo
    jSNLZuSJLgHjgMUD
    x6kwrRRRgBMWCEXB
    • Svita le 7 viti nel cavo flex del Wi-Fi.

    • Il riscaldamento del cavo flessibile con una pistola termica ne renderà più facile la rimozione.

    which screw driver its been used

    momenal01 -

    the same you use to unscrew the display’s screw

    neax -

    need screw description, and tiny piece placement (three)

    Alan Kmiecik -

  12. CtyULXCFWrZPF4NB
    CtyULXCFWrZPF4NB
    dTxKJv3qXwfQTvSm
    pxu6fOZOeLMnqbhQ
    • Rimuovi le 3 viti del pulsante di accensione.

    • Il riscaldamento del cavo flessibile con una pistola termica ne renderà più facile la rimozione.

    Is it possible to use a normal hair dryer instead of a heating gun? Tanx!!

    Mikayil -

Conclusione

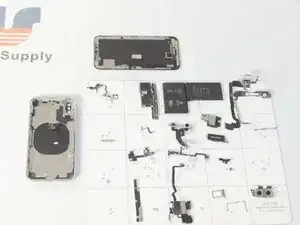
Per riassemblare il tuo dispositivo segui questi passaggi in ordine inverso.

Mandy

Membro da: 06/12/14

9518 Reputazione

25 commenti

excellent guide!!!

Andy Lee -

The iPhone X assemble video: https://youtu.be/E5jyuxgpE_g

Mandy -

What About the backside ? I heard that when the backside is shattered, it’s almost impossible to repair, because of the glue that holds the backside and parts together ?

Arnoud -

Hi avdk, we don’t tear down the back glass but we will pay attention to this question. If there is a definite answer, I will reply to you .Thank you.

Mandy -

The back glass is heavily glued down, and sandwiched between the metal chassis and the rear camera cover (which are welded together). So far as we can tell, there is no practical way to replace the back glass. If it shatters, you’ll have to either live with it, or remove every component and replace the entire enclosure. If you take it to Apple, they will charge you for an out-of-warranty repair (roughly half the original retail price of the phone) and simply replace the entire phone. Check the teardown for some images of the back glass coming off.

Jeff Suovanen -

You can replace the back glass cover of the iPhone X. We do it at work. It takes like 2 hours of heating though but its changeable.

Cristell -

Now there is a machine for remove the iPhone 8/8P/X back glass. Also there are many videos on YouTube about how to remove the back glass easily.

Mandy -

Where can I find your work surface? It looked really organized and had spots for your screwdrivers?

Mike Turrell -

Hi Mike, you can get it in Etrade Supply. Here is the links you need:https://www.etradesupply.com/catalog/pro...

https://www.etradesupply.com/catalog/pro.... May this can help you!

Mandy -

What are the specs for each screw in the iPhone X?

David Ballantyne -

is there any adhesive or glue needed during assembly? seems not needed, but why need heating when disassembly the LCD…? who can give answer? many thanks!

kevin -

It need adhesive during assembly like battery adhesive, the digitize frame adhesive.

Mandy -

Hi, can you tell me where are located the liquid damage indicator? One is on the display assembly, I can not see the second.

thanks

ciaomarco -

Its located on the Mother Board inside the Phone.

Cristell -

Thank you. I love the resources that you guys put together and the detailed instructions.

While the E-Trade Supply video is fantastic, anybody tinkering with the phone may also want to have a look at the video on JerryRigEverything (https://www.youtube.com/watch?v=c97ILI7T...) to reinforce their understanding of the tear-down process.

Noam Xia -

Thank you for this. This is my first time to DIY with my iPhone. I wasn’t able to figure things out without the second video. One issue is that the tools recommended for this repair are incomplete. I ordered a toolkit that met the requirements - but it did not include the tool that has suction cups on both ends to open it easily. That wasn’t on the list. It was only in their video.

ja.hinton -

Not a complete guide to follow. Seeing other teardowns, I notice steps are out of logical order and / or missing. The descriptions lack clarity and left retracing my steps to remove parts not previously mentioned. Then there was not caution of the tweezers possibly poking the battery or by removing the volume flex cable from the wireless charging coil requires re-micro-soldering or replacing the charging coil + flex cable.

Brian Crink -

What can I do if the iPhone X no longer recognizes the SIM card?

wmetzger -

what about the bluetooth antenna

Alan Kmiecik -

Hi,

Auf der Innenseite vom backcover, direkt unter dem Logic Board befindet sich eine schwarze klebe abschirmung.

Wozu dient diese genau? Bzw. handelt es sich dabei überhaupt um eine Art Abschirmung? Was für Auswirkungen hat es, wen bei einem komplettem back cover Tausch dieses klebe pad nicht übernommen wird? Strahlungs schutz folie? Oder doch abschirmung des logic Board bei verwendung der Induktions Ladestation?

Mfg marvin

Veit marvin -

Tankx for the guide!! Excellent and very easy to follow all the steps.. :)

Mikayil -

I don't even understand some of the details in this article, but there is some amazing information for me. I am aiming to build an engaging attractive website named wordle unlimited wordle and I got some ideas after reading this article. Thank you.

Jimmy Dean -

What type of heat gun do you use and what temperature is needed?

Gannon Bjerke -

Really helpful, welldone

FAZAL KP -