Introduzione

Segui questa guida per rimuovere e sostituire la batteria del OnePlus 5. La parte più difficile è rilasciare i ganci della cornice. Dopodiché il resto viene via facilmente.

Se la tua batteria è gonfia, prendi adeguate precauzioni.

"'Per la tua sicurezza, fai scaricare la batteria sotto il 25% di carica prima di smontare il tuo telefono"' Questo riduce il rischio di pericolosi eventi termici, nel caso in cui la batteria dovesse accidentalmente essere danneggiata durante la riparazione.

  1. SYlGM5WyOaBd6pLj
    SYlGM5WyOaBd6pLj
    QAibbw1Y4MJGdgwG
    GPrXnC6XtihhFYj6
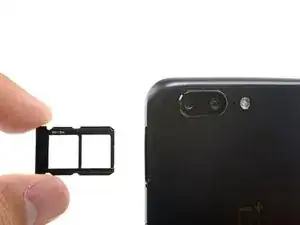
    • Infila uno strumento o una punta per l'eiezione della scheda SIM, o una graffetta raddrizzata nel piccolo foro sotto il vassoio della scheda SIM, posizionato vicino alle fotocamere posteriori sul bordo del telefono.

    • Premi con decisione per espellere il vassoio.

    • Quando reinfili il vassoio della scheda SIM, assicurati che sia orientato correttamente come mostrato.

  2. TBQWhWKy1QEZvuXb
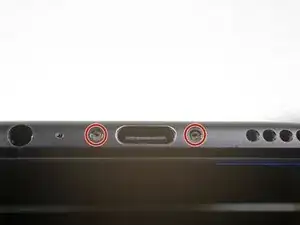
    • Svita le due viti Torx T2 da 2,6 mm accanto alla porta USB-C sul bordo inferiore del telefono.

    What are the reference of the screws ? They are missing in the one I bought !

    Yôken Asakura -

    Hi Yôken,

    They help hold the back cover on. Most of the time, the clips are enough to hold the phone together.

    Arthur Shi -

    Just FYI, for whatever reason my brand new OnePlus 5 had 0,8 mm stars screws instead of T2 Torx.

    strixaluco -

    Same here, T2 doesn’t fit the screws on my Oneplus 5. More like T1’s

    Shaze An -

    Definitely T2 for me. Do watch out during assembly. I have a feeling that it’s easy to strip these.

    Juno Grégoire -

    T2 for me too. It was missing in my kit and iFixit sent it later when I asked them about it.

    Gitanshu Sardana -

  3. P3gkh4u1CW6BvaUT
    P3gkh4u1CW6BvaUT
    HZ2oq3334XBwxOSd
    Z2kNTKjf2Hn4xfhd
    • C'è un elevato rischio di danneggiare il pannello dello schermo se questa procedura di apertura non viene eseguita correttamente.

    • I prossimi quattro passi mostrano come separare la copertura posteriore dalla cornice in plastica. Leggi tutti i passaggi prima di provare ad eseguire questa procedura.

    • Ci sono due diverse fessure tra il corpo del telefono e lo schermo:

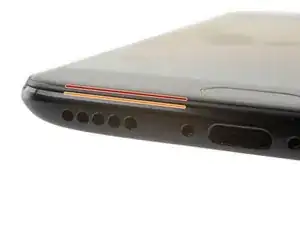
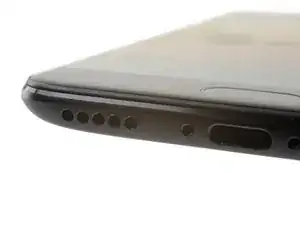
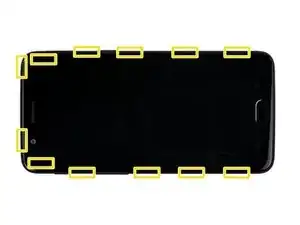
    • Fessura del pannello dello schermo: Questa fessura fa parte del gruppo dello schermo. Non fare leva in questa fessura, o separerai e danneggerai il pannello dello schermo.

    • Fessura della cornice: Questa è dove la cornice in plastica incontra la copertura posteriore. Fai leva solo in questa fessura.

    • Ci sono dodici ganci che fissano la cornice contro la copertura posteriore. Ricordati la loro posizione mentre rimuovi la copertura posteriore nei prossimi passaggi.

  4. etwdJRYqsaaDhSnk
    etwdJRYqsaaDhSnk
    KfBDXKWXddFXRNSI
    • Mentre procedi, cerca di non accendere accidentalmente il telefono. Se succede, spegnilo prima di procedere.

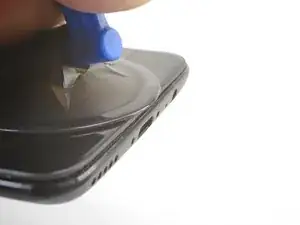
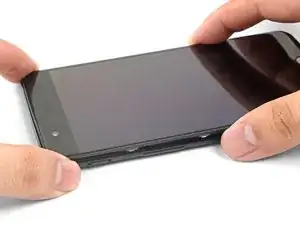
    • Fai aderire una ventosa vicino al bordo inferiore dello schermo.

    • Tira la ventosa con forza costante.

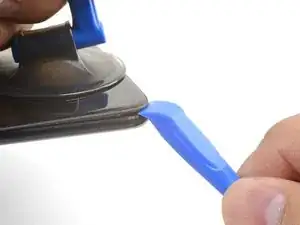
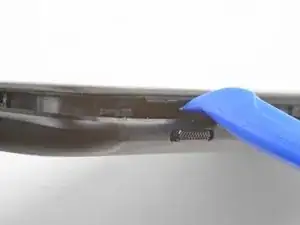
    • Premi il bordo di uno strumento di apertura nella fessura della cornice vicino alla ventosa finché non si infila tra la cornice in plastica e il bordo della copertura posteriore.

    • A causa degli spazi ristretti, questo richiederà parecchia forza. Usare un nuovo strumento di apertura con un bordo intatto ti aiuterà in questo passaggio.

    I found pushing open the frame seam at the corner works better than pushing from the middle like it is shown in the pictures

    Mark -

    I found the suction cup to be more of a hindrance and kept hitting the power button, making it necessary to stop and turn the phone off again. I watched a youtube video where the person didn't use a suction cup at all and decided to try that. I also found that a guitar pick type spudger worked far better than the one shown in the picture. If you're having trouble getting it started, I suggest trying those two things.

    Brett Gersekowski -

  5. G2EuFKReywNVunqY
    G2EuFKReywNVunqY
    2EGqswv53ufVdUop
    KCOec3LgxFrVKBPp
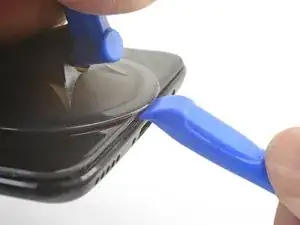
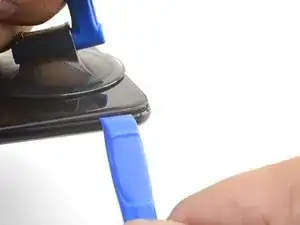
    • Dopo aver infilato lo strumento di apertura, fallo scorrere attentamente sotto il bordo inferiore del telefono.

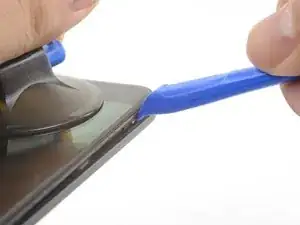
    • Guida attentamente lo strumento di apertura attorno all'angolo in basso a sinistra del telefono mentre lo tieni infilato nella fessura.

    This was extremely difficult & took a lot of force. I needed a thin flat metal spudger and wrecked a couple of plastic ones in the process. I left a few scratches along the join in the process. It would be easier if I had something to hold the phone, in my hand I kept turning it on by accident.

    David Hoffman -

    what was the metal spudger did you use? I am having trouble as well. I cannot seem to pry the back cover and it feels like it is shut tightly, there are no crevices I can pry into. What was your strategy may I ask?

    Azure Shoti -

    At first, I slightly opened the body with a plastic tool, but it was not enough to actually open the back cover. Then I used a thin metal screwdriver for this. It was difficult but nothing special. Just be sure that you are opening the correct seam between the body and the screen and don’t make sudden moves. I bent nothing, everything came back in place when reassembled.

    ivan -

    Same as David here: the plastic opening tools/guitar picks were doing nothing (not even creating the first "crack") . In the end I managed to open it using Jimmy (the metal knife/spudger), but not without scratching the whole metal cover.

    Nessuno Nessuno -

  6. rUcRRH2p6evfJ4RY
    rUcRRH2p6evfJ4RY
    DLUeRvMBGB6N1HCZ
    • Fai leva con lo strumento di apertura per rilasciare il primo gancio dalla cornice.

  7. 1IHQhNpSXtTNfbdc
    1IHQhNpSXtTNfbdc
    GdYPl1KTgPXLaenS
    23SiWCmSwCvYEIZ5
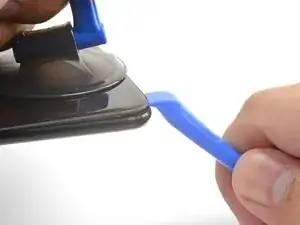
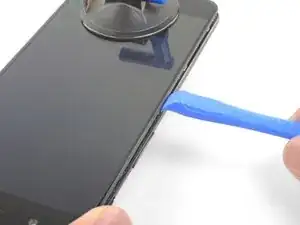
    • Continua a far scorrere lo strumento di apertura sotto il bordo lungo, rilasciando i ganci sulla strada.

    • L'ultimo gancio nell'angolo in alto a sinistra, vicino al selettore di modalità, è incassato e può essere difficile da rilasciare. Prenditi tutto il tempo necessario ed usa la parte piatta di uno spudger o un plettro per aiutarti.

    If you have difficulties with the last clip on the upper left. Try to go round the other side (right side), beginning at the bottom. This worked very well for me after having some difficulties with the clip near the front camera.

    Sebastian -

  8. 6ViL6JCT2JdJC2mB
    • Dopo aver liberato i bordi inferiore e sinistro del telefono, fai ondeggiare delicatamente la cornice per rilasciare i ganci dei bordi superiore e destro.

    • La cornice è ancora collegata alla copertura posteriore tramite un lungo cavo a nastro. Non rimuovere la copertura posteriore.

    • Durante il rimontaggio, fermati qui per provare la funzionalità del tuo telefono prima di richiudere la copertura posteriore.

    • Per richiudere la copertura posteriore:

    • Allinea il bordo superiore della cornice alla copertura posteriore ed assicurati che i ganci superiori si infilino in posizione.

    • Schiaccia i bordi lunghi del telefono per far scattare i ganci restanti.

    Reinstalling the back cover stumped me for a second… If you’re struggling with aligning the top edge of the frame, remember that the camera is going to look off/pointed a bit too low until you actually clip the frame back in.

    Really stupid but it was the only thing that tripped me up in this guide.

    Roger -

  9. s3eTthVrvSeQdHbg
    s3eTthVrvSeQdHbg
    OpemIa6DLGUeoyEj
    AwYBQfaKDAKrtFmE
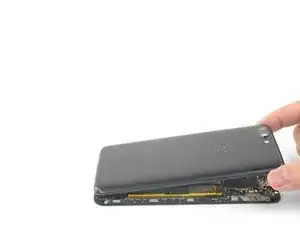
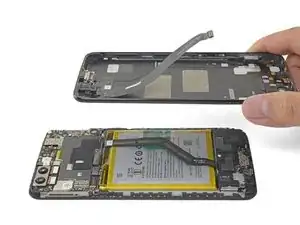
    • Dopo aver rilasciato tutti i ganci, gira il telefono in modo che lo schermo sia rivolto verso il basso.

    • Ruota la copertura ed appoggiala sulla cornice esposta.

    • Stai attento a non tirare il cavo a nastro che collega la copertura posteriore alla cornice.

  10. pfyQGq3RaDESTTM2
    pfyQGq3RaDESTTM2
    rTFqnIgaPC1VYRKZ
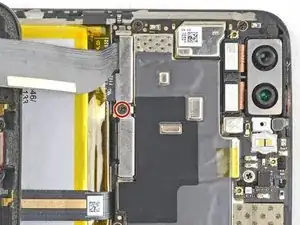
    • Svita la vite a croce Phillips da 2,6 mm che tiene ferma la copertura del cavo sopra la batteria.

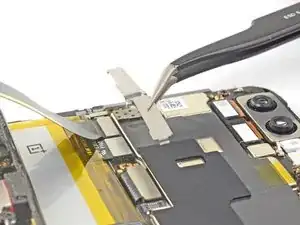
    • Solleva e rimuovi la copertura del cavo.

    • Per reinstallare la copertura, posiziona correttamente un'estremità e piega leggermente la copertura per posizionare l'altra estremità.

  11. RJeEHKqpOLtBPtO6
    RJeEHKqpOLtBPtO6
    EANPufBOY5oCwAai
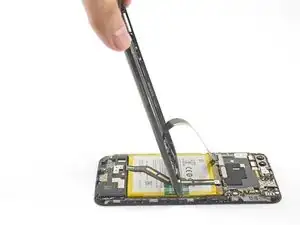
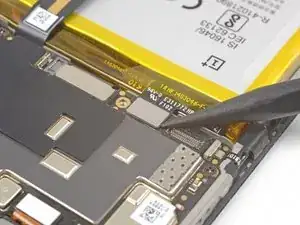
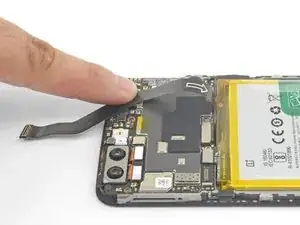
    • Usa la punta di uno spudger per sollevare e scollegare il cavo a nastro della copertura posteriore dalla sua presa.

    • Per ricollegare i connettori a pressione come questo, allinea attentamente e premi su un lato, quindi ripeti per l'altro lato. Non premere nel centro. Se il connettore non è allineato correttamente, i contatti si possono piegare, causando danni permanenti.

    If it is damaged permanently is there a solution for it?

    Run River -

    If the flex cable pins are damaged, the flex cable can be replaced.

    If the connecter pins (on the motherboard) are damaged, you might need to do microsoldering (or contact a microsoldering company) to replace the damaged connector.

    Brendan -

  12. CkrFZmYRNbVCqR4i
    • Rimuovi la copertura posteriore.

  13. Xbxj4YR6HFSJhTZo
    Xbxj4YR6HFSJhTZo
    NsuNfUZJkyVaCEWg
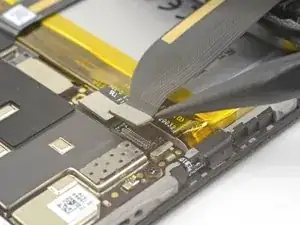
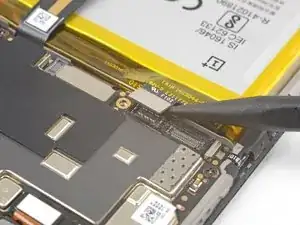
    • Usa la punta di uno spudger per sollevare e scollegare il connettore della batteria dalla sua presa.

  14. hWAKPeA4uPKOHV4n
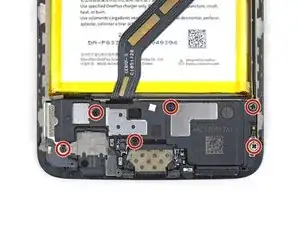
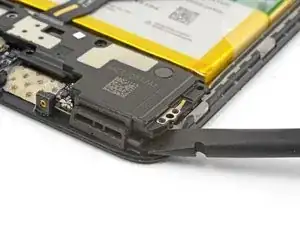
    • Svita le sei viti a croce Phillips da 2,6 mm che fissano lo speaker principale alla cornice.

  15. SAq12RkicpY13HQU
    SAq12RkicpY13HQU
    NhLAyY5F5CxkQU3D
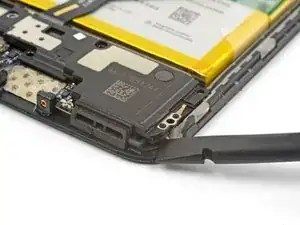
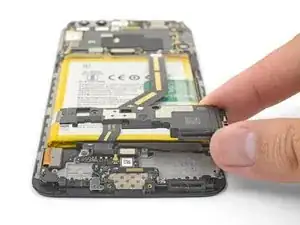
    • Infila la parte piatta di uno spudger nell'angolo del gruppo dello speaker principale e sollevalo leggermente, rilasciando lo speaker principale dal suo alloggio.

  16. gwWsgoh41HeHMTqc
    • Rimuovi lo speaker principale.

    • Per reinstallare lo speaker principale, allineane il bordo inferiore alla cornice, quindi premilo in posizione.

    • Durante il rimontaggio, assicurati che il connettore del cavo dello schermo sotto il gruppo dello speaker principale sia ancora collegato saldamente.

  17. MCZVWKZDidrnpCTl
    MCZVWKZDidrnpCTl
    oEntDs4ETvhnoEDt
    cLG1RDKQldkYWaB3
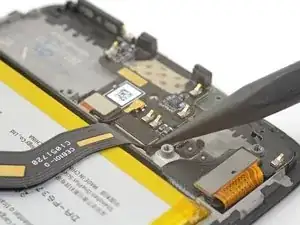
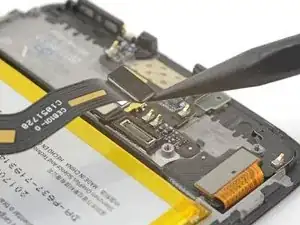
    • Usa la punta di uno spudger per sollevare e scollegare il cavo a nastro di interconnessione dalla presa.

    • Se stai sostituendo la batteria, piega il cavo a nastro di interconnessione lontano dal telefono e fissalo con un elastico o del nastro.

    What if you’re NOT replacing the battery?

    e nigma -

    This step is used in multiple guides, and not all of them require the cable to be bent away. You can just leave it sitting there, disconnected.

    Arthur Shi -

    This image seems to show the daughterboard removed but there is no corresponding previous step. I see no way to remove the interconnect flex cable without removing the daughterboard. Possibly the volume switch can be removed with the cable still connected but I'm not confident enough to try this so will remove the daughterboard.

    David Hoffman -

    David,

    Thanks for bringing this up. That's indeed a procedural error! I've added the missing steps in the affected guides.

    Arthur Shi -

  18. YMR2tis5L51nDXfo
    • Solleva l'aletta di tiraggio verde dalla batteria.

  19. JN2mfbuNdwYjPda1
    JN2mfbuNdwYjPda1
    soJVkPrnSUoZJrdL
    fI5sOH1e3HCQWiNN
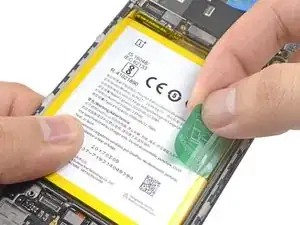
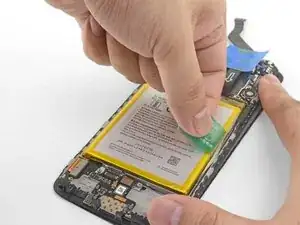
    • Tieni ferma la cornice del telefono contro il tavolo.

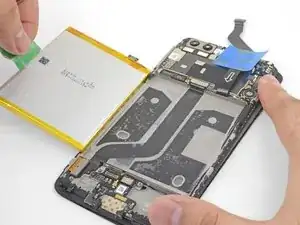
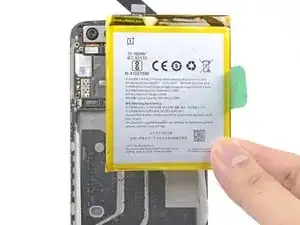
    • Facendo forza costante, tira l'aletta di tiraggio verde verso l'alto finché la batteria non si libera dal suo alloggio.

    • Se stai avendo delle difficoltà, applica dell'alcool isopropilico ad alta concentrazione (> 90%) lungo la fessura della batteria per ammorbidire l'adesivo.

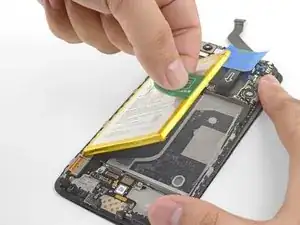
    • Ruota completamente la batteria fuori dal suo alloggio e rimuovila dal rivestimento in plastica.

  20. 5eKUhLH5srOiBvMD
    • Rimuovi la batteria.

    • Non riutilizzare la batteria dopo averla rimossa. Riutilizzare una batteria piegata o danneggiata è un potenziale rischio per la sicurezza.

    • Se la batteria sostitutiva non ha una linguetta di estrazione, puoi prenderla dalla vecchia batteria e applicarla a quella nuova, per facilitare future ed eventuali sostituzioni.

    • Mentre installi la batteria, connetti temporaneamente la batteria al telefono per assicurare un corretto allineamento.

    • Se stai installando una batteria su un nuovo modulo schermo + digitizer, assicurati di staccare il rivestimento adesivo blu scuro per esporre l'adesivo per la nuova batteria.

Conclusione

Per rimontare il tuo dispositivo, segui le istruzioni in ordine inverso.

Per prestazioni ottimali, calibra la tua nuova batteria installata: Caricala fino al 100% e lasciala sotto carica per almeno altre 2 ore. Poi usa il tuo dispositivo fino a scaricare completamente la batteria. Infine carica la batteria fino al 100%.

Porta i tuoi rifiuti elettronici a un riciclatore certificato R2 o e-Stewards.

La riparazione non è andata come previsto? Prova delle soluzioni di base ai problemi, oppure rivolgiti alla nostra comunità Risposte per trovare aiuto.

Arthur Shi

Membro da: 03/01/18

248236 Reputazione

26 commenti

Thanks a lot for your contribution! It worked perfectly.

Kyuhwa Lee -

I follow the instructions but it said the battery is too slow

Jhonny Cheong -

Charge the battery for at least a few hours. If the battery does not charge, double-check all connectors, especially the interconnect cable. Does the phone react to a charging cable? If not, something may be broken between the USB port and the motherboard.

Arthur Shi -

It honestly took an hour to get the back cover off, and then another hour to take the rest apart and put it back together. But this guide was useful.

Matthew MacDonald -

Thanks so much for this guide. Worked out great!

johndbattles -

Followed the guide and worked perfectly. Thank you!

Collin Whiting -

Very nice and detailled guide. It was easy to follow the steps and change the battery :)

Sebastian -

Thank a lot, pretty easy.

Panithi Saktrakulkla -

Thanks a lot for these instructions. It took me about 20min. to undertake the full process.

ottavio.cremona -

Finally changed my battery after more than couple months of buying. My phone had started getting stuck in bootloop and after rebooting twice it would go blank with a light blue LED. I thought no way this is a battery issue. Guess I was wrong.

Opening the display part looked scary and I kept putting it off. Definitely takes a substantial amount of force to pry it open from the bottom, specially the bottom left corner for me. Make sure you read the whole thing first and Don’t go trying to open from top if the bottom feels tight.

Took me an hour tops. Thanks a lot!

Gitanshu Sardana -

After putting it back together I wondered what to do with the screw I had left over. Had to go through the process of opening it back up to find somewhere for it to go!

Great help, thanks for the instructions.

Jonathan Sebright -

Battery was slightly thicker than the available space. This is causing the screen to be pushed out from its frame a bit when put back together. otherwise everything worked as described.

Swathin -

I also had a battery that was 0.5mm thicker. the screen was bent and the glass on the sides was detaching from the display, I had to replace the old battery. do you know where to find the exact measurements of the battery?

Corrado Corradini -

After first charge of new battery, it seems that the battery will only charge to 85%. What should I do. It has been 2+ hrs that it is stuck at 85%, and (if I understand correctly) this is a critical step for battery conditioning.

J Barnes -

Just try to unplug then plug the phone to the charger again :)

Brendan -

Great guide. Mind you, the cover is REALLY, REALLY hard to get off. I broke a few plastic tools, tried it with a metal one but made a tiny crack on the screen under the home button, so don’t do that. You can also expect some blood, as I damaged my skin a few times trying to get it open ;) Once this was done it was quite easy, though some screws don’t come out very easily. Oh, and I had some cheap tools which wore out, so I had to find better ones. I’m currently attempting to calibrate the battery, and I’ll see how it goes. I also changes the charging port while I was there, which is even simpler than the battery. So if you’re changing the battery, change the port also, it’s really cheap and it does make a change.

Rok Novak -

La procédure est clair et je n’ai eu aucun problème à changer ma batterie!

Merci beaucoup !

Jerome -

Thanks for the guide.. only ended up taking me about 30 mins but I already have some experience with phone repairs. This guide was bang on!

astonradford -

Worked perfectly! Managed to get through the whole thing in half an hour. Thank you :)

Jem Walker -

Everything worked great! Full battery install complete! :D I'd say the only thing I was confusing was receiving the adhesive for the OP5 battery replacement. You don't really need the adhesive to do the install since the factory adhesive seems to do the trick just fine. That's maybe the only thing I'd explain more (how to use the adhesive's given, or not).

Thank you!

Josh Toczko -

I replaced my battery! It worked! Thanks author!

Tim Graboski -

The screws either side of the charging port are not T2 - they are T1. This is an unusual size and should be emphasised.

It would be useful to know what size Phillips screwdriver is needed for internal screws. I assume that the mentioned 2.6mm refers to the screw length. This does not help.

Ian -

Hallo, vielen Dank, sehr gute Anleitung! Hat alles gut funktioniert ... :o)

Tom Biel -

I ordered the battery and had to remove a piece of the tap as the cabel was bent way way way to far to be plugged in so i had to rebend it IM NOT A FAN OF BENDING THOSE FLAT CABELS! I took fotos of it was thinking i got send the wrong battery... Made me really !#^&@@ off rebended the cabel amd pluged it in... Pls check next time that the connect is in the right spot be fore sending out a battery

STARTJIM -

Did it! The screen suction handle did not work. I kind of pressed it very very hard, but after that it did not apply enough suction force. So I just used the Jimmy tool, which scraped the edge of cover from black to metallic a bit until I understood that it has to be not horizontal but pointing kind of down, then it worked and I could get in the blue plastic opening tools to pry the bottom side outwards.
Also reassembly had to be made first on the power button side, then top, after that it went well.

Uldis Seglins -

Muchísimas gracias por compartir vuestro conocimiento. Con esta guía la sustitución resultó extrañamente sencilla a la par de que resulta entretenido el reparar las cosas por ti mismo. Espero darle una buena segunda vida a mi móvil :) Thanks so much!!!

Diego Castillo -