
Introduzione
Usa questa guida per ridare la vita al tuo iPhone 7 con una nuova batteria. Se la tua batteria è gonfia, prendi le dovute precauzioni.
Questa guida ti spiega come staccare completamente il gruppo display allo scopo di evitare danni ai cavi del display. Se pensi di essere in grado di rimuovere la batteria senza dover forzare troppo sui cavi del display, puoi evitare i passi sulla disconnessione del display.
Per ottimizzare le prestazioni dopo aver ultimato la procedura indicata in questa guida, calibra la tua batteria appena installata: caricala al 100% e lasciala caricare per almeno altre due ore. Quindi utilizza il tuo iPhone fino a quando si spegne a causa della batteria scarica e poi ricaricalo ininterrottamente fino al 100%.
Strumenti
-
-
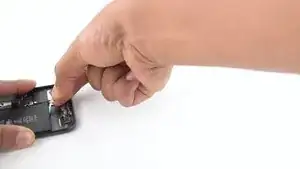
Spegni il tuo iPhone prima di cominciare a smontarlo.
-
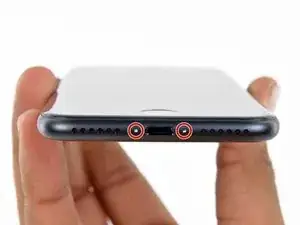
Rimuovi le due viti pentalobe da 3,4 mm nella parte inferiore del tuo iPhone.
-
-
-
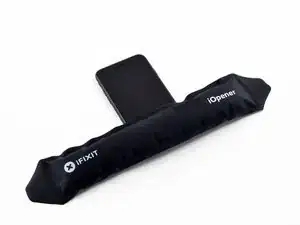
Usa un asciugacapelli o prepara un iOpener e applica calore per circa un minuto per ammorbidire l'adesivo sottostante.
-
-
-
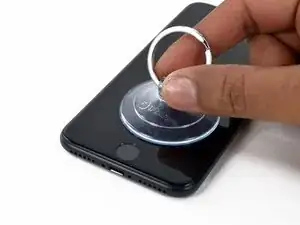
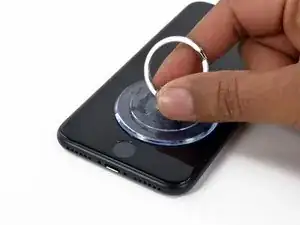
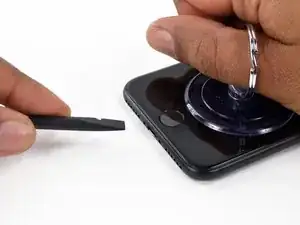
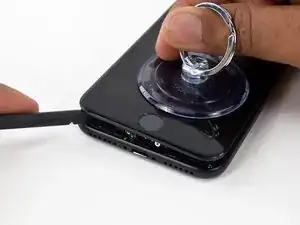
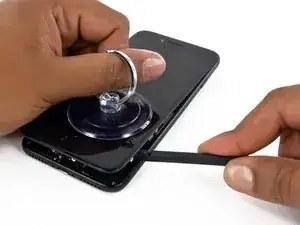
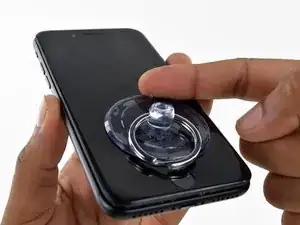
Tira la ventosa fino a creare una piccola fessura tra il gruppo display e il case posteriore.
-
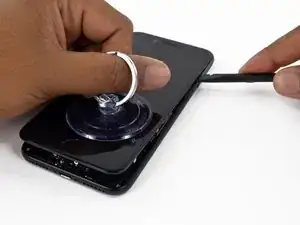
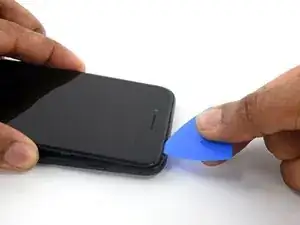
Inserisci l'estremità piatta di uno spudger nella fessura.
-
-
-
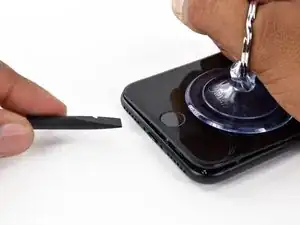
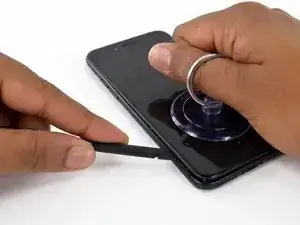
Fai scorrere lo spudger verso sinistra lungo il lato inferiore dell'iPhone.
-
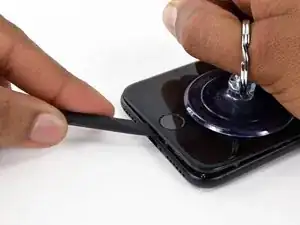
Ruota lo spudger per allargare la fessura tra il display e il case posteriore.
-
-
-
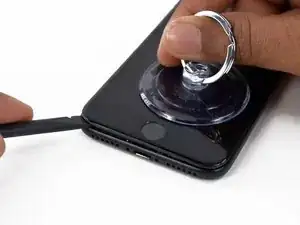
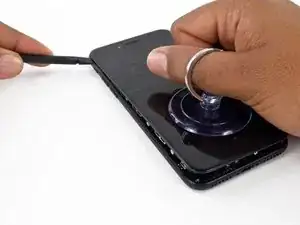
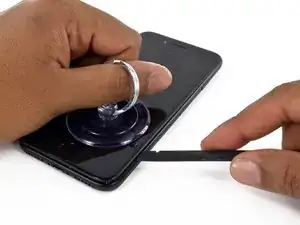
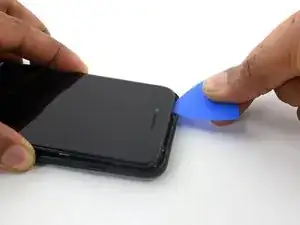
Fai scorrere lo spudger lungo il lato sinistro dell'iPhone, iniziando dalla parte inferiore e spostandoti verso i pulsanti del controllo volume e l'interruttore della modalità silenziosa.
-
-
-
Inserisci l'estremità piatta di uno spudger nell'angolo inferiore destro del dispositivo.
-
Ruota lo spudger per allargare la fessura tra il gruppo display e il case posteriore.
-
Fai scorrere l'estremità piatta dello spudger sul lato destro del telefono per rompere l'adesivo che tiene in posizione il display.
-
-
-
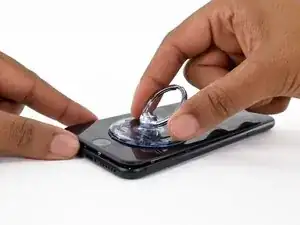
Solleva la piccola appendice della ventosa per rimuovere lo strumento dal pannello anteriore.
-
-
-
Fai scorrere uno strumento di apertura lungo il lato superiore dell'iPhone, tra il case posteriore e il pannello anteriore, per rompere la parte restante dell'adesivo che tiene in posizione lo schermo.
-
-
-
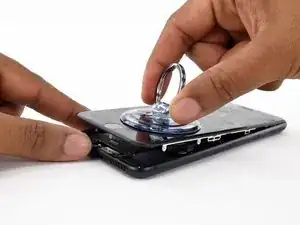
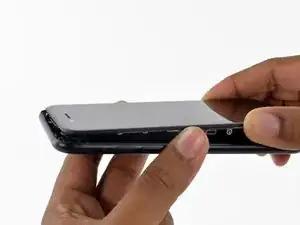
Tira lievemente in orizzontale il gruppo display per allontanarlo dalla parte superiore del telefono per scollegare le clip che tengono bloccato lo schermo al case posteriore.
-
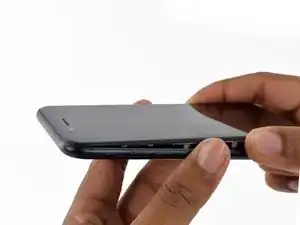
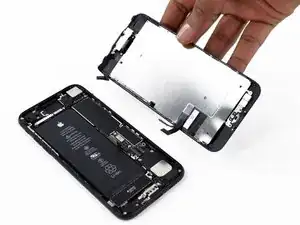
Apri l'iPhone sollevando il display dal lato destro, come se fosse la copertina posteriore di un libro.
-
-
-
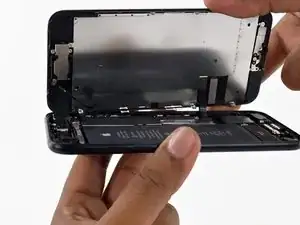
Rimuovi le seguenti viti con testa tri-wing Y000 dalla staffa inferiore del connettore:
-
Tre viti da 1,2 mm
-
Una vite da 2,4 mm
-
-
-
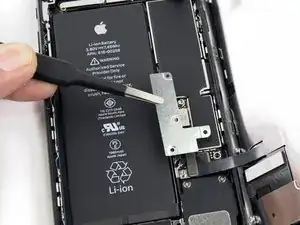
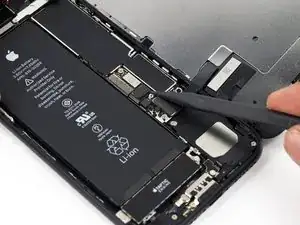
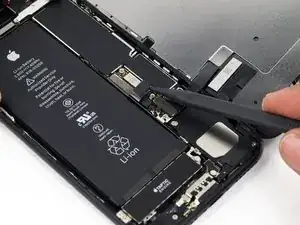
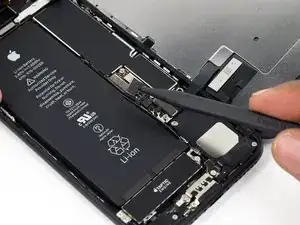
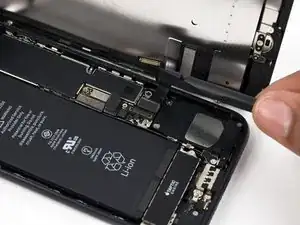
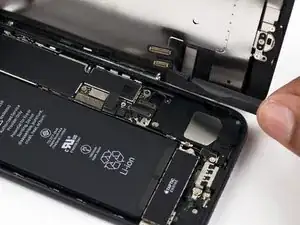
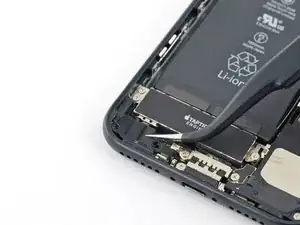
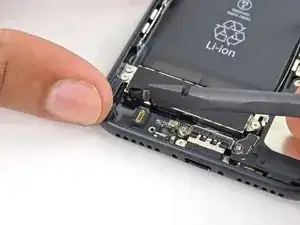
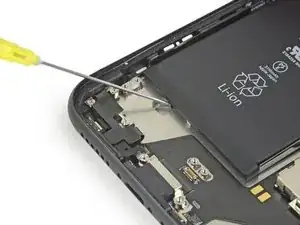
Usa l'estremità a punta di uno spudger per sollevare il connettore della batteria dal suo zoccolino sulla scheda logica.
-
-
-
In questo passo, accertati che la batteria sia scollegata quando disconnetti o riconnetti i cavi.
-
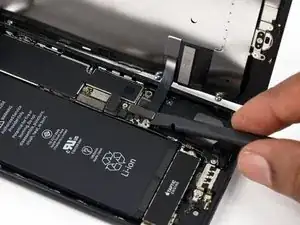
Usa l'estremità piatta di uno spudger o un'unghia per staccare i due connettori inferiori del display sollevandoli verso l'alto dai loro zoccolini sulla scheda logica.
-
-
-
Rimuovi le due viti Phillips da 1,3 mm che fissano la staffa sopra il connettore del gruppo sensore del pannello frontale.
-
-
-
Stacca il connettore del gruppo sensore del pannello frontale dal suo zoccolino sulla scheda logica.
-
-
-
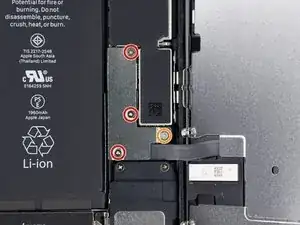
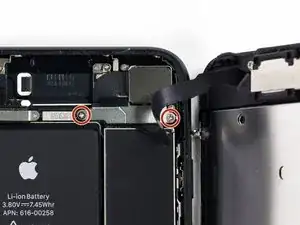
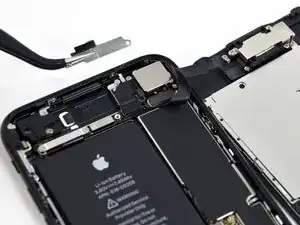
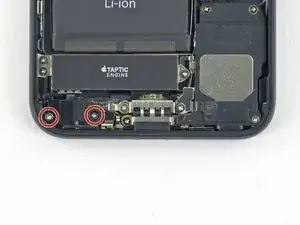
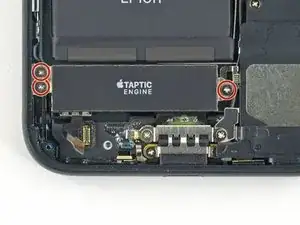
Rimuovi le due viti Phillips da 1,9 mm che fissano lo sfiato barometrico al case posteriore.
-
-
-
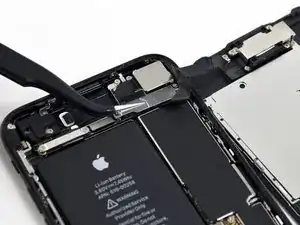
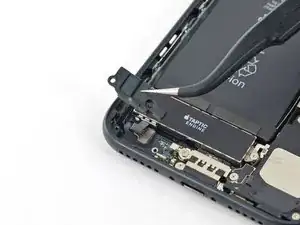
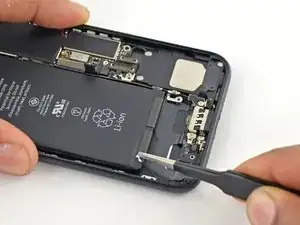
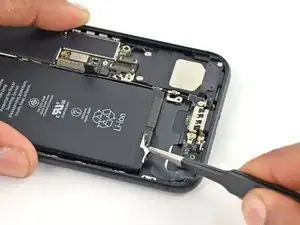
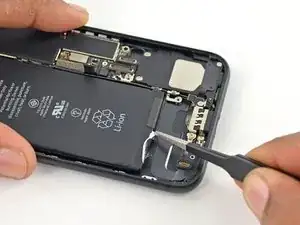
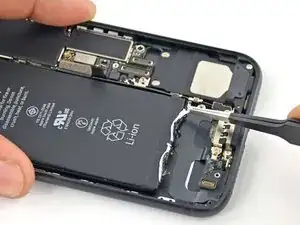
Usa l'estremità piatta di uno spudger per disconnettere il connettore del Taptic Engine dal suo zoccolo sulla scheda logica.
-
-
-
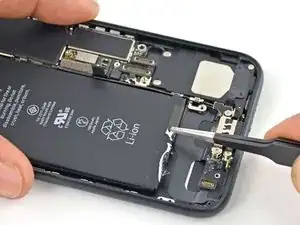
Rimuovi le tre viti a croce Phillips da 1,6 mm che fissano il Taptic Engine al case posteriore.
-
-
-
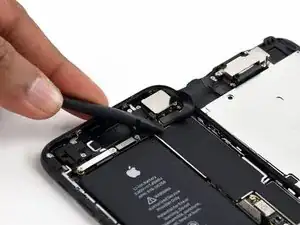
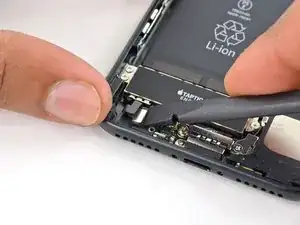
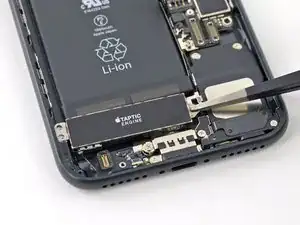
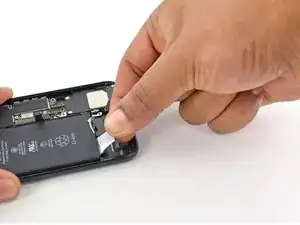
Usa delle pinzette a punte arrotondate per staccare una delle strisce adesive sul lato inferiore della batteria.
-
-
-
Usa delle pinzette a punte arrotondate per staccare l'altra striscia adesiva sul lato inferiore della batteria.
-
-
-
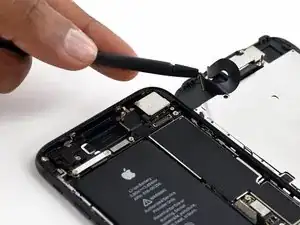
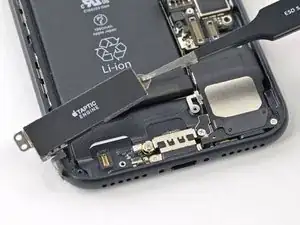
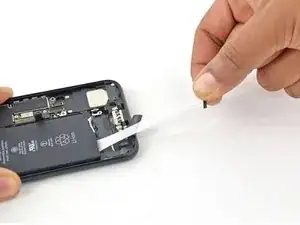
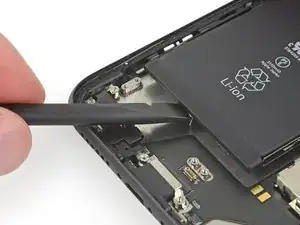
Tira lentamente una delle linguette adesive della batteria in direzione della parte posteriore dell'iPhone.
-
Tira senza scatti, mantenendo una tensione costante sulla striscia finché scivola fuori da sotto la batteria e il case posteriore. Per i migliori risultati, tira la striscia a un angolo di 60° o meno.
-
-
-
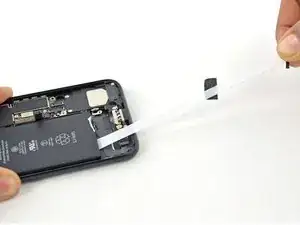
Ripeti il passo precedente per la seconda striscia.
-
Se hai rimosso con successo entrambe le strisce adesive, salta il passo successivo.
-
Se invece una delle strisce adesive si è rotta sotto la batteria e non può essere recuperata, continua con il passo successivo.
-
-
-
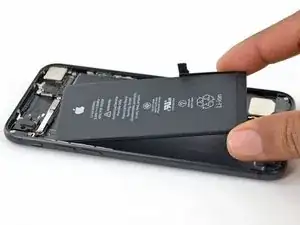
Rimuovi la batteria dal case posteriore.
-
Fai aderire la batteria, scollegala e continua a rimontare il tuo dispositivo.
-
Effettua un riavvio forzato dopo il riassemblamento. Questo previene diversi problemi e ne semplifica la risoluzione.
-


Confronta il pezzo sostituito con quello originale, potresti dover trasferire componenti rimasti sulla vecchia parte o rimuovere adesivi sul retro del componente nuovo prima di installarlo.
Per riassemblare il tuo dispositivo, segui i passi descritti in ordine inverso.
Porta i tuoi rifiuti elettronici a un riciclatore certificato R2 o e-Stewards.
La riparazione non è andata secondo i piani? Vai sulla nostra comunità Risposte per trovare aiuto nella risoluzione dei problemi.

120 commenti
Does this effectively negate the waterproof feature of the new iPhones?
Tubby -
yes , unless it is sealed back with new waterproof tape, which almost no one has yet
Atronx -
No you can buy the replacement. See the above guide for a link on how to do that and iFixIt sells them. Recommend buying more than one because installation is tricky - must get it aligned perfectly though the spluger and pointy tweezers can help reposition minor slipups.
The back adhesive is available on ifixit. So you can make it water proof-ish again.
Recall, an original iPhone is far from waterproof after only a month usage.
Guenter -
iPhone 6 take battery off put new one now not changing at all but saying yes but no going up new battery saying all time 6@.all time
ant2101 -
Is there any way to put back the waterproof sealing after changing the battery for iPhone 7? Thanks
I too would like to know this! It's a shame they don't elaborate as such. There is this part here - Display Adhesive iPhone 7 Display Assembly Adhesive which I assume needs to be put on after the screen is taken off but this guide says it's not needed? But for a screen repair it is? Does it get placed on the phone housing or screen? Thanks
blitzn -
Yep, we have a guide for replacing the seal (display adhesive) now. I don't know how waterproof the seal will be afterward, but I think it's worth doing regardless.
Most of the adhesives that are being sold are not rated to be waterproof, and are not the geniune OEM brand materials.
Atronx -
Probably too late, but there are many vendors that sell the waterproof seal for iPhone7. Use alchohol and tweezers to remove the old seal and glue, align the new seal and stick it. Compared to the battery change, it’s a breeze.
Yes it is. Have a look at the iPhone Display Adhesive Replacement guide
steinmb -
Can anyone confirm 7/7P's pentalobe screws have a ring of seal near the screw head?
Cooper Chase -
Confirmed, the screws have a black ring seal around the head.
rcheing -
Can’t get the display front
Bernadette Pfeifer -
From personal experience, I highly recommend before doing this procedure or any other, that you do a backup of your phone (preferably local) in case your procedure goes south.
ballina5ny -
I purchased the repair tools with the replacement battery from iFixit. The tools include a screw driver and three heads none were labeled 3.4 mm. I think the one that fit the pentalobe screws was labeled Y000. The guide should identify the screw driver head supplied by the kit not 3.4mm.
Mark Lieberman -
in the iphone 7 replacement battery kit from iFixit, the screwdriver that fits the 3.4 mm pentalobe screws is labeled P2 (and not Y000)
Jan-Tijn Oppermann -
3.4 mm is the height of the screw and is not related to the screw driver code.
Ahmad Vaziri -
the screwdriver PH000 does not work i wasted two screws and now they dont have the 4 cross mark they are now a circle, i buyed it all from Paraguay and it doesnt work, had to assembly back the parts because i got stuck like i mention with some screws, well im just going to send to a professional to install, thanks
Martin Frutos, Nuñez -
The bottom screws are Pentalobe, not Phillips.
Bram Driesen -
Before starting, I would recommend backing up your Iphone’s data just in case.
Jon Moylan -
If you managed to make it to this section, just send the phone into apple for 50 + 6 dollars shipping. The ribbon cables on the screen are designed to break. I can literally twist on the rest of the cable and it won’t fall apart but there is a diagonal section where it snaps. This is the fault of apple and the fault of ifixit for misrepresenting the fragility of the cables.
Ryan Huebert -
Had to reheat it a few times for a minute each with a hairdryer to get the seal to break after pulling and rocking the suction
Cynthia Lamb -
I’m technically challenged. Is there a premier national service who can professionally install a replacement battery got my 7 +?
Richard -
Do the screws come out in total?
YVES THEUGELS -
They may come out or may not. If you loosen as much as you can and they don't come out you should still be able to pry open the bottom. Once you get the screen off you can then push the screws out from the inside.
Anthony Falabella -
Is it the P2 you should use for the bottom??
YVES THEUGELS -
I heated the bottom of the phone with a hairdryer and then used a syringe to put a couple of drops of acetone directly into the bottom two screw holes. I GENTLY pulled on the screen with the suction cup and used the pry tool to GENTLY separate the screen. The sealant is applied around the entire display so be very careful pulling it off so you don’t break the fragile display cables.
Anthony Scaminaci -
At first it was very difficult to open, per instructions. I used a heat/ice pack and nuked it for 1 minute. The pry tool wasn’t working so I carefully used my pocket knife to wedge the cover open. The rest of the procedure went well until I cracked the glass while trying to get the top right corner to pop off. Other than that mistake, all went well. Tip: before setting the new battery, attach the battery connector first and leave enough room for the taptic engine, or better yet, place the taptic engine before adhering the replacement battery. This way you’ll have a small gap between the two, whereas mine barely fit. Good job on hosting the video, Gwendyl.
Klaus Preiss -
I love the fact that the screw bit and shaft are magnetic! I almost lost a screw and found it attached to the magnet.
I used a heat/ice pack and nuked it for 1 minute. At first the display cover was very difficult to open with the pry tool, per instructions. The pry tool wasn’t working so I carefully used the blade of my pocket knife to wedge the cover open. The rest of the procedure went well until I cracked the glass while trying to get the top right corner to pop off. Other than that mistake, all went well. Tip: before setting the new battery, attach the battery connector first and leave enough room for the taptic engine, or better yet, see the taptic engine in place before adhering the replacement battery. This way you’ll have a small gap between the two, whereas mine barely fit because I placed it almost too low.
Good job on hosting the video, Gwendyl.
Klaus Preiss -
I replaced the lightning connector assembly and reassembled. The old one did not 'click' into the cable and had corrosion inside, it needed the cable to be placed in a specific way to charge. The new part - does not recognize that a charger is plugged in at all.
I backtracked the assembly - took it apart, put it back again - and find that every thing on the part works - the mic, speakers, taptic engine.
The original problem with the cable still persists. Any ideas?
H K -