Introduzione

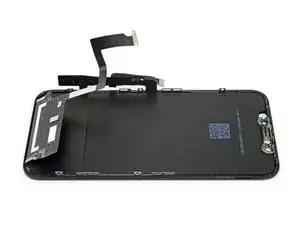
Se stai aggiustando uno schermo rotto e il retro del nuovo display include già una sottile piastra di schermatura LCD, dovresti seguire questa guida più breve per una riparazione più veloce. Se invece la piastra di schermatura LCD è assente, continua a leggere – questa guida ti mostrerà come sostituire il tuo schermo conservando la tua piastra di schermatura LCD originale.

Il gruppo altoparlante voce + gruppo sensori attaccato al retro del display è accoppiato in fabbrica al tuo esemplare di iPhone, quindi devi in ogni caso trasferirlo dal tuo vecchio display a quello nuovo quando sostituisci lo schermo. Comprende l'illuminatore flood, parte integrante del Face ID, il sistema biometrico di sicurezza per l'accesso. Se danneggiato o sostituito, il Face ID smetterà di funzionare, quindi presta una particolare attenzione a non danneggiare nessuna di queste parti nel corso della procedura. In caso di danneggiamento, solo Apple può recuperare le funzionalità Face ID.

Nota: La funzionalità True Tone resta disabilitata dopo la sostituzione lo schermo, anche utilizzando uno schermo Apple originale.

  1. aGeYRP3gUuAwIhn6
    aGeYRP3gUuAwIhn6
    n6aSREpvVP6h1IbH
    • Prima di iniziare, scarica la batteria del tuo iPhone sotto il 25%. Una batteria al litio-ioni carica può prendere fuoco e/o esplodere se viene perforata accidentalmente.

    • Spegni il tuo iPhone prima di iniziare lo smontaggio.

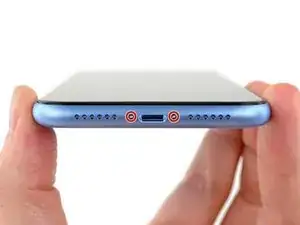
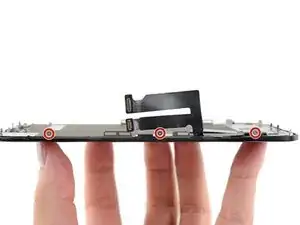
    • Rimuovi le due viti Pentalobe lunghe 6,7 mm sul lato inferiore dell'iPhone.

    • L'apertura del display dell'iPhone comprometterà le sue tenute impermeabili. Procurati tenute di ricambio prima di procedere al passo successivo oppure stai attento ad evitare di esporre il tuo telefono ai liquidi se non sostituisci le guarnizioni.

    • C'è una guarnizione di gomma nera sotto la testa di ogni vite pentalobe. Per avere la massima protezione da polvere e liquidi, controlla le condizioni delle guarnizioni o sostituisci le viti durante il rimontaggio.

    One of my gaskets was as shown in your second photo, the other had been worked into the threads (as if smeared) probably from the factory and was completely unusable.

    In place of replacements (unsure of where to purchase) I just used a clear silicone caulking on both screws upon reassembly to offer at least some water seal. I wish these gaskets were included with the gasket waterproofing sealant kit!

    Erica -

    Is there any place to buy these screw gaskets? I haven’t seen it mentioned anywhere but one of mine was pretty much chewed up. Silicone should work but I’d prefer the oem solution.

    Chilinh Nguyen -

    I found a place on Amazon that sells them. It's cheapest to get a full set of screws than to get just these. $5-$6 USD.

    J Olin -

    Can it be dead?

    Lulu navarro -

    If I transfer the data from the old to the new battery with an icopy, don't I get an error message?

    David Julian Krause -

    how am i supposed to know if the battery is below 25% if the screen won't turn on?

    Beth Jackson -

  2. 6UPwoloGBO4tmVoS
    6UPwoloGBO4tmVoS
    BmSYPJmOy6dbHipF
    efLfshnM2MVKmJNi
    • Se inserito troppo a fondo, un plettro per l'apertura può danneggiare il tuo dispositivo. Segui i passi di questa guida per segnare il tuo plettro ed prevenire eventuali danni.

    • Misura 3 mm dalla punta del plettro e segna questa distanza con un pennarello indelebile.

    • Puoi anche segnare gli altri angoli del plettro con altre misure.

    • Alternativamente, ferma con del nastro adesivo una moneta al plettro a 3mm dalla sua punta.

    Got to step 2 and realized the fix kit doesn't include an opening pick! Looks like a guitar pick, and I have those lying around. Is that expected? Looks like the pick is used in many steps below. There's a little blue crowbar that isn't mentioned in the instructions. Perhaps that replaces the opening pick?

    Sloan Looney -

    Hi! I can't see which guide you were using when writing this comment. Can you reply here with which guide and fix kit you used?

    Clay Eickemeyer -

    I see you posted this in Meta. I hope it's resolved soon! In the meantime, a guitar pick may work well enough for your repair.

    Clay Eickemeyer -

    what fix kit?

    Meow Purr -

    My fix kit didn't include an opening pick either

    WILLIAM HARRIS -

    Make sure you check inside the black boxes after emptying them. My pick was stuck inside one of the boxes.

    AndyF -

    My AliExpress refurbished screen came with a pick that has a coin-like circle that pops out, so no modification was necessary

    Gijs Leegwater -

  3. voNWTD25eWiGUdu3
    voNWTD25eWiGUdu3
    XTM1CepRnVkDnbfI
    NgVMfmOgJwEalMFF
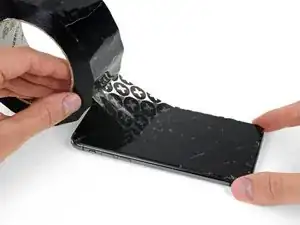
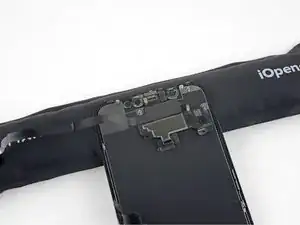
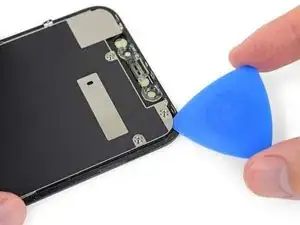
    • Se il tuo iPhone ha lo schermo in pezzi, applicando del nastro adesivo sulla superficie eviterai ulteriori rotture e la possibilità di farti male nel corso della riparazione.

    • Disponi strisce sovrapposte di nastro da pacchi sul display dell'iPhone fino a ricoprire tutta la superficie.

    • In questo modo impedirai la dispersione di schegge di vetro e assicurerai l'integrità strutturale del display quando lo forzerai per sollevarlo.

    • Indossa occhiali di sicurezza per proteggere gli occhi da schegge di vetro che potrebbero volare via nel corso della riparazione.

    • Se la rottura del vetro rende difficile far aderire una ventosa come indicato nei prossimi passi, prova a ripiegare un pezzo di nastro adesivo molto tenace (come il nastro americano) attorno a una maniglia e usalo al posto della ventosa per sollevare il display.

    How to detect my Iphone what screen it is, OLED or LCD?

    sabrihakulii -

    It’s OLED. You can find the specs here, https://support.apple.com/en-us/HT201296

    When you find your phone, at the bottom of the description click on, See the tech specs…

    mcr4u2 -

    The included suction cups were stiff and worthless. They would not lift the screen. Also, I tried every type of tape on the screen to help the suction cups stick without success. Heavy duty suction cups were for my bathroom also failed. However, I had an old GoPro mount with some preapplied double sided 3M VSB tape and stuck that on the screen near the bottom. Magic! This method had the added bonus of being able to use a GoPro attachment as a handle to lift the screen, and propped up the screen like a kickstand in step 12.

    Tawan Khamapirad -

    Very cool! Thanks

    Antonio -

    My screen was pretty stuck… would not budge. Heated, super glued the suction cup, tried gorilla tape. Ended up doing the GoPro mount with 3M VSB tape method mentioned. Worked great. That 3M tape is the bomb.

    Rich Wachtel -

    The included suction cup took a few tries but ended up working for me.

    charlotte -

    If you have flat feeler gauges (for adjusting engine valve tappet clearance, ignition points … old school) the .003 thick goes right in. Work your way up until you can get the pick or supplied pry tool in.

    William Olstad -

    where can I buy 3M VSB plis!!

    gerardo artigas cuellar -

    3M VHB tape is at auto stores and other big box stores, or online.

    nicO -

    I used the tweezers that came with the replacement screen and jammed one of them into the glass and that eventually worked. Heating with a blow dryer is also important. The suction cup was helpful in loosening the adhesive for sure, but just not enough to get the display to come out.

    J Olin -

  4. C3NHJXiiQMPmRmH1
    C3NHJXiiQMPmRmH1
    AvZqCHCmwCqavQEa
    ElEZlRVXFlXaE11y
    • Se lo schermo del tuo iPhone è rotto, blocca il vetro con del nastro adesivo per contenere ulteriori danni e prevenire lesioni durante la riparazione.

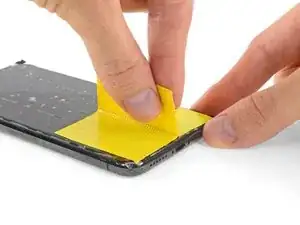
    • Posiziona strisce sovrapposte di nastro adesivo trasparente sullo schermo dell'iPhone fino a coprire l'intera superficie del display.

    • Indossa occhiali di protezione per proteggere i tuoi occhi da eventuali frammenti di vetro che potrebbero essere liberati durante la riparazione.

    • Se non riesci a far aderire la ventosa nei prossimi passaggi, piega un pezzo resistente di nastro (come il nastro adesivo americano) come un manico e solleva lo schermo con quello.

    • Se tutto il resto fallisce, puoi utilizzare della super colla per incollare la ventosa allo schermo.

    This looks like a repeat of Step 3.

    GenjideGaulle -

  5. lXwQA2bBknBmaYMk
    lXwQA2bBknBmaYMk
    FHSJhUkdlCcsOYQb
    eEJeUWVQi3pZT5nt
    • I prossimi tre passaggi ti spiegherano come utilizzare l'Anti-Clamp, uno strumento che abbiamo studiato per rendere la procedura di apertura più facile. Se non stai usando l'Anti-Clamp, salta questi tre passaggi e continua con un metodo alternativo.

    • Per istruzioni complete su come utilizzare l'Anti-Clamp, dai un'occhiata a questa guida.

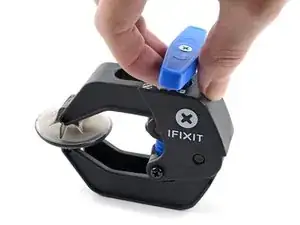
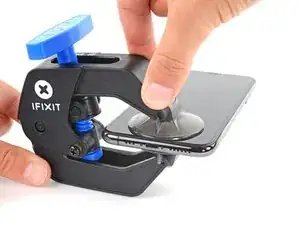
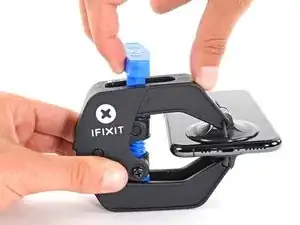
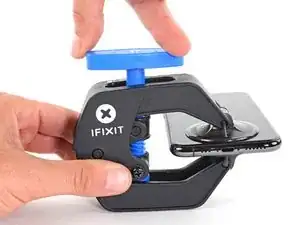
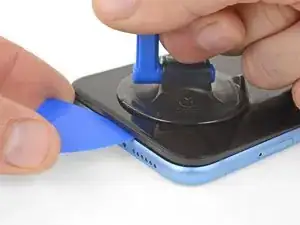
    • Tira indietro la manopola blu per sbloccare i bracci dell'Anti-Clamp.

    • Fai scorrere i bracci oltre il bordo sinistro o destro dell'iPhone.

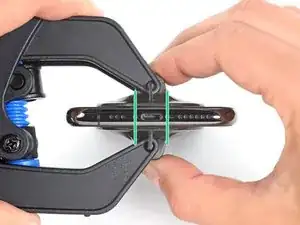
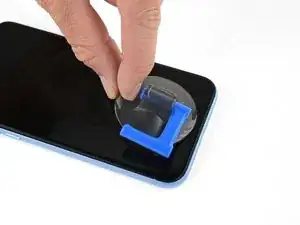
    • Posiziona le ventose vicino al bordo inferiore dell'iPhone, una sul davanti e una sul retro.

    • Premi insieme le ventose per fargli fare presa sull'area desiderata.

    • Se trovi che la superficie del tuo dispositivo sia così scivolosa da impedire all'Anti-Clamp di aderire, puoi usare del nastro adesivo per formare una superficie più aderente.

  6. EOrAXSnhbDqUEfeq
    EOrAXSnhbDqUEfeq
    IZBIIwSmgie3pKNV
    AX2lQWb4EBr6rFML
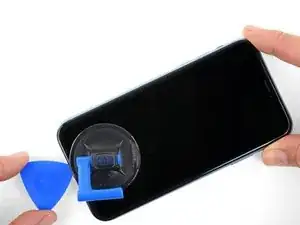
    • Tira in avanti la maniglia blu per bloccare i bracci.

    • Gira la maniglia in senso orario di 360 gradi o finché le ventose iniziano a allungarsi.

    • Assicurati che le ventose rimangano allineate tra loro. Se iniziano a scivolare fuori dall'allineamento, allenta leggermente le ventose e riallinea i bracci.

  7. rIFHrN5JZhosBVDF
    rIFHrN5JZhosBVDF
    RHq3otgHGgSRUaHQ
    MyajHuYx1EYm4LAd
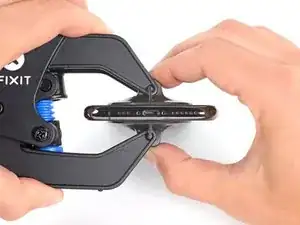
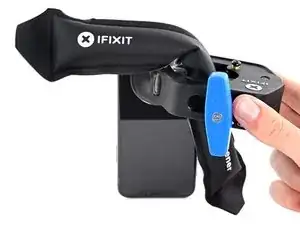
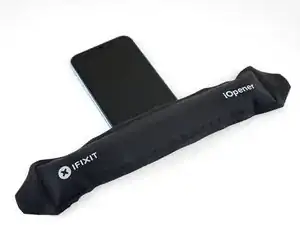
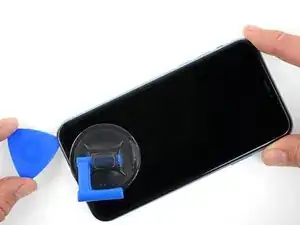
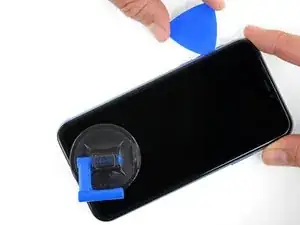
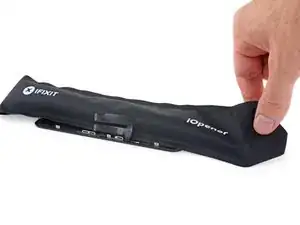
    • Scalda un iOpener e infilalo tra i bracci dell'Anti-Clamp.

    • Puoi anche utilizzare un asciugacapelli, una pistola termica o una piastra riscaldante, ma il calore eccessivo può danneggiare lo schermo e/o la batteria interna, quindi procedi con cautela.

    • Piega l'iOpener in modo che si appoggi sul bordo inferiore dell'iPhone.

    • Aspetta un minuto per dare all'adesivo la possibilità di scollarsi e creare un'apertura.

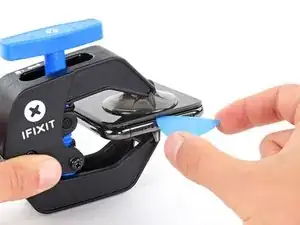
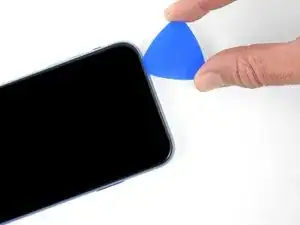
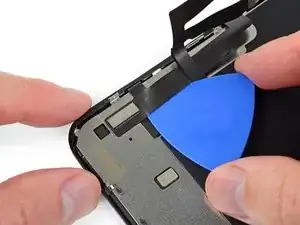
    • Inserisci un plettro di apertura sotto lo schermo e la cornice di plastica, evitando di toccare lo schermo stesso.

    • Se l'Anti-Clamp non crea un'apertura sufficiente, applica più calore all'area e gira la manopola di un quarto di giro.

    • Non girare la manopola di più di un quarto di giro alla volta e attendi un minuto tra ogni rotazione. Lascia che l'Anti-Clamp e il tempo facciano il lavoro per te.

    • Salta i prossimi tre passaggi.

    Please UPDATE THIS STEP to say 'insert the opening pick underneath the PLASTIC FRAME OF THE SCREEN' and not the screen. Way too many people are taking this as the way to do it then posting their screen looks different when it's open when they've actually removed the screen leaving the frame in place. It's not rocket science.

    [deleted] -

    Thanks for the suggestion! We updated this step to clarify that.

    Arthur Shi -

  8. CvqPuR6YujN6uWQ6
    • Il riscaldamento del bordo inferiore dell'iPhone aiuta ad ammorbidire l'adesivo che blocca il display, semplificando l'apertura.

    • Usa un asciugacapelli oppure prepara un iOpener e applicalo per circa un minuto al bordo inferiore dell'iPhone per ammorbidire l'adesivo sottostante.

    An alternative to the Iopener or heat gun is to heat water to EXACTLY 80 degrees F (cooking thermometer is great for this) and pour into a reinforced ziplock type bag. Leave the bag on the screen, but be sure that none of the hot water rests on the zipper portion, as the water is hot enough to soften that seal and leak out on to your device! This meat had is my personal favorite as the heat is distributed very equally and precisely as compared to a heat gun, but is more accessible than the Iopener.

    Colin Wylie -

    When using an iOpener, rest the glossy (transparent) side on the phone so it contacts the phone and conducts heat easily

    Afiq -

  9. P5PouqftuOuIAKpF
    P5PouqftuOuIAKpF
    IhTlLHCH2DAmlimO
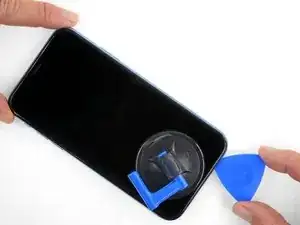
    • Se usi una sola ventosa, applicala sul bordo inferiore del telefono evitando la parte curva del vetro.

  10. nmV3em2q4QXYS1al
    nmV3em2q4QXYS1al
    ade6PZ4Lt42pSQnj
    3fHmwqIgAuXYKGFA
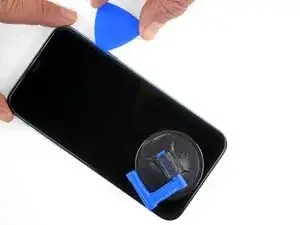
    • Tira la ventosa applicando una trazione forte e costante fino a creare una piccola fessura tra il pannello frontale e il case posteriore.

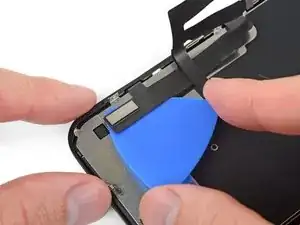
    • Inserisci un plettro di apertura sotto lo schermo e la cornice di plastica, evitando di toccare direttamente lo schermo.

    • L'adesivo impermeabile che tiene in posizione il display è molto tenace. La creazione di questa fessura iniziale richiede l'applicazione di una forza piuttosto elevata. Se hai difficoltà nell'aprire una fessura, applica altro calore e muovi lo schermo su e giù per indebolire l'adesivo finché non riesci a infilare lo strumento di apertura.

  11. mTLhKZ2OFBeZ2Tdm
    mTLhKZ2OFBeZ2Tdm
    Y45KLZQdRY3bn32a
    frfW3Vhso4IPv1nR
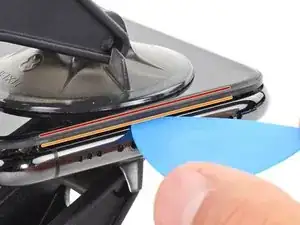
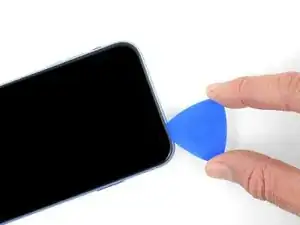
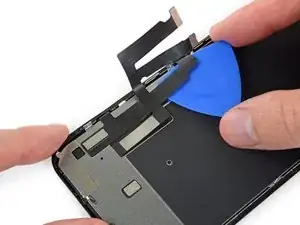
    • Fai scorrere il plettro di apertura attorno all'angolo inferiore sinistro e lungo il bordo sinistro dell'iPhone per tagliare l'adesivo che tiene in posizione il display.

    • Non inserire il plettro di apertura per più di 3 mm, altrimenti potresti danneggiare i componenti interni.

    I think it's important to note that depending on how a screen was damaged, make sure to insert the pic under the black bezel directly under the actual screen. This bezel is a frame around the digitizer. I unknowingly inserted the pic between the bezel and the screen, and separated them both. I did this all the way around the phone. So I basically had to struggle to keep together two different sections of the display assembly because of this mishap, until I removed all the ribbon connectors. It made things much more difficult.

    Dave -

    An edit to my above comment: by digitzer, I mean the LCD shield. My apologies.

    Dave -

  12. RiRjcYKAFFOeKIcv
    • Sul bordo destro del tuo iPhone ci sono cavi delicati. Non inserire il plettro di apertura nelle zone indicate, altrimenti potresti danneggiare i cavi.

  13. ciFaLRnrmwyZDMOS
    ciFaLRnrmwyZDMOS
    H5TqnANpvmXIGpQe
    SRHh1OkaYV5x5XkG
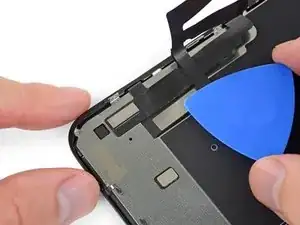
    • Inserisci nuovamente il tuo attrezzo nell'angolo inferiore destro dell'iPhone e fallo scorrere lungo il lato destro del telefono per separare l'adesivo.

    • Non inserire il plettro per più di 3 mm, poiché potresti danneggiare i cavi dello schermo.

    My replacement screen for the XR has a black rim but it looks pink. Is that normal?

    Irwin Cantor -

    You can use some Isopropyl alcohol in a syringe with a thin needle to soften even more the adhesive around the screen. But be careful so as not to overdo it. Just a few drops. It will become more easier to remove the screen.

    Dan Brock -

    Step 11 says not to insert your pick around the right side to avoid damaging cables, then Step 12 says to insert it on the right side. Help, I'm confused!

    ingwis -

    Hi there!

    Thank you for the feedback! The wording in step 11 was definitely ambiguous, so we have changed it! You only need to avoid the marked spots rather than the right edge.

    Alex Diaz-Kokaisl -

  14. qJy3qiZlDfvYHwCQ
    qJy3qiZlDfvYHwCQ
    XxFonXKXmI3M5iSN
    1uZnbxjnhtQFtsUm
    • Il bordo superiore del display è fissato sia con la colla sia con delle clip.

    • Fai scorrere il plettro sotto il bordo superiore del display, mentre muovi oppure scuoti delicatamente il display verso il basso, in direzione della porta Lightning.

    • Se ci metterai troppa forza, le clip si romperanno. Lavora con cautela e pazienza.

    • Non inserire il plettro di apertura per più di 3 mm, altrimenti potresti danneggiare l'insieme dei sensori del pannello frontale.

    • Fai scorrere il plettro nell'angolo opposto e taglia tutto l'adesivo rimanente.

  15. OHLZ3rYnPU6OUxI2
    • Tira la linguetta sulla ventosa per staccarla dal pannello frontale.

  16. gvaAabBGpp5PNyMF
    gvaAabBGpp5PNyMF
    aLbYdtq5MLGGwHqi
    41YpqEeGtyYn5Wxq
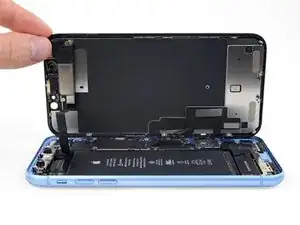
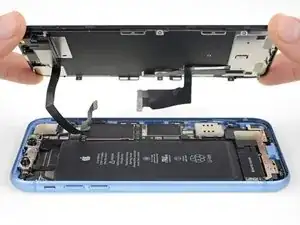
    • Apri l'iPhone sollevando il display dal lato sinistro, come per sollevare la copertina posteriore di un libro.

    • Non cercare di staccare del tutto il display, perché questo è ancora connesso alla scheda logica dell'iPhone da diversi fragili cavi piatti.

    • Appoggia il display contro qualche tipo di supporto per mantenerlo aperto mentre lavori sul telefono.

    • Durante il rimontaggio poni il display in posizione, allinea le clip lungo il bordo superiore e premi delicatamente il bordo stesso per metterlo in posizione prima di reinserire tutto il display. Se non si incastra facilmente fino al clic, controlla le clip lungo il perimetro del display per assicurarti che non si siano deformate.

    sure looks like the "hinge" is on the right hand side to me.. not left...!

    Doug Trout -

    If you leave the suction cup attached to the screen during the “hinging” process, it makes for a very handy holder for the screen until it’s completely detached.

    Richard Deubler -

    What about the sticky black adhesive clinging to the inside of the case?

    Ronald -

  17. Pm3XuCwO4BcYdoNT
    Pm3XuCwO4BcYdoNT
    dbH2ibTJKmdNSytC
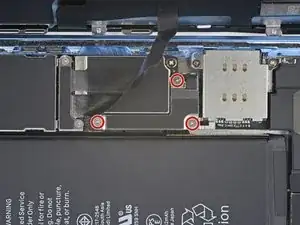
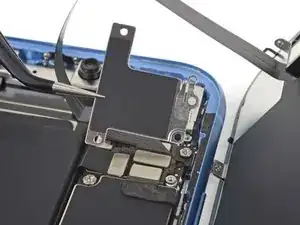
    • Rimuovi le tre viti tri-wing Y000 da 1,2 mm che fissano la staffa di protezione del connettore della batteria.

    • Rimuovi la staffa.

    • Nel corso dell'intera procedura, tieni traccia di ogni vite per essere sicuro che vada esattamente nel posto da cui l'hai tolta per evitare di danneggiare l'iPhone.

    • Nel corso del rimontaggio, è una buona idea accendere l'iPhone e testare tutte le funzionalità prima di sigillare nuovamente il display. Ricordati poi di spegnere completamente l'iPhone prima di continuare con il lavoro.

    Definitely make sure all three lobes of your tool are aligned before use (it’s a little harder to tell with this style of bit) and apply even and adequate pressure to ensure it grabs as you spin the driver to prevent disfiguring the lobes/slot of the screw head.

    Unfortunately my Y000 tool was perhaps not the best fit (tolerance a bit off) in these screws and I ended up stripping out the heads of all three of these. I started to panic but after I sanded the tip of my Y000 bit down a little with super fine grit (1000CW-C) sand paper to flatten the domed tip (visible with macro lens) and give it a bit more bite I was able to remove and reinstall without issue—in fact I had to remove and install them twice since I forgot my adhesive tape during reassembly, so the screws survived and the sanded bit worked.

    Erica -

    +1 to above comment. I bought a cheap kit from Amazon and the Y000 screw driver is not good for this job. I’m concerned that I may have disfigured the heads and i type this comment in the midst of my fix :D Be gentle and assess if you can remove at least one screw with your driver before rummaging through all three and other similar screws holding display connector as well.

    Shan Potti -

    Update to above comment. I got hold of a Y0.8 screw driver bit (lucky to find an ORIA screw driver kit in my office) and it works like wonders :) Now back to work…

    Shan Potti -

  18. wTxgGtY4ALPOaL6M
    wTxgGtY4ALPOaL6M
    oLrG4CKHkHQWnl5b
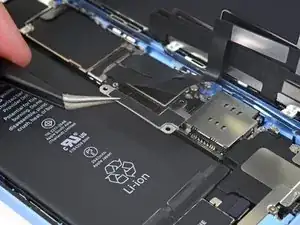
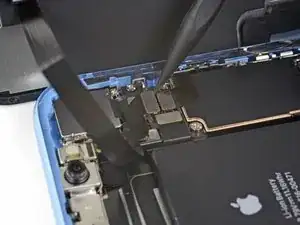
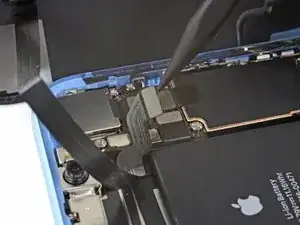
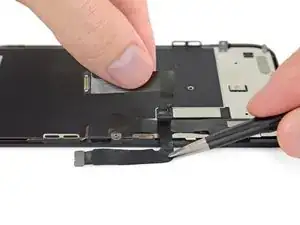
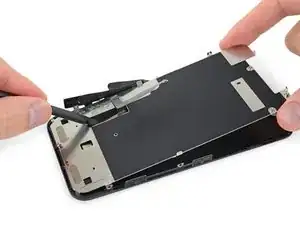
    • Usa la punta di uno spudger per sollevare il connettore della batteria dal suo zoccolo.

    • Cerca di non danneggiare la guarnizione nera in silicone che circonda questo e altri connettori della scheda. Questi sigilli assicurano una protezione supplementare contro l'ingresso di acqua e polvere.

    • Piega lievemente il connettore per allontanarlo dalla scheda logica e impedire che possa fare accidentalmente contatto con lo zoccolo e quindi alimentare il telefono nel corso della riparazione.

  19. ycOPoUnmEuOGtRXs
    ycOPoUnmEuOGtRXs
    AiuRYCepIGVGVEUA
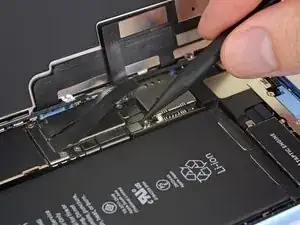
    • Rimuovi le tre viti tri-wing Y000 da 1,2 mm che bloccano la staffa del connettore del display.

    • Rimuovi la staffa.

    What if the screw is damaged and you can’t get one out?

    Kashawn Benjamin -

  20. CFAlA4IEWSGKiQBn
    CFAlA4IEWSGKiQBn
    NAhKByGJ4iRqHGvE
    • Usa la punta di uno spudger per staccare e disconnettere il cavo del digitizer.

    • Per riconnettere i connettori a pressione come questo, allineali con cura e premili da un lato finché non senti il clic di bloccaggio, quindi ripeti l'operazione dall'altro lato. Non premere in centro. Se il connettore non è perfettamente allineato, i pin possono piegarsi, provocando danni permanenti.

    • Se una parte qualsiasi dello schermo non risponde al tocco dopo la riparazione, scollega la batteria e poi rimetti al suo posto questo connettore, accertandoti che scatti perfettamente in posizione e che nello zoccolo non ci siano polvere o altri tipi di ostruzione.

  21. EF5KUKKN1562jycp
    EF5KUKKN1562jycp
    hqHtSbHNDEqk2pPD
    • Usa la punta di uno spudger per scollegare il connettore del cavo del display.

    The new display cable isn’t snapping in but I was just able to snap in the old one. Did I break the new one somehow?

    Andrew Pierson -

    Same it is really frustrating, just keeps slipping up and its bound to get damaged

    Daniel Maldonado -

  22. erV5SYvpSFqRXnWJ
    erV5SYvpSFqRXnWJ
    C5NmtarPVEAnBWBm
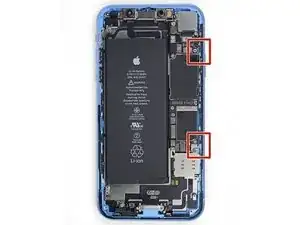
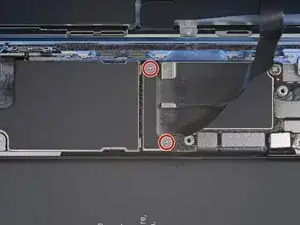
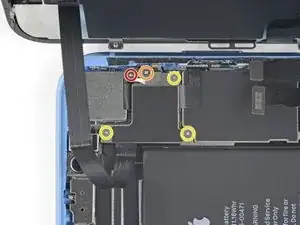
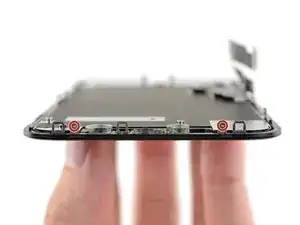
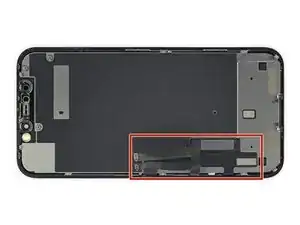
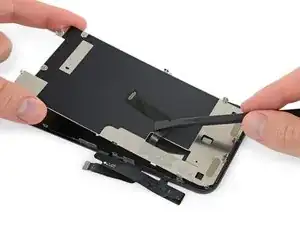
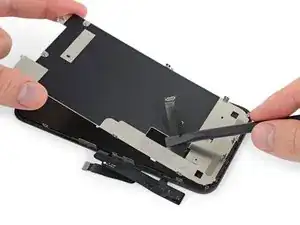
    • Rimuovi le cinque viti che fissano sul case posteriore la staffa del connettore della scheda logica.

    • Una vite a croce Phillips da 1,3 mm

    • Una vite a croce Phillips da 1,5 mm

    • Tre viti tri-wing Y000 da 1,2 mm

    • Stai attento a non perdere la staffa più piccola attaccata al bordo. È tenuta in posizione tramite una piccola clip ed è facile che che si separi accidentalmente dalla staffa più grande.

    Phillips screw 1.3 mm on last step is not working. The small clipped bracket has been damaged. This screw perhaps should be the first, before 1.2 Y000. - To be confirmed by others.

    Dmitri -

    I’m not sure it makes much if any difference, but we went ahead and swapped the order for you guys. Thanks for your comments!

    Jeff Suovanen -

    I just repaired another XR, and you are right! It doesn’t make any differnerce in the order these screws come out. I still damaged this fragile piece. As I work on more of these, I’ll figure out a way to remove this screw without damaging the clip. For now everyone, just use extra caution when removing the 1.3mm phillips screw! Thanks Jeff

    fabianowens -

    I’ve now done at least 6 of these so far and I have fairly consistent good results by taking the 2 Philips head screws out first, then doing the Y screws.

    Stow -

    Is this piece important for the repair if broken? I have broken it on a home repair. What is it used for? Is it a grounding connection or is it completely unimportant. More information needed please

    Squishy Horses -

    I’m wondering that too. Is this piece important?

    Phillip Gross -

    My clip broke too! on iphone XR. Any word on necessity?

    Beth Buer -

    I can confirm that taking out the 1.3 mm screw first then the 1.5 mm screw works the best. If done correctly, you should be able to to remove the rest of the screws and pull the panel off with the clip still attached to the panel. For reassembly, start with the 1.5 mm screw then the 1.3 mm screw.

    Carlos Oulman -

    I don’t remove the small screw at all. I just slide out the metal cover plate and slide back in to reassemble.

    Kyaw-Zin Win -

    this is what i have done as well. Care is still needed to avoid damaging this part. However, it is seemingly far less prone to damage or loss and thus less risky for this repair process.

    Justin Parsons -

    I too broke this shield. In looking over this problem I believe it’s best to loosen, but not remove, either screw first then the other. To be clear, loosen the red or yellow screw but only just to break it free, then the second screw. Then remove both and the others and the shield should remain in one piece. I put it back with the broken part (on the red screw) and made sure the two are in contact so there’s conductivity as these shields serve a purpose other than just holding in connectors. My phone works fine with this fix.

    pgrobin -

    Is this small bracket important if broken??

    Phillip Gross -

    Mine is broken

    Easy Repair -

    Mine is broken and my apple pay doesn’t work. Something to do with NFC antenna this little clip??

    Marcos Fernández -

    I'm guessing so. I replaced a screen on a phone I bought from a friend. I noticed this bracket was broken when I disassembled the phone but didn't think much of it. When I reassembled it my NFC also does not work. Bummer. A lot of people in these comments have asked if it is crucial that this bracket be connected. Can someone from iFixit or other please reply to those comments?

    Larry Jorgenson -

    On the 1.3 mm screw I actually chose not to remove it. I broke it loose then used the tip of the spudger to simply twist the bracket out of the way, with the screw still attached. Then I could remove the larger bracket.

    mpalma -

    Kyaw-Zin is right because the shield contains of two tin parts. But there is another option:

    1. Unscrew the yellow and orange screws first.

    2. Lift the shield gently that it can turn about 20° anticlockwise.

    3. Open the red screw and let the shield turn with it the first degrees.

    Daniel Brehm -

    The first time I did this repair, I didn’t see the comments ahead of time and broke the bracket, even removing the 1.3mm screws first. The second time I did the repair, I was prepared and being extra careful, but the simple act of turning the 1.3mm screw head was enough to break it. If I ever have to do this repair again, I’ll just leave the screw in and try to slide the plate out with the screw (and bracket, hopefully) still in tact, as per Kyaw-Zin Win.

    Debbie Thompson -

    None of the screw driver bits I got fits the 1.3mm and 1.5mm screws. How do I remove them?

    Jonatious Joseph Jawahar -

    Same issue as above. The bits provided in the kit do not work with the 1.3mm and 1.5mm screws

    Graham Hammell -

    Further to above comment about bit not working. Had to go and purchase another PH000 from Home Depot and that worked

    Graham Hammell -

    I’ve broken that little bracket attached to the red screw. Is it important and can I get a replacement????? Thanks all

    steve.arfa -

    Broken the clip. Is this important??

    kyledrumtutor -

    Yikes, broke mine too. Oh god. Think perhaps the delicate 1.3mm should come out first when everything else is secure...

    Ronald -

    Don't remove the 1.3 Phillips screw! Twisting this screw will break the smaller bracket that is clipped to the larger. Remove all the other screws. Block the smaller bracket from moving as you gently slide the larger bracket horizontally toward the battery until free. The smaller bracket can stay in place while the screen is replaced. When reassembling, support the small bracket by backing with a spudger or similar tool.

    doug68242 -

    I just broke the smaller bracket also :( I didn´t notice these comments until now :(

    It looks like part of the antenna for NFC, as all except NFC works on my iPhone now.

    It should be repairable using some wire wrap wire, either twisted around the two screws that connected that part of the bracket (or soldered in place). I will try and report back if it works.

    Richard Croyle -

    Success!! I managed to re-construct the small arm of the bracket by screwing the 1.3mm screw back in with some 0.3mm enamel wire soldered into what was left of the small bracket arm on the screw, then the other end of the enamel wire I wrapped under the 1.5 wire screw's head (enamel exposed to bare metal), then screwed both screws down. also I lifted up the small metal arm with a screw driver (to make sure it reconnects with the display grounding square) ..and NFC worked again (slightly different antenna pattern mind (need to place cards slightly higher up the rear of the phone). Anyway works again :)

    Richard Croyle -

  23. ZKgyTMB3J2eBa6Se
    ZKgyTMB3J2eBa6Se
    RGEOVxym6PmnJXjF
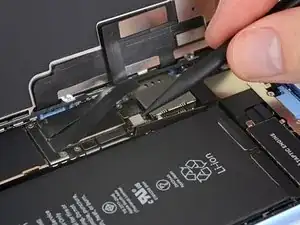
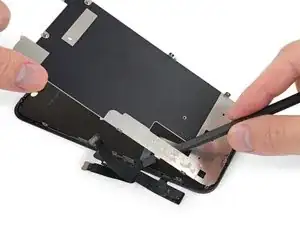
    • Usa la punta di uno spudger per staccare dal suo zoccolo il connettore del gruppo sensori frontali.

    During testing, make sure your proximity sensor is not on upside down, as it’s easy to connect upside down. Your phone will boot loop if it’s on incorrectly.

    Tristan England -

  24. GIZLarh6sZTr4iYM

    unclear if this is where screen removal ends

    Daniel Maldonado -

    I had the same question, but the answer is yes. Steps 21-30 are removing parts from the original screen that need to be reattached onto the new screen. You are no longer working inside the frame, but on the back of the screen itself.

    amclean78 -

    I apologize for missing these comments initially, but yes that’s correct, the screen is removed now and the rest of the guide goes on to other parts, either in the phone or on the back of the screen. Good luck with the repair!

    Adam O'Camb -

    The alternate method of removing the battery should be highlighted as a standard option. There is so much more work and potential to damage the parts than if you left them in place and carefully with plenty of heat remove the battery. I so wish I had seen this before!

    Martin Kappeyne -

  25. qHD6RTEPKNyYoYZG
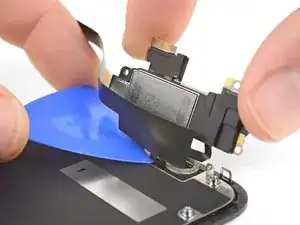
    • Rimuovi le quattro viti che fissano il gruppo altoparlante/sensore al retro del display:

    • Due viti a croce Phillips da 1,6 mm

    • Una vite a croce Phillips da 2,3 mm

    • Una vite tri-wing Y000 da 1,2 mm

    Do you really need to do step 21-30, because it says to replace, do it in reverse. Which means you are taking the components off and putting them back on without touching the screen? sorry if this is a dumb question, i’ve never done this before.

    ExplodingRage -

    Good question! It depends on which guide you are completing. If you are replacing the screen, you do need to complete steps 21-30, in order to remove the front assembly and transfer it to your replacement screen. The front assembly contains the Face ID hardware, which is biometrically linked to the logic board.

    Now, if you are completing other guides, you may not need to remove the front assembly. Guides should have the steps slotted in only if they are pertinent to the procedure.

    Arthur Shi -

    I had the same question, but the answer is yes. Steps 21-30 are removing parts from the original screen that need to be reattached onto the new screen. You are no longer working inside the frame, but on the back of the screen itself.

    amclean78 -

    Im reassembling and notice there are no threaded screw holes to secure the speaker/sensor assembly on the new display. no way to secure it at all. Do i not need to secure it?

    Ashley Fitzgerald -

    Hi Ashley,

    There should definitely be screw holes to secure the assembly to the new display. If you purchased the part from iFixit, please contact our customer support, and we will sort things out for you!

    Arthur Shi -

    Same. No screw holes. Now what?

    M Schmidt -

    Please contact our customer support and we will get the issue resolved!

    Arthur Shi -

  26. kGEGOnFcpINUsltv
    kGEGOnFcpINUsltv
    P6mWfcSMimOsbqY4
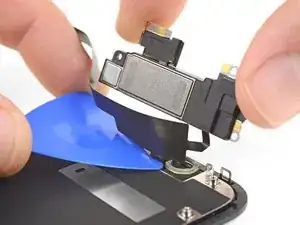
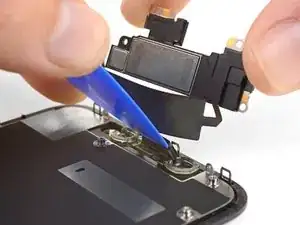
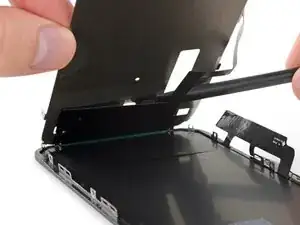
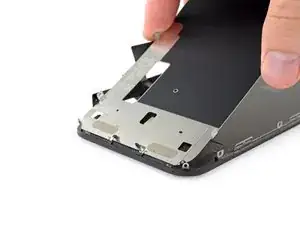
    • Con delle pinzette, ribalta delicatamente il gruppo display in modo che resti giù, lontano dal bordo superiore del display.

    • L'altoparlante rimane collegato da un cavo a nastro molto sottile. Stai attento a non forzare il cavo per non danneggiarlo.

    I don’t understand. It clearly appears that one should stop disassembling after this step. Peeling off the tape here should provide access to the solder connections. Why remove a bunch of other adhered parts? ESD concerns?

    Of course, taking care not to transmit heat to the screen assembly below would be prudent. But it’s unlikely much if any heat would conduct even without using any sort of insulating spacer, assuming one’s soldering technique is acceptable. With a thermal mass that small, overheating the connection is the big concern. Especially since it is lead-free solder.

    (It has a high melting point. If you didn’t already know that, this is definitely not the best project to develop your soldering skills! You can still do it, but should def practice on similar connections until you feel proficient. Lifting a pad or overheating a nearby component are both dangers. Yet, the cost of the part is low enough you could buy two (just in case) and still come out ahead of Apple’s fee. Use flux or you’ll struggle!)

    Ryan Lewis -

    Hey Ryan,

    You are right in that after this step, you could de-solder and replace the earpiece individually, if you choose to do some careful de-soldering and soldering. Alas, not everyone has the background and skill to do so! By instructing users to replace the complete assembly, we bypass the need to solder, and allow a wider audience to successfully complete the repair.

    Arthur Shi -

    When reassembling or placing the whole sensor module on a replacement screen, make sure to gently rock the speaker back into place. There is a rubber gasket lip around the speaker that must be seated all of the way against the screen and speaker grill to function properly. You should feel a gentle click when is goes in. If is not seated correctly it still easily can be screwed in making it difficult to tell if the speaker is in correctly.

    Colin Wylie -

    Hey, I actually ended up accidentally ripping that ribbon off the speaker. What happens now?

    lanize -

  27. PEIZbjIcMKKHg23D
    • Usa un asciugacapelli, una pistola termica oppure applica un iOpener riscaldato nella parte superiore del display per circa un minuto, in modo da ammorbidire l'adesivo che fissa i sensori.

    Review steps 24-29 prior to doing this. Step 27 shows removing ambient sensor. It is attached….barely…to the rest of this assembly. I thought I was being overly cautions, and it still broke. Don’t be afraid to use heat. Do not force. Any resistance, do not force it.. Heat it up and then try. Other than that, sound and camera works fine, and it appears that FaceID works. Not my phone, so I can’t test that part without unlocking customer’s phone. No error messages appeared, so Im assuming all is good. With the touch home button on older models, if touch wouldn’t work, you’d receive a message as soon as you booted the phone up. OK.. That’s enough. Just be careful over the next 5 steps..

    Shawn Bailey -

  28. 42IwK2EfOHLwxpRU
    42IwK2EfOHLwxpRU
    wPrWI5ouRYnHjSRl
    IDYRQPxbHgHrMKoN
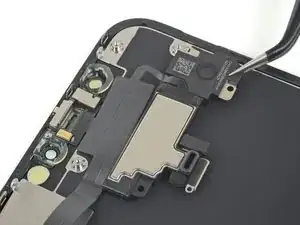
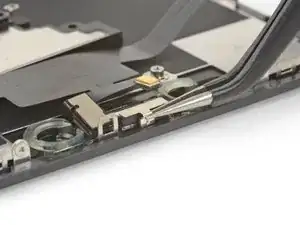
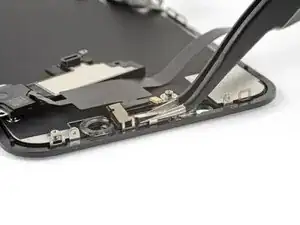
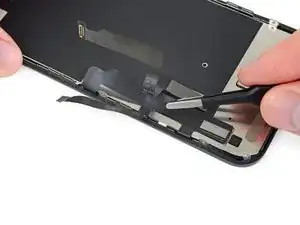
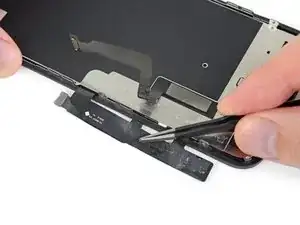
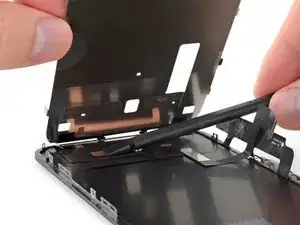
    • Fai scorrere con attenzione l'estremità piatta di uno spudger sotto il cavo flex sotto il microfono.

    • Applica una delicata torsione per separare il microfono, stando attento a non forzare o danneggiare il cavo flessibile.

    • Se necessario, usa la punta di uno spudger per terminare il distacco del microfono dalla sua cavità nel pannello anteriore. Se il microfono resta difficile da staccare, applica dell'altro calore.

  29. AMYOmIAqsVJjD52P
    AMYOmIAqsVJjD52P
    Jkw51QtNpDpxArlK
    WmlMveEBG2MW1pbN
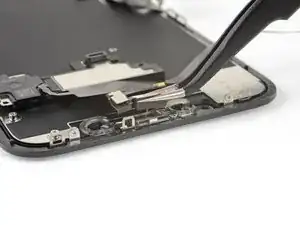
    • Lavorando da sinistra verso destra, fai scorrere un plettro di apertura nella parte sottostante al cavo flex e sotto il modulo sensore prossimità + illuminatore flood.

    • Smuovi e solleva delicatamente il modulo per staccarlo dal suo alloggiamento nel pannello frontale.

    • Può essere di aiuto sollevare e tenere discosto l'altoparlante per accedere al modulo. Fai solo attenzione a non tirare il sottile cavo flessibile nel corso dell'operazione.

    what happens if the metal plate from the sensor separates from the flood illuminator module?

    Yeison rodriguez -

    At this point I thought looking at the image that I was lifting the speaker away and tore off the thin cable completely unaware. Please read and view the next two instruction stages before doing this one and then come back and ensure you keep the speaker very close to the screen as you do it.

    Sally-ann -

  30. A2KNvyVuTGWsvWnB
    A2KNvyVuTGWsvWnB
    sZctEsnflRRkTSUY
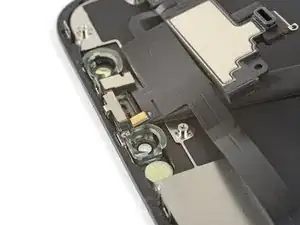
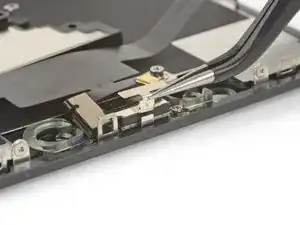
    • Usa delle pinzette per far scorrere la piccola staffa verso l'alto, allontanandola dal sensore luce ambiente.

    I tore the ribbon cable that connects to the light sensor, what do I do? will the phone work even if the sensor doesn’t?

    wittyahole - -

    When you are putting this clip on, you can practice without putting the light sensor on it. It takes some practice. I also may not stay on tightly but it's not a big deal.

    J Olin -

    This clip is a nightmare to get back on!

    Ronald -

    I gave up trying to get the clip back on. Appears to function properly without it.

    Paul Chipelo -

  31. HeWLpnVGbVSEnZvv
    HeWLpnVGbVSEnZvv
    pNXCnbhkT2WPLvMM
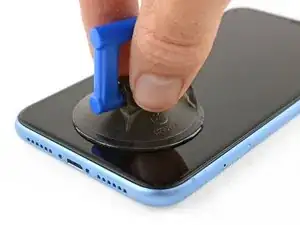
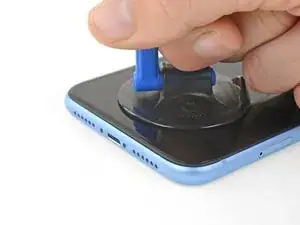
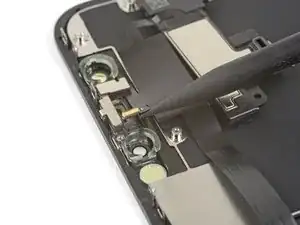
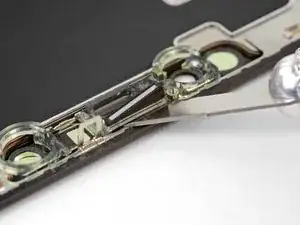
    • Usa delle pinzette per smuovere il sensore luce ambiente e sollevarlo dal suo recesso nel display.

    • Se il sensore non diventa libero di muoversi nel giro di qualche secondo, applica dell'altro calore e prova di nuovo.

    • Il sensore resta collegato al resto del gruppo da un cavo a nastro molto sottile. Stai attento a non forzare o danneggiare il cavo.

    On picture two, the thin transparent thread between the sensor and the display is not the “very thin flex cable” they are talking about but just some glue remains. In my case this thread of glue was sticking onto the sensor in the exact same way which made me suspicious at first.

    Konstantin -

    The top part of the ambient light sensor easily breaks off from the bottom part. In that case do not despair. Pry the stuck part from the old display and transfer it to the new display. Put the assembly back together without glue. It should hold together just fine. Usually the auto brightness feature will still work.

    Heiko Quant -

    I broke the flex cable from the light sensor that connects to the rest. Anything I can do?

    Matias Bedoya -

  32. BSLlHjKQuoWpIdm1
    BSLlHjKQuoWpIdm1
    toTqIeEIxWRSiNKo
    ArGPbS2ELhX6ZHi6
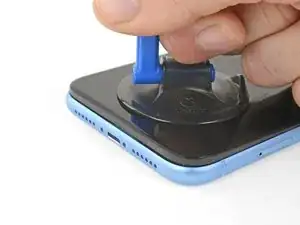
    • Se hai avuto successo nella rimozione del sensore luce ambiente, come illustrato nella prima foto, continua con il prossimo passo qui sotto.

    • Se la striscia diffusiva bianca si è staccata ed è rimasta attaccata al display, come mostrato nella seconda foto, devi staccarla facendo leva con delicatezza lungo il bordo superiore utilizzando una lama sottile o uno strumento di apertura. L'operazione è un po' più facile se prima di iniziare riscaldi di nuovo la parte.

    • In fase di rimontaggio, per prima cosa installa il diffusore sul display, facendo attenzione che sia rivolto nella giusta direzione (la faccia frontale è illustrata la prima immagine, quella posteriore nella terza foto).

    • A questo punto, disponi il sensore luce ambiente al di sopra del diffusore. Dovrai tenere in posizione il sensore mentre rimonti le viti che fissano il gruppo altoparlante/sensore. Una volta che le viti saranno strette a fondo, il sensore rimarrà al suo posto e funzionerà normalmente.

  33. FOWFlEvF4mJLpDhC
    FOWFlEvF4mJLpDhC
    fvewlLaGEDVQwZbp
    2Nvy2UQvZTHBNrNo
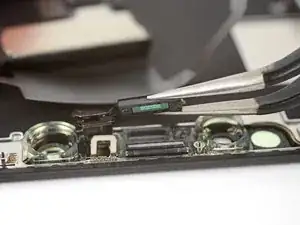
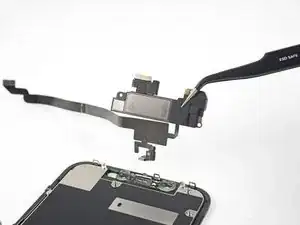
    • Rimuovi il gruppo altoparlante voce e sensori frontali.

    • In fase di rimontaggio, controlla la posizione del modulo di plastica nero che contiene questi componenti:

    • Sensore di prossimità

    • Illuminatore Flood

    • Il modulo deve essere posizionato in modo che questi componenti non siano coperti da adesivo.

    To replace just the earspeaker, you will have to re-use the the flex assembly which is soldered to the earspeaker…….

    the 2 solder connection are hidden under a tiny piece of thin black tape, on the underside of the speaker.

    Alan Sears -

    forgot to mention to take the clear plastic mold off from the old screen!!

    BKimc -

    Before attaching the sensor module to your replacement screen, ensure there is nothing blocking the earpiece screen on the new screen part. Mine had a mfg defect or something where there was a black foam like film on the outside of the speaker grill that I couldn’t remove with tape or sticky putty. I had to blow through the back of the grill with a computer duster compressed air can. Otherwise the call volume via the earpiece is extremely low, even when turned to max volume.

    Colin Wylie -

    Hey there, if I have an iPhone bit damage and I remove the top speaker and sensor and put it on my other iPhone XR. Will it work? It is original iPhone XR and please let me know

    Nash G Krish -

    The Face ID hardware is paired to the logic board and will not work if you transfer the front sensor assembly. Everything else should work.

    Arthur Shi -

    Are you suposeted to do it backwards when your done

    hewi fewi -

    super gemacht , danke der olli

    schlüppi punkstrumpf -

    The iPhone XR Screen Replacement Kit comes with an adhesive replacement on a blue plastic sheet. I didn’t know what this was and thought it was just protection for the screen during shipping.

    Don’t throw it out - At this step 29 remove the old adhesive using this guide -> Sostituzione guarnizione adesiva display iPhone

    Don’t be dumb like me.

    Toby BC -

    I would definitely add a step at the end –
    30) Replace the adhesive seal -> iPhone Display Adhesive Replacement.

    Steve Koontz -

    How do I configure True Tone on the new screen?

    Armando -

    You need to use an EEPROM programmer. This will read code from the old screen to the new screen (assuming the replacement screen is of decent quality and supports True Tone programming). Check out YouTube and you will find plenty of information on how to do this. It really should be mentioned in screen replacement guides/videos, that if you just replace the screen without this specialist equipment, the True Tone function is not available. This is the same for all iPhones that have True Tone.

    Mark Affleck -

    i just saw recently where the ear hole in the new display was occluded - needed to drill it out. can see with a microscope - may want to check this before reassembly.

    greg -

    Add a comment: remove blue protective covers from back of screen when installing

    Martin Kappeyne -

  34. LErxnWwmQ6AGr2Kj
    LErxnWwmQ6AGr2Kj
    EwUPPqr1142GBaRv
    gFxrnm5vMsYI1CTj
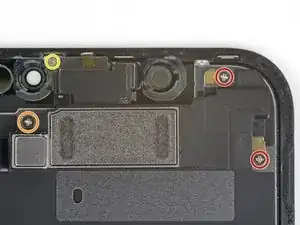
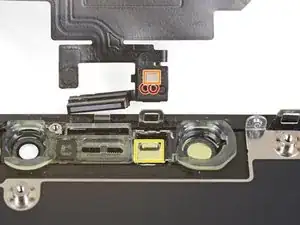
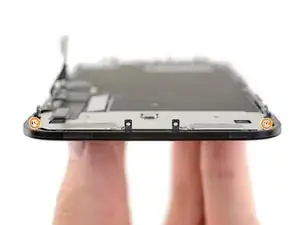
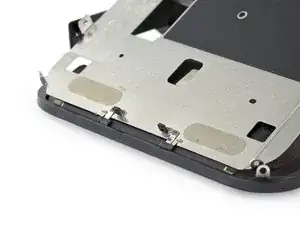
    • Usa un cacciavite Y000 per rimuovere le viti da 1,1 mm che tengono ferma la schermatura dell'LCD:

    • Tre viti sul lato più vicino ai cavi del display

    • Altre 2 viti sul lato opposto

    • Premi con decisone il cacciavite contro la vite mentre lo ruoti. Se serve, puoi usare lo spudger per tenere ferma la vite da dietro, in modo da applicare più pressione alle viti senza piegare lo schermo protettivo.

    There is two more screws at the bottom !

    ubrunner -

    L’appui sur les vis est réellement important, au risque de foirer celles-ci. N’hésitez donc pas à appuyer, en faisant contre-poids du côté opposé bien évidemment.

    Tristan Nans -

    This is the bit that was difficult. The tri'point screwdriver y0000 barely fits this tricky size. It could have been the cheap screwdriver that came with the screen replacement kit. Stripped 2 screws, drilled out with an appropriate size drill bit ' frame still intact. I had more success using a size 0.7mm flathead screwdriver.

    noname -

  35. 1CnhgaMGZO2r5iLf
    1CnhgaMGZO2r5iLf
    vGnGCFRBYSwY1MvE
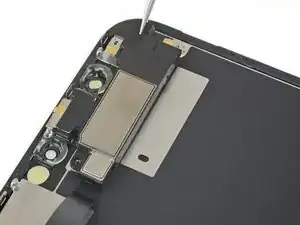
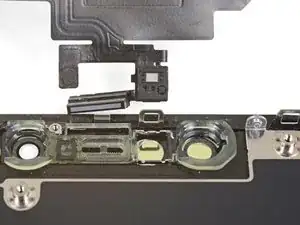
    • Rimuovi le viti Y000 da 1,1 mm rimanenti dai bodi superiore e inferiore della piastra dell'LCD:

    • 2 viti vicino agli intagli per la fotocamera

    • 2 viti vicino agli angoli sul fondo.

  36. uDReDhFA2bXRCmGY
    uDReDhFA2bXRCmGY
    3OquLX6XiiokcWmj
    • Applica un po' di calore usando iOpener (o un asciugacapelli o una pistola termica) sul retro dello schermo, in modo da ammorbidire l'adesivo che tiene attaccati i cavi del display alla piastra di schermatura dell'LCD.

  37. jUeKbHyLYRvGYJsL
    jUeKbHyLYRvGYJsL
    w1BKSNmonggoONeE
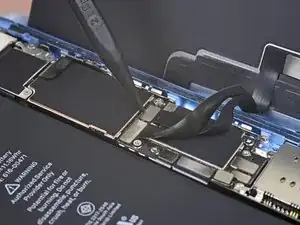
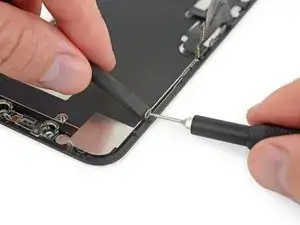
    • Inserisci il plettro tra i cavi del display e la schermatura dell'LCD.

    • Fallo scorrere verso il bordo inferiore del display in modo da separare i cavi.

    • Fermati quando raggiungi la fine del primo cavo.

  38. fcgR2GHWiHSdC13g
    fcgR2GHWiHSdC13g
    T6giiyp3fn63fVkN
    Wl6pGKQ4ARdIfbCB
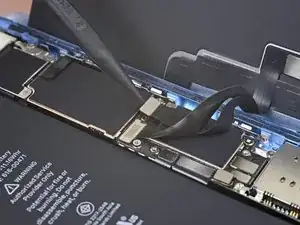
    • Inserisci di nuovo il plettro, questa volta in mezzo ai due cavi.

    • Fai scorrere il plettro fino in fondo al bordo inferiore dello schermo per staccare i cavi l'uno dall'altro.

  39. ebZhaRcBGUTPHBmU
    ebZhaRcBGUTPHBmU
    qqSplMxIQyhShwLp
    • Afferra i cavi vicino alla piega a 90° e separali.

  40. yUBidA5PHmIuND3A
    yUBidA5PHmIuND3A
    1erlLVnZwKTYFxVF
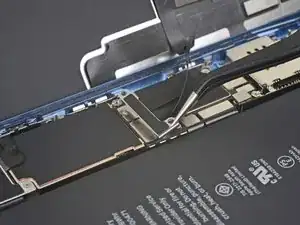
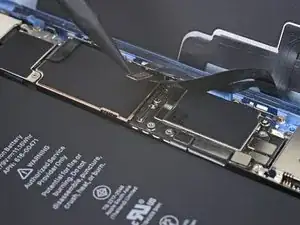
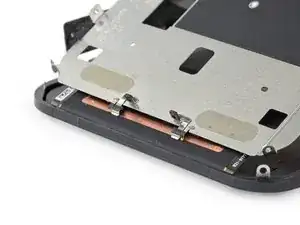
    • Rimuovi l'intero cavo del digitizer dalla piastra di schermatura e spostalo sul lato, piegandolo.

    Be very careful of all parts of the ribbon cable connected to the screen, especially the segment close to the top, as it can tear easily at this

    crtrue -

  41. nkFO3PQleSRFUECt
    nkFO3PQleSRFUECt
    UyMn2VyuE4OrTSgM
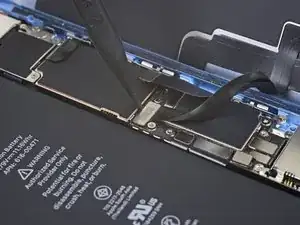
    • Inserisci il plettro sotto il bordo superiore della piastra ed esegui una torsione per staccarla dal display.

  42. qSMxGj4yxRj3J5Yh
    qSMxGj4yxRj3J5Yh
    ZpwYy4EgYDZbXFqt
    • Afferra la piastra di schermatura dal bordo superiore e inclinala di qualche grado.

    • Usando uno spudger, premi delicatamente sulla parte inferiore del cavo display, spingendolo attraverso l'intaglio nella piastra.

  43. xAeYRm6WGKRSWj2L
    xAeYRm6WGKRSWj2L
    jXPBpfu5YkGrevZ1
    pLKbrLHHUQvuNTsO
    • Solleva ancora un po' il bordo superiore della schermatura dell'LCD e fai passare il resto del cavo dello schermo attraverso l'intaglio della piastra.

  44. rwMpFGFiGRCyTCAK
    rwMpFGFiGRCyTCAK
    m3qLyiEQORG4VRDH
    2EcKI2U1qeIrwc3P
    • Angola maggiormente la schermatura dell'LCD, fino a vedere il resto del cavo dello schermo attaccato al retro.

    • Fai passare lo spudger tra la schermatura e il cavo del display e separa completamente questi due elementi.

  45. I1CskVXDHR6Tfsux
    I1CskVXDHR6Tfsux
    tDfKre6SyCpPgoMY
    cMPjSNJlHEmNaYUW
    • Mentre sollevi la piastra LCD, tieni d'occhio i dentini di metallo sulla parte bassa.

    • Mentre riassembli l'iPhone, accertati che i dentini (ovvero le EMI fingers) siano correttamente inserite nel telaietto dell' LCD come nella foto.

    hello whaty if one of the golden contact pins ( i guess it is) to be exact right one has freyed up a bit and looks messy. could it cause harm or it is not very important?

    thetroll1401 -

    On reassembly leave the adhesive cover on the digitizer cable so that it doesn’t get caught on the LCD shield while working the other cable in place and positioning the shield on the frame. When you are ready to stick the digitizer cable to the shield remove the protective plastic.

    pgrobin -

  46. ISJKZTNwdCZN3VRM
    • Rimuovi la schermatura dell'LCD.

  47. k1xqLVCC1ZKI46wY
    • Ora restano solo la piastra di schermatura dell'LCD e il digitizer.

    Tech nor working my iphone xr

    Mohammed Chand -

Conclusione

Per rimontare il tuo dispositivo, segui questi passi in ordine inverso.

Porta i tuoi rifiuti elettronici a un riciclatore certificato R2 o e-Stewards.

La riparazione non è andata come previsto? Prova delle soluzioni di base ai problemi, oppure rivolgiti alla nostra comunità Risposte per trovare aiuto nella risoluzione dei problemi.

Jeff Suovanen

Membro da: 06/08/13

426765 Reputazione

15 commenti

So it’s like the X had a baby with an 8

James Heinrich -

Hello everyone! Hoping I can get some feedbacks on a problem I’m having. I’m doing a screen replacement on an XR but the bottom half of the screen is unresponsive to touch. The replacement screen is from another XR with original Apple screen. When I put the replacement screen back, it works fine so it can’t be anything that’s damaged on the replacement screen. Also this replacement screen does the same thing to any iphone XR I put in so I know it means there’s no problems with the logic board. The replacement screen only works with its original but not on any other XR.

duc -

i have same problem. Need Help

RNS -

Did you find a way Around this ??im experiencing the same thing

abooismail1234 -

What if I just needed to replace the front outer glass only, what steps are needed? Do you have to disassemble the phone?

Gene -

@emika491 Glass-only repairs are possible for pros, but it’s not a DIY. It takes practice to perfect, and the equipment alone costs about as much as a new phone. I’d stick to replacing the whole display. ;)

Jeff Suovanen -

Hi

The last 2 cables connected to the LCD digitizer is cut and is there a way to remove then?

Behrooz Hussaini -

Hallo, i have same problem, Can you help me, please?

Filip Treger -

These instructions are amazing! I followed them and they worked to a T. Every detail was good, the pictures were good. My iPhone XR has a new screen, reused the old LCD metal panel, and put in a new waterproof seal. Thank you for posting this.

Kyle Closner -

Hi,

So I did a screen replacement on an xr and I wanted to activate true tone, but the flex cable broke on the original screen. Now I think if I use the cover board number for activation that could work too., but I noticed that the number printed on the back of the old lcd looks very similar to it, now is that the screens serial and could I use that number too?

szbalint -

Finito senza alcun problema. Il display funziona alla perfezione. Grazie.

Paolo Notaro -

There are 3 types of LCD screen manufacturers that Apple use for their mobile devices – SharpToshiba and LG. The Sharp and Toshiba LCD screens are cross-compatible and you can use either of these screens on each handset, however, when you have an iPhone with an LG screen then you would only be able to use an LG screen replacement for these LG coded devices. Again, you might be wondering why.  Well, if you fit a Toshiba or Sharp LCD to an iPhone that had an LG screen previously then the chances are you will either have no touch function or intermittent touch issues, so you must identify the screen manufacturer of your iPhone before ordering a premium replacement.

See more at: https://www.iparts-4u.co.uk/blog/how-to-...

clbr -

@jeffsu With all due respect, responding to someone’s post inquiring different options for repairing their iPhone XR screen with rebuttal about how hard it is and not at least pointing them in the direction of resources should they still want to try is unproductive and seemingly maligned with ifixit’s philosophy regarding user’s retaining the right to fix their own devices, unless I’m misunderstanding something here?

Isn’t it possible to advice of the technical difficulty/ potential issues AND celebrate their desire to take on such a project by equipping them with some info and pointing them in the direction of a great tool kit to get them started , whatever they decide?

Wether it should be left to a Pro or not is ultimately the consumer’s decision and border’s the same rhetoric Apple uses to justify all of its proprietary tech guides and components. And before we refute the premise of what I’m saying with the “liability” argument, remember that this is what disclosures are for.

Happy Fixing!

Sata -

Thanks for your concern. I’m sorry if my comment came across as flippant or dismissive. By way of background: There are a lot of companies deceiving customers by selling “glass-only” screen repair kits for $10-20 that are in reality a waste of money—the repair requires expensive equipment and a fair bit of practice/skill. Most professional repair shops won’t attempt it, and those that do usually destroy quite a few displays getting the hang of it, even after investing in all the equipment. Few can do it consistently and with good results. Meanwhile, we’ve seen plenty of readers fall for the “glass-only” repair kit scam and then complain after being ripped off because we didn’t warn them away strongly enough. Bottom line, it doesn’t make any sense to attempt this unless you’re planning to make a business out of it. Just bite the bullet and replace the whole display. It’s cheaper, faster, and the only approach with a reasonable chance of success for a DIYer.

Jeff Suovanen -

First off, great site, all around. Iphone will not start unless unless I also pinch screen right top corner while affecting volume up and power button.

John -